Category Archives: Starters School

Articles essential for starters

Five great ways to improve your photography

I heart Photokonnexion

The top five posts from 2012

In our first year as a website we learned a lot about our readers and worked hard to provide great content for you. We did some research and identified the most read posts of the year.

Number five

Light is the most important component of our work as photographers…
Six things to know about light.
[Also check out other Light and Lighting resources].

Number four

Composition was an important theme through the year. Simple ideas are the best. This post captured a consistent readership…
The Rule of Odds – Uneven Composition

Number three

This is a great post from my friend Steve Maidwell (imageinnation.com). As a contributing author he made a hit with our readers. He’s promised another post soon…
Creating a Fake Smoke Effect

Number two

I made a personal recommendation for two ideal Christmas presents. They really went down well. These would make great gifts to yourself too…
Two great Christmas gift ideas for photographers

And the top post of the year:

Number one

Street photography has been a consistent success on Photokonnexion. The most viewed post in 2012…
Forty six quick street photography tips

By Damon Guy (author and Photokonnexion editor)

Damon Guy - Netkonnexion

Damon Guy (Netkonnexion)

Damon is a writer-photog and editor of this site. He has run some major websites, a computing department and a digital image library. He started out as a trained teacher and now runs training for digital photographers.
See also: Editors ‘Bio’.

Ten simple tips to help your photography…

Ten Tips about self expression. It takes time and effort to learn to communicate

Ten Tips about self expression. It takes time and effort to learn to communicate.

…but which are not about taking photographs.

It’s great to learn all about taking photos. But, sometimes you need to learn other things. Your skill is affected by things beyond photographic skills. Appreciate the whole experience. It is not just pushing the button that counts.

Photography is a form of self expression. It takes time and commitment to improve that. You need to focus on it. Think about releasing energy. Your creative energy. To improve self expression in photography, learn how to do in many ways. Not only through your pictures.

Self expression – release the inner you…
  1. If you are doing photography to be famous – try something else.
  2. Great images are only made by well prepared photographers who concentrate and attend to detail.
  3. Try the methods of other photographers. Don’t copy them. Be you. Work to be better.
  4. Make friends who also do photography. Learn from each other.
  5. Make mistakes freely – but work to improve everything.
  6. Observe yourself. Know you, know your photography.
  7. Work to improve you. Good photography will follow. Improvement is a habit. It comes out in everything you do.
  8. Improve your writing, talking, drawing, photography… all your self expression. Your passion only shows if you can freely express yourself.
  9. Always pack more warm clothes than you need. You cannot concentrate and be creative if you are cold.
  10. Openly discuss your opinions about photography. Talking helps you learn. Self expression takes practice.
Why self expression?

Study how YOU communicate. Then you will know how your self expression works. Photography is like every form of art. It is a way of talking to the world. You are talking to those who see your pictures. Expressing yourself through this medium is about learning self expression in general. That includes the way you communicate in other ways. If your general communication improves you will help your photography. Your new self-knowledge will show itself through self expression in your photography.

Netkonnexion

Damon Guy (Netkonnexion)

Damon is editor of Photokonnexion. He has professional experience in photography, writing, image libraries, and computing. He is an experienced, webmaster and a trained teacher. Damon runs regular training for digital photographers.
See also: Editors ‘Bio’
By Damon Guy :: Profile on Google+.

How to take a test shot

Cornish Dusk - Test shot

• Cornish Dusk – Test shot •
Underexposed, over bright at the top, over dark in the foreground, poor focus… the test shows a need to do some work…

Click image to view large final version with corrections
• Cornish dusk • By Netkonnexion on Flickr External link - opens new tab/page

Ever taken a shot without thinking?

…And regretted it later. We all have. Yet it’s simple to run through a simple check list and do a few test shots. In this article we look at setting up that procedure.

What needs doing?

I will assume you are in the right place and have your camera out of the bag, ready to go. The first thing to do is work the scene and try to see what sort of shots will serve your subject best. Find which angle looks the best through the viewfinder. Your subject is the critical item to focus on, so walk all around to get a full range of ideas of how best to frame it. Then, when you have composed and decided on your shot, you need to start considering your settings.

Approaching the settings

You will be working with the idea of ‘chimping’ now. If you don’t know what that is then read this first.

Here is the list of adjustments you need to make…

  • The first thing to consider is focus. If that is wrong you are in trouble from the start. So make sure that you can get a good focus.
  • White balance – It helps to have your white balance correct even if shooting raw.
  • ISO – Set your ISO for the light levels you are experiencing as your ambient light. If you don’t know about setting the ISO correctly then read ISO: get control of your sensitive camera!
  • Next select the mode you want to work in. You should select for…
    • Shutter speed if you want to adjust exposure length.
    • Aperture if the critical issue is depth of field (DoF).
    • Full manual if you want to work with both, or have more control overall.

Next you need to decide if you are going to work with the DoF or the shutter speed as your main consideration…

  • If working with DoF set the aperture you want to work with now. DoF is one of the primary considerations when composing a shot. Where you want your image to be sharp and where you want it to be unsharp. So play around with aperture for a while. Take a shot, chimp it, adjust the aperture, take another and so on. Once your DoF is correct.
  • If you are working with shutter speed as your main control then you need to adjust this instead of your DoF first. Again, shutter speed is a primary consideration in your shot. A long exposure will get more blur if there is any movement in the field of view. The shorter the shutter speed the more the shot will appear frozen, movement blur will tend to be eliminated.

As you set up each setting you can take a test shot of your subject. Then, by doing a bit of chimping, you can work out if you have your setting correct. You may need to take one, two, or maybe three shots to get your setting correct.

Once you get experienced working with these settings you will do them in seconds. Two things helps to achieve that. First, you will become familiar with which settings are appropriate for the conditions you are working with. Secondly you will be more sensitive to what you need to think about as you set up your shot. In particular the type of light is the main consideration. That in turn leads you to get a feel for what settings you need.

Some issues to note…

If you are working with landscapes you will need to do a bit of ranging to get your focus right. When working with longer distances the DoF and the focus vary. As your focus point gets further away from you the distant edge of acceptable sharpness rapidly goes into the distance. It is not always easy to determine DoF control precisely at long distances. There are methods but I will discuss them in another article. Just remember that from f11 you will effectively get sharpness right through the shot.

If you are working with an on-board (pop-up flash) then the camera will sync automatically to your camera settings. When working with off-camera flash, adjust that at the same time as the shutter speed. Normally your camera will have a ‘sync-speed’ to work with your flash – it maybe 200ths sec or 250ths sec depending on the camera. So you will need to consider that too.

Working with a tripod? Make sure you turn off all electronic motors in your camera to prevent tripod vibrations (Vibration compensation, auto-focus). This means you will have to manually focus the lens.

By Damon Guy (author and Photokonnexion editor)

Damon Guy - Netkonnexion

Damon Guy (Netkonnexion)

Damon is a writer-photog and editor of this site. He has run some major websites, a computing department and a digital image library. He started out as a trained teacher and now runs training for digital photographers.
See also: Editors ‘Bio’.

Get your settings right with all file types

File-formats and settings

The power of the file format you use…

Most photographers don’t think about settings and file formats when starting. First off, most people just want to take pictures. Down the road you need to think about what you are doing more carefully. You will need to get into RAW processing to overcome the shortcomings (but also, see my comment after this article)

File formats

When you think about settings and file formats it appears very technical. It’s not easy to work out what you need to know. Here are the basics. There are two in-camera file types for photographers…

  • RAW = a file type for capturing all the data from your camera, but which needs developing (post processing) after the file is downloaded. There are many manufacturer-specific versions of the RAW format.
  • *.jpg = a specific file type created in-camera from a RAW file. It is processed by the camera. The *.jpg format was originally designed only for transmitting and displaying files. It is extremely limited for post processing and easily degraded.

Both file types are useful for certain things. The RAW format is ultimately the most useful for photographers because it is so flexible. It allows you to develop the image you want from the picture you have taken. The *.jpg file on the other hand is processed for you, in a limited auto-processing system over which you have little control. It is confusing for beginners because *.jpg files create reasonably good images. But it is difficult to make them do what you intend. Beginners eventually find they cannot create the excellent images that RAW users produce. Nevertheless, starters use *.jpg because they don’t understand RAW and processing – they are stuck without help.

The processing is already done for *.jpg files by the time they are downloaded. Most beginners think they have something special when they get a great image straight out of the camera. Actually they are getting something processed according to someone else’s ideas. So it is not entirely their creation.

How do you break out of this situation?

The easiest way is to do a course or join a club or both. Then you can gain the experience and techniques you need to learn while having fun with others who share your interests. There are lots of courses and clubs around. More specifically you will have three goals. You need to learn how to…

  • Control your camera to get the picture you want.
  • Do post processing to produce great images.
  • See great scenes and compose them to create great images.
Along the way…

At some point every aspiring photographer is told, “why not try moving to RAW, that format gives you greater control over your processing”. This is true and a worthwhile pursuit.

What most beginners also hear along the way is something like this… “It is easier to shoot in RAW because you don’t need to worry about your settings so much”. “You can sort it out in post processing”.

This whole “sort it out later” attitude is a recipe for disaster. Here is my reasoning…
Most beginners:

  • Have an underdeveloped sense of colour.
  • Are not sensitive to light intensity or brightness variations.
  • Have an underdeveloped sense of the quality of light.

And crucially…

  • Cannot properly remember the colours shades, tones and brightness levels at a scene until they can start the post processing hours or days later.

The result is that during processing colours, brightnesses, tones and shades get over/under processed owing to no reference point. The resultant image is often a long way from reality. Incidentally, as your eye/mind system develops the “photographers eye” you begin to remember these details much more.

I urge you to cultivate the habit of fine control of your camera. Every shot, or at least every set of similar shots, should be set up individually. Be obsessive about it. Then, when you get your work into the computer, your post processing has a realistic starting point. It is easier, and more realistic, to process a picture that starts out very close to your intended image.

There is another reason to be obsessive and accurate about controlling settings from the start. Bad habits are really, really difficult to break. If you get into the habit of sloppy settings from the start you will almost certainly be a lazy photographer. I can assure you that will condemn you to many hours in front of the computer doing menial development tasks. It is much easier to get it right in-camera from the start. Then you can slightly tweak it later. Breaking a sloppy habit to get fine control of your camera later is a long, hard road.

Professional photographers are obsessive about getting the settings right. They know that the difference between an amateur and a professional is getting EXACTLY the image they want. And, they know they will not get that exact image by being sloppy. Precise, accurate and pre-set control is the name of the game if you want to create sharp, and realistic images.

So, forget about ‘rescuing images later’. Do your photography correctly from the start and do it using RAW files.

Addendum:
It is important to consider the tools you work with. If your camera does not offer the opportunity to save RAW files you have to work with what you have got. Nothing wrong with that. It is worth reading my comment after this article.

By Damon Guy (author and Photokonnexion editor)

Damon Guy - Netkonnexion

Damon Guy (Netkonnexion)

Damon is a writer-photog and editor of this site. He has run some major websites, a computing department and a digital image library. He started out as a trained teacher and now runs training for digital photographers.
See also: Editors ‘Bio’.

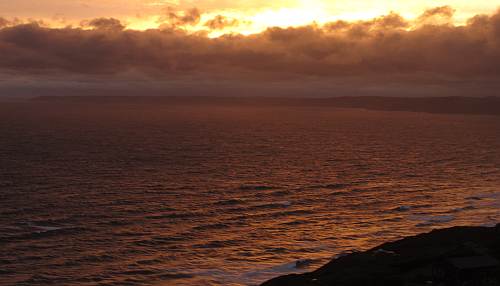
Do you suffer from the sunset fail?

Disappointed... The sunset photography auto white-balance fail!

• Disappointed…
• Auto white-balance fail! •
sunset photography can present colour and detail problems.
Click image to view large
• Disappointed – Auto-white-balance fail! • By Netkonnexion on Flickr External link - opens new tab/page

Flat sunset and poor colour – a beginners special.

My first digital sunset failed and it affected my confidence. It was flat, desaturated and the detail was lost. In this quick tip we look at how to fix it in one easy step…

The Sunset sunset photography fail!

In the picture above the flat, desaturated appearance caught me out. I sat there, after a 60 mile drive, for over an hour, and this flat failure was all I produced from hundreds of shots. For months I had this hanging over me. I had never had this problem with film. What was going wrong?

The problem was the auto white balance (AWB). In digital sunset photography the AWB tries to create a picture where the colours and the spread of light variations are balanced around a neutral grey. This reduces the shift in colour temperatures away from neutral. It has a very high impact on oranges and golden colours typical of sunsets (and sun rises). The upshot is you get a flat, cartoon-like, washed out colour range. This also reduces the detail in the sky.

The solution to the sunset photography fail?

Switch your colour balance to non-AWB settings. ‘Daylight’ AWB setting works well, giving realistic results.

However, if you select the ‘Cloudy’ setting this can have a spectacular pay-off. The ‘cloudy’ setting is used to off-set the coolness that clouds often give light. It warms the scene. So, if your sunset is already warmed by reds, oranges and golds the setting intensifies them.

You can intensify the colours in your sunset photography by using the White Balance ‘Shade’ setting. This adds an even greater warmth than the ‘cloudy’ setting. Be careful though, it can look unrealistically saturated. Run some test shots to be sure you have the right setting.

That’s it! Get your confidence back and increase the impact of your sunset photography in one easy setting.

By Damon Guy (author and Photokonnexion editor)

Damon Guy - Netkonnexion

Damon Guy (Netkonnexion)

Damon is a writer-photog and editor of this site. He has run some major websites, a computing department and a digital image library. He started out as a trained teacher and now runs training for digital photographers.
See also: Editors ‘Bio’.

A simple lesson in photography is the main study

Are your eyes wide shut?

Most people walk around with their eyes open. But not everyone sees the same things. Do people see the things that photographers see? What is it that photographers see that is different?

The way of seeing

After years looking through a lens I did not understand that photographers see things that other people do not see. Then I began a thorough study of composition. After a while of looking around at the world with my new insight I noticed two things. First, the lens distorted the view that my eye saw. Second, the compositional elements I had learned about changed my view of the world through the lens.

As I have studied photography, and in particular composition, I have found more and more insights. My view of photography as a discipline has completely changed from my early ideas. In my photographs I see many compositional possibilities that help me view the scene in front of me. The new things I learned about gave me new ways to see. There is nothing special about this. People go through rigorous professional training for years to get insights that affect the way they think.

The extraordinary thing is that I do not find it easy to explain what I see that is different. I just know that light, colours, lines, shapes, forms, colours and tones are all things I notice now that I did not before.

There are other things I see too. When we view the world we notice things that interest us and then filter out the clutter that is of no interest. Our brains simplify the world to make it understandable. That does not happen as readily in the real world. Yet when photographers get started they try to photograph everything as if the viewer can see past the clutter. In fact, in a photograph, the clutter gets in the way of the image. Photographers learn to distill the clutter from the photograph and present the image in a simplified way.

The other thing I have learned is that there is meaning in every image. That is something that is difficult to divine. Sometimes even the photographer cannot understand their own motive for shooting a picture or articulate the meaning in it. Yet there is always some personal, emotional, social or interest-based meaning underlying the shot. All sorts of hidden messages can be imparted by the image to the viewer – often in a subliminal way. These messages are readily open to being focused on by the photographer, amplified by the setting and the composition. The meaning becomes an important part of the image.

For me there are three dimensions in photography. The length of photography is seeing the light. By seeing and understanding light we see colour, dark, shadow, form – all the manifestations of the real world. The width of photography is the simplicity we bring to our images to make them understandable. By reducing the clutter and opening up the scene in the image for our viewer we let them in to perceive the point of the image. The height of the image is the meaning. By imparting a meaning, no matter how simple, we give the image a life which is detected by our viewers.

All the things which impact on a starter in photography become a sort of white noise. So it is difficult to see the core of what goes into images. Yet these three dimensions are there in every part of our work. It may not be easy to see straight away, but look for these things and your photography will improve.

By Damon Guy (author and Photokonnexion editor)

Damon Guy - Netkonnexion

Damon Guy (Netkonnexion)

Damon is a writer-photog and editor of this site. He has run some major websites, a computing department and a digital image library. He started out as a trained teacher and now runs training for digital photographers.
See also: Editors ‘Bio’.

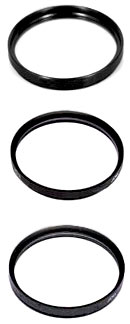
Skylight and UV filters

UV and skylight filters

• UV and skylight filters •
There is a debate about how useful they are…

What are UV and Skylight filters?

The keen starter in photography wants to protect their investment… Filters protect your lens – right? Or, is it that they stop damage from the sun? I want to clear up some myths and explain some half truths in this article. You may also save some money.

What are these filters for

Skylight and UV (UltraViolet) filters have a single purpose… to reduce ultraviolet light reaching film. The only difference between them is that skylight filters have a slight pink colour. Both filters prevent the slight tendency of some chemical films to acquire a slightly blue colour cast under some light conditions. (Yes, we are talking about film).

That was simple, wasn’t it?

Now the myths cleared up

UV and skylight filters have a number of myths surrounding them.

They prevent sunlight damaging my digital image sensor.
• No, they don’t. Sensors are UV insensitive or have built in filters (for both infra red and ultraviolet). UV (and IR) light has no effect on them.

They prevent the blue colour cast on sunny days.
• Not true. It is about 25 years since ultraviolet sensitive film was on sale. Even then, the film brands that were sensitive tended to only be sensitive in relatively few conditions; eg. when it was sunny at high elevations or beside the sea.

They provide more clarity in bright sunlight or at high elevations (over say, five thousand feet).
• Once upon a time… some colour film brands used a chemical that was sensitive to UV light. Around 30 years ago an ultraviolet inhibitor was developed that reduced the sensitivity of the film. Problem solved. The slight lack of clarity caused by the sensitivity went away.

They prevent lighter greys being over-bright when in black and white mode.
• Silver-based chemical black and white films were affected by UV. This is not a problem in digital cameras.

The skylight filter has slight pinkness that warms the picture up.
• No it doesn’t – pink is not a warming filter colour. Pink reduces blues in the image. Anyway, if you use auto-white balance any colour effect will be wiped out. If you use RAW there is no need for a filter as you can adjust in developing.

Actually these filters have problems

It turns out that UV and skylight filters can cause a few problems. Poor quality filters; inappropriate filter materials and lack of special coatings all take their toll…

Image effects…
Affects are created by using these filters. In particular over-exposure haze, flare and ghosting are created. The haze results from light bouncing between filter, lens elements and the sensor inside the body of the lens/camera. This creates a slight haze of over-exposure in very bright conditions. Flare, and therefore reduced contrast in the image, is sometimes caused by a beam of bright light being scattered by the filter. More expensive filters reduce this by having chemical coatings on (lens glass has coatings too). Ghosting is where spots of light appear in the image that were not in the scene. They originate from back reflection off the sensor onto the other lens elements or the filter. Usually this happens in low light situations stimulated by bright lights like car headlights.

Adding another glass (or resin/plastic) element…
Additional elements degrade the image. Cheaper filters can cause chromatic aerations, creating colour banding in an image. There may be additional light scattering. Some filters significantly reduce the light getting through (maybe as much as 1/3rd of a stop of light) leading to underexposure. Optical aberrations may be caused by poor alignment of the filter element (not flat/parallel) in its place. This causes loss of definition, particularly in some places where sharpness would be expected.

Are there any reasons to buy them?

Yes, but not many.

Protection:
UV and skylight filters do provide protection, creating a barrier against mechanical damage to your lens. The front elements glass or coatings on the surface are protected from dust, dirt, splashes and possible scratches or breakage from a bump, scrape or blow.
• Alternatively, consider a proper lens hood. They prevent angular light beams straying into the lens which can improve the image. They also greatly reduce the probability of damage to the lens too. Lens hoods are cheaper than filters, and don’t cause optical problems.

Supporting your dealer:
Filters are expensive to buy, but are profitable to sell. In these hard economic times you will be providing a rich return for your dealer and helping him survive a tough market.

A mistake to clear up

Somebody told me recently, “I always have this polarising filter on the front of my lens”. Wow! (It was actually a skylight filter when I looked). Polarising filters are great for reducing some reflections from some surfaces and may darken skies in some light conditions. Some people mix them up with UV and skylight filters. Just let me say for now, don’t keep a polarising filter on your camera.

By Damon Guy (author and Photokonnexion editor)

Damon Guy - Netkonnexion

Damon Guy (Netkonnexion)

Damon is a writer-photog and editor of this site. He has run some major websites, a computing department and a digital image library. He started out as a trained teacher and now runs training for digital photographers.
See also: Editors ‘Bio’.