Category Archives: Starters School

Articles essential for starters

31 ways to use composition in your photography

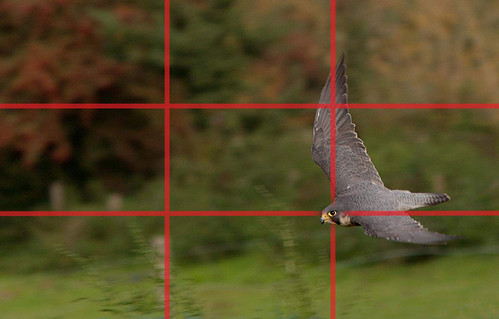
A peregrine falcon swooping - Use composition to help your images look more appealing.

A peregrine falcon swooping - an image using the power of the Rule of Thirds. Use composition to place the eye on one of the intersections. This helps draw the eye into the shot.
Click to see large.

Use composition for a more successful image.

When we make a photograph what we like guides our capture. If you use Composition in your photograph it helps bring out the best of the subject. Getting the composition right is the way we grab the viewers attention. So it’s worth while knowing what composition is about.

I am sometimes asked “what is composition?”. That’s simple. Composition is the arrangement of the elements of the picture through conscious planning or framing of the shot.

On the “composition resources page” we have a whole range of links dedicated to composition (also look under “Subject/Articles” in the menu above). Each article will help you use composition to make great photographs.

Tips for Composition by Joe McNally

The video below gets the view of Joe McNally. He is an acclaimed photographer with over 30 years experience. He tells us some of his ideas about composition. He brings out some wonderful stuff.

Putting it into practice

Understanding what ‘composition’ means is not the same as actually being able to do it. To help you out I have designed a 31 day programme. Each day one subject is provided for you to photograph. Each of these subjects can draw out a composition to attract the eye. There is no right or wrong way to do it. But, it should be easy for you to work with each subject to use composition in a deliberate way.

The Photokonnexion 31 Day Photography Challenge

Day 1. Deep red
Day 2. An item of clothing
Day 3. Something with special meaning
Day 4. Night lights
Day 5. Pet eyes
Day 6. Love is…
Day 7. Candles
Day 8. Circles
Day 9. Many people
Day 10. Tree
Day 11. Light at dawn
Day 12. Silhouette
Day 13. Black and white
Day 14. Power
Day 15. High-tech
Day 16. Long shadows
Day 17. Strong blue
Day 18. Roads
Day 19. Your favourite room
Day 20. A good thing
Day 21. A bad thing
Day 22. Humour
Day 23. Jewellery
Day 24. Self portrait
Day 25. Fame
Day 26. Bird
Day 27. Change
Day 28. Distance
Day 29. Wooden
Day 30. Your love
Day 31. Open space

Have fun with your challenge. Use composition with each one to bring out the subject of your picture.

find out more...Photokonnexion tips by email
If you enjoyed this article please sign up for our
daily email service.
                                                 Find out more
#11030#

Netkonnexion

Damon Guy (Netkonnexion)

Damon is editor of Photokonnexion. He has professional experience in photography, writing, image libraries, and computing. He is an experienced, webmaster and a trained teacher. Damon runs regular training for digital photographers.
See also: Editors ‘Bio’
By Damon Guy :: Profile on Google+.

Simple videos showing how camera settings work

Understanding the relationship between ISO, Aperture and Shutter speed…

These are the three critical factors in the exposure relationship. Getting a feel for how they work together is the essence of controlling your camera. Several people asked me to find a simple explanation for the way this relationship works after seeing this post yesterday: How to work with your camera settings – a simple, fun lesson.

The key point

The three settings, ISO, Aperture or Shutter Speed are set up on your camera in stops, or fractions of stops. The stop is a photographers way of measuring light in the camera.

The most important thing to remember is that a stop of aperture is the same as a stop of ISO, and in turn a stop of shutter speed. As they equal each other, you can keep them in balance. If you put one setting up a stop (or fraction of a stop) you can put one of the others down a stop (or fraction) and you will get the same exposure. This allows you to change your settings to get a different result (more bokeh, less movement blur etc) but retain the same exposure levels.

The two videos below will help you to understand the way the settings work. I have given you two versions of the same information. They both present differently, and they both have snippets of information that are different from the other. However, they both cover the same material. I hope that one or both of them will help you to see how the settings work. Enjoy!

Aperture Shutter Speed and ISO, Photography 101

The second video covers almost identical material but shows some of the points through the camera viewer. This helps you to see the context of the settings easier.

Exposure (Aperture, Shutter Speed, ISO)

Now try out your new knowledge…

Now you can try out CameraSim in yesterdays post. Try varying the settings for yourself like they did in the videos and see how they work together to get an exposure balance.

By Damon Guy (author and Photokonnexion editor)

Damon Guy - Netkonnexion

Damon Guy (Netkonnexion)

Damon is a writer-photog and editor of this site. He has run some major websites, a computing department and a digital image library. He started out as a trained teacher and now runs training for digital photographers.
See also: Editors ‘Bio’.

Can you write? Of course you can!
Write for Photokonnexion...

We would love to have your articles or tips posted on our site.
Find out more…
Write for Photokonnexion.

How safe are your photography files from file loss?

Electronic files are threatened by many dangers.

File loss comes down to one of two problems. They can be electronically lost or mechanically lost. There are simple things you can do about it. A proper backup strategy is something we should all have in place. Have you reviewed yours recently?

File loss can seriously affect your happiness – that’s important

As a keen photographer, if you lose your electronically stored photographs you lose the fruits of all your labour. If you are a keen family photographer you could lose all the memories those photos represent of good times and family togetherness. You might be losing both, or more if you have other uses for your images. Losing files, and particularly ones that impact on your family life and memories, can be quite traumatic. If your home is destroyed by fire the trauma is terrible. Imagine if you were to lose all your family photographs in that fire too! File loss can be completely devastating.

When a disaster strikes – earthquake, fire or tsunami – the disaster organisations pick up the pieces. Often they say the loss of photographs causes serious emotional problems for people recovering from trauma. Think carefully about taking action to protect your files. Don’t let file loss devastate your memories.

Protecting against file loss is easy

Being keen on taking photographs can help you to enjoy yourself. Protecting against file loss helps you to preserve your files. But it also gives you peace of mind. So it is worth investing a little time to protect your files.

Things change

You may have a great computer. It may even be new. Things change fast with technology. Before long your existing hard drive will be getting old, subject to mechanical failure. Hard drives are more reliable than they used to be. However, they are are still liable to fail. If you have all your data on one hard drive that fails you will lose everything. I used to run an Information Technology department. I know how often hard drives just suddenly give up. Believe me do not trust to luck. One day you will lose everything. A mechanical failure will occur and file loss will happen.

Of course you may suffer from some sort of software error first. I have seen hard drives that completely corrupted themselves. They were working fine. But everything on the drives was simply trashed beyond use. There are several ways this can happen. Virus or malware activity on the computer can be one cause. Damage to the file storage database is another possibility. There are other issues too.

Knowing about the reasons for file loss or damage is interesting. However, all you really need to know is that your files can be deleted, completely corrupted or otherwise damaged. This can happen at any time.

I know you are going to tell me of firewalls, anti-virus and other protection. But, even those can be overcome by hackers, virus infection or malware. Computer security is an ongoing battle. It never ends. You can protect yourself as much as you can afford. The worst can still happen – although it is less likely. And, that is the point. If you ensure you have all the right protection AND you back up your files you have the best possible cover against file loss.

Don’t panic about potential file loss

The answer is simple. Back up; back up; back up!

Notice I said that three times? Well, for safety sake that is what you should do. The principle is simple. Here is how it works:

  • Level one: Updated every time you create a new file or change a file. Most hobbyist photographers will have this storage on the hard drive of their computer. It is the working storage space. But this storage alone is vulnerable. It is a single point of failure for file loss.
  • Level two (back up): Use an external/portable hard drive. Normally these plug into your computer using a USB connector. Each time you create new files or change old files, you copy them to the back-up external drive.
  • Level three (off-site backup): This is also an external/portable hard drive. You need to keep this copy at a different site to your computer. Then, if there is a fire at your house the level two back up drive is safe at another site. Then, about once a week, you copy all new files from your level two back up to the off-site level three drive.

So, in addition to your computer hard drive, you need two external hard drives. One stays next to your computer. The other you can keep in your office, or in a shed – anywhere out of your home. Then, you need to back them up to each other regularly. That three level approach is a simple and safe system to prevent file loss.

It’s supposed to be fun

Photography is fun. We all love it. However, file loss would be a a total disaster. You will be able to relax and enjoy your hobby all the more if there is a fall-back position. You can rest easy and feel comfortable with your hobby if you know that those files are safe.

Look carefully at your potential file loss situation. Think about getting yourself a couple of hard drives and backing up all your files on them. Then you are covered.

Check out these external hard drives on Amazon:
External hard drives on Amazon  Protect against file loss. Backup to a hard drive | External link - opens new tab/page

Also check out the links below for more information on files and file protection…

By Damon Guy (author and Photokonnexion editor)

Damon Guy - Netkonnexion

Damon Guy (Netkonnexion)

Damon is a writer-photog and editor of this site. He has run some major websites, a computing department and a digital image library. He started out as a trained teacher and now runs training for digital photographers.
See also: Editors ‘Bio’.

Can you write? Of course you can!
Write for Photokonnexion...

We would love to have your articles or tips posted on our site.
Find out more…
Write for Photokonnexion.

When is a tripod not a tripod?

Tripods & Bean Bags

Tripods & Bean Bags are great alternatives to a full sized three legged contraption. And there is one other option too!

A tripod is not a tripod when it’s another stabiliser!

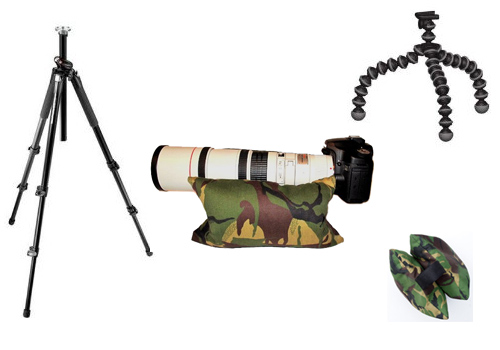
I suggest everyone use a tripod for the sharpest image. Of course they are not always practical. However, there are alternatives. Here are ideas for stabilised working without tripod.

Working alternatives

Working with a tripod is perhaps evidence for careful attention to detail. After all the use of a tripod does require some persistence. They can be heavy, they certainly take up space and take a little time to put up when you want to take a shot. On the other hand, they definitely increase the sharpness of the shot and allow longer exposures. They also provide a firm platform to work with when working a scene, giving the photographer flexibility to walk around. They also provide a vantage point for the camera during the shot – a solid holding point for the camera in difficult situations.

Using different versions of tripods extend their usefulness. The Joby Gorillapod  External link - opens new tab/page series of tripods are excellent. They provide a solid platform for taking photos which can be adapted to almost anything as a holding point. So instead of a long set of three legs, the existing bendy legs can be used to grip fences, poles, furniture, walls… well pretty much anything you can think of using. They are light and practical and can be used in most situations as long as you can find a place to anchor them. They do not work at their best with a very heavy camera and lens setup. So they do have their limitations. However, for most entry level DSLRs, medium sized DSLRs and most normal lenses they are great.

The other possible tripod-alternative product to consider is the bean bag. There have been a number of different types of bean bags made over the years. The idea is that you can use a bean bag to bed down your camera on a variety of surfaces. Wall tops, rocks, the ground, cars, even furniture are all perfectly acceptable for using the bean bag. The one that I recommend is the Maxsima – Professional Camera Bean Bag – ‘twin bags’ 262×162. Lens support Bean Bags for Wildlife photography etc.. also Designed for use on a Vehicle / Car door  External link - opens new tab/page. It provides a solid and adaptable way to put your camera on a hard surface to prevent damage to the camera (from abrasion, chips and dirt). This is, in effect, a cheap and efficient way to make a solid stand-point from which to make a shot. It is not as accurate as a tripod – you may have to massage the bean bag into the right shape to get the camera pointing exactly where you want it. In general however, it is a great way to work when you have limited options, especially at ground level or when working with other surfaces.

Another, simple option!

The final option you have is somewhat surprising. Its simplicity is also its flexibility. And because it is so simple, a lot of photographers forget to use it as an option. Try rolling up your jumper, jacket or even your coat! If you make a ball or cushion on which to put your camera you have a way to protect it from the ground or abrasive surfaces. But it provides a simple and solid surface for your camera. Lots of photographers forget the simple answer. They often think of the high-tech solution. But sometimes it pays to work smart when you are in a situation and you are caught out.

By Damon Guy (author and Photokonnexion editor)

Damon Guy - Netkonnexion

Damon Guy (Netkonnexion)

Damon is a writer-photog and editor of this site. He has run some major websites, a computing department and a digital image library. He started out as a trained teacher and now runs training for digital photographers.
See also: Editors ‘Bio’.

Can you write? Of course you can!
Write for Photokonnexion...

We would love to have your articles or tips posted on our site.
Find out more…
Write for Photokonnexion.

Do you make these three style mistakes?

• Soaring •

• Soaring •
If you want to develop your style – see the world a different way.
Click image to view large
• Soaring • By Netkonnexion on Flickr External link - opens new tab/page

Your personal style defines your photography.

When you start out in photography your style takes time to develop. However, you can easily stifle your photographic style if you don’t develop your photographic skills. You can avoid the problem by paying attention to these three key issues.

1. Little photographic experience

You can take thousands of pictures and still have little photographic experience. It is easy to do lots of pictures about the same type of thing. After a while this becomes boring and your pictures will become mundane or clichéd. It is easy to get into a rut and find your personal style stops developing. This happens even if you are photographing something you really find interesting.

Solution: Find new techniques to take photographs of your interest. To break out of a style rut you can easily change your technique. Here are some ways to do it…

  • Try a different lens… keep using it to force yourself to take new perspectives
  • Develop particular themes – Colour, shape, size, distance, angle
  • Use online tutorials to develop a new approach
  • Do a Google search on your image interests to see how others approach the subject
  • Discuss your interests with another photographer with different interests to get a new perspective
2. Limited range of photographic techniques

Lots of photographers beginning to develop their style are limited by the range of techniques they know. To take a different perspective it helps to extend your photographic skills. Here are some examples of techniques you can use change your photographic viewpoint…
Learn to manipulate Depth of Field – try these links to start you off:
Depth of field – a powerful photographic tool
An easy lesson in beautiful bokeh
One big change – one easy step forward (depth of field)
Controlling the Depth of Field (DoF) – Three Tips
Learn about action shots and panning – check out the resources here: Action shots – how to…
Try out night photography of your subject. Here is a resource page: Night Photography
There are lot of other resources on Photokonnexion. Check out the “Articles” section in the menu on the top of each page. Also you could try the “Categories” section up there too. They both offer different perspectives for resources on this site.

3. Poor understanding of composition and light

Both composition and light have a key role to play in your photographic style and how you approach your subject. You can follow up on some easy lessons in understanding light and compositional techniques from this site too. Here are some suggestions to get you started.
Key lessons in composition are:
Rule of thirds
Lines
Perspective
Key lessons in understanding light:
Six things to know about light
Three little known facts about shadows
Light, a Little Difference Makes a Big Impact (Hard and soft light example).
There are further links on the bottom of each page to help you follow up on more ideas.

Developing your style and skill go together

If you want to develop your own style, change your style if you are in a rut or just have wider experiences in photography – then learn more. As you develop your skills and take into account wider perspectives you will broaden your experience. You will have more fun too!

By Damon Guy (author and Photokonnexion editor)

Damon Guy - Netkonnexion

Damon Guy (Netkonnexion)

Damon is a writer-photog and editor of this site. He has run some major websites, a computing department and a digital image library. He started out as a trained teacher and now runs training for digital photographers.
See also: Editors ‘Bio’.

Easy bird pictures in your own back yard

• Bird Compilation •

• Bird Compilation •
You can have a great time with these simple tips – a world of birds in your own back yard.

Birds offer endless photographic opportunities.

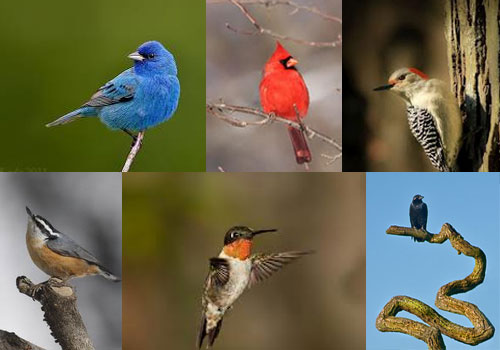
I’ve been fascinated by birds since boyhood, particularly birds of prey. Recently I’ve followed some keen bird photographers. I find that the small birds in my back yard are facinating too. Lets get started on some backyard photography. This will be a fun project for starting over the weekend.

This video gives down to earth, simple advice about working with birds close to home. Getting started in Feeding and attracting the birds mid-Winter gives a lead for the birds nesting in the spring. I am going to get started now. It’s Winter here and I am looking forward to spring.

How to Photograph Garden Birds


How to Photograph Garden Birds – RandoMnBest  External link - opens new tab/page – Uploaded on 28 Jan 2011

find out more...Photokonnexion tips by email
If you enjoyed this article please sign up for our
daily email service.
                                                 Find out more
#11030#

By Damon Guy (author and Photokonnexion editor)

Damon Guy - Netkonnexion

Damon Guy (Netkonnexion)

Damon is a writer-photog and editor of this site. He has run some major websites, a computing department and a digital image library. He started out as a trained teacher and now runs training for digital photographers.
See also: Editors ‘Bio’.

Can you write? Of course you can!
Write for Photokonnexion...

We would love to have your articles or tips posted on our site.
Find out more…
Write for Photokonnexion.

Simple explanations of camera exposure modes

Choose your settings from a range of modes.
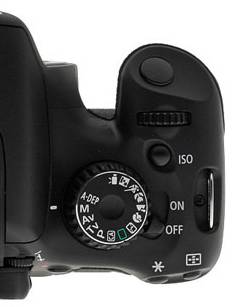
Canon550DModeDial

Camera Mode Dial
Choose the most suitable setting for your shot.


The DSLR contains a sophisticated computer providing a wide range of exposure options. They may seem bewildering. In this post we will provide simple explanations for the most common exposure modes to help you choose the best method for your next shot.

Exposure…

The modern Digital Single Lens Reflex (DSLR) can accommodate so many options that it is often difficult to know how to get started. So it is helpful if you have some idea of what exposure is about.

As photographers we are concerned with the use and manipulation of light. Everything else is secondary. We need to understand the concepts relation to how the camera detects light and the impact that has. Basically there are three controls which affect way the camera uses light. These controls are:

  • ISO – controls how sensitive the camera is to light. However, at high ISO levels there is an increase in digital noise.
  • Shutter speed – controls how long the camera sensor is exposed to light. The shutter speed also affects the amount of movement blur in the shot. The slower the shutter speed the more blur.
  • Aperture – controls how much light is allowed into the camera. Aperture also controls the depth of field. The wider the aperture the shallower the sharp zone in the picture.

(The links above take you to a full explanation of each control).

Between them these three provide control over your exposure. Co-ordinating them requires a little practice. Nothing too difficult. It is about balance. For the camera to create an exposure it has to collect a fixed amount of light. Too much light and the picture will be over-exposed. Too little light and the pictures will be underexposed. Getting it right requires a little knowledge of your camera light meter and how to change the controls to create the balance that makes the exposure.

In addition to the direct controls listed above there are the others called “modes” found on most cameras. These have been developed by the camera manufacturers to try and assist beginners who don’t understand the exposure process. The modes are intended to provide easy pre-selections for certain situations.

The different modes range from fully controlled by the camera (fully automatic mode) through to fully controlled by you (full manual mode). That is a range of controls from where the camera does everything for you through to where you make all the decisions. These modes differ from camera to camera but in general terms they are described below. The names may be different with each manufacturer too…

Full Auto: Basically this puts your camera into “point-and-shoot” mode. The camera uses its sensors to make an exposure. It responds to its programming and creates a picture which is of good quality but which you have no creative control over at all. It will even activate the flash if the camera detects insufficient light to create a balanced exposure.

Auto with No Flash: This is the same as the full auto setting, but the flash will not work under any circumstances. This leaves the camera to make the exposure without the additional light from the flash.

Program: The camera responds to its programming and makes an exposure by controlling the settings on your behalf. However, you have the option to make changes to that pre-programmed exposure – small adjustments that allow you to have a small amount of creative control.

Scene settings:
The scene settings on your camera includes a number of scene variations. These are likely to vary widely between the manufacturers and various models they make. Here are some of the more popular options:
• Portrait (for taking portraits)
• Landscape (landscapes shots and long distance shots)
• Night-time (night and dark shots)
• Sports and/or Action
• Macro
The above are standard modes. In most recent cameras these may be extended to include other additional modes to cover children, pets, specialised filters for colours and vintage settings for example. All sorts of other modes may be included depending on the target market for the camera.

These automatic modes above are pretty much camera controlled. Aside from tweaks, the camera has all the control. The problems with all of these is that the manufacturer is calling the shots. You can compose the shot, but have little control over what it looks like in the exposure. The discerning photographer wants to take creative control and use the main three controls mentioned above. Then they will be able to use the depth of field, movement blur and sensitivity to light to create the exposure that expresses their interpretation of the scene they are shooting. As a result there are three modes to deal with this. The first two are “semi-automatic” and the third gives you full manual control of the camera.

Aperture Priority:
The aperture semi-automatic mode relates to the manual control of aperture and the automatic control of the shutter speed and ISO. When you are in ‘A’ or ‘Av’ (aperture value) mode you are able to change the size of the aperture. The different sizes of the aperture are measured in “f-stops”. You can find out more about f-stops in this Definition: f number; f stop; Stop. The term aperture relates to the size of the hole which allows light into the camera. As the aperture varies the depth of field changes. Controlling the depth of field gives you discretion over the sharp area of the picture. The sharp parts of the picture attract the eye. Controlling where the sharpness is in the picture therefore affects where the viewer looks. This makes aperture control a valuable aspect of your composition.

Aperture also determines how much light is allowed through to the digital imaging sensor. A wide aperture allows more light in (say, F2.8) and has a shallow depth of field. A narrow aperture allows less light through (say, F22) but has a deep depth of field – at F22 sharpness will be more or less right through the picture.

Aperture priority allows you true control over the creative aspects of the light levels in the exposure. However, the camera balances your exposure control to make a good quality exposure because it sets appropriate ISO and shutter speed. You have creative control, it provides the quality exposure you need to make a great image.

Shutter Priority: This too is a semi-automatic mode. However, using this mode you have access to the shutter speed. Nominated as S, T, or Tv (time value) mode allows you creative control over the length of the exposure. Using this mode you can set yourself up for longer or shorter shutter opening. If the shutter is open for longer anything moving in the field of view will tend to blur. If the shutter is open longer the movement will be more blurred.

Shutter speed allows for control over the creative aspects of the total amount of light allowed to influence the exposure. While using the shutter speed the aperture setting and the ISO are under the control of the camera so it can balance the overall exposure while you control the creative part.

Manual or Full manual setting: The manual setting or “M” setting on the modes dial of your camera is used to give you full control. If you do it right your exposure will allow for depth of field control as well as creative use of movement blur. This mode gives you full control of all three aspects of the exposure.

So which mode do you choose?
In essence the automatic modes and scene modes are manufacturers programming – they do all the work for you. They represent an attempt to create classic ways of doing certain shots without you needing to take part in the exposure control. However, as a result these modes respond to make a picture that is not of your vision. Instead it is the suggested settings that manufacturers have researched about what the average shot of that type. These modes are in effect telling you how to take the shot.

On the other hand, the semi-automatic modes allow you to take control of major aspects of the control of the camera. As you have control of only one of the controls it allows you to concentrate on working on the creative part of the shot. That leaves the camera the make a balanced exposure to support your creativity. As this mode gives you an important aspect of the control without upsetting the outcome of the exposure it is an excellent mode to learn control of the camera.

Likewise, when using the shutter speed as a way of controlling the camera. You have the creative control over the length of exposure and any movement blur. This too is a great mode to learn control of the camera.

Both Av and Tv modes are affected by the other controls when in use. So, it stands to reason that you do not have the total control needed to get an exact overall exposure. However, for you to make full use of such a full manual control you should also have quite a sophisticated vision of what you want to achieve in your final exposure. While that is quite a normal requirement for a picture it does require some practice. The semi-automatic modes allow you to learn about the use of these controls and to develop the vision you need to start using the full manual mode. Learn to use these semi-automatic modes and you are not only on the way to full manual control, but also learning about how to envision your final exposure.

find out more...Photokonnexion tips by email
If you enjoyed this article please sign up for our
daily email service.
                                                 Find out more
#11030#