Category Archives: Starters School

Articles essential for starters

Learn to shoot while controlling the depth of field…

Depth of Field

• Depth of Field •
Work with Depth of Field in mind. It will help you to control the blur that provides soft and un-distracting backgrounds.
(Image taken from the video.)

Shooting with Depth of Field

The controlled use of Depth of Field (DoF), when done skilfully, is a central pillar of artistic success in photography. To learn how to properly control its use will help you to master many challenging situations.

Getting the measure of Depth of Field

Following the great response from “Understanding depth of field” yesterday, here is another video. In this one Mark Wallace shows how the three basic controls of DoF actually affect the clarity and blur in fields where depth of field is visible. It is important to watch the settings as he takes the pictures. Follow how the blur changes as the settings change.

SnapFactory  External link - opens new tab/page

Comments, additions, amendments or ideas on this article? Contact Us
or why not leave a comment at the bottom of the page…

Like this article? Don’t miss the next — sign up for tips by email.

By Damon Guy (author and Photokonnexion editor)

Damon Guy - Netkonnexion

Damon Guy (Netkonnexion)

Damon is a writer-photog and editor of this site. He has run some major websites, a computing department and a digital image library. He started out as a trained teacher and now runs training for digital photographers.
See also: Editors ‘Bio’.

Everybody Street… a new documentary about street photography

Video

Video

Documentary released for Film Festival.

Released at the “Hot Docs International Film Festival”, Everybody Street is about the street photography art of New York. Focusing on a range of street photogs it opens up the everyday reality of street photography.

The trailer for the documentary has been released and provides an insight to what may be in the documentary. It shows some stunning shots and some powerful insights. However, it also takes a rather voyeuristic and antagonistic view of street photography. While I personally don’t aspire to that approach there are others that do.

I believe that to act as an antagonist on the street is both dangerous and unnecessary. Personally I believe in respect, contact and participation in the street scene. But I do acknowledge that there are some people that take a different view.

I think it is worth seeing this documentary and I hope that one day it will be widely available. For now I leave you with the trailer. See what you think. The video is just over two minutes.

EVERYBODY STREET – New York City

Everybody Street Trailer from ALLDAYEVERYDAY on Vimeo.

Visit the website for the documentary at: http://everybodystreet.com/  External link - opens new tab/page

Comments, additions, amendments or ideas on this article? Contact Us
or why not leave a comment at the bottom of the page…

find out more...Photokonnexion tips by email
If you enjoyed this article please sign up for our
Tips by email service.
                                                 Find out more

By Damon Guy (author and Photokonnexion editor)

Damon Guy - Netkonnexion

Damon Guy (Netkonnexion)

Damon is a writer-photog and editor of this site. He has run some major websites, a computing department and a digital image library. He started out as a trained teacher and now runs training for digital photographers.
See also: Editors ‘Bio’.

Use implied infinity to make your shots bigger than the frame

• Passing Boats •

• Passing Boats •
Click image to view large
• Passing Boats • By Netkonnexion on Flickr External link - opens new tab/page

You can fool the brain into seeing beyond the frame…

The eye is trained to see sideways and the brain to imagine things we cannot see. The eye/brain system sees things that are peripheral to our vision – or beyond the frame.

Major compositional impact

When we see a picture containing things we expect to be extensive we make a leap of imagination. Although a picture is quite small the content takes the imagination beyond the frame – possibly to infinity. The picture above is an example. One of the boats is heading close to a substantial rocky outcrop. You cannot see it in the picture and get the impression that they are both sailing into open water. Our knowledge of the sea and the fact that we see no break in the picture we get the impression that it is clear open water.

The use of continuous patterns, open/extensive scenes and continuous lines can take the imagination beyond the frame. It makes a picture have a much larger aspect in our mind than might actually be there. The feeling of extensiveness which takes the imagination beyond the frame is down to how you crop or frame your photo.

In the next picture the stones are cropped so they are continuously cut off on the edge of the image. It gives the impression of a great expanse – a whole beach – extending beyond the frame.

Stones and shell

• Stones and shell •
Click image to view large
• Stones and shell • By Netkonnexion on Flickr External link - opens new tab/page

In fact the picture was taken on a beach so the impression is realistic and effective. However, in the next picture the roof looks as if it might extend to infinity.

• French Roof •

• French Roof •
Click image to view large
• French Roof • By Netkonnexion on Flickr External link - opens new tab/page

The lines and roof tiles give you the impression that the roof extends way beyond the edges of the frame. In fact it is cropped to look like that. The actual house edges are just beyond the frame on each side. But the implied size fools the eye.

You can also give the impression of more when you don’t have more with lots of little things. In the next picture I leave you to imagine how far the rubber bands extend either side. Do they really go far beyond the frame?

• Rubber Bands •

• Rubber Bands •
Click image to view large
• Rubber Bands • By Netkonnexion on Flickr External link - opens new tab/page

In this example the crop, and the pencil, still allows you to see beyond the frame of the picture. Yet it does seem to limit the view a bit. The fact that we normally don’t view a sea of rubber bands in our minds eye, puts limits on the extent of them beyond the frame. The pencil also seems to stop the view being truly extensive beyond the frame.

The limits of the implied expanse

The crop or framing of the picture is crucial to patterns, continuous lines and extensive scenes which open implied spaces in our images. You have to ensure that nothing intrudes into the picture to terminate the view. Had you seen the rocky outcrop in the top picture you would have had your imaginary journey foreshortened on one side of the picture. The pencil provides a limiting scale to our thinking which also foreshortens our vision outside of the frame.

Paraglider

• Paraglider •
Implied infinity created by openness gives a great sense of freedom to a picture.

Openness

What is lovely about this compositional idea is that when we have a truly extensive potential in a scene our imagination plays wonderful tricks of escapism, freedom and openness. It can really set us free when we see a scene like this. However, it can be ruined if we put in something which limits our imaginary journey out of the scene.

Comments, additions, amendments or ideas on this article? Contact Us

By Damon Guy (author and Photokonnexion editor)

Damon Guy - Netkonnexion

Damon Guy (Netkonnexion)

Damon is a writer-photog and editor of this site. He has run some major websites, a computing department and a digital image library. He started out as a trained teacher and now runs training for digital photographers.
See also: Editors ‘Bio’.

Can you write? Of course you can!
Write for Photokonnexion...

We would love to have your articles or tips posted on our site.
Find out more…
Write for Photokonnexion.

Do you understand the play of light on faces?

Video

Video

Understanding light involves seeing it on your subject…

That understanding comes from seeing light in different environments. Next time you are outside look at the light and shadow on the faces of people around you. Look for light/shadow relationships and look out for light playing on the face – how it moves around as the face moves in the light.

The play of light on faces is interesting, but often ugly

When you study faces and light together you will see that there are some pretty ugly shapes and shadows created by light on the face. We are programmed to follow edges, lines and contrasts with our eyes. Oddly, we see these on faces all the time but tend to ignore them.

Normally we ignore the ugliness of bad light because we have no control over light on other peoples faces. And, our familiarity with the face turns off our attention to light. It allows us to forget that faces can be pretty ugly in bad light or a bad position relative to the light.

Somehow, when we translate a scene to a 2 dimensional picture, these shapes, contrasts and lines created by light on the face become more obvious than in real life. They seem to take on an ugliness that we normally do not see.

‘Picture-awareness’, what we see on pictures but not in real life, happens in a lot of things. With faces it is pretty important. For photographers doing portraits it can make or break a picture. Becoming familiar with the concept is important if you want your portraits to succeed.

How to use natural light and fill flash Portrait tutorial

In the video Tony Northrup shows how light and shadow can be changed to your advantage easily and simply.

Tony Northrup  External link - opens new tab/page

Comments, additions, amendments or ideas on this article? Contact Us

find out more...Photokonnexion tips by email
If you enjoyed this article please sign up for our
Tips by email service.
                                                 Find out more

The top twenty phototips that you should know

20 spots - twenty tips

• 20 spots – twenty tips •
Click image to view large

Learning photography is about…

Doing the simple things really well. Although there are a lot of things to learn, the important ones are a few things you do over and over again. If you improve them you will automatically improve your photography.

Work on these to make the biggest improvement
  1. A proper stance will provide a proper, steady hand-held camera position.
  2. Go everywhere with your camera. Use it every day – improve every day.
  3. Learn with what you’ve got, better equipment will not improve your skill.
  4. Three essentials – camera, lens, tripod. Learn to use them all equally well.
  5. Get close, fill the frame, your shots will probably be better.
  6. Think about every shot before you push the shutter button.
  7. Count to two before taking your camera away from your face.
  8. Never just look at others’ photos – do a critique every time.
  9. Work on your composition skills at least as hard as your technical skills.
  10. Be inspired by other photographers, but develop your own style.
  11. Discuss photography as much as possible with other photographers.
  12. Look for contrasts in colour, light, shape and other variables.
  13. Declutter your shots, show it as simply as possible.
  14. Use natural light as much as possible – get to know its properties.
  15. The rule of thirds works more than 95% of the time.
  16. Try different perspectives, points of view and heights at each scene.
  17. Vary shutter speeds, ISO and aperture settings to experiment with exposure.
  18. Make people, and especially faces, a central study in your photography.
  19. Great photos can be found everywhere – you just need to look out for them.
  20. Be completely obsessed with the study of light and the language of light.

If you pay attention to these important tips you will find your photography will develop.

Photography becomes a way of life, but don’t make it the only thing in your life. You need other interests to bring new perspectives into your photography.

Most of all enjoy what you are doing. Photography should be fun… don’t take it too seriously. Laugh a lot.

find out more...Photokonnexion tips by email
If you enjoyed this article please sign up for our
Tips by email service.
                                                 Find out more

By Damon Guy (author and Photokonnexion editor)

Damon Guy - Netkonnexion

Damon Guy (Netkonnexion)

Damon is a writer-photog and editor of this site. He has run some major websites, a computing department and a digital image library. He started out as a trained teacher and now runs training for digital photographers.
See also: Editors ‘Bio’.

Three rules of lighting… simple, but effective

• Three Rules of Lighting •

• Three Rules of Lighting •

The simple explanations are the best.

Here at Photokonnexion we try hard to provide simple explanations for the things we all want to learn about our favourite subject. If you think anything is too complicated let us know on our Contact Us page or leave a comment below the article.

Well, here is a video in the spirit of simple explanations. I really do not need to explain before you see it… just watch and enjoy.

More after this…

find out more...Photokonnexion tips by email
Enjoying this article? Please sign up for our
Tips by email service.
                                                Find out more
#11030#

Three Rules of Lighting for Photography

“We talk about the three important rules regarding the behaviour of light. As photographers we can use these rules to achieve the type of lighting we want, including the look of soft light.” – Ed Verosky
© Ed Verosky 2012  External link - opens new tab/page

For more background on lighting

Don’t forget to check out our Light and Lighting resource pages and especially the links on Hard Light and Soft Light. These are essential to the understanding of light.

All our resources can be found in the menu at the top of the page.

By Damon Guy (author and Photokonnexion editor)

Damon Guy - Netkonnexion

Damon Guy (Netkonnexion)

Damon is a writer-photog and editor of this site. He has run some major websites, a computing department and a digital image library. He started out as a trained teacher and now runs training for digital photographers.
See also: Editors ‘Bio’.

Can you write? Of course you can!
Write for Photokonnexion...

We would love to have your articles or tips posted on our site.
Find out more…
Write for Photokonnexion.

Finding lenses and buying to suit your needs

Finding lenses | A wide range of lenses makes choice difficult

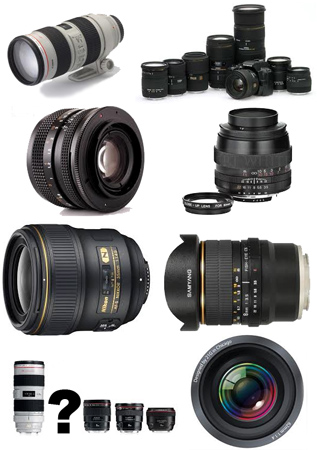
The choice is wide. Finding lenses requires careful thought.

Finding lenses that are right for you can be hard

Knowing what lens to buy is a challenge. It can be made simple if you have a few ideas. It is all about understanding your needs and making sure you fit the lens to a budget. First, some general advice about buying lenses.

Are you happy with the camera brand you own?

After a line of different cameras SLRs and different brands, my first digital camera was a Canon. It was my first Canon too. I was impressed. Well, they told me that Canon lenses were the best in the world! So I stayed with Canon.

I know, I know… you don’t agree with me on the best lenses. Whatever the outcome of that argument, I am not going there. That’s the whole point. Buying lenses is a personal decision. It relates to a range of needs and understandings you have about your photography.

You need to be completely happy with your camera brand before you buy lenses. Otherwise you will be stuck with a camera brand you don’t like and lots of money invested in lenses. Love the brand first. Then look for the ‘glass’.

Finding lenses… Things to consider

Usually the budget is fairly clear. However, I have one word of advice. Make sure you look at the upper range of your budget where the quality will be better. Don’t cut corners. Quality lenses don’t come cheap. There are lots of cheap lenses around, but you get what you pay for with lenses. They are expensive, but they are also high precision instruments. If the lens is cheap it probably will not be very robust and the quality of the optics will tend to be low.

After budget the next most important thing is to define your needs. It may be lovely to have a 500mm behemoth of a lens weighing two kilos and costing thousands. But if you are only in a position to use it once a year then it will not be worth investing. Far better to buy a more general purpose lens of higher quality to benefit your general photography and will use often. Focus on your regular photography action and expand your lenses around those activities. If you need that behemoth one weekend, hire or borrow one.

Defining your ‘needs’ is often confused with defining your ‘wishes’. Try to be realistic. Finding lenses is about knowing what you need. Only go for a lens that will be of regular, practical use. Do not define your needs based on your wish to pursue a dream. Most types of photography can be performed with a non-specialist set of lenses. Get good with those. Only buy good quality lenses to replace them. Only buy lenses when you can afford it. And, when you have the mega-once-in-a-lifetime trip actually planned, then factor in the specialist lens (if you really need it for most of the trip). Finding lenses suited to your needs is about being realistic about what you can achieve and how you will use them.

Of course the focal length and how ‘fast’ the lens is are both important. Also important is the type of lens – zoom, telephoto, prime, normal, wide angle and so on… However, most of these will come out in your decision around why you need the lens.

There are other things that are a little less obvious when finding lenses…

  • Weight – Some people simply cannot hold up a big camera and a big lens. Be realistic about what you can handle.
  • Size – especially for travel purposes, big lenses are a complication and a problem.
  • Image stabilisation – Modern lenses usually have stabilisation – consider its weight, availability, cost and if you need it or not (large lenses are normally where there is an option).
  • Glass quality – with professional grade lenses the glass is usually of very high optical quality. However, it is also expensive. So consider the importance of glass quality and overall lens quality for your budget and use.
  • Brand name – Are you paying for a manufacturers reputation, or is the lens equalled by a third party manufacture – check the review websites. Ask around to see what other photographers think.
  • Suitability for purpose – does the lens you want to buy actually suit your intended use. Check on the manufactures website, review sites or on discussion forums to get more information about the best type of lens for your use.
  • Consider the insurance implications and cost. Covering several thousand pounds of lens for a foreign holiday is a significant extra cost.
Buying your lens

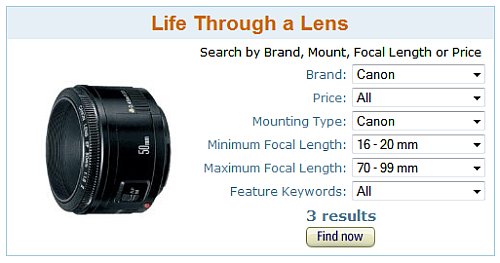
The sheer number of lenses available is bewildering. Finding lenses is best done with a finder tool. This tool for finding lenses on Amazon has made lens searches much easier.


The tool for finding lenses allows you to enter the factors that you consider important. It will return you a list of the available lenses to suit that purpose. After years of buying lenses I find this tool invaluable for helping to me to find a range of lenses from which to choose my ideal purchase.

If you want advice on what to do once your new lens arrives, check out this post: Getting started with a new lens.

find out more...Photokonnexion tips by email
If you enjoyed this article please sign up for our
daily email service.
                                                 Find out more
#11030#

Damon Guy - Netkonnexion

Damon Guy (Netkonnexion)

Damon is a writer-photographer and editor of this site. He has run some major websites, a computing department and a digital image library. He started out as a trained teacher and now runs training for digital photogs.
See also: Editors ‘Bio’.
By Damon Guy see his profile on Google+.