Category Archives: Insights

Get down to eye level with animals

Work at the eye level of the animal - get into their world

Work at the eye level of the animal – get into their world.

The world at eye level…

Photography can be wonderful because of the alternative views we can get. Often the best photographs are the ones that show us new views, or ones we don’t see from our normal standing position. The world of animals is a particular case in point. Use the eyes as a guide. Work at eye level.

Photographing animals

There is a whole range of animals involved in our lives. Domestic animals and others make great photo-subjects and there is a huge number of different ways to photograph them. Inexperienced photogs often make the mistake of taking the shot from the normal upright standing position. This does two things. It renders the subject “normal” in the eyes of the viewer – because this is the angle they see it normally. This upright position also tends to make the animal seem small and subservient. Both these viewpoints can make your shot look mundane or worse, flat. It will probably be uninteresting to the viewer.

Get down to the eye level of the animal. All of a sudden you are in the animals own world. By engaging directly with the animal at its eye level you create a correspondence with it. Eye-to-eye communication is an excellent way to get to the story of the animal. You see it at its own height. You can also see its world the way the animal does.

The point about this is that you are telling the viewer a new story. It is one they normally stand above. The viewer will have a much better insight from the animal you have pictured. More to the point you will be developing the eye level contact between the pictured animal and the viewer themselves. That contact brings the viewer into the picture. Eye to eye pictures are very powerful.

Eye level contact

Getting eye level contact with an animal is very powerful. The line of sight view the animal has, and the impact of the stare, can all be used to good advantage. If your animal has particularly amazing eyes you are also going to gain from the directness of the shot.

Eye level contact with animals and birds is a very powerful way to draw viewers into your picture.

Eye level contact with animals and birds is a very powerful way to draw viewers into your picture.
(Click image to view large)


Of course you can do the same for animals, in many situations. I enjoy doing photography in zoos. When you try to picture animals there, try to get them at eye level too. To do that you may need to get up a little higher. For example monkeys may be above your head height. I have often found a light ladder or folding step useful when photographing this way. It gets you up to their level.

Getting down low is important too. So be ready to lie down or at least bend for some shots. Try to get your shot right into the eyes of the animal subject you are imaging.

Bring the eyes alive

Eyes tend to look dead if they don’t reflect light. So when possible arrange the light or take the shot to see these reflections. They are called catchlights. If the eyes look alive the dynamic feel of the catchlights will add to the drama of the shot. Catchlights are more easily captured at eye level. So taking a picture on a direct line of sight will help to capture the feel of a penetrating eye.

Eye to eye level

All living subjects have eyes. You will always find that they are most important in the power of your shot. If you get your shot with an eye to eye level correspondence you will connect with that power. Animal or human subject, that power will be there. Your photography will benefit from emphasising it when ever you can.

Comments, additions, amendments or ideas on this article? Contact Us
or why not leave a comment at the bottom of the page…

Like this article? Don’t miss the next — sign up for tips by email.

Damon Guy - Netkonnexion

Damon Guy (Netkonnexion)

Damon is a writer-photographer and editor of this site. He has run some major websites, a computing department and a digital image library. He started out as a trained teacher and now runs training for digital photogs.
See also: Editors ‘Bio’.
By Damon Guy see his profile on Google+.

Three creative jump start ideas

Post by Ann H. LeFevre

A creative jump start – get going again.

It happens to all of us at least once. Our creativity runs down and we feel uninspired. Those are the times when our cameras feel like they weigh a thousand pounds and our brains seem like they are stuffed with cotton. There are many ways to combat such a slump. What you need is a creative jump start. Here are three suggestions to help you the next time you come up against that photographic brick wall.

The 30 second game

Pick a room in your home at random to try the first creative jump start. With camera in hand, walk into the room. Select a subject (perhaps the first thing you see) and start shooting. Don’t “think” about it; just do it. Make it quick and no longer than 30 seconds. The idea here is to be loose.

The Strat • By Ann H. LeFevre • Three creative jump start ideas

• The Strat •
By Ann H. LeFevre (Click to view large)


Creativity can be blocked by over-thinking about the “next shot”. This little game helps to bring back some spontaneity into your picture taking.

Take Another Look

We get used to seeing things the way we always see things. In this exercise the object is to take something common, perhaps something you see all the time. Then, to look at it from a different perspective.

• Wooden Spoon • <br />By Ann H. LeFevre • Three creative jump start ideas

• Wooden Spoon •
By Ann H. LeFevre (Click to view large)


Look at your chosen object from all different angles. Take a shot from each one. Look up. Look down. Look close. Look all around, taking pictures as you go. Looking at a common object from a new vantage point can loosen up the creativity block. A creative jump start works best with a simple views of things.

Play with Processing

Take one of those “Why did I even take this picture?” photos. Make a copy of the original. Put it into your photo processing program and play around with some special effects. Go all out and experiment. Don’t worry about whether or not you’ll actually keep the picture when you’ve finished. Simply spend time playing around on it for as long as you want. Let your processing ideas flow.

• Sunflowers •<br />By Ann H. LeFevre •  Three creative jump start ideas

• Sunflowers •
By Ann H. LeFevre (Click to view large)


Laugh at what you create. Laughter loosens up your creativity. And who knows? One of those crazy effects may trigger an idea! Processing can also transform an ordinary picture into something that is visually pleasing. Playing with the way a photo looks is a great way to charge up your creativity.

Beyond routine and distraction

Shooting slumps occur because we become anchored to routine or distracted by our busy lives. A creative jump start serves to break those habits and change our perspective. Try one out the next time you’re in a rut and see what happens!

Ann H. LeFevre – contributing author

Ann holds a B.A. in Fine Arts from Bethany College. She is a member of the Pocono Photo Club Pocono Photo Club | External link - opens new tab/page, and participates in the 365 Project Ann H. LeFevre - contributing author on 365Project.org | External link - opens new tab/page an on-line photographic community. She has enjoyed the artistic aspects of photography for many years and enjoys exploring a variety of photographic subjects in her work.

Top ^

Comments, additions, amendments or ideas on this article? Contact Us
or why not leave a comment at the bottom of the page…

Like this article? Don’t miss the next — sign up for tips by email.

Can you write? Of course you can!
Write for Photokonnexion...

We would love to have your articles or tips posted on our site.
Find out more…
Write for Photokonnexion.

Twitter Users – Welcome to Photokonnexion

@photokonnexion :: Twitter is a medium of choice for Photokonnexion.com

Twitter is a medium of communication. It perfectly complements the power of photography.

Twitter :: A series of “now” moments

Photokonnexion is all about learning photography. Our tips, tricks and tutorials cater for all levels of skill. We try to write in easily understandable language and to explain new terms and ideas fully. If you enjoy making photographs this is the place to find out more. If you love your camera this is the place to learn more about that too.

Photokonnexion and Twitter

Because Twitter is all about small amounts of information it is easy to learn in bite sized chunks. The @Photokonnexion Twitter stream aims to be on the fun side. We tweet bite-sized chunks of learning. You will find photographic facts, quotes, philosophy and fun comments. It is all about cryptic and comic, tips and tricks, moments and motivation.

A thousand pages helping you learn

Twitter and Photokonnexion.com :: Learn photography, connect with your cameraPhotokonnexion.com has more pages than your average photography book. All of them are packed with photography facts, resources and links to more. It is a rich resource for learning. It is a fun resource to browse. These pages aim to fill the details in. Photokonnexion.com is a perfect complement to our twitter stream.

Twitter users, let us know what you think

We hope you enjoy the site and encourage you to Contact Us with ideas and questions. Help us to develop this site. The more participation and comment the better.

Not landing here from Twitter?

Well, you will find that following our Twitter stream is easy. Just press the button below…


… and sign in to your Twitter account – or sign up for a new account. It’s quick and free.

For a quick idea of what you might find in our Twitter stream check out some of our motivational quotes.

Comments, additions, amendments or ideas on this article? Contact Us
or why not leave a comment at the bottom of the page…

Like this article? Don’t miss the next — sign up for tips by email.

Damon Guy - Netkonnexion

Damon Guy (Netkonnexion)

Damon is a writer-photographer and editor of this site. He has run some major websites, a computing department and a digital image library. He started out as a trained teacher and now runs training for digital photogs.
See also: Editors ‘Bio’.
By Damon Guy see his profile on Google+.

Camera grip – hold your camera correctly

Improving your camera grip.

Improving your camera grip is an important part of developing your skills.
[Image taken from the Joe McNally video below].

Your camera grip is a critical skill.

Do it wrong and you’ll have problems getting a sharp image in many situations. You may even give yourself bad posture and back pain. Learning to have a good camera grip will help develop your skills in many ways.

Camera grip and overall stance

The way you grip your camera works as part of your overall stance. You can get the grip perfect, but with a poor stance it will ruin the impact of a good camera grip. In Simple tips for a good photography stance I set out a detailed plan for a good stance. It will be worth reading that before you see the videos below.

Joe McNally – Da Grip

In this video Joe shows us how to properly hold the camera. He apologises for how this best suits a left-eyed shooter. However, the technique can apply to both left and right eye shots. So don’t be put off. Watch to the end. Joe makes many of the points I do in Simple tips for a good photography stance and this article. He shows you how to properly grip your camera. He also demonstrates how to control it from this grip too.

JoeMcNallyPhoto External link - opens new tab/page.

Sharpness and camera grip are close friends

When teaching I have often found that poor stance and grip go together. They result in soft shots and poor quality images. I try to help people to be more deliberate and use relaxed but firm control. Then, if they hold a good stance and a good grip the sharpness and image framing seem to come together.

In the next short video Gavin Hoey goes through his method for a camera grip. It is very similar to Joes grip and my camera grip too. Everyone has quirks and slightly different ways to do it. The important thing is to follow the basic plan and practice until your shots are sharp and controlled. Then you will see the benefit of good stance and camera grip.

Gavin spends time on some other aspects of sharpness too. This nicely shows how all these methods come together. Great stance, camera grip and control of your camera will develop your skills in leaps and bounds. For more on improving your sharpness check out this article :: The Zen of sharpness – 12 easy ways to improve.

No more blurred photo’s… Ever!

Gavin Hoey External link - opens new tab/page.

Comments, additions, amendments or ideas on this article? Contact Us
or why not leave a comment at the bottom of the page…

Like this article? Don’t miss the next — sign up for tips by email.

Damon Guy - Netkonnexion

Damon Guy (Netkonnexion)

Damon is a writer-photographer and editor of this site. He has run some major websites, a computing department and a digital image library. He started out as a trained teacher and now runs training for digital photogs.
See also: Editors ‘Bio’.
By Damon Guy see his profile on Google+.

Get some new ideas for your photography – a quick tip!

Get some new ideas for developing your photography

Here is a great book External link - opens new tab/page you can learn some new ideas about photography without paying…

New ideas to develop your photography…

Here is an interesting and easy way to find some new ideas. At the same time you can do some reading at no cost. A great way to grow your knowledge and find out more about photography.

How to get new ideas

I am sure you know Amazon, that great book-shop on the web. It is not all about book sales (and more). It is also a source of actual reading too. There are ways to use the website for new ideas and information. More to the point it’s free.

Let’s take an example to see how you can get these new ideas. The Collins Complete Photography Course External link - opens new tab/page is an excellent book. Well produced and researched. It’s a top seller and well reviewed. When you go to the Amazon page for it the book also has a readable section. That’s right. While on Amazon you can read several chapters. If the book has a “click to read” tag, like the picture above, you can read some of the text. The chapters you can read in this book are…

  • The story of photography
  • Camera types
  • Getting to grips with your DSLR camera
  • About various exposure modes

…and at the back of the book you can read a great little glossary of terms used in the book.

OK, so maybe you are not going to learn the whole of photography with this method. But, it is one way to pick up some new ideas and information. Other books are of interest too. This extends to books about art and composition ideas as well as other information. You could find yourself in a world of new ideas, facts and know-how.

One more new idea

If you are looking for projects or new ideas for a photograph try this. Go to the index at the back, or sometimes the contents at the front. Both of these areas of a book are packed with concepts. If you are in a book about art or composition in photography, these can start you thinking. Inspiration is all about the idea right? Use this resource just to get the new ideas flowing. Then follow your thoughts…

Comments, additions, amendments or ideas on this article? Contact Us
or why not leave a comment at the bottom of the page…

Like this article? Don’t miss the next — sign up for tips by email.

Damon Guy - Netkonnexion

Damon Guy (Netkonnexion)

Damon is a writer-photographer and editor of this site. He has run some major websites, a computing department and a digital image library. He started out as a trained teacher and now runs training for digital photogs.
See also: Editors ‘Bio’.
By Damon Guy see his profile on Google+.

Light intensity – estimating the light you need

Light intensity is about finding the natural look

• Computer user •
Get familiar with light intensity. Look for the right light intensity in every shot. It is not always easy – here’s how.

Aim for a light intensity that suites the subject.

When using artificial lights think about how light best suits the subject. Learners often use lights set too bright. We will explore the use of distance to reduce the light intensity.

What is light intensity

You might describe light intensity as the power that light has at a given place. A light is most powerful at its source. As it radiates away from the source it becomes less intense. Actually the light radiated still has the same total energy. As it gets further from the light source it is just spread out more.

At each point where you measure light travelling away from the source there will be less and less light. This is because the total light is more and more spread out. This relationship is called the Inverse Square Law. It is a bit of math which describes how light behaves. For our purposes we just need to know that as the distance from a light increases, the illuminated area also gets larger. The same amount of energy is spread out over a larger area. We can say this in a simple way…

As you move away from a light, the light intensity reduces by “distance squared”.

A camera only samples a small area of light. If the light is spreading out the amount of light it can gather is getting less. The light intensity it can capture reduces with distance. Less light is going to get into the camera.

So the light intensity gets less with distance?

At one meter from the light you can say light intensity is one unit. At two meters the light is spread out over four square meters (1 divided by four). If you take a photo you will get one quarter of the light entering your camera. Here is a table that shows how this goes…

1 M from source :: Light intensity per square meter = 1
2 M from source :: Light intensity per square meter = 1/4
3 M from source :: Light intensity per square meter = 1/9
4 M from source :: Light intensity per square meter = 1/16
and so on…
[M = Meter]

Here is a diagram showing how light intensity falls off according to the inverse square law.

How does this help?

When using artificial light of any kind you should remember light intensity. Good light should match the scene for a good image. It should look natural and the right sort of light (colour, intensity, etc). You also need to have enough illumination for the shot. Too little and the picture will be under exposed. Too much? The picture will be washed out, over exposed. All simple enough.

You need to know that light intensity falls off with the square of the distance for one reason. If you take a picture close to a light (1m) that may be bright enough to achieve what you need. If you move to three meters the light intensity will be reduced to one ninth of its previous amount. That is very different light to use. It changes your light levels in the scene. It will also affect your cameras ability to make an exposure. It may affect the colour of the light or other properties.

For someone using a flash on a camera it works the other way around. If you move to three meters from your subject the flash will light them at one ninth of the light intensity of a shot taken from one meter. They will appear much less bright.

Moving close to or away from a light source

The point is simple. Light intensity determines both the illumination and the brightness of a subject. You don’t need to move a lamp or flash very far for a significant loss (or gain) of light intensity. So guessing where to take your next shot is made easier. You can predict that fall-off now you know how the lighting behaves.

Now you can control your flash two ways. You can turn it down using the menus on your camera (check your manual). Alternatively you can move back. Even a short distance back will reduce the brightness of the shot by a lot.

Next time you are using a flash…

Why not test the theory. Put your camera in manual mode. Take a picture at one meter. Without changing the settings, move back. Try two meters, then three, and so on. Each picture will get dimmer. Quicker than you expect you will not be able to make an exposure. This is probably one of the most important lessons about the behaviour of light.

Comments, additions, amendments or ideas on this article? Contact Us
or why not leave a comment at the bottom of the page…

Like this article? Don’t miss the next — sign up for tips by email.

Lag time – don’t miss the shot

Lag time - test one

• Lag time – test one •
There is a gap between pushing the button and the making the photo.
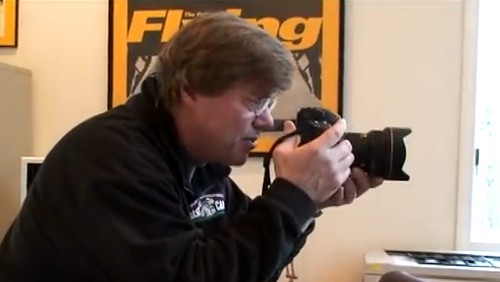
(image by Netkonnexion)

Every time you push the button…

There’s a period when not much happens. Lag time is the total time taken for the camera to complete the exposure process from the button push. In that process is a lot of detail. Here we look at lag time. With a simple test you can get a feel for the lag time in your camera.

Why is lag time important?

If you buy a camera for action shots you want minimal lag time. Otherwise you look and press, but the action has gone. Of course you can anticipate the action. This is how we all deal with lag time. But to know what time to anticipate you need a feel for the camera. A long lag time is likely to make your guess about when to press the shutter button less accurate. So it’s in your interest to know the lag time and practice with it. If you know the lag it makes it easer to guess the delay for shots.

Shutter lag – don’t misuse the term

Some people use the term shutter lag in a confusing way. They mean it to be the same as lag time. In the past this may have been the case. In early cameras most of the exposure process was completed by the shutter. Today we have a lot of other steps involved. The list of various time related things in the exposure process is quite long today…

  1. LCD activation of the picture (LCD display and electronic [mirrorless] viewfinders only).
  2. Thinking time between seeing a subject on the display and the finger push on the button.
  3. Time taken to get a focus.
  4. Aperture – time to calculate & set aperture size.
  5. Meter – time from light reading to exposure set up.
  6. Digital sensor start up to be ready.
  7. Shutter motor/mechanism actuation.
  8. Shutter opening.
  9. Digital capture of light data.
  10. Shutter closing.
  11. Data emptied from sensor ready for next exposure.

These items may overlap, run simultaneously or be in sequence. Some may not apply to some cameras. It depends on the camera model, design, efficiency and the components involved.

This list adds up to the total lag time. The first five items are not shutter related. They delay the firing of the shutter. They are shutter delay times. The other items are shutter lag items. They are responsible for the shutter and sensor capture of the exposure. They determine the shutter process from start to finish. These are the shutter lag items.

To be clear, lag time is the sum of all the lag items. Shutter lag is only those items related to the shutter-sensor system.

For a more detailed look at various components of lag times check out: Definition: Shutter lag; Shutter delay; Lag time; Processing lag;

Getting the shot – lag time explored

In order to know your camera better you can actually measure your lag time. So here is a method you can use at home. I have tested it using two different pieces of equipment and on two cameras with good results.

A word of warning. The on-board flash crosses all the other lag/delay times and may extend your total lag quite a lot. This is because it takes time to charge up ready for the flash. It will affect the results. Before testing turn off your flash. Check your manual if you are not sure how. Both these methods have back-lighting. You will get enough light without it.

Explanation/method: to measure the lag time we need to identify all the processes involved. I have done this for you above. This allows you to know what parts of the process are holding things up. You will see later that can help you save time.

Next we need to find a way to mark the start and end of the process. Fortunately the camera helps us. When the shutter button is pushed we know the exposure process is started. The clever part is that if we photograph a timer we know when the exposure process is finished because the clock will show the finish time.

To find out our lag time is easy. We activate a clock at the same time as we push the shutter button. We do this while photographing the clock. When the shot is taken the end of the the lag time is shown on the photograph.

Two methods to try out

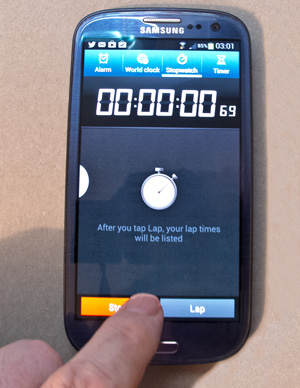
In the photo “Test one” above I have used this method with my smart phone. I set up the stop-watch app on my phone. Then I pushed “start” with my left hand. I simultaneously held the camera and pushed the shutter button. The key is to make sure you set off both the timer and shutter button at once. If you do, the the photograph will show the lag time. In the photo above it shows 69/100ths of a second. This is my lag time for a photo taken on my little Canon G12. Use a tripod or stand if holding your camera and pushing the button at once is not steady enough.

If you do not have a smart phone (or a stop watch) to photograph, try this web page…
This page will allow you to test your Digital Camera’s shutter lag… External link - opens new tab/page.
(Note: this page is about your total lag time even though it refers to the shutter lag).

Shutter Lag Test two

• Shutter Lag Test two •
Test your Digital Camera’s lag time External link - opens new tab/page.

Follow the instructions on that page. You will see a very slight retard on the clock at the ‘zero’ point. That gives you time to notice the top point and press the shutter button. The resulting photo will tell you the lag time on your camera.

I have run tests on my camera using both the web page and the stop-watch app method. They give consistent results. I feel confident you will find either test will work for you.

Pre-focus to get the shot

Notice on the second test page there are two tests. The second one shows you how you can shorten your lag time. If you pre-focus the camera that saves some pre-shutter time. Focus takes quite a bit of time. So if it is already focused when you take the shot your lag is reduced.

To reduce the delay with pre-focus press the button half way down while looking at the clock. The camera will focus and take meter reading. Then you can hold the half way position – this is called focus-lock. Hold your half-down position until, at zero. Then push the shutter button the rest of the way down. You will normally find your camera lag time is greatly reduced. Possibly by as much as a half. Something to bear in mind for future shots.

Accuracy

Of course you might take a totally bad reading for your fist shot. After playing I found that for both methods you need to practice a little to get consistent readings.

To ensure you get a good overall result I suggest taking ten readings after some practice. Here are readings from my run of ten… 0.53 + 0.53 + 0.69 + 0.98 + 0.89 + 0.66 + 0.74 + 0.65 + 0.66 + 0.74 = 7.07
If we divide the total by ten we will get an average reading. It will iron out any anomalous readings.
Thus: 7.07÷10 = 0.71 (rounded to two places). The lag time on this camera is therefore 71/100ths of a second.

This ‘average’ method provides us with a consistent standard over our readings. This is a more accurate method of gauging the lag time.

What have we done?

The things a modern camera does to take a picture has created a long lag. The lag time is the sum of all the different things that impact the exposure process. From button-press to complete capture-of-data is the lag time.

We have looked at two ways of testing the lag time: a stop watch app; and a web page timer. I have also suggested using an average reading to iron out anomalies.

If you go through this process you will know your camera much better. But more to the point you will have a new confidence. You will know how long it takes to complete an exposure. And, you will know how much time to delay for a shot.

Comments, additions, amendments or ideas on this article? Contact Us
or why not leave a comment at the bottom of the page…

Like this article? Don’t miss the next — sign up for tips by email.

Damon Guy - Netkonnexion

Damon Guy (Netkonnexion)

Damon is a writer-photographer and editor of this site. He has also run some major websites, a computing department and a digital image library. He started out as a trained teacher and now runs training for digital photogs.
See also: Editors ‘Bio’.
By Damon Guy see his profile on Google+.