Category Archives: DIY Projects

DIY Camera Chest Harness for Weak Hands & Arms

Chest based harness to help support the weight of your SLR if you have weakness in the hands or arms

Chest based harness to help support the weight of your SLR if you have weakness in the hands or arms. Click to see the full construction articles on Instructables.

Carry on using your SLR after weakness causes problems

A lot of people suffer from weak hands and arms. Injury, disease and age can all affect photographers. It is understandable that weakness makes it difficult to lift or hold a DSLR. The frustration, and perhaps pain, can be very off-putting. Here is a solution that just about anyone can make. It takes the weight off the hands and arms. Bracing the weight of your camera against the chest makes sense. It is a stable platform, the weight is supported by the neck and shoulders and it is easy to use with one hand. Using a remote trigger you can even hold the camera with just your left hand.

This easy-build solution is found on “Instructables.com“. There are detailed instructions on how to build the ‘Camera Chest Harness‘. In addition detailed photographs show you the components and assembly. All the parts are easily purchased or made from materials found in local hardware warehouses or DIY stores.

If you have not seen “Instructables.com” it is a great site. There are lots of Instructables DIY photography Projects as well as thousands of other interesting ideas for DIY projects. If you sign up for free you can follow people to keep up with their latest projects. Or, you can post your own hacks or projects. You can comment and ask questions and take part in all sorts of community activities including competitions. There are quite a few DIY photography projects there too. Why not take a jump over there and check it out.

Making Your Own Photography Equipment

1/4 in by 20 thread bolts are what fits into the bottom of your camera for mounting on a tripod. It also happens to fit many other photography accessories.

1/4 in by 20 thread bolts are what fits into the bottom of your camera for mounting on a tripod. It also happens to fit many other photography accessories.

A DIY Project

Here is a quick and easy photographic DIY project. Pictured above are three bolts which are 1/4in by 20 by 3/8th inch long. These are the size that screw fit into the bottom of your camera, flash units, lights, tripods and so on. This is a standard size. (See: DIY Photography Equipment. I have used these bolts in several DIY photography projects. In this project we are going to drill on hole to create a clamp that will hold a remote flash unit.

Off-camera flash provides a great way to light your projects. It is easy to diffuse the light since the lens is not mounted on the camera. You can use diffusers, reflectors or even bounce flash off the roof or walls. Because the light is not in line with the lens, back reflections are more easily controlled. The highlights do not reflect directly back at the camera. Off-camera flash is fun to use and easy to do. However, you have to find a way to mount it somewhere. This quick clamp idea gives you a flexible and easy method for attaching your flash to all sorts of items. Tables, pipes, chairs, your tripod, all sorts of things can be a mounting. You just clamp it to a firm base and away you go. You can even buy a cheap ball-head mount to go on your clamp so you can set the angle of the flash more accurately.

You will need…
A clamp;
the bolt;
a drill bit (1/4in) of a type suitable for drilling your clamp;
a thin rubber washer;
and an electric drill.

You will also need a cold-shoe mount for your flash. Most off-camera flash units come with their own ‘foot’ or base. Often these have a screw mounting bolt built into the bottom so you can either stand the flash on a table or screw fit it to a tripod or light stand. In our case we are going to use a clamp.

The method is simple. You have to purchase a suitable clamp. Some photographic retailers sell cheap clamps for photographic studios. One of these would be fine. I used a plastic hand squeezed clamp from a DIY store. It cost about £7.00 (about US $15.00) for four clamps.

I took a little time to set the clamp onto a few things so I could work out what is the best place to drill the hole. It is easy to just drill it and find it is at the wrong angle. My tests showed that with my clamp it tends to sit slightly angled down when clamped to a table. So I picked an upper position where the flash would sit upright despite the slight angle.

Next I put the clamp in a vice, you could use other grips. This was just to allow me to drill the hole safely. Then I simply drilled one hole in the clamp handle. Next, the bolt is pushed through the hole. It was a little tight as it was the same diameter as the hole. However I did intend that to enable a grip. Once through I pushed the rubber washer onto the bolt. In my case this was a rubber washer from a tap. You could use a variety of different types of rubber washers. The washer is to take up any slack when the flash foot or cold screw is screwed on. There! Job done.

Here is the completed project with the flash mounted on its own foot base.

Off-camera flash mounted on a clamp.

Off-camera flash mounted on a clamp. Notice the bolt through the handle which screws into the 'foot' plate of the flash. Click to see large.

By Damon Guy (author and Photokonnexion editor)

Damon Guy - Netkonnexion

Damon Guy (Netkonnexion)

Damon is a writer-photog and editor of this site. He has run some major websites, a computing department and a digital image library. He started out as a trained teacher and now runs training for digital photographers.
See also: Editors ‘Bio’.

Thread Size for Photography Equipment

Photography thread size :: Standard tripod and camera thread sizes

• Photography thread size •
Standard tripod thread sizes and camera thread sizes… these are standard throughout the world.
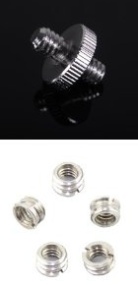
On the left 3/8 inch 16 UNC thread on a Manfrotto camera mount. On the right a 1/4 inch 20 UNC thread for a removable tripod top. The 1/4 – 20 UNC thread (right) is the standard on most consumer cameras.

Interested in Photography Equipment?

You need to know something before you start buying your kit. You need to know the size of that screw thread into the bottom of your camera. It is used on your tripod and a range of other photographic mountings. To fit things to photo-equipment you will need to know the photography thread size(s). Well here are the details you want…

Universal Photography Thread Size Table
Diameter inch Diameter mm Thread size
1/4 6.3500 20
3/8 7.9375 16

These are set out under the ‘Unified Thread Standard’ (UTS). It’s published by the American National Standards Institute (ANSI). The camera thread is a UNC specification for a ‘coarse’ thread. The Standard ISO 1222:2010 Photography – Tripod connections External link - opens new tab/page allows for the same fit in metric size.

Most cameras are fitted with a hole to take a photography thread size of 1/4in – 20 UNC thread. This means…

  • A quarter inch width (1/4 inch)
  • By 20 threads per inch UNC thread

Larger/heavier fittings, pro-cameras and heavy lens mountings may take the larger photography thread size…

  • A three-eighth inch width (3/8in)
  • By 16 threads per inch UNC thread.
Manufacturer awareness – consumer awareness

Quality manufacturers are aware of this compatibility of threads. For example, buying a tripod head and tripod from the same manufacturer usually means compatible thread and mounting standards.

Beware of the equipment range trap. Some “pro-range” equipment may have a photography thread size that differs from the standard “consumer range” photography thread size. That difference is despite being made by the same manufacturer. If you are picking and choosing equipment from different equipment ranges or from different manufactures, check photography thread size compatibility first.

If you do buy differing photography thread sizes on equipment there is probably a converter available. However, it is better to have a direct fit than fiddle around with converters on your expensive equipment.

Converters are available from photo-retailers…

Photography thread size :: Thread adapters
• Photographic Thread Adapters •

Most cameras, tripods and other photo-equipment have mounting screws or threaded holes. If these do not match you have a problem.

Actually, matching a tripod and camera thread is easy. These threads are standard sizes. A variety of adapters are widely available and cheap.

Click the link below to see a some adapters.
Photographic thread adapters

Tripods

Some tripod manufacturers fit the larger sized 3/8in – 16 UNC to their tripods. When buying a tripod make sure you buy it with one of the standard fitting threads given in the table above. Alternatively, make sure you are able to use a converter if needed.

Very old tripods may not have used the same photography thread sizes I gave above. In most cases a digital camera will mount on a legacy tripod. Just check it with a fitting test. But do not force the thread if it is tight. For modern tripods the threads size for the tripod head and the camera fitting is the modern standard.

Tripod heads

Tripod Heads fit onto the same standard photography thread sizes used on the tripod. So buying a tripod head from a modern photography manufacturer ensures a proper fit to a standard tripod screw (one of the two sizes given above). But, make sure you buy the compatible thread size. Obviously, if the tripod mount has the large size thread (3/8 inch), a tripod head with a small sized hole (1/4 inch) will not mount in a stable way on it as you will have to use an inverting converter.

Lighting equipment and stands

A wider range of fittings are found on light stands and light fittings, flash units and special mountings. They tend to meet the same standards of thread sizes on modern equipment. That allows the easy inter-change of photographic kit. Again, modern manufacturers are aware of the standards. So buying lighting equipment from reputable suppliers and manufacturers will usually ensure compatible thread sizes as I give them above.

A lesson learned…

I bought a light stand that looked like a good deal from a Hong Kong supplier. It did not have a compatible screw on the top for anything except the supplied fitting. This meant that the stand is of very limited use and will not fit with any of my other stands or lighting equipment. The moral is, beware of “knock-offs” and cheap imitations. Stick with reputable manufacturers. That message is true of most photography equipment.

Comments, additions, amendments or ideas on this article?
Contact Us or leave a comment at the bottom of the page…

Like this article? Don’t miss the next — sign up for tips by email.

Damon Guy - Netkonnexion

Damon Guy (Netkonnexion)

Damon is a writer-photographer and editor of this site. He has run some major websites, a computing department and a digital image library. He started out as a trained teacher and now runs training for digital photogs.
See also: Editors ‘Bio’.
By Damon Guy see his profile on Google+.

Outdoor lighting – Getting into Portraits

Natural light makes wonderful portraits – a great video

When photographers feel the first urge to start on portrait photography they think they have to buy a whole range of new equipment. That’s not true. Photography is all about the light. It is the only thing we really need to know well. Getting to know how to do portrait shots without a huge investment in lighting equipment is easy and fun. Not only that, the outdoors provides a great resource for portraits and the light is already there.

In this video Jeff Smith explains how to run an outdoor portrait session. He explains the way to use natural light using only reflectors. He also explains great ways to bring out the character of your subject in natural light. A great video.

Can you write? Of course you can!
Write for Photokonnexion...

We would love to have your articles or tips posted on our site.
Find out more…
Write for Photokonnexion.