Tag Archives: Wide-angle

Autumn photography – 50 things to think about

Autumn Cherry Leaves

• Autumn Cherry Leaves •
As Fall is upon us. Think of new ways to pull in the eye of the viewer.
Autumn Cherry Leaves by Netkonnexion on Flickr

Autumn is a great time of year.

There is so much to see and photograph. Being out in the open air and lovely locations is part of the attraction. Here are some other important and photographic things to consider.

Locations
  • Don’t always go to the same spot. Find somewhere new every Autumn.
  • Fall colours depend on the species, which may not be shown on maps.
  • Check with park information centres to see if the colours are right.
  • Information centres are great at giving directions to the best locations.
  • Watch weather forecasts to see when the best light is likely to show up.
  • Check websites for the area near the location for useful information.
Colours

What makes Autumn particularly exciting is the lovely russet and golden colours. Making those come out is not always easy. Think about these points…

  • Even slight greyness in the sky can dampen the colours.
  • Bright colour can be lost against a bright sky, exaggerate colour contrast.
  • Shoot yellows against a darker background so they don’t get lost.
  • Golden colours are best with a red dusk. Aim for times in the Golden Hour.
  • Don’t use a pop-up flash. It will flatten the colour and depth.
  • Use off-camera flash from the side to make leaves translucent and bright.
  • Use side light as much as possible to emphasis shadows and define shapes.
  • Use any greens you can as a back-drop for golden colours.
  • Low sunlight peeping under clouds often brings out yellows.
  • Take pictures after rain – the wetness often revitalises colours.
  • Consider a filter on your camera to exaggerate natural colours.
  • Try shots with as many mixed colours as possible.
  • Try shots with lots of similar colours across the picture.
Equipment

Every shoot demands its own approach. But here are some ideas to help the Autumn shots work for you…

  • A tripod is essential. A fuzzy shot of a great scene is horrible!
  • Most people forget the wide angle shots.
  • Remember that zoom lenses flatten perspective – consider prime lenses.
  • Consider using white boards and gold reflectors to help bring up colours.
  • You can’t make great images if you are cold/wet. Wear proper clothing.
  • Beware of changing lenses in damp air!
The shots

Found a great place to rejoice in colour and texture? Now you need to think about composition and ideas for your shots…

  • Check out our resources on composition.
  • Before going spend two hours looking at images by others (Google)  External link - opens new tab/page.
  • Work out a list of, say, 25 shots you would like to try out.
  • Concentrate your efforts on a few ideas.
  • Use your trip to try at least one type of shot new to you.
  • Practice your chosen shots before you go.
  • Remember to work the scene at the location.
  • Remember The fifteen second landscape appraisal.
  • Have a go at this old sailors trick to improve landscapes.
  • People often look up when in trees. Look down, there is plenty there.
  • Get really low.
  • Get really close.
  • Experiment with Depth of Field:.
  • Light leaves from behind. Translucent leaves are wonderful.
  • Consider backlighting to bring out shapes.
  • Hold up something interesting and photograph it with your hand.
  • Dogs look great in leaves! Capture your pet having fun!
  • Take a macro lens or macro tubes. Get really close.
  • Look for golden, yellows and reds in reflections… they look great!
Try going to manual (M) settings…

There is nothing more exciting. Get great images knowing they came out the way you intended. Avoid ‘auto’ shots programmed by a boffin at the camera factory.

Autumn and you…

Don’t be so intense that its not fun! Love your trip, enjoy the moment and if possible share it with a friend. Make some great images along the way.

Have a great Autumn.

Comments, additions, amendments or ideas on this article? Contact Us
or why not leave a comment at the bottom of the page…

Like this article? Don’t miss the next — sign up for tips by email.

Netkonnexion

Damon Guy (Netkonnexion)

Damon is managing editor of Photokonnexion.com with professional experience in photography, writing, image libraries, and computing. He is also an experienced, webmaster and a trained teacher. Damon runs regular training for digital photographers who are just starting out.
See also: Editors ‘Bio’
By Damon Guy :: Profile on Google+

How to use camera angle to change body shape

How camera angle affects body shape.

How camera angle affects body shape.
[Image taken from the attached video].

Camera angle affects body shape

How you approach your subject can significantly affect their shape. The camera height affects the relative size of parts of the body. The part of the body nearest to the camera appears largest. So the angle you take to the body can affect emphasis and shape. Your lens can also affect body shape too. These two factors in your shots can really change the view of your subject.

Basic shooting positions that show camera angle affects body shape
  • Getting down low gives your subject height and presence.
  • At waist level the angle is even across the body placing no strong emphasis on any one part of the body.
  • At eye level the head appears more significant and you can really draw out the features of the face, focus on the eyes for best effect.
  • From above the head and shoulders are emphasised and the legs are foreshortened.

From these basic positions you can also use different camera lenses. A 50mm lens is the lens that most closely matches the visual abilities of the human eye. Using one of these will help you to see the body as the eye will see it. On the other hand a wide angle lens (around 24mm) will help to bring out the emphasis of the body length. If you use a wide angle lens in portrait view from below you will tend to make your subject look statuesque – tall and grand. If you view the subject from above you will shorten the body and legs and make them look squat. These forms of emphasis have powerful impacts in pictures where you are trying to portray a persons presence. Statuesque tends to convey power and presence. Bodies that appear more compact tend to emphasis a more physical presence.

How camera angle affects the body shape – a video

The video brings out in detail the above points. The shoot is on the Bonneville Salt Flats, which is a wonderful location – even if it is flooded! The white of the salt brings out some great high contrast shots. You really can see how camera angle affects body shape.

TheSlantedLens External link - opens new tab/page (Published: 02.Apr.2013)

By Damon Guy (author and Photokonnexion editor)

Damon Guy - Netkonnexion

Damon Guy (Netkonnexion)

Damon is a writer-photog and editor of this site. He has run some major websites, a computing department and a digital image library. He started out as a trained teacher and now runs training for digital photographers.
See also: Editors ‘Bio’.

Can you write? Of course you can!
Write for Photokonnexion...

We would love to have your articles or tips posted on our site.
Find out more…
Write for Photokonnexion.

The advantages and disadvantages of live view

• DSLR Camera •

• DSLR camera diagram (side veiw) showing mirror down position •
Click image to view large
• DSLR Camera • By Netkonnexion on Flickr External link - opens new tab/page

Live view is here to stay.

What are the good and bad aspects of this technology? Should we be using it? What does it offer the DSLR user over the time honoured viewfinder system? In this post we look at the pros and cons.

The DSLR mirror system

If you are not familiar with the inner workings of the DSLR you can read more about it in this post: DSLR; Digital Single Lens Reflex Camera.

The essence of the mirror system is simple. The photographer peers through the viewfinder (see the diagram above) and the eye receives light directly from the main lens. Light reaching the eye has been redirected by the mirror up through the camera to the viewfinder eyepiece. When the photograph is taken the mirror flips up. Then the shutter opens allowing the digital image sensor to be exposed to light entering through the lens. While the mirror is up the photographer is unable to see through.

Live view…

When using live view the mirror is flipped up. You cannot see through the viewfinder. The view detected by the image sensor is instead created electronically on the camera screen on the back of the camera. In the most up to date mirrorless cameras the view is projected electronically into the viewfinder so you can use that instead of the screen-view on the camera.

The screens on the back of the DSLR, bridge cameras and point-and-shoot cameras provide a good, clear image on the screen. The displays offer a pretty good representation of the image seen through the lens. Reviews of the new mirrorless cameras suggest that electronic viewfinders are apparently not as good as those using mirrors. However, the technology is young and significant advances have been made recently. I think eventually electronic viewfinders will provide as good a view as the back screen.

Why do we need a viewfinder?

One of the problems of a back-screen is holding the camera steady. When you have a big lens on a camera the sheer unbalanced weight-in-hand makes it difficult to steady the camera with two hands held out in front of you. For a professional, or the keen amateur, the extra softness this induces is intolerable.

This is less important with light point-and-shoot cameras which can be held steady with one hand. Mirrorless cameras are smaller and lighter than DSLR counterparts. Bigger lenses still make them relatively heavy. Pressing a camera-lens combo to your eye while also held in both hands gives a third point of stabilisation to your camera – a steady position. So, a practical consideration for more substantial combinations of large camera and lens.

Retaining a viewfinder also ensures the “eye-view” is actually available to the photographer. By this I mean that the camera can be placed where the eye actually is on the body. Then the photographer sees through the camera in the same plane and level as the eye. I find this leads to better composition. We are more used to using eye-level views in our everyday vision. I acknowledge that the free-roaming screen composition may provide a more unusual point of view. However, artistic considerations aside, when composing an image I find close scrutiny of the scene leads to cleaner images and a rigorous composition. OK, this is not for everyone. It is a point to bear in mind for the more discerning photographer.

In my experience doing a back-screen composition is difficult because the eye is distracted from the screen. This leads to limited, incomplete composition, or missed details. I have been guilty of this sort of sloppy composition and have seen it in the images of others. Personally, I think the viewfinder helps me to compose accurately and cleanly allowing proper examination of detail.

What live view can offer…

Despite the shortcomings of back-screen composition and lack of steadiness there are good reasons to use live view.

On a tripod… While using a tripod to compose for landscapes, macros, wide angle and fish-eye shots do a quick check in live view before the shot. I suggest you do your initial composition using a viewfinder on the tripod. Once composed quickly check the live view simultaneously scanning your scene by eye. This enables comparison of the lens-distorted view against the scene as the eye sees it. This cross-checks your composition against your vision for the final outcome of the shot.

Mirror lock-up… When using a tripod use mirror lock-up to help sharpness. This mode sets the camera to flip-up the mirror ahead of the shot. The vibration from the ‘mirror-flip-up’ then passes before the exposure takes place. This reduces vibration enabling a sharper shot. Most DSLRs offer the mode which is found in the menu screens. Live view also performs a mirror lock-up action on many cameras. If you have a “live-view” button, do your composition, perform a live view check and take a mirror lock-up shot in the same sequence.

Access to the viewfinder is restricted… Yes, sometimes I simply cannot get to the viewfinder. When doing macro work, complex close-ups suspended under a tripod and when holding the camera high all create situations when the eye cannot easily get to the viewfinder. In this case the live view mode is a definite advantage and enable otherwise impossible shots.

Depth of field… The viewfinder has its own optical characteristics additional to the main photographic lens. Normally viewfinder lenses are pretty faithful and do not affect the view through the main lens. When using a fast lens, say f1.2 wide open aperture, the depth of field may be distorted by the viewfinder. It’s said live view helps you better see the areas of bokeh. I am sceptical. I have not seen this effect accurately on my Canon 5D MkII to make any difference. I am prepared to accept it works on other cameras. Try it and see.

Horizons, converging verticals and straight lines… Live view offers a set of lines dividing the screen up into thirds (nine segments). This “rule of thirds” grid is helpful in composition. I find it most useful when checking converging verticals when lining the camera up. However, a good electronic display of focus points laid out in your viewfinder is excellent for most compositions. The focus points usually allow for rule of thirds composition and more. So, live view offers an option, but no better than the viewfinder. Other cameras may differ on this, make your own choice.

Live view histogram… Some cameras allow the display of a live view histogram. This enables you to check your colour and light intensity prior to the shot. This saves later examination of lots of frames online. However, I prefer “Chimping”. The post-shot histogram review is the best way to tell if you have a good shot or not. If you do use the live view histogram beware of poor composition. The histogram takes up screen space I prefer to use for composition. So, not to my taste, but the opportunity is there on some cameras.

Live view can be useful

More cameras are providing good live view mode and offering more facilities with it. I think there are some good reasons to use this mode especially with a tripod. It certainly provides some useful functions. There are some severe shortcomings with live view composition and personal stance when using it. The good old viewfinder still wins the day for me. However, a lot depends on your camera. I hope these points have opened your eyes. I leave you to draw your own conclusions.

find out more...Photokonnexion tips by email
If you enjoyed this article please sign up for our
daily email service.
                                                 Find out more
#11030#

By Damon Guy (author and Photokonnexion editor)

Damon Guy - Netkonnexion

Damon Guy (Netkonnexion)

Damon is a writer-photog and editor of this site. He has run some major websites, a computing department and a digital image library. He started out as a trained teacher and now runs training for digital photographers.
See also: Editors ‘Bio’.

Photographers – don’t forget your feet!

Tug-o-war · The fun of the game is recreated by the close-to-distance balance - Use your feet to get the right position.

• Tug-o-war •
The fun of the game is recreated by the close-to-distance balance. Use your feet to move in close allows a large subject but a wide scene.
Click image to view large
Tug-o-war · By Netkonnexion on Flickr External link - opens new tab/page

Your zoom can’t do everything.

When you zoom into a shot you do get the close-up. Getting in close is important right? Well, yes, but you don’t always want to fill the frame with the subject. In this tip we look at another way to approach the shot. Use your feet to get the right position, not your zoom.

When you have an expensive and fun zoom lens you want to use it to the fullest extent. Most beginners go for a zoom because it gives them a flexibility that a prime lens does not. But then again, having that flexible zoom makes most photographers forget that they have feet!

What! Forget my feet? Ridiculous. OK, I am being flippant. But how many of you reading this would be inclined to stand off to one side in one position. Then using your zoom lens just take all the shots from where you stand? If you are a recent starter at serious photography I am willing to bet you will be taking a back seat and doing lots of zooming. What you are doing is waving aside a lot of composition opportunities. I urge you to stop zooming and use your feet.

If we don’t zoom in – what then?

Remember, when you zoom into a subject you are making the object of your focus bigger. Getting closer yes, but also you are narrowing the field of view – cutting out the background. That is the thing about zoom lenses. They get you in close to fill the frame.

What you might consider some times is to open up the zoom, go wide. And, instead of zooming into your subject walk up to it instead. Yup! Use your feet.

Use your feet to get into the shot

What this magical walking stuff will do is make your subject large, but allow you to retain a big chunk of the background at the same time. Wow! This gives you a great new perspective. Look at my picture above. I walked out of the crowd and got close to the team members. This gave me a nice big foreground object. Then looking down the line I get superb perspective as the line diminishes.

Composition is not about framing everything from one spot

When you are framing the shot consider doing it from a number of different places. Working the scene is about being dynamic and trying out all the angles. Walking into the scene and getting a close-up with your zoom wide open creates a great opportunity to develop perspective. On the other hand going really narrow and walking out of the scene gives you more context for you to select only those parts of the scene you want to show in your image. Walk in, walk out – use your feet to get you an advantage.

The zoom gives you half a story. Taking it for a walk around the scene is the other half. Use your feet to good effect and you will get more great shots than you would just using a zoom.

Using a wide angle lens

Using a wide-angle lens.

Unless you have seen the effects of the distortion created by a wide-angle lens or a fish-eye lens it is difficult to imagine how the image is a impacted. In this post we look closely at the actual distortion and impact of the characteristics of these lenses.

In Tips for doing wide angle shots we looked at the type of subject in which you can use a wide angle lens. I pointed out the characteristics and ways the lens affects the image. In this video we look more closely at the impact of the lens on the image/eye. The commentator shows the effect of various types of moves and perspectives the lens affects. A simple and informative examination of the wide angle lens.


Photography tutorial: How to use wide-angle lenses | lynda.com – A Lyndapodcast


Tips for doing wide angle shots

Retired aeroplane - wide angle photography really brings out certain features of a shot.

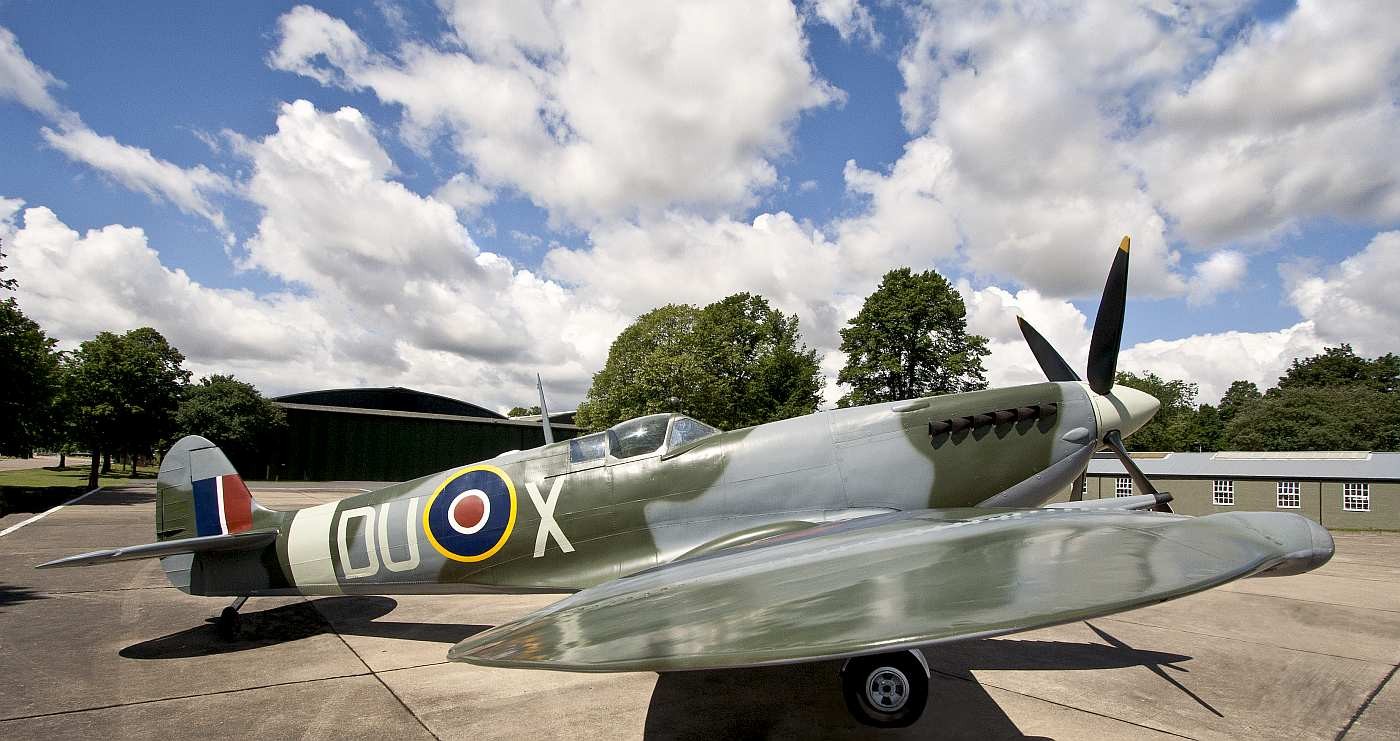
• Retired aeroplane •
Wide angle photography really brings out certain features of a shot.

You can do wide angle photography with most zoom lenses

I am surprised how little the wide end of the zoom focal lengths are used. Keen starters often forget wide! We are going to look at what you get for going wide angle photography work.

But I don’t have a wide angle lens?

No? Have a look. Most people buy their first lens as a kit lens with their first DSLR. Very often these lenses are in the focal length range of 18mm to 70mm. With a bridge or compact camera they are built-in. To benefit from this article you just need to set the focal length to the wider end. Any lens which can open up below 35mm will be working on the wider end. Wide angle photography is available to nearly everyone. Read on!

What is a wide angle lens?

A wide angle lens is considered to have a focal length considerably less than a ‘normal’ lens. Lenses are measured against the old SLR standard of 35mm film. Today we have 35mm digital sensors. These are used in “full-frame” cameras (as against the smaller ‘cropped sensor’ or ‘APS-C’ camera of most DSLRs). A ‘normal’ lens for a ‘full frame’ is a 50mm lens. A 35mm focal length or less is considered to be great for wide angle photography. Many wide angle lenses are around 24 – 35mm. For APS-C sensors, focal lengths wider than around 25mm are considered to be getting into the wide angle photography range.

Below 24mm there is a class of lenses called an “ultra-wide angle” lenses. These are around 24mm to around 18mm. In this case, depending on the camera they are built for, they would show some distortion and a tendency to create fish-eye shots or actually be a fish-eye lens. Some lenses, like a 16mm lens for a DSLR will be a fish-eye on a full-frame sensor. However, the same lens mount on a camera with a cropped sensor would use the lens as for ultra-wide angle photography. The fish-eye distortion would not be seen at all.

Many smaller focal lengths exist. Some digital cameras with very small sensors (compact cameras for example and some point-and-shoot models) have wide angle capability of around 8mm, possibly 6mm. These focal lengths are not practical for a DSLR. There are special design features involved to use them at this short focal length which are not feasible in larger cameras.

With all that in mind… here’s my first tip. If you are looking for a lens for wide angle photography, know your sensor size. Look at the manufacturers specification carefully to see that the lens is suitable for what you want on the camera you’ll be using. If you buy the wrong lens/sensor mix you may not get what you expect – although you will get a perfectly good lens!

What is wide angle photography?

In general wide angle photography tends to emphasise a difference of size and distance between a photographic subject in the foreground and one in the background. The result is an optically distorted view magnifying distance between objects, but allows a greater depth of field than a normal lens. This creates a pleasingly large foreground object and by comparison a tiny background one even though the distance between them is quite short.

The exaggeration of the size of foreground objects provides opportunities for composition that really emphasise the expanse of the background. In the picture above the large relative size of the Spitfire wing emphasises the shape and prominence of the aircraft in the foreground. Meanwhile the foreshortening of the foreground-to-background distance has really given the clouds a powerful strength in this shot. They appear to be trending toward the centre-distance. Appropriate for an aircraft don’t you think? At the same time the expanse of the airfield itself is also felt because of the relative smallness of the buildings and the width of the scene captured by the wide angle.

Find ways to exaggerate the relative sizes of foreground and background objects. For example, Spitfire vs. buidings. Where you can use perspective lines (eg. receding clouds) through the scene. This will help you develop a strong composition in your wide angle photography.
More after this…

Interior shots

Wide angle photography works best with focal lengths of around 24 to 30mm on most DSLRs. These lenses are great for use in the interior of buildings. This type of lens lets you see more of the scene without having to move a long way back. In a small room that is very useful as you are unable to move back very far anyway. Personally, I love rooms taken on the diagonal from the corner. These shots with a wide angle lens give you the perspectives of the room angles to help provide depth and still get everything in the shot. Do be careful to get the camera straight. If the level is off and you are using the lines of the room to frame the shot it becomes almost sickeningly wrong with a wide angle and there is little you can do to retrieve it! wide angle lenses are very good at bringing out perspective lines in your composition. With some lenses there is some curvature (spherical) distortion. So in a room watch out to correct for that when the lines curve.

Record shots and wide angle photography

If you are taking a record shot, for example, to capture an objects uniqueness, then wide angle photography is useful. The lens emphasises the foreground object, background objects lose prominence. By isolating the foreground object, which is what your record is about, you can make is really stand out with no background distractions. This technique is useful for statues, vehicles, buildings… well you can see the point. Again, be careful. Some wide angle lenses can badly distort in the vertical plane if you are too close, say, to a building. So experiment. Particularly with a record shot, you are trying not to distort as you want the image to be a record of the object as it is.

The artist in you

As an exact opposite to the record shot you can exercise quite a lot of creative licence with wide angle photography. The superb exaggeration of length is great for really long perspective lines or long objects. It’s great fun to take pictures of people with a portrait view. Small people look large and loom over the shot when done close up. Buildings, columns, trees and other tall objects can really be made to loom large. So if you want to really to emphasise certain features a wide angle shot can be really fun.

Portraits and wide angle photography

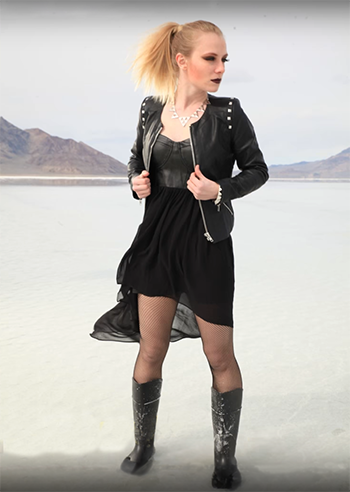
A current favourite format for portraits is the ‘environmental portrait’. Sounds grand. Actually its about taking pictures of your subject outside in the open air. The wide end of the focal lengths are particularly good for capturing a lot of scene while making it look like your subject is close. And yet it can be a really freeing way to tackle portraits – you can really use the environment to say something about your subject. Picture the proverbial pretty girl in a field of flowers… a lovely wide shot pulls in the expanse of flowers and yet the foreground emphasis is on the subject. Nice. Equally, the right sort of urban environment can be great for emphasising maleness… Again, let your creative juices flow. Study some wide angle photography work of other portraiture artists. It is important to see how the body can be distorted by the lens to artistic effect or emphasis.

Landscape shots and wide angle photography

The landscape shot is one of the popular pursuits for photographers. Yet, as many good photographers have pointed out, they are difficult to carry off well. Wide angle photography can fail miserably with landscapes. Particularly if there is something big like mountains in the distance. The relativity of a wide angle shot is not good with massive background objects. It tends to take the awesomeness out of such a shot. On the other hand, wide angle photography with a foreground is great. It emphasises the lateral extent of the shot. Think beaches and wide landscape vistas. The horizon makes a good marker for the depth of the shot with wide angles (as long as it is straight!). Remember, if you are going to emphasis the foreground and lateral extent of a view have a prominent foreground object to focus upon.

Actually this is an opportunity. Often photographers forget the human element in a landscape. Sometimes you can make your focus the well placed family or an interesting personality, whatever. The human interest is often stronger than people think in a landscape. Wide angle lenses give you a chance to do something others forget!

What now!

Get out there and do it! If you have a wide angle lens, or if you have a zoom that gets you down to those focal lengths, try experimenting with wide angle photography. We often hear people saying ‘get in close’, well here is an opportunity to go out wide.

Damon Guy - Netkonnexion

Damon Guy (Netkonnexion)

Damon is a writer-photographer and editor of this site. He has run some major websites, a computing department and a digital image library. He started out as a trained teacher and now runs training for digital photogs.
See also: Editors ‘Bio’.
By Damon Guy see his profile on Google+.