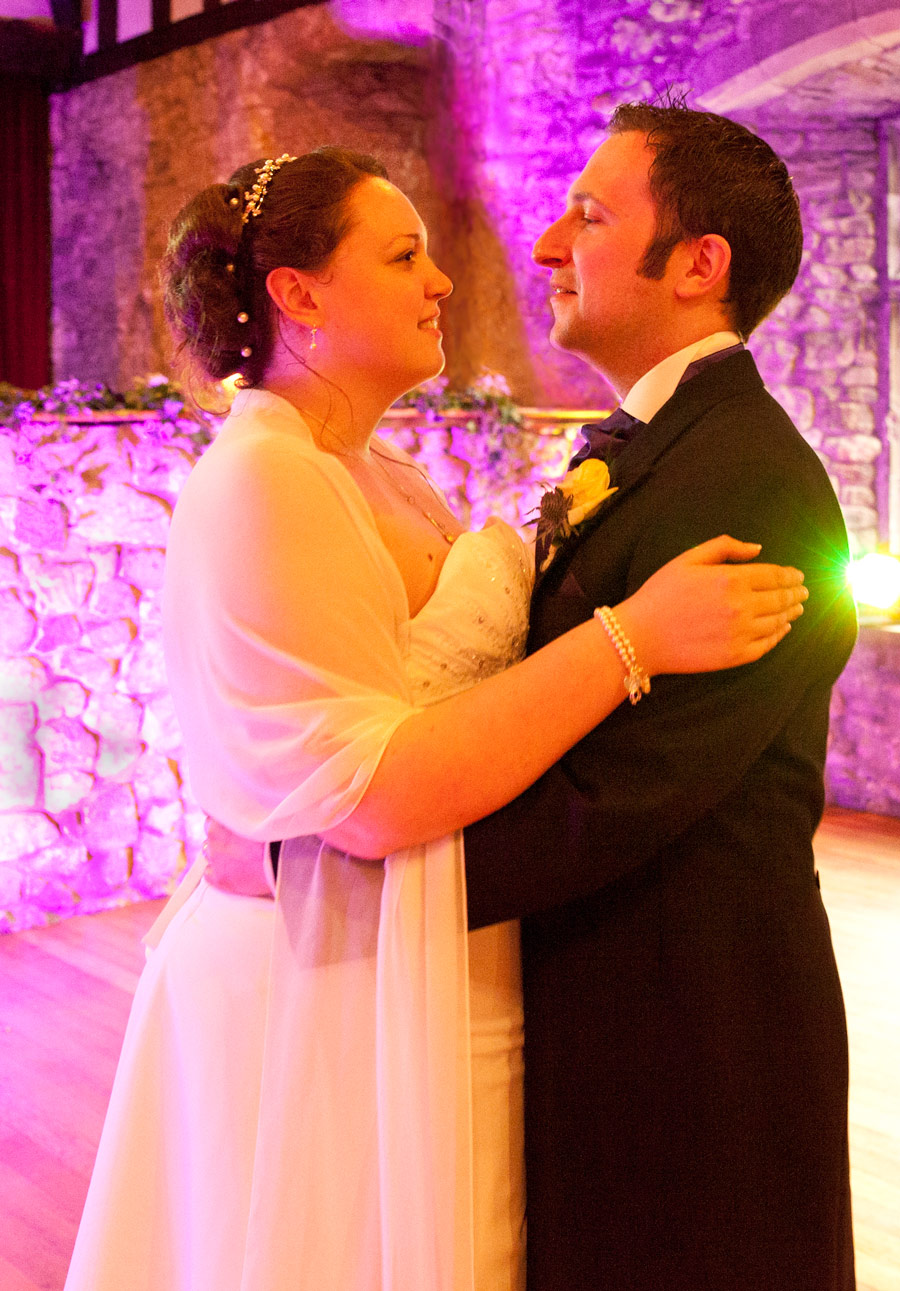
Tag Archives: Wedding

Settings for overcoming hand-shake blur

Balance your settings to avoid hand-shake blur in low light.

First dance
Low light photography needs a careful balance of settings to ensure a sharp shot and avoid hand-shake blur.

Hand-shake blur and sharp results.

Hand held shots often return blurred results. While using auto-settings the problem does not seem to arise. What is going on and how do you overcome hand-shake blur?

Manual settings and auto

Your digital camera is a sophisticated computer. It has access to a range of powerful programs that make decisions about each shot. When you use auto settings you are handing the camera over to the control of its programming. The auto setting is selected with the green square on the program dial. It makes all the decisions and you just point and shoot. This ‘auto’ strategy is limited. It leaves you unable to make creative decisions about your shot. Depth of field, movement blur and the light or dark emphasis in a scene is beyond your control.

With any of the manual settings on the program dial things are different. Shutter speed (S or Tv), Aperture (A or Av) and ISO settings allow you to get control of the exposure. Once you control these settings you are able to make creative decisions about your shot. But if you get it wrong you might allow hand-shake blur to creep in. Equally, with the right strategy, you can also set up to prevent the effects of hand-shake blur.

What causes hand-shake blur

Low light, long shutter opening or low ISO can all contribute. Hand shake-blur is caused by hand movement while the shutter is open. To prevent it you shorten the time the shutter is open. With a shorter shutter opening any hand movement is not given time to impact on the shot. Very fast shutter opening, say 1000th of a second, freezes the shot. The hand has almost no time to move in that short period. So, no hand-shake blur.

However, short shutter opening time means less light reaches the sensor. A good exposure requires sufficient light. A shutter speed of 1000th of a second would leave the picture under exposed in low light conditions. On the other hand, if you select a 15th of a second, the shutter is open for a long time. Hey presto! Enough light. But, (boo!) hand-shake blur. The shutter is open too long. Your hands have plenty of time to move.

Over coming hand-shake blur is about balance

If you raise the ISO setting, the sensor becomes more sensitive to light. So, raise the ISO until you can set the shutter to around 200th of a second. At that speed it is easier to hold the camera steady.

Of course, if you have to raise the ISO a lot to allow 200ths sec. you will get a grainy picture. Raising the ISO reduces the quality of the shot. Ideally an ISO setting of 100 will give you the best quality photographic result. On an average day you may have to set your ISO at around 200 or 400 to get a 200ths of a second shutter speed. Up to about ISO 800 the quality from most good DSLRs will be fine. After that, the quality of the image will be affected more and more by grain or “Digital Noise”.

Pictures taken in a dark church, or at an evening dance will have very low light. So, as an example, an ISO of 1600 would possibly give you enough sensitivity to work with a shutter speed of, say, 160th of a second. That would allow you to get a hand-held shot without hand-shake blur, if you have a steady hand. But you might also get a little digital noise in the final image.

Getting the right settings between the ISO and shutter speed is a fine balance. You need to raise the ISO the right amount to give you the shutter speed you need. Too much ISO and you get bad quality in the picture. Too little ISO and you will be forced to use a shutter speed that’s too low. Hand holding under these low light conditions may cause hand-shake blur.

Hand-shake blur and aperture

With ‘auto’ shots the camera program takes account of the light conditions. The program sets the ISO, aperture and shutter speed to values that allow shorter shutter opening. So far we have only discussed shutter speed and ISO. But aperture has a part to play too.

If you open the aperture wider it lets in more light. So, you don’t need to raise your ISO so high if you also open your aperture. In our church example above, an ISO of 800 (not 1600), shutter speed of 200th sec. and an aperture of f4 (wide) could create a good exposure.

If your aperture is set at say f11 (small) less light will get through. So, again you are going to need to have higher ISO or long shutter opening (or both), depending on your light conditions. A small aperture, like f11, will give you a sharp picture to infinity. But, you may have to sacrifice picture quality (high ISO) or suffer hand-shake blur (from longer shutter opening).

The wide aperture does have a penalty too. As the aperture gets wider the depth of field gets shallower. So once again we are back to a balance. To hand-hold a camera we must make decisions about all three basic settings – Shutter speed, aperture and ISO.

Other strategies for avoiding hand-shake blur

Camera movement or hand-shake blur can be avoided in a lot of different ways. Sometimes you must work in situations where hand-shake blur is inevitable without more radical solutions. Then there are other things you can do to reduce hand-shake blur. Here are some of them…

  • Lens anti-vibration: Many quality lenses have anti-vibration systems. These sophisticated systems detect hand-shake blur as it happens and counteract it. This might extend your safe shutter speed down to quite slow shutter speeds (say a 60th of a second). While this many not solve all your problems it can help in less extreme light conditions.
  • Tripod: A steady platform will prevent camera movement. If you need a long shutter opening then work from a tripod to eliminate hand-shake blur.
  • Flash: If you are working in a low light situation you may need to raise light levels. A flash unit, on or off the camera, is one answer. An intense flash of light can raise the light high enough for you to work with settings that prevent hand-shake blur.
  • Studio lights: More controllable, but more expensive, these lights can accurately raise light levels to enable you to reliably avoid hand-shake blur and get a good exposure.
  • Reflectors: You can use these to bring more light to where you are working by, say, reflecting from another artificial light or natural light source. Reflectors are particularly useful in reducing the darker areas of a shot. You can reflect the light to just raise light levels in some areas bringing the over all light level up. As the light level across the shot is raised the hand-shake blur can be reduced since shutter speed can be faster.
  • Improve your stance: A better stance is a great way to improve your steadiness.
  • Go to the gym: “What? This is about photography not fitness”, I hear you say. Well, here is a revelation. If your arms are stronger you can hold the camera steadier. A DSLR is a heavy object. Especially after a long session your arms will not hold the camera steady. If your camera is too heavy for you – well, strengthen up. Actually, more strength gives you much better motor control of your hands in any case. You will be able to hold even a point and shoot camera or phone with a steadier hand after regular exercise. Photography, like all other pursuits benefits from a fit body. Improved fitness will reduce hand-shake blur.
The answer to avoiding hand-shake blur

The auto program in your camera may give good results and reduce hand-shake blur. However, it will only do so in average conditions. In more extreme conditions, or where you want to exert some creative control over your shot you need to go manual.

The use of manual settings gives you control. You can control depth of field, subject movement-blur and light vs. dark emphasis in your shots. But, to get the best out of your camera you will need to set it up to avoid hand-shake blur. In this article I have tried to help you understand that the settings you pick can help you control hand-shake blur. Overall, the answer lies in creating a balance between the basic settings of aperture, shutter speed and ISO so that your hand held shutter speed is around 200ths of a second or higher. Lower than 200ths of a second and hand-shake blur is liable to creep into your shots.

Of course there are other things you can do to help raise your shutter speed. I have mentioned some of them. But they all have the same effect. They either stabilise the camera (tripod) or allow you to get the shutter speed high enough so you can steady the camera. So, now you know. Get out there and try to get your settings so you have around a 200th of a second when you take the shot.

Comments, additions, amendments or ideas on this article? Contact Us
or why not leave a comment at the bottom of the page…

Like this article? Don’t miss the next — sign up for tips by email.

Damon Guy - Netkonnexion

Damon Guy (Netkonnexion)

Damon is a writer-photographer and editor of this site. He has run some major websites, a computing department and a digital image library. He started out as a trained teacher and now runs training for digital photogs.
See also: Editors ‘Bio’.
By Damon Guy see his profile on Google+.

Ten reasons not to take pictures for free

You and your camera go beyond your hobby

• You and your camera •
Don’t let your hobby take over your life or put you under undue pressure.

Don’t feel guilty saying no to “photography-for-free”.

Keen photogs will probably be asked to take photos for friends. OK. Don’t be shy. The odd shot is fun. It’s about being friendly. What about when that ‘ask’ is really a ‘job’? Here are the ten reasons you need to think carefully before committing to a job without pay…

1. What is a job?

There’s no clear definition. The line between amateur and professional is blurred. Making good or great images is not the only factor involved. Being a professional photographer involves a whole lot more. A keen amateur can produce great images. But can they do it under the same pressure that professionals work under? This is the key to the issue. When you agree to do a “pictures-for-free-gig” you are doing what a professional will do – and not getting paid for it. Can you perform to professional requirements and provide the goods despite the pressure and no pay?

2. When it does not come out right who is at fault?

You! The person who agreed to do this is you. And, the responsibility is yours to deliver. Can you – deliver? You had better be clear about that; and happy to provide a comeback when it fails. Professionals carry professional indemnity to cover serious disasters and legal proceedings. Do you have cover? Have you thought about the consequences for something priceless – your friendship? A possible law suite and loss of friendship can both be devastating.

3. Unforeseen problems

Your friends have asked you to do a job. Do you know what problems are likely to crop up? They probably do not… and they rely on your expertise. You might be happy to produce the shots but do you really know what else is needed? Jumping in blind can be a minefield. What are the expected shots for this type of shoot? Do you even know to ask that question? Do you know what you will need to do to get that information? If you have not worked out what is needed to cover eventualities when problems arise you are in a difficult situation. If you do not see the problems it will be your fault. Are you sure you have covered everything? Think again. And again. For you it’s about photos. For your friends it is about their memories. You really need to be sure you know it all and what will happen.

4. Your time will not be respected…

Your “friends” will expect you to be on call. You may be happy with that. But you have your life to live too, right? Nevertheless, you are doing the job and you will need to be the one who covers the time. Some events have a lot of meeting time and provision for professional input. Do you have that time? Rehearsals, shoot lists, requirements and principle characters are all important and as the photographer you may have to meet them all. You may be required to meet people both during working hours and at evenings and weekends. You may be involved in planning for months ahead of the event. You will need to be ready to fall in line. If you are not being called to these meetings then you are potentially building up a legacy of problems for the day. When you don’t know the details of the event minute by minute but are required to get all the shots, who is at fault? Your time is important to the event. Or at least that is the way it will be seen by the event organisers. Can you really provide that resource? For free?

5. Professional standards

Sure, you will be told, “We don’t expect professional standards”. Your friends have seen your images. They know you are good. Will they feel so forgiving when you do not produce one hundred top quality images with all the expected and formal variations for their wedding, party, engagement, event etc.? One or two good ones from a shoot is great. For your personal interest it may be what you want. When you are working for someone else their expectations are more exacting. Professional standards are expected for all the shots, not just a few. Be ready to provide for that.

6. Things do go wrong!

You are the ONE! The person for the job. Do you have the eventualities covered? Here are some of the sort of things photographers might encounter…

  • You drop and break your camera on the day;
  • Your memory card is defective;
  • You get sick;
  • On the day you discover you are not allowed to use flash in church;
  • You break a lens;
  • Your daughter breaks an arm the day before the event;
  • You’re asked on the spot for shots you’ve not agreed or were not prepared to do;
  • A passing pedestrian steals your camera bag  External link - opens new tab/page;
  • A drunk guest wants to take “up front pictures” while you are doing the formal shots;
  • Extreme sunlight outside the church will blow out the white on the brides dress;

A professional photographer will have contingencies, strategies and cover for things like these. Things always go wrong in some respect. You need to cover for all these and be prepared for more. And, you need to do it for free.

7. People don’t value things that come free

It is almost a cliché – “the best things in life are the most expensive”. It may not be true. But it is a public perception. If you are doing this “job” for free there can be consequences. Your advice will be devalued because you are free. You will be on the same advice level as Aunt Mavis, the brides father and others. Worse, the chap down the road who is a retired photographer and family friend (who has never used a digital camera) will also be advising out of your earshot. Working in those conditions adds a pressure that is a new dimension beyond friendship (and professionalism). Be aware that doing the job – even if you get it right – may still damage your friendship.

8. Post production

A professional photographer provides an after-shoot service. Within a week the processed images are provided as contact-sheet choices for final prints. There may be a need for a book; a cd; other types of mounted images. Be prepared for about four or five days processing work. Then you will need to provide for the future requirements. You will need to be ready to send out images, keep copies available for updates and reprints for several months. You will also need to retain the images on file indefinitely (securely). You will need to make solid editorial decisions about which images you allow to be seen and which you do not. You may have a thousand images… common for amateur digital photographers. Post production is a big part of a professional shoot. Can you resource it? Can you make the grade in post production? Can you resist when your friends says she wants all the images, not just the ones you chose? Feel good about that?

9. One for free… many more to go

Once people know you do professional work – without the cost – you will be in the front line. All sorts of pressures and unreasonable requests will be made. You will be taken for granted. And, it will be up to you to resource it. Travel, printing, expenses, processing, insurance, time, new equipment – there is more to shooting regularly than simply turning up with your camera. You have to provide resources too. Remember, you will not have the benefit of income for it either. How do you say no to other friends and family when you have done a professional job once already?

10. Photography is fun – right?

Doing the free stuff is fun when you are doing it for you. There is a completely different spin on it when you are doing something under pressure for someone else and not getting anything but hassle in return. Professionals enjoy their job. They are prepared and resourced for the problems and pressures. You need to have the same resources and cope with those pressures too – free. Where is the fun in that? Taking a photography “job” for free takes the fun out of your work. And, it is no fun being taken for granted.

The overview

Despite the opinion of many people, photography is a job. There are professional standards, costs, requirements and pressures. You may want to take up professional photography. That’s fine. However, be prepared. I have pointed out the professional dimensions.

The key point is simple. There are additional pressures on you and your friendships when you let yourself be taken for granted by doing free work. Sometimes they go beyond professional pressure.

Feel free to do family shots, fun activities and enjoyable photography. Even a little charity work and some contributions to local groups are fine – on your terms. Be prepared for something that looks like a “job”. A polite withdrawal will be looked on with respect and friendship once you explain the pressures involved. Failing to make the grade will not be looked on with simple forgiveness.

Comments, additions, amendments or ideas on this article? Contact Us
or why not leave a comment at the bottom of the page…

Like this article? Don’t miss the next — sign up for tips by email.

By Damon Guy (author and Photokonnexion editor)

Damon Guy - Netkonnexion

Damon Guy (Netkonnexion)

Damon is a writer-photog and editor of this site. He has run some major websites, a computing department and a digital image library. He started out as a trained teacher and now runs training for digital photographers.
See also: Editors ‘Bio’.

Can you write? Of course you can!
Write for Photokonnexion...

We would love to have your articles or tips posted on our site.
Find out more…
Write for Photokonnexion.

Cliché in photography – are you guilty and what to do about it

• Hat Selective •

• Hat Selective •
Click image to view large
Hat Selective By Netkonnexion on Flickr External link - opens new tab/page
It is one of the things we have a go at… selective colour. But, is it really effective?

Clichés are fun but can blow your credibility.

Everyone wants to try some well tried ideas in photography. They help you learn the basics with great examples. Beware, some things have been done so often they are clichéd. It is not wrong to do them. It might be right to keep them to yourself in some situations. Here is some advice about cliché in photography.

Advice

Caring, sharing websites around the web help you get honest, fun and supportive comments made. They are great places where learners can safely post clichés and enjoy doing it. In fact it is a good thing to do. You learn by doing the photos that other people have done, and by example. You get the obvious shots out of your system then move on to more creative photography.

Developing photographers cultivate observational skill helping them get past the cliché. I think the lifetime challenge for a photographer is to see what everyone else failed to see and were amazed they missed. Work to get past the cliché and publish the inspirational.

Photographs create the beautiful and – over generations of picture-taking – use it up. Certain glories of nature… have been all but abandoned to the indefatigable attentions of amateur camera buffs. The image-surfeited are likely to find sunsets corny; they now look, alas, too much like photographs.
Susan Sontag, “On Photography”, London, 1979

In a competition once I heard a judge say… “Ah, N – A – B – S – S!”. He didn’t say what he meant until he encountered the third sunset that evening. Several audience hands shot up to ask. He recounted the story of a judges seminar. They had seen so many sunsets the acronym stuck for “Not Another Bl..dy Sun Set! Taking a sunsets for the sake of it is not an achievement. It is a disappointment – unless something inspirational is included. Sunsets should set the scene, not be the scene.

If you publish a cliché on some websites, or in a personal gallery, you had better watch out for your credibility ratings. What else should we cut out from our online portfolio?

What are these clichés?

Bathroom mirror selfies: Doing “selfies” is fun. They’re examples of things we need to purge from our system. Lets face it most bathroom selfies are boring – of interest mostly to the person making them. Consider doing a mirror selfie in a truly palatial rest room (try the Palace of Versailles, Paris  External link - opens new tab/page).
Selective colour: I happen to enjoy some of these. But really, most of them are out of context. It is fine with a clear artistic point. Quite often there is not.
Black and white (B&W): Making a picture B&W does not make it artsy. A naff picture remains naff when converted to B&W. There are some well documented, excellent reasons to use B&W. It can ruin a shot, or doesn’t add anything. Use the technique. I love a contrasty B&W capture. However, make sure it works before publishing. The long history of B&W photos in street photography make a modern B&W look clichéd if done only for effect. It is NOT a “street photography” shot just because it lacks colour. There should be something else there that justifies that approach.
Flower: Your prize bloom is of extreme interest to you and your family. Most other people have seen stunning photos of blooms in magnificent gardens or with exquisite photography. These are the ones that capture the eye. If you have a truly inspired view of your blooms and a top technique, then publish.
“Perspective shots” in tourist spots: We have all seen them – pinch the Eiffel Tower between two fingers, Kiss the Sphinx, catch the sun between your hands; hold up the Leaning Tower of Pisa  External link - opens new tab/page. These are fun. We should all have one in the home album. Online they are definitely a cliché.
Fake lens flare: Flare is great when used to good artistic effect. Faux flare is just a disaster and easily spotted. Do it right with a proper shot or not at all.
Vintage iPhone apps: They’re not great because everyone else does them. Several years ago they were fun and different. Now, I think “Phone apps” look tired and frankly embarrassing. Over done or what!
Naff borders: Powerful borders filled with character, exotic flushes or effects make strong statements. If your picture needs that then it’s probably lacking in some way. Don’t publish it.
Over-saturated HDR: HDR has been vastly overdone. We are beginning to see HDR photographs that are not super-saturated, heavily rimmed and tonally wrecked. That’s good. HDR is a post-processing technique that is beginning to mature. If you use HDR, try it as it should be used, to enhance contrast depth. If you really notice HDR – it has been over cooked!
Your car on holiday: After 1000 pictures of the Grand Canyon the vista is not improved by the presence of your car in the last shot. Great shot for the hard drive. Not one to publish.
Fake gang signs, peace signs, bunny ears and naughty middle fingers: These have been over done. If you find them funny keep them to yourself. Remember, employers often use social network sites to check on prospective employees. Do you want a potential boss checking out your gangster signs and middle fingers shots!
Duck face: The average snapper gets quite a few of these. The silly poser with the pouting smackeroonie kiss lips! Just not good photography.
Making heart-shaped hands at sunset, weddings, engagements: These are usually just embarrassing. If you feel an occasion is romantic there are a multitude of soft focus, colour casts and posing angles that do the job so much better. There are a few other wedding clichés too…

  • Brides garter around the grooms head.
  • Posing to cut your partners throat with the cake knife.
  • Selective colour on confetti, wedding cakes, brides shoes etc.
  • “Bloke shots” – doing silly things in lines, with beer and mock genitals etc.

A few years ago there were thousands of shots of rings standing upright in open books. The ring casts a shadow heart-shape. They are good in the right place – the wedding ring ceremony. Certainly learn about the light/shadow relationship and have a go at a classic. Otherwise it’s an idea with a limited time and place. For examples: Google Image Search = Heart Ring Book  External link - opens new tab/page.

It is not just the amateur

Professional photographers are guilty of creating cliché in their work too. Take two minutes to enjoy this video poking fun at “Stock” photographers.

The Clichéd Stock Photo Song


GerritAndKit

Inspirational is good.

Are there any more of these cliché shots? Yes, hundreds… some websites are filled with nothing but these types of shots. So how do you avoid the mistake?

The cliché is something we can all spot – we’ve seen it so often it’s tiresome. Quietly have a go at the techniques – learn – move on. Don’t infest your online gallery with it. Cliché tends to come and go. In 20 or 30 years the retro effect will re-birth today’s cliches! That’s the time to release ones safely stored on the hard drive.

Your time as a photographer is best spent looking for inspirational images and developing a unique communication with your viewers. You will learn more by ignoring the cliché and working on your unique vision of the world.

Comments, additions, amendments or ideas on this article? Contact Us
or why not leave a comment at the bottom of the page…

Like this article? Don’t miss the next — sign up for tips by email.

Can you write? Of course you can!
Write for Photokonnexion...

We would love to have your articles or tips posted on our site.
Find out more…
Write for Photokonnexion.

By Damon Guy (author and Photokonnexion editor)

Damon Guy - Netkonnexion

Damon Guy (Netkonnexion)

Damon is a writer-photog and editor of this site. He has run some major websites, a computing department and a digital image library. He started out as a trained teacher and now runs training for digital photographers.
See also: Editors ‘Bio’.