Tag Archives: Visualisation

Review your own photographs

Low flying aircraft

• Low flying aircraft •
Click image to view large
• Low flying aircraft • By Netkonnexion on Flickr External link - opens new tab/page
Every picture has its merits. However is there enough in the picture to interest and invigorate the attention of your viewers? Sometimes, like this picture, if you don’t have a point worth making then you should not really bother with it.

A picture is a wonderful communication.

But like speech if there’s no point there is no impact. To help you see if you have made a great picture here are some guiding points.

We are going to consider…
• What you are communicating:
• Presentation:
• Camera technique:
• Technical Quality:
• Visual Awareness, Visualisation, Seeing and aesthetics:

Looking critically at your own picture

When you make a picture your previsualisation of what you want to achieve is critical to the outcome. If you don’t know what you are trying to make how can you make it convincing? So try to have a mental image of what your picture it going to look like when you make it. If you can see the image before you make it you should have a good point in mind – a reason for making it. All too often snappers see something and just ‘snap’. That being the case, few of the images will have real meaning or impact.

When looking at your own picture you must see if there is really something there. Are you really saying anything? Are you really communicating with the viewer of your picture? Or, is what you have just made only a simple picture? To have real impact is to create in the viewers mind an image. An image that means something to them. So look at your picture and honestly ask yourself what is the viewer going to get from it? What will it mean to them? If you find that you have really said something in the picture then the first criteria for success has been passed.

To this end you should consider how successfully each of these things has contributed to the success of the image…

  • Personal input: have you understood and connected with the subject
  • Appropriate communication the message, mood, ideas, and information you want to pass to your viewer
  • Complementary use of the photographic media (mounting, projection, printing, texture of print etc.)
  • Appropriate imagination and creativity / suitable timing for the shot
What about the other things?

• Presentation: It is important to have a good presentation for your picture. Have you edited out distractions and sensor/lens spots, removed the errant sweet rapper littering the foreground etc. In other words, have you done the little tidying up tasks that make the image stand up as clean representation of your original vision for it? If it is a print, is it well mounted in a non-distracting way. Is the printing immaculate or are there streaks and spots; over-run and smear.

• Camera technique: Is the sharpness the way you want it – deliberate softness is fine as long as that is making an artistic point in a way you intended. Is the depth of field right for the composition? Have you emphasised the point or simply missed the point. Is the digital noise too high, or the contrast too low. What you are looking for here is to see if your prowess with the camera has come through. Did your technique work or were there any errors or mistakes that detract from the delivery of your point? Some of the other things to consider are…

  • Viewpoint to the subject – exciting, interesting, different, right?
  • Choice of lighting – does it complement or complete the subject or is it at odds with your point?
  • Accurate focusing – accurate choice of focus for the subject.
  • Appropriate quality and choice of exposure.
  • Suitable use of depth of field (aperture).
  • Appropriate shutter speed for the subject (and shot timing).
  • Highlights and shadows (ensuring detail is retained)
  • Appropriate quality and choice of exposure – does the balance of light and dark complement or detract from the subject?
  • Is the quality of the light effective or bland; does is make a statement or is it of little consequence?

• Technical Quality:
In this category you should consider exposure, colour and tonal control…

  • Absence of processing faults (dust, spots, hairs, processing artefacts, image damage by sharpening etc.)
  • Appropriate adjustments of colour temperature; hue, saturation, colour balance etc.
  • Appropriate tonal use and control of the range of tones.
  • Good image finishing: removal of distractions, removal of abrupt or discordant features.
  • Appropriate use of levels, curves, colour management, filters, overlays etc (post processing)

In this category you are looking to make sure that the image is digitally developed properly. Is the exposure even or has it been obviously enhanced and changed. Is the light effective to make the point or has the exposure not been fine tuned. It is easy to take a picture, but all these thing go into making an image. Think about what you are trying to achieve and does this picture achieve it with its colour and technical delivery/

• Visual Awareness, Visualisation, Seeing and aesthetics:
Do you think that your shot, the one you have in front of you sees anything different? Are you reporting what you saw or expressing a point, message, communication, feeling… does this picture have IMPACT?

  • Is the composition, design and cropping of the image an effective aesthetic construction?
  • Appropriate simplification (minimising complexity and clutter)
  • Distractions / intrusions should not divert the viewers eye
  • Good use of light, mood, texture and colour
  • Good use of masking/manipulation where appropriate
What you are doing…

Each time you want others to look at your picture you want to impress them, to lift them, to… well, get out your message or point for the picture. The type of questions I have asked above are aimed at getting you looking at your images with a critical eye. If you are honest, you will find that none of your pictures will be satisfactory in all of the above. But if you find you are gradually improving your standard of delivery you will see that the above get closer to ideal with every new picture. Critically reviewing each picture before you publish print or show it to other people helps make sure you are producing something worth showing.

You won’t be right every time. But you will see as you develop, your comments will begin matching those of other people. You will than have a benchmark that tells you if your work is measuring up to peoples view of it. Or, more importantly to see if your picture is measuring up to your original vision of how you wanted the shot.

Comments, additions, amendments or ideas on this article? Contact Us
or why not leave a comment at the bottom of the page…

Like this article? Don’t miss the next — sign up for tips by email.

By Damon Guy (author and Photokonnexion editor)

Damon Guy - Netkonnexion

Damon Guy (Netkonnexion)

Damon is a writer-photog and editor of this site. He has run some major websites, a computing department and a digital image library. He started out as a trained teacher and now runs training for digital photographers.
See also: Editors ‘Bio’.

Seeing what you want to create

• Mushrooms •

• Mushrooms •
Photographers learn many techniques to achieve a particular outcome or ‘look’ in their images. They go beyond reality to create a specific previsualised final image.
Click image to view large
• Mushrooms • By Netkonnexion on Flickr External link - opens new tab/page

Visualise the image you want to make.

Producing a picture can be as simple as point and shoot or as complex as a long planned production. To produce great images you often have to go beyond an elementary snap-capture. The best images are made from a careful thought process. The photographer has a goal in mind, a visualisation of what they want the final image to be.

What is visualisation?

People who use visualisation techniques seek to perform challenging tasks to achieve the visualised goal. The existence of a previsualised goal gives them a clear sense of being able to achieve the goal while trying to achieve it. Users of the technique report they gain an internal boost from having the outcome already in mind.

In sports users of the technique are taught to visualise an explosive use of energy through which they then see themselves complete a record breaking event or win a race. In business the user visualises a goal for their business and continues to enrich the detail and nature of the successful outcome in their mind while working toward attaining it in the real world.

In cinematography whole scenes are previsualised and committed to storyboard form. This creates for the director a clear, detailed mock-up of the scene(s). The storyboards augment and crystalise their mental visualisation of the scene. The latter provides a shared vision for the production team with which to pursue the quality cinematic outcome.

In still photography there has been a long tradition of visualisation. Ansel Adams and several of his contemporaries used the technique. Adams himself defined the use of visualisation as…

…the ability to anticipate a finished image before making an exposure.
Ansel Adams, The Camera, 1980

“.
Adams continued to write about visualisation in photography throughout his life and clearly attributed much of his own success as a photographer to being able to see the finished print in mind before he took the picture.

Adams came to understand the nature of the visualisation through the creation of one of his most important pictures. While working in Yosemite making a picture of the “Half Dome  External link - opens new tab/page” he was using yellow filters to darken the sky. This was a common practice at the time used to simulate in black and white the depth of colour in a sky. However, Adams imagined that the yellow filter would provide an insufficient depth of sky tone to show the drama of the scene before him. Instead he imagined the final print would look better with a darker sky-tone. Applying a red filter instead, he created in the final print the dramatic outcome he had visualised before setting up the camera.

This proved an important moment. He became aware the camera did not simply record a scene. Instead it could be set up to achieve an outcome he had imagined before making the exposure. This visualisation became his guide to the production of the image rather than the absolute reality in the scene.

This realisation enabled Adams to see past the literal and technical capture of the plain camera and lens combination. Instead he was able to create something “expressive” that was a manifestation of the vivid image he had visualised in his imagination.

Today photographers learn many different techniques to achieve a particular outcome or ‘look’ in their images. We see deliberate under or over exposure scenarios created from daylight scenes, or dramatic blood-red sunsets over-saturated to emphasis the power of the retiring sun. The use of visualisation allows the photographer to see in their minds-eye what they want the final image to look like.

Visualisation does not ensure the success of an outcome but it does provide a powerful guide in the process of achieving success. As the photographers visualisations become more detailed and their artistic talents develop so does the visualisation.

Where visualisation is used the technique can only be successful if the appropriate technical steps are deployed. The successful rendering of the visualisation can only come out of a quality photographic process. However, there must also be an interdependence.

Visualisation can be achieved artistically without knowledge of the photographic process. And, the act of visualisation is improved with practice. At the same time, the scene conjured in the minds-eye must also be achievable by the available photographic skills. As skills develop their visualisation skills are more likely to respond to the growing range of techniques the photographer knows. In other words, as a photographers experience grows what is achievable through visualisation also develops. The strength and quality of the visualisation will also be better in areas where the photographer has practised and polished skills.

So, we can reliably infer that visualisation and skill set work together. Landscape photographers will tend to produce better sunset visualisations and images because that is their area of practice and expertise. At the same time fashion photographers will see an outcome for an image that shows off an article of clothing or a delicate facial bone structure because that is how they spend the majority of their time. Each has their specific photographic skill set and technical process. Each photographer also has their own artistic and observational skills that help build expressive visualisations for the type of images they want.

Practice and development

Visualisation is a dynamic and evolving skill. As you become familiar with new techniques your ability to achieve a particular visualisation develops. Visualisation is a skill that develops with awareness of the potential and an ability to imagine a great image before you produce it. The earlier you start to try deliberate visualisation and planning for its fulfilment the more likely you are to take control of your development as a photographer.

By Damon Guy (author and Photokonnexion editor)

Damon Guy - Netkonnexion

Damon Guy (Netkonnexion)

Damon is a writer-photog and editor of this site. He has run some major websites, a computing department and a digital image library. He started out as a trained teacher and now runs training for digital photographers.
See also: Editors ‘Bio’.

find out more...Photokonnexion tips by email
If you enjoyed this article please sign up for our
Tips by email service.
                                                 Find out more

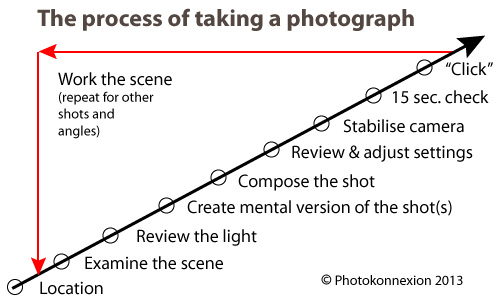
How to take photos – each important step in making a photograph

Infographic download - How to take photos

• Infographic showing the various steps in how to take photos •
A guide to what you should doing to make great images.
• Click to download printable full page version

Getting down to the detail…

Yesterdays article was How to take photos – each important step in making a photograph. Today I want to share the detail behind each step. Be warned! You might need to think again about your existing knowledge. Unlearning old ideas will help you to move forward and improve.

How to take photos – The location

Lots of people think you can just turn up and take pictures. Well you can, but often they are not good ones. Getting the best out of your location involves understanding what you’ll find there. Find out about the weather on the day. An idea of light levels and times of sunset and sunrise etc. is useful too. There have probably been lots of visits by others at popular destinations. Check “Google Images” for that site. Google will help with other details too.

When you arrive don’t just fire off loads of shots. Settle down and get into the location. Don’t make photography mistakes that mean you miss great shots. The first time you do this consider a variety of shots. Think about more than one shot, think about the whole shoot.

How to take photos – Examine the scene

Considering the scene is an important part of the work-flow on site. Unless you have been there before you need to get to know it. Use all your knowledge about camera angles, composition, lighting, camera settings and so on. Take the time to examine your location while thinking of these things. Consider your feelings about the scene too. How you feel will help your shot be an impassioned response to the location. What you feel about the scene is the best guide on how to take photos at that location.

How to take photos – Review the light

Most photographers forget this step. They are too wrapped up in the scene and the camera settings or the passion of it all. This step will make or break your shot. Look at the light. If you don’t know what I mean read these:

Ask yourself some simple questions about the light…

  • Is it hard or soft?
  • Is it coloured or more neutral?
  • Is it at the right angle to best capture the location/scene?
  • What is the best time for the right light?
  • Is it very bright and intense or dull and diffused?
  • Do I need any artificial illumination (flash, diffusers etc)?
  • Is the shadow hardly defined (sun up high) or strongly defined (sun to the side)?

Lean about the properties and vocabulary of light. It helps give you a greater understanding of photography. These questions, and others, help you make decisions about lighting for your scene. For more on “How to take photos – Light and Lighting” see the resource page in the SUBJECTS/ARTICLES menu at the top of every page.

How to take photos – Create a mental version of the the shot

If you want to make a great image – have a great picture in your head of your intended outcome. Visualisation has helped athletes, artists, thinkers, inventors and others to achieve amazing things. Train your mind to visualise in detail. If you see what you want to achieve it will guide you when setting up your camera. Take the time to create that mental picture – in detail. Consider how you are going to make the best of the light when you consider how to take photos. More about visualisation… 80 year old secret of world class photographers revealed.

How to take photos – Compose the shot

By now you have an intimate photographic knowledge of your scene. Composing the shot is about realising that potential. Long-time followers of this blog already know something about composition. For first-timers you can get lots of information from our Composition resources page in the SUBJECTS/ARTICLES menu at the top of every page. Composition is a skill that evolves as you develop as a photographer. Knowing more about composition helps your awareness and skill develop. Read about it to gain insight. Think about it every shot.

How to take photos – Review and adjust the camera settings

Now you have a picture in mind, composed, and are ready to set up your exposure. The exposure is defined by your camera settings. Camera makers will have you believe that the auto-setting on your camera is the perfect exposure. The fact is they made informed guesses to arrive at that exposure. It is different for every model of image sensor. Modern cameras do make a good representation of the scene. It is not always what you want however. You can change the exposure by under-exposing, over-exposing and by using different apertures, ISO levels and shutter times. That is your interpretation of the shot. When you think about how to take photos, plan how you want the image to come out.

Having a visualisation in your head helps you set the camera up to make that mental image. You do it using ISO, Aperture and Shutter speed. Even using one of the ‘mode’ settings is still a way of regulating your exposure. They all adjust those three basic facets of the exposure.

Here are some other links to pull together ideas about exposure:

How to take photos – Stabilise the camera

You want the photo to be sharp, crisp and clear. The faster the shutter speed the easier it is to get a sharp shot. But often, especially for a good quality shot, longer exposures are better. You need a good stance to hand-hold the camera. You will need a tripod (or other method) to steady it for longer exposures.

Stance is down to basic technique and comfort. The stance you use will be a personal thing for you. I have found many photogs have to relearn their stance after many years of a poor stance. It is best to learn a good one early. Here is my recommendation: Simple tips for a good stance

The use of tripods or other supports is a wide subject. It is also one that many learners tend to ignore- at least at first. When learning how to take photos sharpness is vital. Become acquainted with a tripod (preferably a good one) as early as you can. Your images will improve a huge amount. Here is some advice about tripods:

And, here is some basic advice about improving sharpness overall – The Zen of sharpness – 12 easy ways to improve

How to take photos – 15 second check

OK, that may seem like a long time. However, it is actually the time you need. You can get faster at it, but if you are taking a serious attitude to your shot then give it the time. You can find out all about the the 15 second check by reading these in order:

  1. An old sailors trick to improve your photography
  2. The fifteen second landscape appraisal
How to take photos – “Click”

This is where you press the shutter button. How you press that button can make a difference to your sharpness. Earlier, I mentioned this link, Simple tips for a good stance. It also gives advice on pushing the button without affecting sharpness.

An essential element of your shot is about confidence in what you have done. Today we are lucky. We just look at the back of our camera. Your first “click” may be a test shot. If your settings need adjustment then a simple technique called “Chimping” will help. Chimp and adjust. You will only need to do it a few times to get the shot right. You will not need to machine-gun the site with hundreds of “just in case” shots.

How to take photos – Work the scene

Chimping helps you set up for the shot and compose it. To get other possible shots you visualised earlier, you should work the scene. Repeat all the steps you have just done for each of the shots you foresaw. Working the scene is a skill and takes practice.

How to take photos – Time line

What is not obvious from the diagram is that the diagonal arrow is also a time-line of the shot. Of course it is a different length for every shot. You will have different problems to solve and ideas to consider for every shot. That’s fine. You have just learned a more careful, precise method for how to take photos. As you practice will quickly get faster at taking shots. But you will also make better images.

A promise

I can guarantee that if you follow the steps on this page you will…

  • Take less shots;
  • Get a better hit-rate (more usable shots per shoot);
  • Spend less time in post-processing;
  • Have better composition;
  • Improve your photography overall.

What is less obvious is that you will also save a lot of time.

By Damon Guy (author and Photokonnexion editor)

Damon Guy - Netkonnexion

Damon Guy (Netkonnexion)

Damon is a writer-photog and editor of this site. He has run some major websites, a computing department and a digital image library. He started out as a trained teacher and now runs training for digital photographers.
See also: Editors ‘Bio’.

Wait for the shot – an easy guide

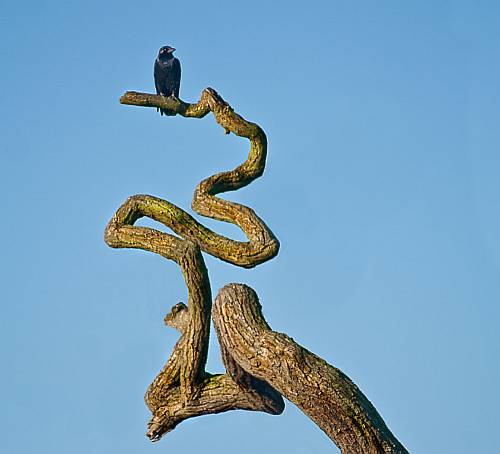
• Contorted •

• Contorted •
Wait for the right moment. What would there be in this picture without the bird?

Every great shot is a splendid moment in time

A significant difference between an accomplished photographer and a “snapper” is the insight to wait. Realising a potential shot at the right moment is the supreme judgement call. Microseconds or months – it makes no difference. Understanding the visualisation and committing to the time element are skills great photographers cultivate.

Seeing the moment

Once the idea comes to mind you have the basic material for the most important moment in the life of a great image – it’s visualisation. While visualising the shot you have to consider all the details including the timing. The image above would have been very uninteresting if not for the bird. I first saw this shot from a quarter mile away and no bird. After watching the bird alight and fly several times I worked closer and waited. The capture at that moment made the shot. Knowing the moment is a critical visualisation skill.

How to wait…

Watchful waiting: Sometimes your visualisation has shown you the shot you want to make. However, conditions have to be right. The right people, light, weather, things… it all has to come together and you need to watch for the right time. Could be a long time, but you can wait.

Lying in wait: You have seen the shot. You know it is going to come together. You are there, waiting for that one piece to fall into place. A person to walk into the right space; a car to drive onto the ferry; a skier to make the jump… it will happen! Wait for it, wait for it: click!

Passive waiting: You have in mind a shot. It is an agonising itch. You are not sure how, when or where it is going to happen. You just have to wait for things to start coming together. Maybe you need to find the right location; perhaps you have not seen the right fashion accessory; need access to the right car? This is a sort of one-shot project. At some time you will know the time is right and you can then work to put together the shot. I have three of these in mind right now… one day; one day.

find out more...Photokonnexion tips by email
Enjoying this article? Please sign up for our
daily email service.
                                                Find out more

Repeat waits: Often the situation is wrong. I have some landscape shots I want to make. I know they are right, but I have to get the right weather. It is a 250 mile drive, so I have to make an effort to get there and wait. So far one image has eluded me 6 times. I will try again… and again.

Active waiting: Every street photographer knows this one. You are observing, hunting, seeing, looking for the moment, the right move, just the right character. Then suddenly the light and the person and the move all happen… the decisive moment – click!

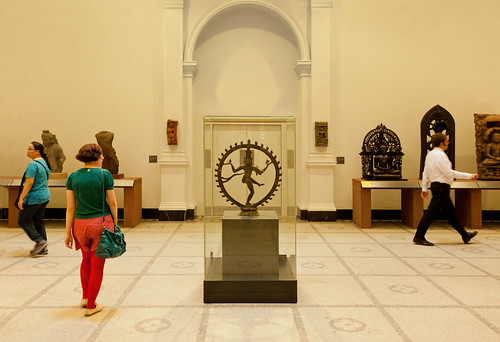
• Coming And Going •

• Coming And Going •
Click image to view large
• Coming And Going • By Netkonnexion on Flickr External link - opens new tab/page

Constructive waiting: You have your idea. You have visualised every detail. Now you need to put it together. You need to buy a particular candle; to find a specific book; to contrive just the right mood and lighting. Then, after a few days, it all comes together and the production can start. People, props, positioning – perfect… click. Aaaah!

Wait! There’s more…

There are bound to be other types of “wait”. You may call them something different to me. Whatever, I think you can see, waiting is not only a critical aspect of your visualisation… it is also a fundamental part of the life of your shot.

Can you write? Of course you can!
Write for Photokonnexion...

We would love to have your articles or tips posted on our site.
Find out more…
Write for Photokonnexion.

By Damon Guy (author and Photokonnexion editor)

Damon Guy - Netkonnexion

Damon Guy (Netkonnexion)

Damon is a writer-photog and editor of this site. He has run some major websites, a computing department and a digital image library. He started out as a trained teacher and now runs training for digital photographers.
See also: Editors ‘Bio’.