
• Orange •
Have a go at producing a floating orange in “exploded view”
Click image to view large
Orange By Netkonnexion on Flickr ![]()
Fruit is fun!
This tutorial will show you how to photograph fruit in all its glory – in a unique way. There are ways you can make the project your own with plenty of room for creative ideas. It is an easy project giving you some useful tips for still life lighting and working with a high key background. Have fun!
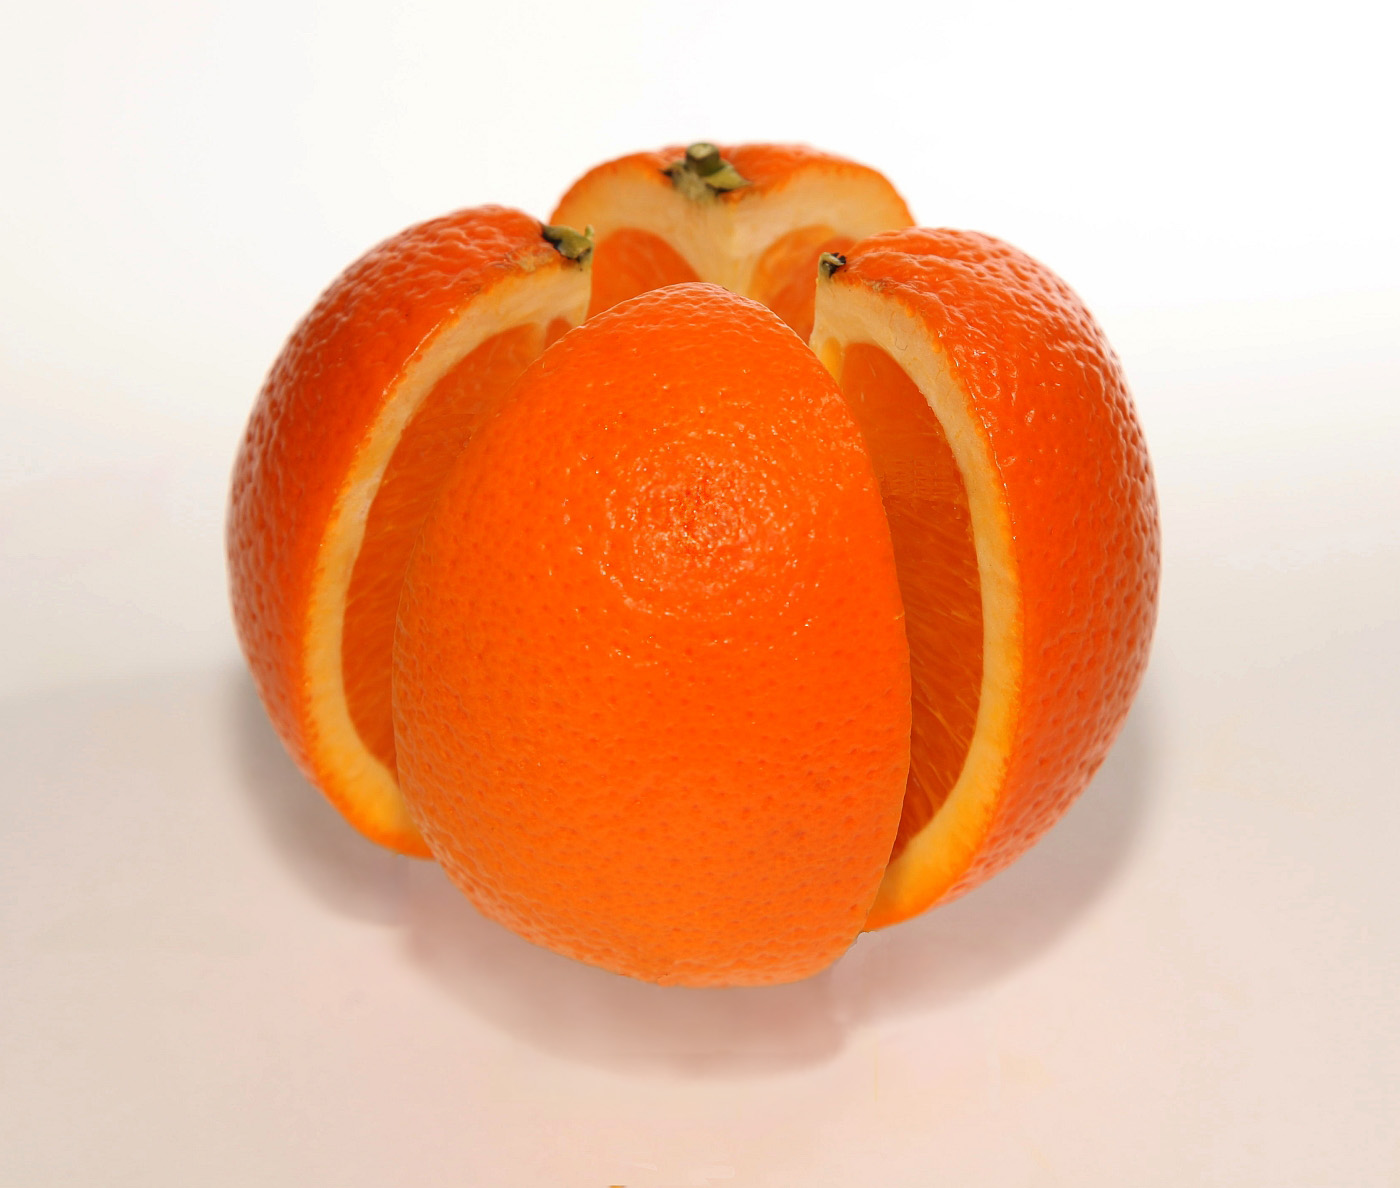
The picture of the orange
The picture above shows an orange, a wonderful fruit, in all its glory. We can see both inside parts and out. In this tutorial I will show you how to create this yourself and show some other similar examples to give you some ideas of your own. This tutorial will cover the following simple steps:
- Pick a good firm, clean orange.
- Cut it into quarters.
- Assemble the orange in an “exploded view” using toothpicks.
- Create lighting to show off your orange without highlights.
- Finally you will clone out the toothpicks on the computer.
Choose your fruit
Be careful, make sure that your orange is nicely shaped, no odd depressions or bruises, and as firm as possible, not over-ripe. Check the skin for consistent colour too. You want your orange to look delicious. No one will be interested in your shot if it is damaged, dripping and discoloured. Also, wash and gently wipe the skin before starting the tutorial. The skin should look bright and clean. Dirt, hairs and marks will really draw the eye of the viewer. Don’t let them be distracted.
Constructing the orange
Cut it in four pieces top to bottom (two cuts). It helps not to have too many cuts. Cut carefully and accurately. If you hack the orange you will be adding distractions to draw the eye. Be careful and slow to ensure accuracy.
Once cut we are going to assemble the orange in an “exploded view”. That is the term used to describe an “almost” assembled item that is floating in space so you can see how it would assemble. To hold the pieces apart I arranged the quarters using tooth picks. In the picture below you can see how the orange is braced with the toothpicks. The picture also shows how the back lighting is set up.
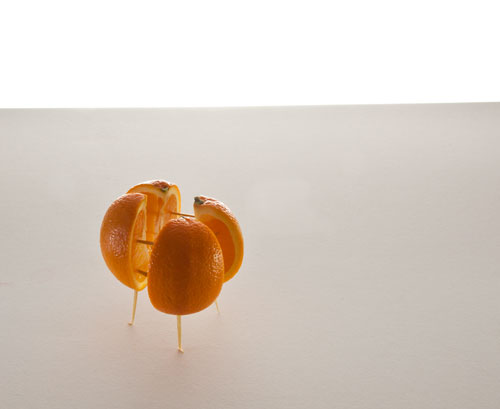
• The toothpick set-up and initial back lighting •
• The toothpick set-up and initial backlighting • By Netkonnexion on Flickr ![]()
You can see from the picture the orange is held firmly together by the toothpicks. It is also supported by four toothpicks as legs. We want the orange to be slightly off the ground so it has the feel of an independent object in space.
The white card under the orange extends to the edge of a table. On a chair a little way back from the table is another upright card. You can see the white back-card is very bright. I used a strong light under the table to illuminate that card giving it a high-key brightness. There are some links at the end to explain more about high-key effects.
We want to take the final shot with a little shadow under the orange. This give the impression the orange is floating in space. I will light the orange from the front with a flash. You can use the flash on your camera. However, that will create a very sharp shadow since flash is a very hard light. This means very harsh, sharp-edged shadows that will be quite dark.
In the next picture you can see how I created some under-lighting below the orange to soften the shadows created by the flash. I have two cheap Rolson 61770 72 LED Camping Lights. These are really flexible for table-top still-life and can be easily set up for fill light. They are great lights and affordable.
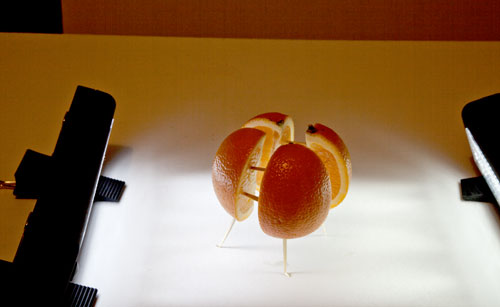
• The underlighting setup to soften the shadows and create fill light •
• The underlighting setup to soften the shadows and create fill light • By Netkonnexion on Flickr ![]()
The lights under the orange and the back-lit card provide light on all sides except the front. If you have an off-camera flash you can use that, off-set to one side, for the front lighting. It is important to off-set so that you prevent ugly highlights on the front of the orange. Better still you could bounce the light off the ceiling if it is white. That way the orange will be evenly lit from above. To find out more about off-camera flash and some great opportunities for affordable models see:
If you only have a pop-up or on-camera flash then you should find a way of diffusing the light from it. Alternatively you could create a diffused reflection. You should be trying to find ways to prevent the flash pointing directly on the orange. Bright highlights would be created that are distracting and ugly.
Once the lighting is set up to your satisfaction you need to position the orange for the final shot. It is important to spend a little while positioning the orange so it obscures as many of the toothpicks as possible ready for your final shot.
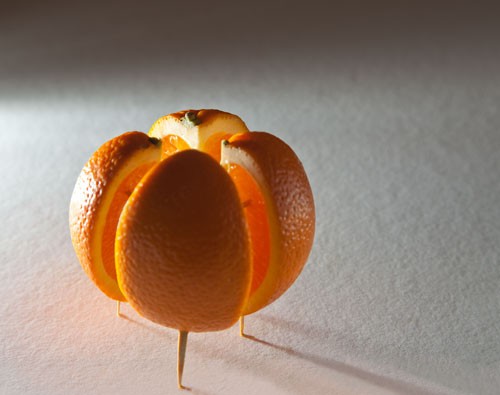
The final position ready to photograph the orange obscures as many of the toothpicks as possible. Then there is less cloning work to do on the computer.
The positioned orange By Netkonnexion on Flickr ![]()
You can see from the picture that the orange is positioned so most of the internal toothpicks are not visible and the legs are minimised. Once the shot is taken we are going to clone out the remaining sticks. So if you have less showing you have less cloning-out to do.
Now you are ready to take the shot – shoot it! Make a few attempts. Do plenty of chimping to ensure you have the lighting right. Pay special care to minimising highlights on the orange. When you are ready you can download your shots to your computer.
The remaining work is to clone out the toothpicks. You will need to very carefully clone the white surface around the legs over the legs themselves until you can not see them any more. Pay attention to any shadows so that they remain realistic and consistent after your cloning is finished. When cloning over the toothpicks in the orange interior use the same coloured flesh of the orange to clone out the remaining toothpicks you can see.
If you are not familiar with cloning techniques you can see a tutorial here: Getting Started With Cloning.
 Photokonnexion tips by email
Enjoying this article? Please sign up for our
daily email service.
Find out more…
If you want to try other ideas here are a selection of other fruit-cut pictures below. All done using toothpicks or cocktail sticks. There is an infinite variety of things you can do using this technique so have lots of fun!
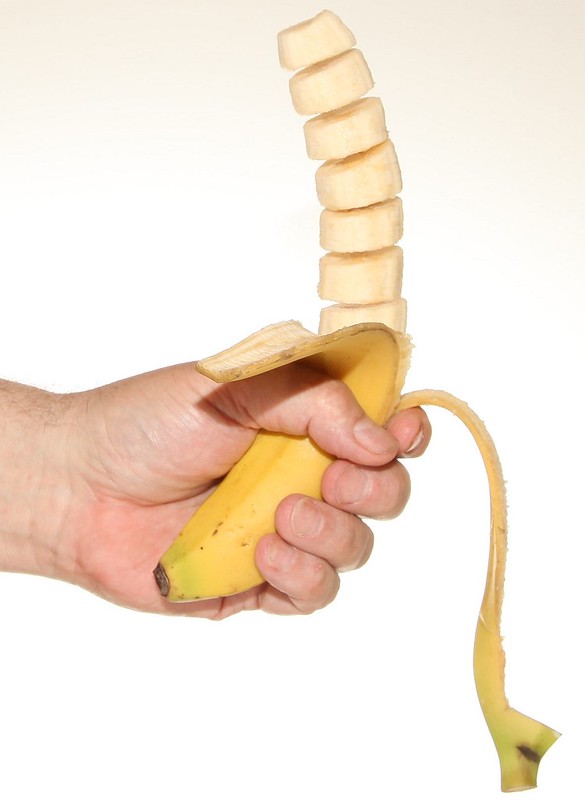
• Sliced Banana •
Click image to view large
The banana slices were held together with cocktail sticks while the shot was taken. Then they were cloned out afterwards.
• Sliced Banana • By Netkonnexion on Flickr ![]()
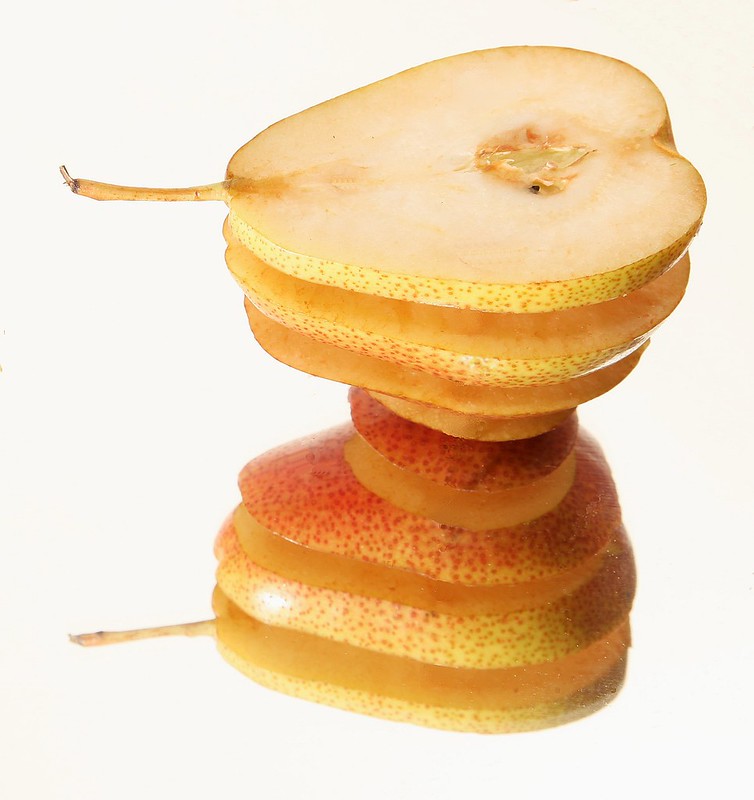
• Sliced pear on mirror •
Click image to view large
A half pear was sliced and held in the exploded view with toothpicks. However, the pear was on a mirror – giving the effect of an inverted pear.
• Sliced pear on mirror • By Netkonnexion on Flickr ![]()

• Alexander The Grape •
Click image to view large
Each grape was painstakingly held apart using cocktail sticks.
• Alexander The Grape • By Netkonnexion on Flickr ![]()
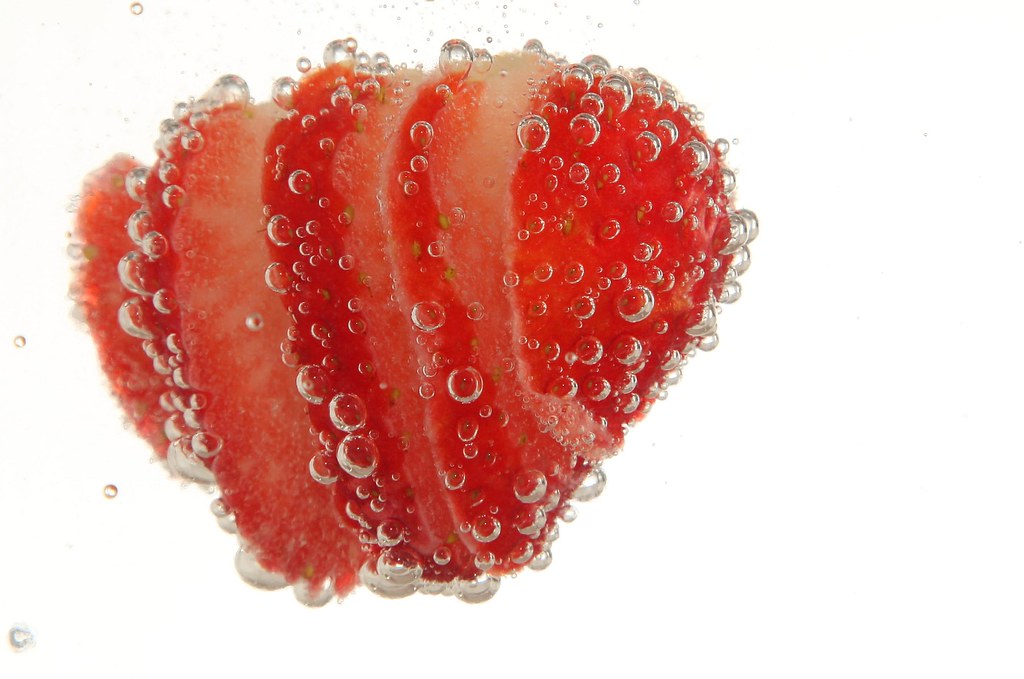
• Strawberry Layer Drink •
Click image to view large
The strawberry has been sliced and held together with toothpicks. Then it has been placed in sparkling water to create the bubbles.
• Strawberry Layer Drink • By Netkonnexion on Flickr ![]()
Start Photokonnexion email subscription now!
Photokonnexion Photographic Glossary – Definitions and articles.
A simple way to make and use a seamless white wall
How to shoot bright white backgrounds
Definition: High Key lighting/photography
Definition: Hard Light
Rolson 61770 72 LED Camping Lights
Definition: Diffuser; Diffusion; Diffusion Filter
Definition: Diffuse Reflection
Examine Shots Before Shooting Again – Chimping
Definition: Cloning; To Clone; Cloned; Clone Tool
Getting Started With Cloning
By Damon Guy (author and Photokonnexion editor)

Damon Guy (Netkonnexion)
See also: Editors ‘Bio’.


