Tag Archives: Time

Wait for the shot – an easy guide

• Contorted •

• Contorted •
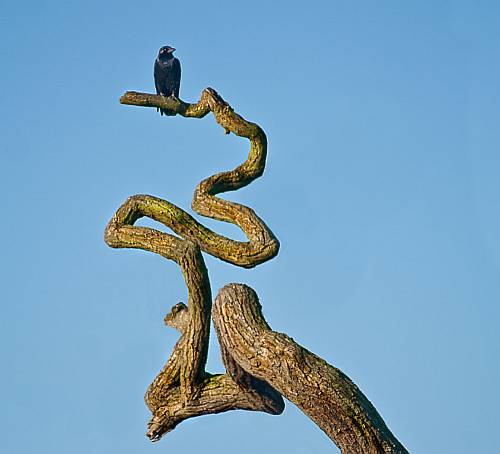
Wait for the right moment. What would there be in this picture without the bird?

Every great shot is a splendid moment in time

A significant difference between an accomplished photographer and a “snapper” is the insight to wait. Realising a potential shot at the right moment is the supreme judgement call. Microseconds or months – it makes no difference. Understanding the visualisation and committing to the time element are skills great photographers cultivate.

Seeing the moment

Once the idea comes to mind you have the basic material for the most important moment in the life of a great image – it’s visualisation. While visualising the shot you have to consider all the details including the timing. The image above would have been very uninteresting if not for the bird. I first saw this shot from a quarter mile away and no bird. After watching the bird alight and fly several times I worked closer and waited. The capture at that moment made the shot. Knowing the moment is a critical visualisation skill.

How to wait…

Watchful waiting: Sometimes your visualisation has shown you the shot you want to make. However, conditions have to be right. The right people, light, weather, things… it all has to come together and you need to watch for the right time. Could be a long time, but you can wait.

Lying in wait: You have seen the shot. You know it is going to come together. You are there, waiting for that one piece to fall into place. A person to walk into the right space; a car to drive onto the ferry; a skier to make the jump… it will happen! Wait for it, wait for it: click!

Passive waiting: You have in mind a shot. It is an agonising itch. You are not sure how, when or where it is going to happen. You just have to wait for things to start coming together. Maybe you need to find the right location; perhaps you have not seen the right fashion accessory; need access to the right car? This is a sort of one-shot project. At some time you will know the time is right and you can then work to put together the shot. I have three of these in mind right now… one day; one day.

find out more...Photokonnexion tips by email
Enjoying this article? Please sign up for our
daily email service.
                                                Find out more

Repeat waits: Often the situation is wrong. I have some landscape shots I want to make. I know they are right, but I have to get the right weather. It is a 250 mile drive, so I have to make an effort to get there and wait. So far one image has eluded me 6 times. I will try again… and again.

Active waiting: Every street photographer knows this one. You are observing, hunting, seeing, looking for the moment, the right move, just the right character. Then suddenly the light and the person and the move all happen… the decisive moment – click!

• Coming And Going •

• Coming And Going •
Click image to view large
• Coming And Going • By Netkonnexion on Flickr External link - opens new tab/page

Constructive waiting: You have your idea. You have visualised every detail. Now you need to put it together. You need to buy a particular candle; to find a specific book; to contrive just the right mood and lighting. Then, after a few days, it all comes together and the production can start. People, props, positioning – perfect… click. Aaaah!

Wait! There’s more…

There are bound to be other types of “wait”. You may call them something different to me. Whatever, I think you can see, waiting is not only a critical aspect of your visualisation… it is also a fundamental part of the life of your shot.

Can you write? Of course you can!
Write for Photokonnexion...

We would love to have your articles or tips posted on our site.
Find out more…
Write for Photokonnexion.

By Damon Guy (author and Photokonnexion editor)

Damon Guy - Netkonnexion

Damon Guy (Netkonnexion)

Damon is a writer-photog and editor of this site. He has run some major websites, a computing department and a digital image library. He started out as a trained teacher and now runs training for digital photographers.
See also: Editors ‘Bio’.

Twelve Simple tips for atmospheric candlelight shots

Candles put out a wonderful light…

Everyone feels the atmospheric impact of candlelight. The colour and the low light seems to draw you in. Capturing that light is easy with a few simple hints. Lets look at what is needed…

Tripod…

There is nearly always low light associated with candle photography. That means working with longer exposures. A tripod is excellent for that. Indoors, beware of a wooden floor, any move you make can be transferred to the tripod. Floor vibrations can ruin a shot or make it soft. For sharpness remember to use the camera timer for the shot or a remote shutter release.

Lighting…

The best way to view candles is by their own light. Because they don’t use a tripod many people are tempted to use flash. Unfortunately flash will over-power the candlelight. It will take out the colour from the light and tend to create hard, sharp shadows. It will ruin the atmosphere of the candlelight. Make sure you switch off your flash. If you need more light the you can use as many candles as you need to raise light levels. They don’t need to be in the shot, but they will keep the light the same throughout the shot.

Composition…

First decide if your candle or candles are the subject or are props. This decision will affect your focus and how you lay out your scene. Candles can create a strong bright spot in the scene. If it is too bright the flame will form a burnt out white spot. Once you have arranged your scene, ensure that the candle will only draw the eye a small amount unless it is the subject. You should consider the placement of the candle in a way that might minimise the impact of the bright flame spot.

Positioning…

If all your candles are close together the light will tend to act as one light source. This will tend to act as a hard light creating more defined shadows. If you want the light to be softer and the shadows with less well defined edges set your candles further apart. If the light is to be cast on a face then soft light will be more flattering.

Movement…

One of the peculiarities of working with candles is that the flames are subject to the slightest air movement. Unfortunately candle flicker is attractive to the eye in real-time; but looks like a loss of sharpness in a still image. It is quite useful in close focus shots with a candle to use an air break of some kind nearby to stop air movement. In a table-top study use a large sheet of card to one side out of shot. That will help prevent air movements. If not, keep an eye on the flames when shooting. Try to capture the flame upright or, if using more than one flame, make sure they are all going the same way. They look more natural that way.

Since candle light is low intensity, make sure you also prevent other sources of movement in the shot. They will inevitably be blurred as the shot will be using a long exposure. This will look like a distraction against still flames.

Can you write? Of course you can!
Write for Photokonnexion...

We would love to have your articles or tips posted on our site.
Find out more…
Write for Photokonnexion.

Light intensity…

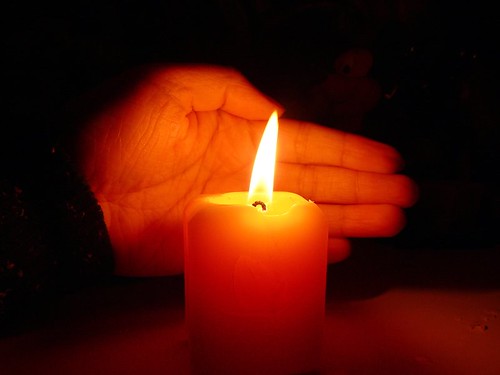
The light from a candle can be made much more intense if you use something to catch the light from the candle. A face, hand or other objects bring alive the picture and complements the candle. The presence of the object acts to reflect the candlelight. Light flesh tones are particularly good in this respect since the flesh colour is tonally close to the candlelight hues and they act as a reflector to bring out the light.

From

From “Candle Series” by Spicedfish
From “Candle Series” by Spicedfish on Flickr External link - opens new tab/page

Using reflectors in a candle scene is a great way to raise the light intensity. You can find other types of surface than the one in this picture in most scenes. Walls, ceilings and even off-shot reflectors are all good. Be careful to use neutral colours. Colour reflectors will affect the colour of the scene. If you are using a big card out-of-shot make it white. This will reflect the same colour light back into the scene, filling in the light.

Shadows…

The other side of light intensity is the shadows. The darker tones and strong contrasts of candle shots create most of the atmosphere. Spend time studying the shadows created in your scene. Strong contrasts are great subjects. If you create shadows that fall badly across your scene it will impact on the overall effect. The best use of shadows is often to the edges of the shot. If the light fades out to edges this holds the scene into the shot – naturally focusing the eye. Work with shadows to ensure the mood is harmonious.

Additional lights…

If you want to use fill light in the scene try to match the quality of light from your candles. Use soft light sources and natural light with hues matching the candles. Natural light will fill the scene well but tend to neutralise the colour of the candle light. The warm glow of candles is a great mix with evening, low-intensity light.

Some people use light with gels to give a warm glow. Warming gels can also be used with a flash. However, beware the power of flash. The candles will lose their soothing effect if all the shadows are taken away around the base of the candle and harsh shadows are introduced from one side. Typically use a diffused flash on the lowest setting – it also helps to be a distance away from the candles as well.

Multiple candles…

When working with one candle as subject the main focus of the shot is clear. However, there is a lot of scope for creativity. Consider two main issues. How to layout your candles and how to use the overall light with the layout. Using candles for making patterns is great fun and can produce excellent shots.
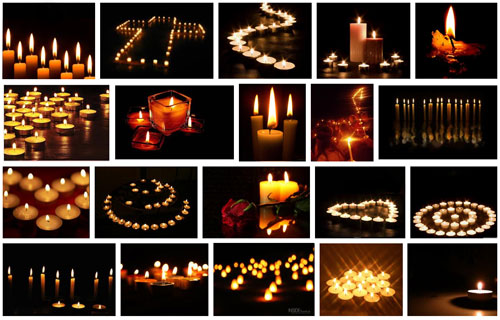
Patterns with candles

Making patterns with candles
Click to view Google Images “Candle Light” search

Try to keep the scene simple. Overlapping candles or indistinct objects in the pattern are confusing. Work with the sharp contrasts and keep your pattern well defined.

Exposure…

How long should you make your exposure? This depends, like any scene, on your light levels. To get more light in the exposure a long shutter speed is suitable for most candle shots. A range of 1/15 second down to 2 seconds is a good starting range with an ISO of 100. Camera settings vary significantly with reflectors, multiple candles or fill lights. Experiment to get it right. Aim to make the shot moody or atmospheric while providing detail for the eye to look at around the candle flame(s).

The main exposure concern with dark or shadowy shots is digital noise. If ISO is too high you will get more noise. It is better to use a low ISO, say 100 and have longer shutter opening. This reduces noise and means more detail is visible.

Lenses…

A fast lens allows a wider aperture. Faster lenses will allow a quicker exposure than a smaller aperture. Nevertheless, when experimenting check the depth of field. With big candle patterns, or larger subjects, a very wide aperture will give a very shallow depth of field. Too shallow and you will lose a lot of detail. On the other hand, lots of candles in the background with a shallow depth of field will produce pleasing bokeh. For choosing your lens, more than other aspects of your set-up, you need to have a clear vision of what you want your final shot to look like. Then do some “Chimping” to check results.

Prime lenses, especially the 50mm, will give an approximation to the human eyes. To capture the mood of a scene a 50mm will help. A wide angle lens close-up can provide great exaggerations of candle tallness or broadness – depending on lens orientation. There is great scope for artistic interpretation. Also remember that zoom lenses tend to foreshorten, reducing the apparent depth of the shot. With a zoom lens place your candles to give an impression of depth.

White balance…

The warm glow of candles is attractive. If you change the white balance you will change the characteristics of the warm glow. Candlelight shots are about moodiness and atmosphere. It is worth playing with the white balance to influence the shot and increase moodiness, but be careful you don’t remove it. You only need to adjust white balance when shooting in *.jpg as it will be fixed once the shot is taken. If you are shooting in RAW you have more flexibility with settings in post processing to control colours and the final exposure. If you cannot shoot in RAW then, again, make sure you do some “chimping” to get the colours right.

Being safe…

Although fun, candles are naked flames. It is all too easy in low light to leave something close to the candle. Fires start quickly and spread fast too. Feel free to experiment but make sure you don’t accidentally knock over candles, touch wall paper with one or do something else to set off a fire. Never leave candles alight and unattended. Always blow them out and wait for the smoke stop raising before leaving.

find out more...Photokonnexion tips by email
If you enjoyed this article please sign up for our
daily email service.
                                                 Find out more
#11030#

By Damon Guy (author and Photokonnexion editor)

Damon Guy - Netkonnexion

Damon Guy (Netkonnexion)

Damon is a writer-photog and editor of this site. He has run some major websites, a computing department and a digital image library. He started out as a trained teacher and now runs training for digital photographers.
See also: Editors ‘Bio’.
How to tell a story with your picture

Photo storytelling :: Spoken With Humour My Lady

“Spoken with humour my Lady”
Photo storytelling with your picture will capture the imagination of your viewer and draw them into the image.

What is photo storytelling?

Help your viewer to be involved in your picture. Get them thinking. Then they will look hard at it. So, tell a story with it. To get viewers thinking draw out the threads of a story with a time line. Aim to help them see how the story came about. Show clues for what might happen next. Photo storytelling is about making your image clear on what is happening.

The best photo story-tellers are photo-journalists. They capture an event or activity. They try to show the progress of a story. Things you see in the shot tell you what’s happened, what is happening now, and what is possible. In short, it is a time-line.

Photo storytelling :: Keep it simple

Don’t obscure the story. The more interesting you can make the shot, the more viewers will want to look at it. Your story should portray the fullness of events.

Try to make the shot as simple as possible. If there is too much going on it distracts the viewer. Too much clutter does the same. If you do distract the viewer it will confuse or obscure the story.

Have a plan

Ensure clarity in your story. Have a complete plan of what you want to convey. You should:

  • Know what you want to say.
  • Have a clear idea of the main subject.
  • Know the story line (as simple as possible).
  • Know how to express the storyline.
  • Know the composition you will use.
  • Be aware of light, mood, time.
  • Know what to exclude (de-clutter).
  • Know how you are going to work the scene.
  • Have technical settings worked out.
Behind the subject

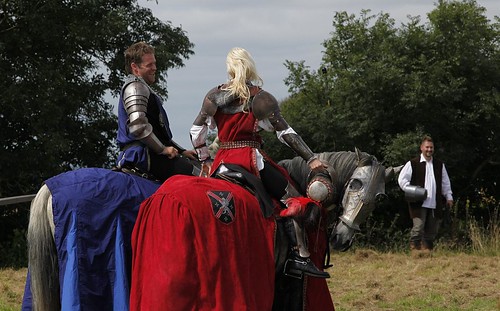
It is easy to confuse the viewer with the background. Ensure it is consistent with the story. The little romantic exchange in my picture above fits with its background. If this were an urban scene the knights would be out of their expected context. That throws the story off.

How people and things relate to each other

As the story unfolds show the relations between people. That is juicy eye-candy for viewers. The relationship between people and things, in the scene helps too. Working with one photograph, your photo storytelling is going to have to show these links.

There are three relationships in the photo storytelling above. The horse is engaging with the viewer. It stares back at us. The knights are engaging in light-hearted flirting. The peasant is clearly amused by the whole scene. The story tells the viewer where the people are, but also about the feeling between them. Looks, and the direction of gaze, are important. Facial expressions speak volumes. The position of things and people show how they relate to each other.

You must be careful to pick up these traces of relationships. Without them you don’t have the sense of interaction. Then you don’t see photo storytelling in progress.

Time

Time in photo storytelling usually comes from action, expression or movement. In this picture the horse shows boredom. The knights show an on-going and flirtatious conversation. The peasant clearly enjoys the moment. These things show the story is not static. And, it has a future because the knights are clearly enjoying the exchange.

In another type of photo storytelling you might see strong movement. A race is a story. The action shows the progress of time. The race positions tell of the competition. The place where the race is sets the scene.

Clearly there are many ways to express progress through the story. The important thing is that you do actually make sure that it is obvious to the viewer.

The fresh, candid look

Clearly, if the story is staged and forced, the fresh look will be lost. Capture it as if it was unscripted. Captured on the spur of the moment makes it look fresh. Even better if it was a complete candid shot. Nothing beats an honest, true expression. The best scenes are spontaneous. The whole discipline of street photography is based on that concept. However, make sure that the elements of a story still hold true. It will look false if they are not.

If doing candid street shots your post-production work can help. In your editing look to find the shots with the elements above. Then crop or work your post processing to bring it out. Don’t try staging them through a plan. Urban scenes make poor acting scenes for photography.

Patience

Photo storytelling takes patience. So does trying to spot a story in progress. To shoot a scene like the one above takes a few moments. It may only involve a few quick few shots. But the right result may not happen the first time. Take your time and work on the elements needed for your Photo storytelling. As you get better at the things mentioned here you will bring out the story easier.

Photo storytelling :: In Post-production

A story is almost always completed in post-production. Often the composition has to be done quickly in order to capture the right moment. As a result you may need to think about the framing and the crop later. Also think about cloning out clutter and distractions. When Photo storytelling, that is especially true for candid shots.

Photo storytelling is helped by a title

If my image above was called “knights on horses”, there’d be less interest. The title sets the scene. It shows the viewer the link between the knights. A good human relationship or a juicy gossip-phrase gets attention. Photo storytelling is all about those human things. Bring them out in a title.

The actual story

Most important is the actual Photo storytelling itself. To get that right you have to check you have a story at all. That means finding the shot that expresses the story. That is an editorial task. Be ruthless when you try to tell a story with a picture. Show only the shots which actually tell one. Otherwise you will have a fudged concept. There is nothing worse.

Enjoy your Photo storytelling. It’s fun and a challenge. Your skill as a photographer and as an editor of your own work will improve.

Comments, additions, amendments or ideas on this article? Contact Us
or why not leave a comment at the bottom of the page…

Like this article? Don’t miss the next — sign up for tips by email.

Damon Guy - Netkonnexion

Damon Guy (Netkonnexion)

Damon is a writer-photographer and editor of this site. He has run some major websites, a computing department and a digital image library. He started out as a trained teacher and now runs training for digital photogs.
See also: Editors ‘Bio’.
By Damon Guy see his profile on Google+.

Shedding Light on Family History

When you take a photograph or video do you think about the use future generations will make of your work?

Photography was one of the first ‘new media’ that enabled people to see a place they had never physically visited. Together with sound recording it enabled barriers of place and time to be broken down.

It also does rather more than that. One of my particular hobby horses is that family history needs to be viewed as more than a list of names, places and occupations. We should also consider the times in which they lived. The photograph, and latterly the video, provide a method to give us this extra information. As camera equipment became cheaper, and more people were able to take photographs, it enabled us to see how all levels of society lived. Before photography, and in its early years, it was the wealthier members of society who were depicted.

By opening a window to the masses the photograph can also show “true” history rather than the popular view of history we tend to take for granted.

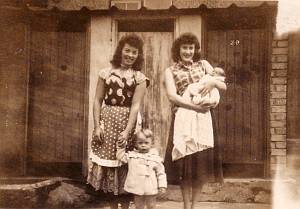
Two proud mothers...

Two proud mothers…

Take the picture to the left. At first sight it is nothing special. It shows two women, we assume the proud mothers of the children in the picture. It was obviously taken, like many such photographs are, to show off their children to friends and family. It is little different to the many millions of snaps taken over the years.

To the family historian photographs like this add a little colour to the family. They also show a little of how people lived. I asked a member of the family being researched about this photo. I found out the picture was taken around 1959-60 in Dartford, Kent and that the doors behind the women are actually outside toilets. From the picture we also see the type of everyday fashion worn in the early 1960s. We can also see that despite much work to remove slums and modernise our towns even by the 1960s people still lived in houses without the basic facilities we take for granted today.
 

The popular view that everyone in the 1960s was a hippy and spent all their time lazing about and listening to Grateful Dead albums in a haze of naughty smoke is a little off the mark. That will certainly shock my eldest niece. She is convinced I must have known The Beatles and met President Kennedy!

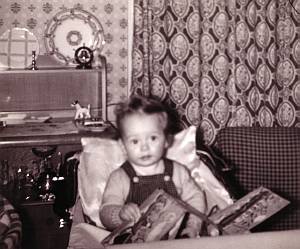
Baby and book

Baby and book

The photograph on the right demonstrates how a picture can show information on interior decoration. Not to the standard you would see in a Design Magazine, it sheds light on decoration in ordinary homes of the period. If you look a little deeper into the picture you might infer that conditions in this house were a little cramped.

It goes without saying that this process works in reverse. I remember spending a happy hour or two indexing photographs of the building of Basingstoke town centre. They were donated to the library some years ago. Most were helpfully catalogued. A few were not and a rough date could be worked out from looking at surrounding buildings, fashions and other objects like cars. In some cases this took some time and I’m sure my mutterings and wanderings round the reference section in Basingstoke library were a subject of some speculation for staff!

Suburban House in Basingstoke

Suburban House in Basingstoke

The picture on the left illustrates this. It is not one of the photographs I referred to above but shows a house in the suburb of Basingstoke. This picture may be roughly dated by the car in the foreground. This may be done by looking at the date identifier on the registration plate. Alternatively, you can check when this model of car was in production. This would give the date range during which the picture might have been taken.

One final area in which pictures can help is in jogging the memory. When the occasion demands a picture can act as an aide memoir and open up the memory. This is something the family historian finds invaluable when trying to find additional information for a family member.

Remember, your photographs are a record of the people and places that are in them. They are much more than a simple picture.

Have fun with your photographs and researching your family history.

By Terry Firth (contributing author)

Terry lives in Hampshire UK. An experienced reference librarian, he did research for the public, business and the and local authorities. Later Terry managed the Hampshire County reference and local studies services. He was a Board member on the Sense of Place South East External link - opens new tab/page which managed a digitisation/website project for five local authorities including ‘Hantsphere’ External link - opens new tab/page. Terry now runs ‘Terry Firth Research Services’ External link - opens new tab/page using his experience doing family history research for clients worldwide.

Can you write? Of course you can!
Write for Photokonnexion...

We would love to have your articles or tips posted on our site.
Find out more…
Write for Photokonnexion.

What It Takes To Be A Great Photographer

Thoughts on photographic aspirations

It takes a lot of bad pictures to make a few good ones… Not every photo is good, fewer are great. To get some great photographs you need take many, many more mediocre ones.

Doing photography takes time… If you want to succeed, you are going to have to work at it. You will lose some sleep. You will have some heart-ache. If you want to do it be prepared to spend a lot of time practicing.

The best photographs are fashioned from a quest for perfection… It is only through constantly working to improve and to being being aware of improvement will you know what perfection can be. Then you need to go for it!

An honest appraisal is worth a thousand weasel words… Only your real friends will help you to look critically and constructively at your photographs. This is precious knowledge and precious friendship.

Photography is about the struggle to know what to photograph and how to photograph it… You face constant frustration and perpetual personal turmoil. This is the difficulty and the fun of photography.

One thought on outcomes

Overcoming obstacles that stand in the way of a great photograph is what makes achieving it worth while. Never compromise in the pursuit of perfection. Let your passion out.

By Damon Guy (author and Photokonnexion editor)

Damon Guy - Netkonnexion

Damon Guy (Netkonnexion)

Damon is a writer-photog and editor of this site. He has run some major websites, a computing department and a digital image library. He started out as a trained teacher and now runs training for digital photographers.
See also: Editors ‘Bio’.

Can you write? Of course you can!
Write for Photokonnexion...

We would love to have your articles or tips posted on our site.
Find out more…
Write for Photokonnexion.

Family History (Genealogy) is for photographers

This picture represents the future of your images

This picture represents the future of your images

Time and Photographs Stand Still For No Man

I recently read an article that gave me a new insight. Shedding Light on Your Life and Times External link - opens new tab/page highlights what a heritage we are building up by taking photographs.

Yesterday, today and tomorrow are concepts that as photographers we sometimes forget to consider. Time, a compositional element, has a longer view than just the moment the photograph was taken. The ordinary photograph above was taken in a time that is long gone. Yet, we recognise it and can relate to it. That’s because everything in it screams of yester-year. Any photograph we take today will become dated in some way, and eventually in every way.

Shedding Light on Your Life and Times External link - opens new tab/page is a reminder that what you photograph today will, one day, become a reminder of the past. Possibly your work will be a subject for research at some time in the future. This is true of everything in your pictures.

Photography already reaches back 150 years. The pictures have chronicled some incredible changes in that time. What will your images say about you in another 150 years? It is possible – even probable – your photographs will be passed down your family for hundreds of years. The next time you take a photograph consider what you are showing to future generations. It might be important to you. It might be history to them!

Time – 5 Essential Tips For Photographers

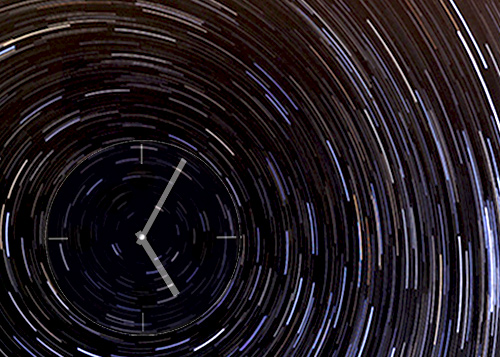
The cosmic clock is ticking... photographers should be aware of time

The cosmic clock is ticking... photographers should be aware of time

Time is an imperative for photographers

An essential element of photography, time impacts on us photographers in many ways. Here are some of the issues you should be thinking about.

The Obvious
Of course… shutter speed, the time the shutter is open. We all know that it is one of the most important aspects of taking a photograph. Tip number one: is to know the impact of shutter speed on the other two important aspects of exposure. I am talking about ISO and Aperture. Without a clear understanding of how these three components interact photographers are doomed to live with auto-settings.

Shutter speed, ISO and aperture all work together to produce your exposure. Between the three of them there is a balance. Raise/lower one of these and one or both of the others have to be adjusted to compensate. Your exposure is a dynamic balance between these three elements. Shutter speed is inseparable from the other two. Read up on the three components of exposure so you understand the impact of shutter speed.

Less Obvious

Composition is a time related activity. We all think about the best way to take a shot. What do we included or exclude? How do we frame? What angle is best? The questions are endless… the compositional variations are too. Actually, the important issue is getting the shot. Some people walk up to a scene snap and go. Have they considered the composition fully? There is a balance to be had. Time is important. I find that as my students develop the shot consideration-time shortens. They spend less time thinking about ‘the’ shot and more time working on variations… hunting for the right shot; working the scene. Tip number two is learn the settings on your camera and practice thinking about compositional elements but remember the time. Get in a number of shots, different angles, perspectives and so on. As you practice these skills try to work to time. Don’t machine-gun your shots. Work the scene – quickly, efficiently.

Being there

Timing is everything: If you don’t turn up you will miss the shot. In photography getting to the right place at the right time is everything. If you are late you will miss something… I am certain that quite often it will be the importing ‘thing’. Tip number three… leave on time, know where you are going and leave enough time to set up before you are going to take the shots. It sounds an obvious tip. However, there is a hidden component. The most important part of getting the shot is being in the right place at the right time. That will need some work. Work the scene before the event; the day before, the hour before. Which ever is right. Know where you will be taking the shots. Know what are the best places to stand. Know in advance what shots you want to take. This planning is essential if you want to make the right moves when you are doing your shoot.

Knowing the time: A lot of activities in photography are about time of day. The Golden Hour at the beginning and end of the day is quite a precise time. Knowing when it starts and ends is something you should think about if you are to make the best use of your time. Precise timings for the Golden Hour are calculated as are the angle of the sun to a particular location. It is therefore possible for you to know what time you need to be at a place to catch the golden glow of this great time of day. And, you can find out what direction to look in if the sun is not apparent when you arrive. If you don’t know the terrain you could turn up at a location and find that your times are out because the hills prevent you seeing the sun at that time.

Tip number four… know the time, and direction of your shot in advance and make sure the light is right! Consult a map to work out if you will be in hills. Ordnance Survey maps  External link - opens new tab/page have contours to indicate the lie of lines of hills and their height.

You can find out the times of the Golden Hour on The Photographer’s Ephemeris (Desktop computer version) The Photographer's Ephemeris | External link - opens new tab/page – the site helps you plan outdoor photography in natural light. The website will show you how the light will fall on the land, day or night, for any location around the earth. There are phone apps available too. Details available on the site.

You can also find the position of the sun  External link - opens new tab/page at any time of the day.

Tip five… Other important times of day you should know about:
Dawn and Dusk times: dawn is the start of the morning golden hour; Dusk is the end of the evening golden hour. However, having a knowledge of exactly what time the sun rises and sets lets you know how much time you have left on your shoot (or when it is about to start).
Mid-day: this is the time the sun is likely to be harsh, producing hard light. Mid-day is not a good time for photography. Colours may be washed out and the overhead sun reduces those all-important shadows. Remember, local DST (Daylight Saving Time) may may affect the time the sun is overhead.
Moon phases and times: The moon is a great addition to night shots. Knowing when it is up and what phase it is at is important. There are several websites with Moon tables and times.
Astronomy: The astronomical side of photography is great fun and very rewarding. You will need to have precise timings of astronomical events starting and finishing as well as knowing where to look.

Contribute A Definition?

Send us a definition of a photographic word or phrase...

Send us a definition for our list of photographic words and phrases. Simply write a clear definition and send it in. Include an original picture if you wish. Give us your name and a link to your website and we will credit your work.

By Damon Guy (author and Photokonnexion editor)

Damon Guy - Netkonnexion

Damon Guy (Netkonnexion)

Damon is a writer-photog and editor of this site. He has run some major websites, a computing department and a digital image library. He started out as a trained teacher and now runs training for digital photographers.
See also: Editors ‘Bio’.