Tag Archives: Technology

Of video graphics and cameras

The history of video graphics.

While computers were developing the monitors were also undergoing considerable development. The significance of these improvements had an impact on the development of digital cameras. The modern LED display of the camera owes little to the original cathode Ray Tubes of the first monitors. However, the resolution of the displays and the aspect ratio was important.

Early Video Resolution

Prior to the 1970s most computer displays resembled big typewriters. They were noisy, mechanical units with wide paper (128 or 256 spaces across). Early video displays were pretty poor too. They were only able to display characters and visually limited graphical blocks. After the introduction of colour television in the 1970s computer screens did not improve much until after the invention of the Apple Macintosh in the 1980s. Computers up until that time had little or no graphical display capability. However, Apple and Microsoft were racing one another to improve graphics systems. By the late 1980s computer graphics had come of age. The video graphic systems needed to improve to meet the new standards of computer displays being sought out for the new consumer market in personal computers.

In 1987, International Business Machines (IBM) released – VGA – the Video Graphics Array standard. This standard was quickly found to be insufficient and in 1990 IBM released the XGA – Extended Graphics Array standard.

Throughout the 1990’s the improvements in video standard moved rapidly. The release of flat panel displays and especially the LCD screens had a significant impact on digital camera technology.

LCD displays

Through the 1990s the video standards evolved. However, the developments of plasma screens and Liquid Crystal Display (LCD) screens (flat screens) had begun. By the year 2000 Plasma flat screens had largely been used for large television displays, mostly those in excess of the 30inch standard. The more flexible format, the LCD screen, had been gaining ground in a variety of sizes. The first LCD displays for cameras went to market in the late 1990s. These began to have a significant impact on consumer interest in the camera market after the year 2000. LCD Displays are used today on nearly all DSLRs and most other consumer cameras.

Video Graphics after the year 2000

Following the growing use of flat panel displays in computing, and its adoption by camera manufacturers the video graphics standards continued to develop. After the year 2000 camera manufacturers have continued to try to get greater numbers of crystals (pixels) into the small screen on the back of the camera. Of course the graphics standards have also been developing. Most of the improvements had been based on the XGA Video standard.

In the last decade the video graphics situation became much more complex. High Definition systems (HD) have become important in all aspects of media, broadcasting and technology. The aspect ratio (see below), the number of pixels in the screen, the colour depth and the contrast capability of modern screens have all improved to a considerable degree. The extent to which these properties relate to different media has become differentiated. Video, digital camera image sensors, televisions, printing, and other display technologies have all evolved standards that are applicable to their specific requirements. HD has come to mean a high resolution (exceeding 1920 x 1080 pixels), ‘deep colour’ (billions of colour possibilities), high contrast, high refresh rate screen technology. The situation is confused by a large number of different national requirements globally. As a result the various graphics media standards have tended to be established more by manufacturer than by international standards and also by the broadcast standards accepted worldwide. Manufacturers have therefore tended to concentrate on making their equipment compatible with a wide range of common aspect ratios and compatible with local national broadcast standards.

The real meaning of HD for camera owners therefore relies on the specification of the equipment rather than an established standard. Equipment like monitors and screens on cameras are therefore best researched by comparison of specifications between models.

Five easy ways to learn about the light/shadow relationship

Practice blocks provide a great way to understand light/shadow relationship.

Practice blocks provide a great way to understand light/shadow relationship.
View large About the light/shadow relationship :: External link - opens new tab/page

Our first priority is light – second is shadow.

The relationship between them is one of the great pillars of photography. Learning about them is essential. The key to understanding the use of light is seeing the effect of shadow. In this article I am offering some ways to learn about the light/shadow relationship. If you have not already done so I recommend you read Three little known facts about shadows External link - opens new tab/page first.

The light/shadow relationship – a transition

When looking for a scene the right light and shadows can make or break a shot. We are looking at the light/shadow relationship so we can convey the right message to the viewer. Things with harsh and sharp shadow-lines tend to indicate hard, masculine, tight, dark, angular, tough, solid, artificial, technical. Things with soft shadow-lines showing gradual light-to-dark change are the opposite. They tend to be gentle, mild mannered, lighter, soft, rounded, meek, curved, natural and feminine in appearance. Using the wrong light sends conflicting messages to the viewer. The right light will help your message. The defining aspect of this relationship is the transition from light to dark. The shades between light and shadow are the definition of form. “Form” being the three dimensional shapes we see. The harsh sharp shadows of hard light are great for angular forms. The soft rounded and gradual shadows of a softer light are great for showing rounded three dimensional forms – like faces, eggs and balls.

Creating the right light

Creating light of the right sort is the quickest way to understanding the different types of light and the shadows they create. So, we are looking to bring out the transitional light/shadow relationship through the use of different types of light. This will help us define form in our images and bring out the 3D feel that makes pictures appear to have depth.

You need to be able to create two types of light for these experiments. Hard light – created with an intense beam from a relatively small light source. A torch like this one is excellent for this purpose…

 
The ‘Lenser’ LED Torches

The ‘Lenser’ LED range of torches External link - opens new tab/page is available on Amazon. I personally recommend the excellent LED Lenser 8407 P7 (Black) External link - opens new tab/page torch (advert – left). It is excellent for all types of photography. At night you want a rugged and powerful torch for safety, lighting and to prevent losing equipment. Lenser also sell a coloured filter set for it making this torch great for light painting External link - opens new tab/page too. It’s the top seller (5 star) in the range. Experience has shown it to be an exceptional piece of technology.

You also need soft light – usually generated from a large light source like a window, softbox or photographic umbrella.

Make sure you are using only one light source for your tests. Multiple lights confuse the shadows. The hard and soft lights are best used at the same intensity so you can compare results between them later. If you have one, an off-camera flash with the appropriate modifiers would do the same work. Use a honeycomb or snoot to get the tight beam of a hard light. Use a diffuser or bounce the light off reflectors or walls to create a soft light.

For your first experiments with soft and hard light try out your different light sources. Place a simple object of your choice on a table. For the subject see a small vase, a simple ornament, a small box or something similar. Take a few photographs with both hard and soft light. Then open them on your computer and compare them. What you are looking for is the quality of the shadow. How intense is it – light or dark. How quickly does the light change from light to dark. Is it an abrupt, sharp change? Or, is it a slow, gradual transition? Study your shots to see which you prefer. The light/shadow relationship is best shown in gradual steps. So your shots should show very hard light right through to very soft light.

Experimenting with curves

The use of curved subjects is going to create gradual transitions of light anyway. But curves can also have quite hard shadow-lines if the light is also hard. Using something rounded will show the point. A small ball, an egg or something similar are great for testing the hard or soft light effects. I have several wooden eggs for this purpose. They make test subjects for thinking through individual or group portrait shots. They help in planning shoots and lighting set-ups. They are a very cheap way of making your mistakes before the shoot! Give them a try.

Using a rounded subject, try your hard and soft tests again. This time take shots from at least eight light-positions in a circle round your egg. You must stay in the same position to take each shot. That way you will see all the different angles of the light/shadow relationship as a graduation as you move the light round for each shot.

In your computer ask the same questions about the hard edges and soft graduations of light through shadow. Imagine the eggs are faces. Which will work best on a face – those hard sharp lines or the soft graduations?

Experimenting with lines

For working with more hard-edged objects I have 50 wooden children’s building blocks. I use these in the same way as the eggs. They help me plan lighting and sets/props positions for shoots.

Use one block to start. Repeat the exercise as you did with the eggs. Take eight shots using different light positions around the cube. Keep the camera and cube in the same position from the start. Just move the light to each of the eight positions around the cube. Repeat the exercise for the hard and soft light sources. You will see that the results for a hard edged object is very different to the soft edged eggs in the previous experiment. Concentrate on how the light transitions in the light/shadow relationship shown by each shot.

This time, you are asking the same types of questions… about the quality of the shadow. How intense is it? How quickly does the light/shadow relationship transition, and so on. Again, study your shots to see which you prefer. You will have a different type of result because the edges are much harder than the rounded eggs. The shadow shapes will be very different too.

The wooden blocks are useful. The set I use for this purpose is advertised to the left. It has rounded blocks and a variety of shapes. This gives you the opportunity of trying out a whole range of effects and test lighting set-ups.

Experimenting with specifics

You have experimented with rounded subjects and hard edged ones above. Now it is time to look at the other possibilities.

Try mixing rounded and square edges. Try out a few scenes using the blocks to map out props. If you have other toys around use the blocks to create little still life scenes with the toys or other objects. The idea is to try and creatively use the toys, blocks and egg to make a scene. But you must concentrate on creating sympathetic shadows. Look always for the way you can understand the balance in the light/shadow relationship and make it complement your theme.

Suppose you depict a robot war. Your best light will be hard and very direct. The harsh sharp curves will help create a chaotic and harsh environment. Try depicting a love scene between two figures. You want to use soft, diffused light to carry the romantic mood.

You see my point. You are trying out in miniature what you want to do in the real world to emphasis your message.

I used to use several action figures for testing out scenes with people. But the kids broke them eventually. These days I use cheap wooden artists dummies. They are fun to use and give a very good idea how to set up lighting for poses. The one I use is advertised to the left. It is really great for lighting tests.

The Importance of Eggs

Finally, here is a video which I posted earlier this year. It focuses on the angles of light in the light/shadow relationship. It will show you the point of the eggs exercise. So you can see how it is all done. He shows you the principles. However, you will need to try out for hard and soft light and hard and soft edges – which the video does not show… Enjoy!

The Importance of Eggs (a previous post on Photokonnexion).

How do you make a camera lens?

A lens is a high-tech piece of equipment

We don’t see what goes into their production and we also see straight through them. So it is easy to see why lenses are not appreciated as high-tech components. So when I saw these three videos I was suddenly intrigued. They are produced by Canon to show what goes into making lenses. Considering how much work and manufacturing technology is involved we should not be surprised by the cost.

The first video in the series especially fascinated me. I had no idea that creating the glass in lenses was such an involved process. It is not just glass, it is high-quality, high-technology, high production work all in one.

More after the jump…

The grinding of the lenses is also a very precise and time-intensive process. The coatings applied to lenses are high-tech processes too.

In the final video we see how a lens is actually constructed. There is a lot of very detailed and skilled work done by hand. The use use of a whole range of special tools and adhesives makes it inadvisable to take lenes apart!

A personal recommendation…
This little lens cloth is a very handy item. It hangs on any ring or strap right next to your camera. It’s completely out of the way until you need it and then it is right on hand. It is a quality cloth and because if is always near at hand reminds you to keep your lenses clean. Clean lenses have a longer life and your images will be free of dirt smudges.
Lenses are expensive. Protect them for the long-run. Buy now while you remember!


How the CCD Digital Image Sensor Works

How the Charge Coupled image sensor works

A recent post here covered the definition of the Digital Image Sensor. Some of the information there is illustrated in the video below. I like the way that ‘EngineerGuy’ presents this video. It is simple enough for anyone to understand, comprehensive enough to feel satisfied with the explanation. He is so enthusiastic too. A great, and short, video. Enjoy!

Video by “EngineerGuy External link - opens new tab/page” (Bill Hammack)
On YouTube: http://www.youtube.com/user/engineerguyvideo External link - opens new tab/page

As an additional piece of background, why not also have a look at the definition page for DSLR. It fits in well with this video and will help you understand the context of the image sensor.

More on EXIF Data

Data in your photograph tells you about your shots

EXIF data helps you analyse your shots and improve your photography

EXIF data helps you analyse your shots and improve your photography.


Information in your image files is a great way to improve your shot. You can look up the EXIF data and find ways to improve your photography. A previous posting on this subject provided ways to investigate your EXIF files… EXIF Data – Understanding Your Shots. Today we have published more definitions in the Photographic Glossary providing more on EXIF data.

Three more articles are available here…

EXIF (Exchangeable Image File Format)
Photo Metadata External link - opens new tab/page
Definition: Metadata

By Damon Guy (author and Photokonnexion editor)

Damon Guy - Netkonnexion

Damon Guy (Netkonnexion)

Damon is a writer-photog and editor of this site. He has run some major websites, a computing department and a digital image library. He started out as a trained teacher and now runs training for digital photographers.
See also: Editors ‘Bio’.

Post Processing Defined

The growth of a multi-billion Pound industry worldwide in software and post-processing work has been phenomenal in recent years. However, the camera manufacturers are in rude health. The mobile industries are active and growing. The Internet is hosting more and more online facilities for processing. Websites that are using images, photographic processing and social networking in images are growing daily. The post-processing industry is quite possibly one of the largest computer industry interfaces with the public.

Find out more about post-processing in our new article in the Photographic Glossary.

By Damon Guy (author and Photokonnexion editor)

Damon Guy - Netkonnexion

Damon Guy (Netkonnexion)

Damon is a writer-photog and editor of this site. He has run some major websites, a computing department and a digital image library. He started out as a trained teacher and now runs training for digital photographers.
See also: Editors ‘Bio’.


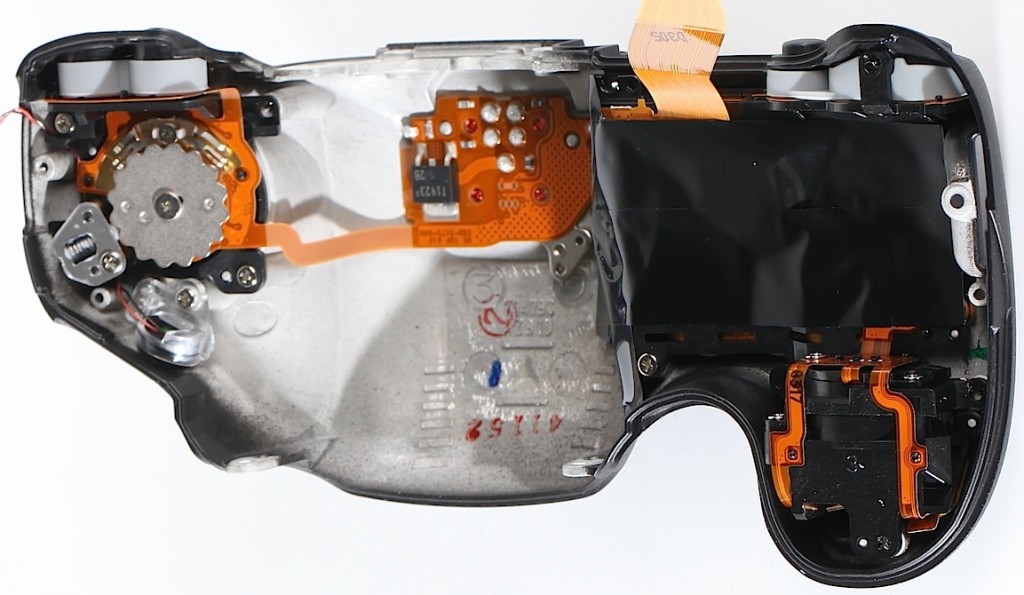
Canon 5D III woe fixed with black tape!

Black tape fixes light leak in new Canon 5D mkIII

Black tape fixes light leak in new Canon 5D mkIII.
Image from lensrentals.com.

Electrical tape fixes the problem

Hands up if you have used sticky tape to fix something… yup, I guess most people have. Now top camera manufacturer, Canon, have too.

Earlier this year the new Canon 5D mkIII ran into trouble when a light leak became apparent behind an LED display. According to Lensrentals.com the tape fix is light-tight. Roger Cicala says in his latest posting, “Some people seem to think tape is a bad or cheap fix. It’s Not.” He goes on to say that this tape is extremely durable and the fix… “works flawlessly”. It “seems silly, but it’s logical and effective”.

The problem does not undermine the testing process at Canon. It is not possible to test every scenario or new developments would never make it to the consumer at a reasonable price. We now know how unlikely the problem scenario is to arise. Canon have dealt with the issue confidently and quickly and are shipping with a simple fix. This sort of issue arises frequently in hi-technology first releases. There appears to be little reason to lose confidence in Canon. If your camera is affected Canon will fix the problem for you.

The light leak in the new Canon 5D mkII caused upset, production delays and delayed shipping. After investigation Canon issued a notice to assure users and offered to fix the problem free of charge. Independent scrutiny has confirmed Canons examination of the problem. The light leak skews the results of the automatic light meter readings. However, this only happens in extreme low-light/dark conditions. The use of auto-metering in extreme low-light is an unlikely scenario. Canon say that there is insignificant effect on exposure.

Read the full story… www.lensrentals.com