Tag Archives: Technique

Seven easy tips to improve your group photography

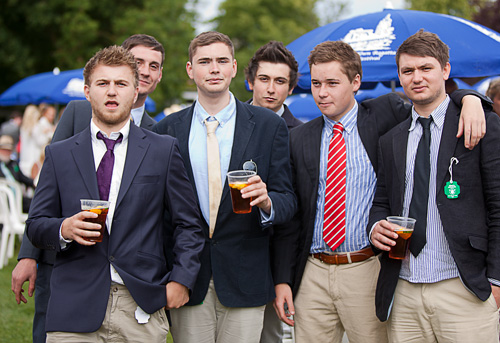
• Boys Group •

• Boys Group •
The humble group photograph can be much improved by a few simple steps.

Simple steps lead to great shots…

With groups you must go a little further than with straight portraits. Getting people coordinated, a range of different settings, beating the dreaded ‘blinks’, great sharpness… Check these out, go the extra mile.

Planning

When doing group shots a few ideas up front helps. Some simple ideas about cohesion, commonality and framing can make your shots more compelling. Clear ideas about how you want this particular group arranged will enable you to get them quickly into place. Groups, by their nature become impatient quickly. Preparation moves things along keeps people on the ball. Have your location scouted and know where you are going to place your group. Have a good, simple background ready. Make sure you have adequate light to work with. Location is everything.

Settings

Remember, groups require a wide view and you need some depth too. Set your aperture too large and you risk the back row being out of the zone of sharpness. Most groups are best photographed at f8 or even better f11. To get the sharpness work with your shutter speed up reasonably high. 1/125th minimum – better 200ths of a second. Go higher if you don’t need flash.

Bigger groups always have a certain amount of movement. Higher shutter speeds help to freeze the action. The problem is, high shutter speed and small aperture leave you needing flash or extra lighting. There is always a trade-off. To compensate you may need to raise your ISO.

Sharp shooting

Shooting at high speed will help freeze the action. It will not steady your hand. If shooting a big group, especially for formal shots, it’s best to use other sharpening techniques. Consider these sharpness…

  • Using a tripod
  • Use mirror lock-up function
  • Image stabilisation off (not needed on tripods – it creates vibration)
  • Auto-focus off on a tripod after the group is focused (it creates vibration)
  • Operate with a remote shutter button or use the on-camera timer

A tripod saves time. You can arrange the group and smooth the shot through. If you have more than one group, your camera is always set up when it is on a tripod. It helps smooth the flow.

Light and shade

Overall light in the scene is important, so is the shade. When taking pictures of groups you are taking a wide angle view. The group is often spread out. It’s easy to miss that one or two of the group are in the shade. Or, with a camera mounted flash, the shadows from the flash fall harshly onto the people behind. Trees, buildings, other people, towers, street lights – any number of objects can cast unexpected shadows which are difficult to notice. Flash casts shadows you don’t see until you open the picture on a computer later. Look carefully at your group. Arrange them to be in clear, consistent light. Make sure any lights or flash you are using treats all the members of the group evenly and fairly.

Clothing

So often with groups you have no control over clothing. If the event is formal the clothes often have a stiff and upright feel. People don’t relax so well in this situation so you will have to set the scene and pose them accordingly. It is not easy, especially with family conventions or a preset plan. Where possible let them arrange themselves with your help. People will be most comfortable next to the people they like and know.

When a group is coming together informally the clothes may be wildly variable in character. What matters when working with a candid group is the fun arrangement of the group. Try to get the group to look dynamic and together. This will offset a strong clothing variation.
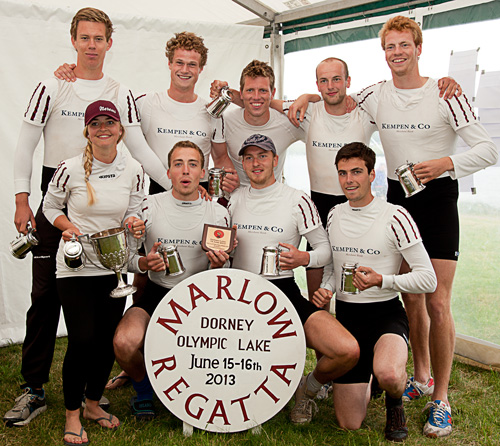
The prize giving

• The prize giving •
If the group feels comfortable and you work with them they’ll help make a great picture.

Organisation

Groups, especially close up, look odd if the faces are at different distances from the camera. They are close enough to us to look fine. However, the lens plays tricks on our eyes. If they are out of line – at different distances, but close together – they will appear to have different head sizes. Try to make people in each line of a group stand evenly down the line.

Sometimes the classic, short in front taller to the back works fine. Other times it is better to actually mix up short and tall – especially with different generations. It is much more natural for grandchildren to be arranged with grandparents than stuck on the end of the line because they are small. Putting children between adults also provides an opportunity to have a shorter person behind so as to break up a line up – to make it less formally arranged.

Close family groups, and friends, often look good leaning together, or heads together. It is very intimate to touch heads.

The dreaded ‘blinkies’ strike every group shot if you are not careful. The bigger the group the more likely that someone will blink. Overcome it with a little group control. Ready to shoot? Tell them you are going to help stop them blinking in the shot. Tell every one to shut their eyes. Count to two, tell everyone to open. Count to two. Press the shutter. Everyone will have open eyes. Explain it first so they know what is coming. It will make sure they all have eyes open long enough for you to get the shot.

So, with all these different ways of organising the group make sure that what you have is comfortable, natural – never forced.

Posing

Organising the group is about positioning and location. Posing is about personal stance and comfort. You, as the photographer, need to direct the group. But on the other hand you have to work with the people you have before you. Try to make it fun. Get them to relate to one another. If you have time, especially with candids or informal group, get them to experiment. Handshakes, greetings, hugs, arms around each other, standing in groups – the idea is to make ‘that’ group look good. Another group might not look good with the same poses. You should work with them, discuss ideas with them, respect their thoughts. They probably know each other better than you know them and will make the best suggestions. It is your job as a director to pick up on the most effective shots from their ideas. Consider what you know about them, consider their ideas for their poses – then work together to make the shot just right.

Getting the right feeling…

Working with groups is more than just lining them up. You have to consider the time, place, light, shade, the settings and the technique. But the best shots still come from the group itself. If the members of the group are comfortable, having fun and feel natural about their poses they will make sure you get a good shot. Work with them, help them make your picture work.

Comments, additions, amendments or ideas on this article? Contact Us

find out more...Photokonnexion tips by email
If you enjoyed this article please sign up for our
Tips by email service.
                                                 Find out more

By Damon Guy (author and Photokonnexion editor)

Damon Guy - Netkonnexion

Damon Guy (Netkonnexion)

Damon is a writer-photog and editor of this site. He has run some major websites, a computing department and a digital image library. He started out as a trained teacher and now runs training for digital photographers.
See also: Editors ‘Bio’.

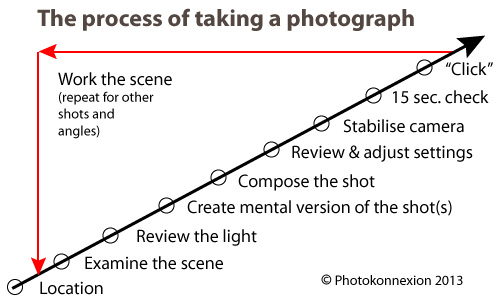
How to take photos – each important step in making a photograph

Infographic download - How to take photos

• Infographic showing the various steps in how to take photos •
A guide to what you should doing to make great images.
• Click to download printable full page version

Getting down to the detail…

Yesterdays article was How to take photos – each important step in making a photograph. Today I want to share the detail behind each step. Be warned! You might need to think again about your existing knowledge. Unlearning old ideas will help you to move forward and improve.

How to take photos – The location

Lots of people think you can just turn up and take pictures. Well you can, but often they are not good ones. Getting the best out of your location involves understanding what you’ll find there. Find out about the weather on the day. An idea of light levels and times of sunset and sunrise etc. is useful too. There have probably been lots of visits by others at popular destinations. Check “Google Images” for that site. Google will help with other details too.

When you arrive don’t just fire off loads of shots. Settle down and get into the location. Don’t make photography mistakes that mean you miss great shots. The first time you do this consider a variety of shots. Think about more than one shot, think about the whole shoot.

How to take photos – Examine the scene

Considering the scene is an important part of the work-flow on site. Unless you have been there before you need to get to know it. Use all your knowledge about camera angles, composition, lighting, camera settings and so on. Take the time to examine your location while thinking of these things. Consider your feelings about the scene too. How you feel will help your shot be an impassioned response to the location. What you feel about the scene is the best guide on how to take photos at that location.

How to take photos – Review the light

Most photographers forget this step. They are too wrapped up in the scene and the camera settings or the passion of it all. This step will make or break your shot. Look at the light. If you don’t know what I mean read these:

Ask yourself some simple questions about the light…

  • Is it hard or soft?
  • Is it coloured or more neutral?
  • Is it at the right angle to best capture the location/scene?
  • What is the best time for the right light?
  • Is it very bright and intense or dull and diffused?
  • Do I need any artificial illumination (flash, diffusers etc)?
  • Is the shadow hardly defined (sun up high) or strongly defined (sun to the side)?

Lean about the properties and vocabulary of light. It helps give you a greater understanding of photography. These questions, and others, help you make decisions about lighting for your scene. For more on “How to take photos – Light and Lighting” see the resource page in the SUBJECTS/ARTICLES menu at the top of every page.

How to take photos – Create a mental version of the the shot

If you want to make a great image – have a great picture in your head of your intended outcome. Visualisation has helped athletes, artists, thinkers, inventors and others to achieve amazing things. Train your mind to visualise in detail. If you see what you want to achieve it will guide you when setting up your camera. Take the time to create that mental picture – in detail. Consider how you are going to make the best of the light when you consider how to take photos. More about visualisation… 80 year old secret of world class photographers revealed.

How to take photos – Compose the shot

By now you have an intimate photographic knowledge of your scene. Composing the shot is about realising that potential. Long-time followers of this blog already know something about composition. For first-timers you can get lots of information from our Composition resources page in the SUBJECTS/ARTICLES menu at the top of every page. Composition is a skill that evolves as you develop as a photographer. Knowing more about composition helps your awareness and skill develop. Read about it to gain insight. Think about it every shot.

How to take photos – Review and adjust the camera settings

Now you have a picture in mind, composed, and are ready to set up your exposure. The exposure is defined by your camera settings. Camera makers will have you believe that the auto-setting on your camera is the perfect exposure. The fact is they made informed guesses to arrive at that exposure. It is different for every model of image sensor. Modern cameras do make a good representation of the scene. It is not always what you want however. You can change the exposure by under-exposing, over-exposing and by using different apertures, ISO levels and shutter times. That is your interpretation of the shot. When you think about how to take photos, plan how you want the image to come out.

Having a visualisation in your head helps you set the camera up to make that mental image. You do it using ISO, Aperture and Shutter speed. Even using one of the ‘mode’ settings is still a way of regulating your exposure. They all adjust those three basic facets of the exposure.

Here are some other links to pull together ideas about exposure:

How to take photos – Stabilise the camera

You want the photo to be sharp, crisp and clear. The faster the shutter speed the easier it is to get a sharp shot. But often, especially for a good quality shot, longer exposures are better. You need a good stance to hand-hold the camera. You will need a tripod (or other method) to steady it for longer exposures.

Stance is down to basic technique and comfort. The stance you use will be a personal thing for you. I have found many photogs have to relearn their stance after many years of a poor stance. It is best to learn a good one early. Here is my recommendation: Simple tips for a good stance

The use of tripods or other supports is a wide subject. It is also one that many learners tend to ignore- at least at first. When learning how to take photos sharpness is vital. Become acquainted with a tripod (preferably a good one) as early as you can. Your images will improve a huge amount. Here is some advice about tripods:

And, here is some basic advice about improving sharpness overall – The Zen of sharpness – 12 easy ways to improve

How to take photos – 15 second check

OK, that may seem like a long time. However, it is actually the time you need. You can get faster at it, but if you are taking a serious attitude to your shot then give it the time. You can find out all about the the 15 second check by reading these in order:

  1. An old sailors trick to improve your photography
  2. The fifteen second landscape appraisal
How to take photos – “Click”

This is where you press the shutter button. How you press that button can make a difference to your sharpness. Earlier, I mentioned this link, Simple tips for a good stance. It also gives advice on pushing the button without affecting sharpness.

An essential element of your shot is about confidence in what you have done. Today we are lucky. We just look at the back of our camera. Your first “click” may be a test shot. If your settings need adjustment then a simple technique called “Chimping” will help. Chimp and adjust. You will only need to do it a few times to get the shot right. You will not need to machine-gun the site with hundreds of “just in case” shots.

How to take photos – Work the scene

Chimping helps you set up for the shot and compose it. To get other possible shots you visualised earlier, you should work the scene. Repeat all the steps you have just done for each of the shots you foresaw. Working the scene is a skill and takes practice.

How to take photos – Time line

What is not obvious from the diagram is that the diagonal arrow is also a time-line of the shot. Of course it is a different length for every shot. You will have different problems to solve and ideas to consider for every shot. That’s fine. You have just learned a more careful, precise method for how to take photos. As you practice will quickly get faster at taking shots. But you will also make better images.

A promise

I can guarantee that if you follow the steps on this page you will…

  • Take less shots;
  • Get a better hit-rate (more usable shots per shoot);
  • Spend less time in post-processing;
  • Have better composition;
  • Improve your photography overall.

What is less obvious is that you will also save a lot of time.

By Damon Guy (author and Photokonnexion editor)

Damon Guy - Netkonnexion

Damon Guy (Netkonnexion)

Damon is a writer-photog and editor of this site. He has run some major websites, a computing department and a digital image library. He started out as a trained teacher and now runs training for digital photographers.
See also: Editors ‘Bio’.

The 5 secret steps every creative photographer should know

Coloured pencils

• Coloured pencils •
The creative process involves five simple steps…

The creative photography process is simple…

It’s completed in five steps. Knowing each step helps you be creative without forcing it. Recognising each step will help you know what to do and how to prepare for the next step. Here is the process for you to work through.

Here are the five steps in the creative process…

Stage 1. Imagining/visualising:

Actions…
• Developing ideas, visualising details, solving problems, considering concepts, ideas, feelings
• Storyboarding, scenarios, presentation shots, angles and lighting
Explanation… In this stage the primary ideas and concepts will need to be ironed out into the visualisation. Your mind-picture of the final creating will need to be fully detailed. This is the stage where you decide what you are going to shoot and how that shoot will turn out. For more on visualisation see: 80 year old secret of world class photographers revealed.

Stage 2. Planning:

Actions…
• Experimenting, researching, designing the set/shoot context
• Provision of props and equipment
• Consideration of location/studio planning work.
• Creating check-lists for the shoot requirements.
Explanation… This is where your ideas need to be tested and planned out ready for the shoot. If you need to acquire resources, travel, consider staff/models etc these will need to be included. At a smaller level, say table-top still life it may be no more that gathering your props. The planning needs to be on a size and time-scale appropriate to the shoot you have in mind.

Stage 3. Artistic Interpretation:

Actions…
• Developing the story/angle of approach/main idea
• Style considerations
• Technical variations of camera settings (movement blur/Depth of field/exposure etc)
Explanation… This is the most indistinct stage. Your artistic interpretation of the scene may be integrated into the planning stage, or into the shooting stage. Alternatively it may stand alone. It depends on how much of a story there is, or how much of a range of shots you anticipate shooting in the end. In my experience it helps to have a lighting plan and camera position plan from the planning stage. But, keep yourself flexible in the shooting stage. You need to be able to respond to the light and scene characteristics of the location in stage 4. However you choose to organise this stage, your story-board/visualisation will guide you in artistically approaching how your shots will be set up in this stage.

Stage 4. Shooting; evaluation/refinement:

Actions…
• Application of skills and techniques to realise the scene as visualised
• Technique types include – aesthetic, intellectual, and technical (photographic).
• Technical variations of camera settings
• In-camera review of results and re-shoot as necessary to achieve visualisation
• Shoot variations ensuring spread of images exploiting potential of the scene
• Refining/re-shooting/possible reinterpretation
Explanation… Here is where the plan and the visualisation come together. You are going to do the shoot. You will need to evaluate your results as you go along (chimping). You will also need to make sure that you cover all aspects of the plan for the shoot (check-lists).

Stage 5. Presentation:

Actions…
• Presentation, competition, viewing, website publication, other publication
• Exhibition
• Sale/contract fulfilment
Explanation… This is the final goal. In this stage you are presenting the final result of your shoot. The different ways you present depends on your media, the publication type and what you are hoping to achieve (public or private end result; exhibition; sale etc.)

The exact detail of what happens at each stage

The creative process will differ from shoot to shoot. After all, the idea itself, the circumstances and the resources needed will vary. So you will need to adapt the circumstances of each shoot to the stages in the process. To begin with, work on understanding how to use each stage and what to achieve to complete it. With experience you will be able to work through each stage quickly.

Overall…

This five step process helps to provide a framework for you to follow when going through the creative process from idea to final presentation. It will not stop you going through the agony of the creative birth of an idea, but it helps to inform you how you should bring that idea to fruition. Creation is more than an idea, you have not truly created something until you have a tangible result at the end.

By Damon Guy (author and Photokonnexion editor)

Damon Guy - Netkonnexion

Damon Guy (Netkonnexion)

Damon is a writer-photog and editor of this site. He has run some major websites, a computing department and a digital image library. He started out as a trained teacher and now runs training for digital photographers.
See also: Editors ‘Bio’.

Entering competitions is easy… here’s how

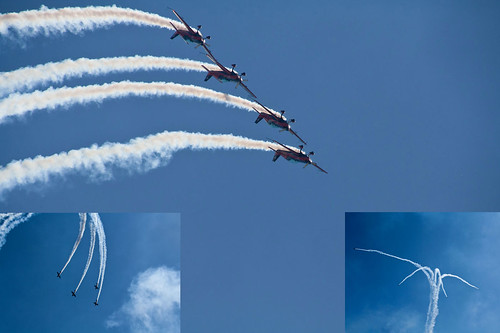
Air Display Montage

• Air Display Montage •
Entered in a competition as three projected digital images today
Click image to view large
• Air Display Montage • By Netkonnexion on Flickr External link - opens new tab/page

Competition is fun and improves your photography.

The essence of improvement is getting feedback and learning from it. Photography is no different. Competition provides feedback and helps you streamline your technique. Improve for competition and you will improve for your viewers.

Is there a problem?

You would think so. I know lots of people who are really rather reluctant to enter competitions. The reasons for this reluctance tends to fall in to three categories:
I am waiting for the perfect picture to enter…
• Ever heard the saying, “Excellence is the enemy of good”? You can waste your whole life waiting for the right circumstance, picture, money, gift, break, whatever. In most cases excellence is only achieved by practice, application, focus and persistence. And, of course, lots of mistakes along the way. If you don’t start now you will never get to a position where you can consistently create excellence. To work toward something excellent in the long run work with the “good” now and test out your skills. If you work at it excellence will follow.

I’m worried someone may say something horrible about my work…
• No one likes to be criticised. Except that is when it is positive and a learning experience. In photography clubs the world over competitions happen all the time. Yes, they are competitive, but they are also learning experiences. Photographers go there to learn what they can do to match up to future competitions. Judges have no investment in crushing people. Judges try to enable more competitors to enjoy photography and improve their skills. When they talk about a picture they want to emphasise the good points and highlight the things that need to be considered in the light of experience. A good judge will make you feel great about successful aspects of your picture and help you learn about the less successful ones.

I worry my effort is shamefully bad and I will be a laughing stock…

• Children are cruel to each other. The playground is a hell of a place to learn tact and diplomacy. Yet, most of us do learn it. We are grown up now and this excuse does not hold water. Most of us have been through the university of hard knocks. Really this is just a throwback to childhood. There is nothing like just doing it… have a go! There is really nothing to be afraid about.

Who will I be up against?

• One of the great things about competitions is they are usually graded. If you are a beginner then get into the novice or starter class. If you have been doing competitions for years then go for it, enter into the advanced competition class. But exercise common sense. If you have never entered a competition, swallow your pride and enter the novice class. You need to know the way these things are played and the gentle approach will allow you to learn and do well. Get the lay of the land before your all out attack! joining a local photographic club is a good start.

Of course you may want to enter a national or international competition right out. Well, feel free. However, the stakes are higher and so is the field of entry. The “Veolia Wildlife Photographer of the Year”, now in its 49th year, usually has more than thirty thousand entries. It is a revered world-wide competition with big prizes. Of course there are far too many entrants to give feedback on them all. So my advice is to start small. Enter club or local competitions. You will be up against people who have similar talent levels. Even if your picture is not commented upon you can often find feedback on the winners photos that will help you see your own errors.

What is expected of me in a competition?

• Competitions are great at putting people on the same level. Everyone is treated the same. There is only one real expectation…
Enter your best picture that matches the brief for the competition

You would be surprised at how many people fall at that simple hurdle. Most beginners simply do not read the brief and provide a photograph to match it. If you want to win, you have to provide a photograph that the judges are looking for when they judge. Sounds simple. It does take some thinking about. The rules (example) and the guidance documentation (example) are essential reading. You should know them inside out. What you think about the rules is irrelevant. No mercy will be shown for people who do not fulfil them and the brief. The image will just be excluded. If you do everything the rules and the competition brief asks, then your picture will be reviewed.

find out more...Photokonnexion tips by email
Enjoying this article? Please sign up for our
daily email service.
                                                Find out more…
#11030#

What will the judges be looking for?

The answer to this varies from competition to competition. Normally you can get a feel for it from the guidelines for the competition. However, as a general rule, the judging will cover the following sorts of criteria:
Fit to the brief
• Does the photo actually meet the competition requirements
Presentation: Overall Impression of the photograph…
• Editing, mounting (if mounted on something), printing (if a print)
Camera Work Technique: (photographic skill)
• Choice of viewpoint or angle taken to the subject
• Choice of lighting (should be appropriate for the subject)
• Accurate focusing
• Appropriate quality and choice of exposure
• Suitable depth of field (aperture)
• Appropriate use of shutter speed for the subject
• Highlights and shadows (ensuring detail is retained)
Technical Quality: (of prints or editing, finish etc)
• Absence of processing faults, dust spots, processing artefacts, image damage by sharpening etc.
• Appropriate tonal use and control of the range of tones
• Good image finishing
• Appropriate use of levels, curves and colour management (post processing)
Visual Awareness, Visualisation and Seeing:
• Composition, design and cropping of the images (aesthetic considerations)
• Appropriate simplification (minimising irrelevant complications)
• Distractions and intrusions should not divert the viewers eye
• Good use of light, mood, texture and colour
• Good use of masking and manipulation where appropriate (or where allowed) depending on the rules of the competition
Communication and meaning:
• Personal input, understanding of, and connection to the subject
• Appropriate communication of any message, mood, ideas, and information
• Complementary use of the photographic medium to suit the subject (mounting, projection, printing, texture of print substrate etc)
• Appropriate imagination and creativity as well as suitable timing for the shot

That is quite a list. It is a lot to take in. Some of the terms may not be familiar to you either. That is why you are advised to go through club channels to learn what is involved in these different processes.

What if I win?

• Congratulation are in order. However, there are usually some post competition issues to consider. For example often competitions put restrictions on what you can say to the press about the competition. You may also be required as a condition of entry to allow the competition organisers to be able to use your image in some way. Be sure that this use is compatible with your use of the image. Some commercial photographers have fallen foul of competition restrictions in the past. Again, the only guidelines you should follow are those of the competition. As to awards and prizes you will normally be told in the instructions for the competition what those are. They differ widely.

Finally…

I can only wish you luck. Competitions are great fun and I have learnt a huge amount from competing over the years at club and other levels. I think if you enter a competition you will learn too. It is all about improving your photography and having fun. If you join a club it will also be about doing it with your friends and with their help too.

By Damon Guy (author and Photokonnexion editor)

Damon Guy - Netkonnexion

Damon Guy (Netkonnexion)

Damon is a writer-photog and editor of this site. He has run some major websites, a computing department and a digital image library. He started out as a trained teacher and now runs training for digital photographers.
See also: Editors ‘Bio’.

Five tips for boosting your photographic creativity

Getting ideas is more than just seeing new things to photograph

“Celebrity on the red carpet”
Getting ideas for shots is more than just seeing new things to photograph.
Click image to view large

Get past photographers block – try these tips.

When you run out of ideas you’re stuck. Getting past this block may be simple. Going somewhere new helps, but you’ll soon run out of places. Try a few idea-boosting tips.

The list of new places to go can be as long as your arm. But, you can’t get to them all. Too far away, too expensive, too time consuming… a problem. Sometimes you have to rely on your wits. You need to think past your lack of ideas. There are some simple things you can do.

Repeats

In photographic competitions I often hear judges say “…it’s a good project, worth following up”. What they mean is the picture is pretty good, but more work will help it become perfect. It’s a fair bet there are lots of pictures in your portfolio that you can re-work with another shoot. Having looked at the shot you will see things you can improve. Repeating old work with a new eye and technique is a great way to improve. It’s also a confidence booster. You will see how much you have improved your skills.

The other thing you can do is take the same picture under different conditions. There’s more variety in the same scene than you might think. Try shooting out of the same window every day for a year. Capture all the seasons, all the states of light and events. There is enough to look at, just read this article… Photographer snaps a million photos out his window in two years External link - opens new tab/page.

Explore new topics

Sometimes a creativity block is about knowing your subject well so you seem to know all the angles. That is rarely true. How to get past it is to take a new perspective. Some of the great advances in science have been from people learning new topics and cross-connecting the ideas. So, try something new. Learn a new topic. Explore a new area of photography. Research a new technique and then use it. New things frequently lead to new ideas. These feed back to your block. Change tack and try a new direction.

Take up a project

Being creative and trying new things takes commitment and application. Often a creativity block is about not committing yourself enough. Try a new project. Commit time, resources and energy to your project. You will learn new things, try new ideas and explore them in depth. Set yourself a personal project. For example, try water-droplet photography – it takes time and practice to get it right. You need to do some research, you will have to put together some basic equipment. You will need to work with new techniques and new ways of looking at your subject. This is not a one evening project – you could make it a whole career. The point is that running a project on one subject gets you into a subject in depth. This opens up your ideas. Try it – its fun.

Challenge yourself

Developing yourself and your skills is about getting past what you can do and trying out some things you cannot do – yet. Sure, there is some fear of failure there, but, no one will criticise you for trying and not getting it right on the first shot. Take time and try out something totally new. You can do it. Look for more difficult approaches, try out alternatives or deliberately do it differently to your normal way. It is certain you will learn something. I often suggest to my students that they buy or borrow a new lens. Then spend a month using it – stop using all other lenses. You will learn a lot of new ways to look at old ideas.

Look for new inspiration

Read a book; search Google images on a new subject; talk to another photographer; break an old habit… there are thousands of things you can do to find new ideas. Most of them are about raising questions. Look at yourself and find out what you know very little about. Then find out about it. Ask new questions, get new answers. The Internet is an endless source of new information… do some idea searches. You will find lots to think about.

The way of creativity…

I have sometimes heard from students that ideas and creativity are a genetic gift of some kind. I don’t subscribe to that. Creativity is more often about playing with ideas, trying new things, and making connections. Creativity is not a talent. It is a skill that can be learned and encouraged. Watch this video. It’ll help you look at yourself as a different, more creative person: How To Be Creative – its not a talent! External link - opens new tab/page