Tag Archives: Stop

Using a neutral density filter

ND filters can be used to produce some great images

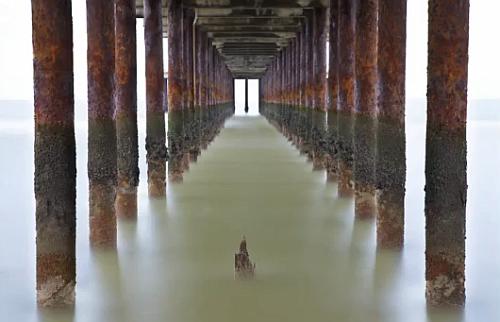
Lee Filters – Big stopper neutral density filter reduces the light by ten stops. You can produce great images like this one from the video.

Sometimes you need a long exposure…

However, to take a very long exposure in daylight will mean too much light will burn out your picture. So you need to turn down the incoming light. For that you use an ND Filter. Here is how they are used.

Remind me, why do I need this?

Remember, shutter speed controls movement blur. If you want to show a car looking blurred as it goes past you might set the shutter speed to about a fifteenth or thirtieth of a second. But what if you want to capture a much less obvious movement or a really slow movement? Say two minutes? Well, normally the amount of light coming in will burn out the shot. Of course you can use a really small aperture (eg: f22) and let less light into the camera. But on a bright day two minutes will still burn out the shot. This is where Neutral Density (ND) filters come in. They are specially darkened filters that cut the light down allowing you to extend your exposure. With one of these you can do some awesome effects.

10 stop Neutral Density Filter (video)

In the video we see the making of a picture (above) by using the Lee Big Stopper Neutral Density Filter. This ND filter is very dark, which takes down the light by 10 stops. It creates a great effect on of the water swirling under the pier. This is the darkest type of ND filter.

ND filter strengths

ND filters can reduce the light entering your camera for up to 10 stops. This allowed 2 minute exposures in the video. However, there is also ND2, then ND4 and ND8. Other strengths exist, but these are the most common. They allow you to have shorter exposures so you can adjust the exposure to the needs of your shot. You can also put them together so an ND8 + ND2 gives you an effective ND10 – the strength in the video.

ND Grad.

Another of these type of filter is the graduated Neutral Density, or ND grad. The use of an ND grad is quite specific. It is used to reduce the incoming light from the sky when you have a bright sky and dark ground. If you expose for the ground the sky burns out. If you expose for the sky the ground is too dark. The ND Grad. helps prevent the sky burning out.

The ND Grad. is dark at one end and clear at the other. The two zones meet in the middle where the clear graduates into grey. Put the filter over the lens so the line of clear/grey graduation lies on the horizon, darkening the sky. Now, you can expose for the scene and get even light distribution. The next video will show you how this type of ND is used.

Mike Browne  External link - opens new tab/page
Problems?

No, filters are simple and easy to use. There are some important things to remember…

Always use a tripod. It is impossible to hold a camera steady for more than about half a second. After that your image will start to get blurry.

You need to be quite precise about lining up ND Grads with the horizon. Take a little practice before going out to do the BIG shot.

The darker the ND Filter the more there is a tendency to impact on the white balance. Sometimes you get a blue colour cast, sometimes a red one. You can remove this in post production if you are using the RAW file format. Alternatively you can test the filter with your camera and adjust the white balance setting in-camera to correct for the aberration. Most of the stronger ND filters have this colour-shift tendency. it is exaggerated by the sensor type. CMOS sensors tend to magnify the effect.

Sometimes getting the exposure right is a matter of experimentation. Take a few test shots and make sure you do some “Chimping”.

If you are buying ND filters, especially ND Grads buy square ones. You can buy adaptors for these to fit any lens and it allows you get creative in more ways than round, screw-on filters that only fit one lens.

There are many different kinds of filters which produce a huge range of fun effects in-camera. Many of these effects cannot be processed into the shot later. The square filter system shown in these videos allows you to expand your collection and develop a new set of skills without buying an expensive filter for each lens.

ND Filter set…

3 full ND filters
3 graduated ND filters
Full fitting kit for a range of camera
and lens sizes.
10 Adapter Set + 6 Filter ND2 ND4 ND8 G.ND2 4 8 For Cokin P Canon Nikon Sony LF6

Please leave any questions or comments you have about these in the comments below.

find out more...Photokonnexion tips by email
If you enjoyed this article please sign up for our
Tips by email service.
                                                 Find out more
#11030#

By Damon Guy (author and Photokonnexion editor)

Damon Guy - Netkonnexion

Damon Guy (Netkonnexion)

Damon is a writer-photog and editor of this site. He has run some major websites, a computing department and a digital image library. He started out as a trained teacher and now runs training for digital photographers.
See also: Editors ‘Bio’.

Ten simple ideas to improve your photography (and a fun quiz)

Ten Tips

Ten Tips and 12 fun quiz questions.

Simple things help you…

We should all take a step back and think about the basics sometimes. It helps us remember essential techniques and keeps us on our toes. Here are the basics with some fun quiz questions too.

The simplest techniques in photography are often the most important ones. In this post we make sure we don’t forget them…

10 essential things to know; 12 fun quiz questions
  1. Not knowing your camera: This is really bad news. If you are hoping to improve your photography make sure you learn what every lump, bump, dial, screen, lens and twiddly bit does. Read your manual regularly. Practice with each function until you have got it right. Then practice it in the dark so you can do a night shoot.
    Quiz Question 1: How many lenses are there on a camera? Answers at the end!
  2. Poor stance: Most people when starting photography don’t realise that the way they stand and hold the camera creates all sorts of problems and poor performance. If you are a keen photographer a good stance can contribute to improved sharpness (hand-held shots), better focus, more steady hand and better shot timing. Learn to stand properly right at the start and you will save yourself lots of re-training time later.
    Quiz Question 2: At what point in the breath cycle is it best to take your shot?
  3. Not using a tripod: classic mistake. Tripods save you lots of time and give you pin sharp photographs. They give you an opportunity to set your camera up properly and ensures that your are ready for your shot.
    Quiz Question 3: A monopod has one leg, a tripod has three legs. What is, and how might you use, a bipod?
  4. Not giving the camera time to focus: When you press the shutter button halfway down it causes the auto-focus to cut in which focuses the camera. But if you punch straight through that to the shot the focus has not had time to do the full focus. This normally happens on the first focus attempt when the focus is right off. After that the lens in nearly focused and will adjust more quickly. So don’t make your first focus attempt too close to the shot or it will be blurred.
    Quiz Question 4: Why do you have two rings on a modern auto-focus/zooming photographic lens? What do you call each of them?
  5. Taking pictures against a bright light? Cameras don’t like very bright lights. Especially if there are also very dark spots nearby. Shooting indoors while looking at a window out to a bright sky will cause a strong white spot. This is very distracting and draws the eye away from the subject. Not good. There are Light and Lighting resource pages on Photokonnexion for you to learn more.
    Quiz Question 5: How many stops of light can healthy human eyes see (20:20 vision)? How many can the camera (rough generalisation) cope with?
  6. Relying on flash (especially pop-up flash): Pop up light has a very small concentrated source. It discolours faces, washes out colours, creates harsh, sharp-lined shadows and is badly placed (too close to the optical axis) creating nasty highlights on faces. Try to use natural light more. It is much more forgiving and does not produce such harsh shadows most of the time.
    Quiz Question 6: What is often the result of using pop-up flash with respect to two parts of the face?
  7. Dead centre subject: If you put the subject of your picture in the centre it will usually be boring. If you off-set your subject the eye will be looking to see why the symmetry is broken. That keeps the eye hunting around the screen. Learn about the “Rule of thirds” and other Composition principles. That will help you make the shot more compelling to the eye.
    Quiz Question 7: What type of compositional perspective would you be working with if you want to promote a three dimensional feel to your picture composition?
  8. Horizon control: Make sure your horizon is level, especially if it is a seascape. If you leave it on an angle the picture will be ruined because it will look like the sea is sliding off the page! Horizons also induce mid-picture viewer-stupor. Make a decision. Either shoot for the sky in which case place the horizon in the bottom third of the picture. Or, shoot for the ground in which case the horizon goes in the top third of the picture. An off-set horizon is more dynamic and keeps the viewers eye moving.
    Quiz Question 8: If your main choice is to shoot for the sky, where would you take your exposure from? (Where would you point your viewfinder focus point?) a. The sky? b. The ground?
    Quiz Question 9: Describe autofocus hunting and why it happens?
  9. Simplify, simplify, simplify: The most effective way to show a subject to your viewer is to de-clutter the picture. Take out of your composition everything that is nothing to do with the subject. The more you make the viewers eye go to the subject the more effective your shot will be.
    Did I mention that you should simplify your shot?
    Quiz Question 10: What is it called when you paint out something from your picture in post processing to simplify a shot?
    By the way, did I mention that you should work really hard to simplify your shots?
  10. Go manual: Auto-modes on your camera are really best guesses about what the manufacturer thinks will be suitable for the average shots most snappers will take. Buy you are a keen photographer. To get the camera to do exactly what you want, and to make discerning choices about your images you should work on improving your manual control. Your understanding of photographic principles will improve, your skill at exposure will improve and you will find yourself making informed choices about how you want your picture to come out. You will turn from a snapper into a photographer.
    Quiz Question 11: What does the ISO control do? a. Adjust the sensitivity of the digital image sensor or b. Change the aperture size?
    Quiz Question 12: Does ‘shutter speed’ or ‘aperture’ control movement blur?
Answers to quiz questions
  • Quiz Question Answer 1: I am talking about any camera that has a lens, not just DSLRs. the number of lenses is a matter of variation. If you are discussing photographic lenses then only that one will count (but read on). Some people think of each glass element in the photographic lens as an independent lens. Technically that is not true. They are optical lenses or glass elements, not photographic lenses. However, if the photographic lens (and elements if you included those) were all you counted you would be wrong. Here is a short list of Possible lenses on a camera of any sort…

    There may be others.

  • Quiz Question Answer 2: You should take a shot at the full inhale point or full exhale point before inhaling or exhaling in the next part of the cycle. You can choose which is best for you. All you do is delay the next part of the cycle while you take a shot. This is the point in the breath cycle when there is least movement of the shoulders/chest. Read more about it in Simple tips for a good stance
  • Quiz Question Answer 3: A bipod is photographically uncommon. Understandably, it has two legs. Find out more here… Definition: Bipod
  • Quiz Question Answer 4: The two rings on an auto-focussing photographic lens allow one ring to focus the image – the focus ring. The other ring is for zooming the lens. The latter changes the focal length and is called the focal length ring.
  • Quiz Question Answer 5: Human eyes can see about 18 to 20 stops of light when healthy. However, by contrast the best commercially available cameras have to operate with a dynamic range of 8 to 12 stops of light. Research is pushing the boundaries but there is still a big gap to meet the dynamic range of the human eye (in 2013).
  • Quiz Question Answer 6: Pop-up flash is very likely to cause red-eye.
  • Quiz Question Answer 7: To make things look three dimensional in your image you should be working with three point perspective. Look for lines in your image that promote cube-like structures. For example buildings, walls and other objects with lines and shapes that have a solid feel in real life. This will trick the eye into believing that there is a solid object in the picture. Read: Simple ideas about perspective in photography and: Definition: Perspective
  • Quiz Question Answer 8: If you shoot for the sky you will need to be taking your exposure from the sky as that is the brightest point. This will leave the ground darker in your exposure than you would see it with your eye. You can use one of a number of techniques to correct that later.
  • Quiz Question 9: Auto-focus hunting is when the auto-focus in the lens cannot focus and will keep going up and down the focus range trying to get a focus. This is a common problem at night, in darker conditions, low contrast conditions and clear or totally grey skies. You can read more about it in: Auto-focus ‘Hunting’ Definition: Hunting, Auto-focus

  • Quiz Question 10: when you paint out something from your picture in post processing to simplify a shot? You normally use a cloning tool. You can find out more in: Definition: Cloning; To Clone; Cloned; Clone Tool.
  • Quiz Question 11: What does the ISO control do? It adjusts the sensitivity of the digital image sensor allowing you to work in bright light (low ISO setting) or low light (high ISO setting). There is an article on ISO here: ISO.

  • Quiz Question 12: Shutter speed controls movement blur. Aperture controls blur (bokeh) created by the loss of sharpness outside the zone of acceptable sharpness. This is traditionally known as the depth of field. More reading on: Definition: Exposure and related to aperture: Definition: f number.

find out more...Photokonnexion tips by email
If you enjoyed this article please sign up for our
Tips by email service.
                                                 Find out more
#11030#

By Damon Guy (author and Photokonnexion editor)

Damon Guy - Netkonnexion

Damon Guy (Netkonnexion)

Damon is a writer-photog and editor of this site. He has run some major websites, a computing department and a digital image library. He started out as a trained teacher and now runs training for digital photographers.
See also: Editors ‘Bio’.

Easy ideas for controlling your flash unit

Specular highlights

Bath toy
Specular highlights are distracting and draw the eye which spoils the shot.

Flash is a great benefit and a problem all at once!

Most people don’t realise two things about flash. First, the standard setting is nearly always too powerful. Second, the highlights resulting from flash are very distracting.

Working with flash power

Like all things in photography you need to think carefully about using flash. It is not simply click and move on. Most improving photographers are just beginning to make shots rather than snaps when they begin to see the quality and colour of light. So it is easy to miss some of the impacts that flash has on a subject. Here are a few consequences of a flash shot…

  • An over-bright subject.
  • Strong highlights with a tendency to wash out colours.
  • Specular highlights that create sharp, bright spots that distract the eye.
  • Bright foreground, dark background.
  • Flesh tones strongly whitened giving a sick look to the face.

Each of these is almost always down to using too much power in the flash. So, the way to over come these issues is to do two things. Turn down the power of the flash and diffuse the flash so it scatters the light.

Turning down the flash is simple. You must find the setting that adjusts the flash power level. This is easy if you are using an off camera flash because the unit usually has a display and a dial or buttons to change the settings. On-camera (pop-up) flash is usually adjusted by finding a menu setting that turns the power up or down. You may need to consult your camera manual to find where that setting is found.

The key to getting the right setting for your flash is to understand how to change it. Most off-camera flash units are marked up so there is two stops of light on the flash. Normally if the flash is marked 1:1 then that is full power, and more often than not this is the default setting. You can usually turn this down by one third of a stop of light at a time. Each time you stop down the setting one stop you are halving the light it emits.

Pop-up flash units may not be marked so clearly. Some are marked [low – medium – high], others, particularly point and shoot cameras, may just have “full | half”. More sophisticated pop-up units may also be marked in the same way that off-camera flash units are marked. Which ever your flash is, you should practice with it so you have an idea of how powerful it is and how much the settings can change the impact of the flash.

Flash diffusion

The best way to get used to using flash and controlling the power is experimenting. However, the issue of nasty highlights is the other problem the inexperienced user often does not spot at first. Strong highlights raise the light levels so you can see the tonal changes in the colour of the surface the light hits. This helps to define the shape of an object. So, for example, a brighter top on a ball and dark shadows under it help to define the spherical shape.

If the light intensity is too high, particularly on reflective surfaces, the reflected light level will exceed the level the camera can cope with. The highlight then becomes blown out. The light is so bright in that area that it becomes a bright spot where all the detail is lost to pure white. Unfortunately such strong, blown out areas, are severe distractions. In the picture above, the small reflective points, called specular highlights, are also strongly distracting. So what can you do to avoid these nasty effects?

If your power adjustments are not working and you still have blown out spots or highlights then you should consider diffusing the flash. This makes a difference in two ways. The diffused light will scatter the light from the flash over a wider area. This effectively lowers the light intensity even further in the area of the highlight since the light is not hitting it from a direct focused hard light from the flash.

Secondly, diffused light spreads the effect of the light. This makes it more likely to bounce off other surfaces nearby. These surfaces then become multiple mini-light sources. All these sources hitting your subject create a soft light which is much less likely to create specular highlights or very strong colour-destroying highlights.

So how do you do this diffusing? I just love this great flash diffuser. Designed to fit your off-camera flash unit it is an ingenious design and easily adaptable to any flash unit. Check out the Rogue FlashBender 2 – off camera flash. If you have an off-camera flash this is the best. It is the most adaptable diffuser I have ever used. You attach it to the flash with a wrap around grip. The big diffuser stands up above the lens of the flash. It is tough, flexible and creates a lovely daylight-white light. It is superb for portraits and still life work. Coupled with adjustments to the power settings on your flash it gives you excellent control and helps reduces highlights and the effects of hard light direct onto the subject.

For off camera flash there are a range of diffusers available. They are based on various different mounting or reflector principles too. So, you need to look around to see if you can find a diffuser that suits you.

For pop-up flash the options are not as easy. However, I recommend one of two options. I have successfully used ordinary white tissue paper sticky taped over the pop-up flash to both reduce and diffuse flash. However, while this works well, reducing the light by about a full stop, it is a temporary solution. Also, if you use the flash a lot the extra insulation may cause the flash to over heat. So, not for regular use.

My favoured options for pop-up flash diffusion are one of these three methods…

Professor Kobre’s Lightscoop, Standard Version Bounce Flash Device, Universal Model, fits over the Pop-up Flash of most SLR Cameras This diffuser produces a very effective ceiling bounce for the diffusion. However, make sure that in rooms where you use it there is no strong colours on the ceiling or it will cause colour casts.


Gary Fong Puffer – Pop-Up Flash Diffuser for Canon / Nikon / Pentax / Olympus / Panasonic- Lumix pop-up flashes A well reviewed unit, and has the advantage of an easy fit. The other advantage is that it diffuses the light moving forwards. The other two units here bounce the light which puts you slightly at a disadvantage in controlling the flash light direction.


Cateye LETS Flash Reflector/Diffuser Hybrid, for use with DSLR pop-up flashes Although I have not used this one personally, I know some people who have. I have had some very good feedback on this unit and it seems to work effectively in a wide range of situations.


Great shots with flash…

Yes, like everything else in photography, to get good with it, you have to practice use of flash. However, first you need to make sure you can spot the highlights, specular highlights and over-powered flash. Once you know what you are looking for you can adjust your flash power.

The best way to gain control of your flash is reducing the power, or at least adjusting it. Also, the more you soften the harsh, hard flash light the less distracting and natural the highlights will be.

Whatever you decide to do to make your flash manageable do plenty of experimenting to gain control of the light. Don’t forget to Examine Shots Before Shooting Again – “Chimping” to check for highlights. The practice will pay you back in great, well lit shots many times over.

find out more...Photokonnexion tips by email
If you enjoyed this article please sign up for our
daily email service.
                                                 Find out more
#11030#

By Damon Guy (author and Photokonnexion editor)

Damon Guy - Netkonnexion

Damon Guy (Netkonnexion)

Damon is a writer-photog and editor of this site. He has run some major websites, a computing department and a digital image library. He started out as a trained teacher and now runs training for digital photographers.
See also: Editors ‘Bio’.

How to shoot bright white backgrounds

Shooting with a high-key background

Shooting with a high-key background – a two stage process.

Simple shots focus attention on the subject.

The bright-white background technique, known as high-key, is used in a wide variety of different photographic situations. It’s fun, easy to do and produces great shots. Here is how it’s done.

The technique is always the same if you are photographing a car or person in a big studio, or a tiny table-top still life. The aim of the technique is to get the subject surrounded by a seamless white surface. This will mean your subject is thrown up in stark contrast to the background. Then the viewer’s attention is directed at the subject because the eye has nowhere else to go. Effective, powerful and bright, the technique really makes your subject pop off the page.

There are two basic methods of doing high-key backgrounds. The first is to spend a long time in photoshop with masks, cloning and painting. You can, with some skill, make your image look like it was produced in camera. Good luck with that. It really does take a lot of time and effort.

The other way to do high key shots is create the bright-white background effect using lights and a white background.

Setting up

You will need something to create the white background. You can use a painted wall, white wallpaper, white card, sheets or pretty much anything else that is white. The brighter the white the easier it is to use.

You need a bright white light. An off-camera flash unit is great. If you don’t have one then you can use very bright house lights. Be careful there is no colour cast. It is advisable to consider some test shots to get the colour right.

To set up your shot you will need to put your subject in front of the white background. In the case of the shot above I was shooting downward onto a piece of card. In this case I put a small support under the hand-carved soapstone heart. This lifted it off the background a bit.

If you want no shadows at all, like the shot below, then you must present the subject far enough off the background that you can get a bright light in behind it.

High key shot with no shadows

High key shot with no shadows. The background is strongly lit up so it blows out to a perfect brilliant white. The subjects in the foreground are lit as they would be normally.

Lighting

Next, you need to position the light so it is pointed directly at the white background. In most cases you will want to point it so that the brightest point is immediately behind the subject. In the shot above it was positioned slightly at the top of the image because I was trying to create a little shadow under it. This made it look like it was floating. However, if you want no shadows then you must have all the bright light behind the subject.

Now take a test shot. The idea is that when the camera sees the white it will be so bright that it burns out the image wherever the white is exposed. If your white looks grey… then you need to brighten the white with more light (or take a longer exposure). If your subject is so overwhelmed with white from the background, you need to reduce the intensity of lights pointing at the background.

As with most photographic lighting, its a balance. To get your background just right you need to play with the light intensity up/down until you have a nice bright seamless background.

Now for the subject

Now you can, if necessary, adjust the lighting on the subject. If you are working with a person, ideally they would be one to two meters in front of the lighted background. So they might need to be lit with a separate light like a flash. Or, if you are working with a still life, the ambient light might be fine.

You are aiming at lighting the subject so the background is much brighter. The idea is that the contrast between the two is so great that the white is blown out… it becomes pure white because of the intensity of the reflected light. The subject needs to be lit normally so it is just how you would like it to look. To achieve that you might need to turn off the back light. You can use the normal exposure mode you use on your camera. Take the picture using flash if you want. Do a few test shots to get the lighting right on your subject with the back-lighting off.

The high-key shot

By now you have hopefully got some blown-out white background shots. You should also have some normally lit subject shots – just how you want it to look. Now it is time to switch on the background lights and, using the lighting you set up on the subject, take the shot with the bright background.

In photographic terms, you are aiming for the background light to be about one or two stops of light brighter than the subject you are shooting. An increase in light of one stop is a doubling of the light intensity. You will need to test that with a few shots.

To get it right you can test the lighting of the subject and background separately with a light meter, or with your on-camera light meter. You could just experiment using test shots and changing the lighting around. Or, you could use the ‘blinkies’ and ‘chimping’ method.

Whatever you choose, a few minutes experimenting will give you some idea of the brightness. Have fun!

By Damon Guy (author and Photokonnexion editor)

Damon Guy - Netkonnexion

Damon Guy (Netkonnexion)

Damon is a writer-photog and editor of this site. He has run some major websites, a computing department and a digital image library. He started out as a trained teacher and now runs training for digital photographers.
See also: Editors ‘Bio’.

Stopping down

A new definition

A new definition

A new definition in our Photography Glossary


Adjusting your aperture is one of the main ways to control exposure in your DSLR. Stopping down refers to the act of making your aperture smaller.

Today we have posted another definition in our Photographic Glossary…
Definition: Stopping down

We have also added an additional definition relating to aperture… Definition: f number; f stop;

By Damon Guy (author and Photokonnexion editor)

Damon Guy - Netkonnexion

Damon Guy (Netkonnexion)

Damon is a writer-photog and editor of this site. He has run some major websites, a computing department and a digital image library. He started out as a trained teacher and now runs training for digital photographers.
See also: Editors ‘Bio’.