Tag Archives: Photographic umbrella

Umbrellas and softboxes

umbrellas and softboxes

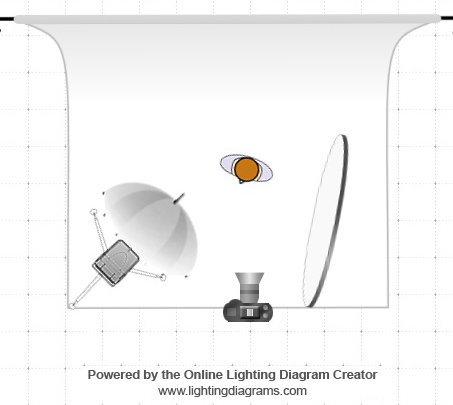
• Softbox Vs. Umbrella •
Umbrellas and softboxes seem to have similar characteristics… or do they?

What IS the difference?

Photographers learning to use lights find it difficult to understand the difference between a softbox and umbrella set-up. It is important to understand if you want to have control of light.

The nature of soft and hard light

Hard light is not some mutated form of ordinary light. It is a type of light that is focussed and which shows a hard transition from bright to dark. The shadow line is a sharp contrast. On the other hand, soft light wraps itself around curves and has a soft transition from light to dark.

The definitions of hard and soft light tell us much about the characteristics of the light but not how the light is formed. Well, it turns out that the light source, its shape, size and focus or diffusion as well as distance from the subject all have an impact on the characteristics of light.

Photographic umbrellas and softboxes

In the video Mark Cleghorn examines the characteristics of photographic umbrellas and softboxes. He does some great shots with both. Pay attention to the way he uses the lights and what characteristics he points out. Distance and size of the sources play an essential role in the formation of the softness and hardness of the light. His experiments are interesting and show you how the nearness of a large light source can create softness. It seems counter intuitive, but it is correct.

The first half of this video is very useful and you will learn a lot about Umbrellas and softboxes as light sources. The second half showcases advanced features of Photoshop. This is a less useful section if you are only interested in the practical issues for umbrellas and softboxes. You can safely skip it.

Lastolite Umbrella Versus Softbox from Lastolite on Vimeo  External link - opens new tab/page.

Types of lights

There are many types of light source that can generate light for umbrellas and softboxes. For most situations it is best to use off-camera flash units. The more expensive studio flash units are more for professional use. If you are just starting out they will be more powerful than required for most general purpose needs. Off camera flash helps give you flexible use. It is also easily controlled. You can work with both umbrellas and softboxes with an off camera flash.

Fortunately, most umbrellas and softboxes units designed for off-camera flash will mount most types of flash units. When looking to purchase lights think about what you want to achieve. Then buy the flash unit needed to meet your need.

Below is an example of a photographic umbrella set…

DynaSun W968S Professional Kit with Holder, Umbrella, Stand and Bag for Cold Shoe Mount Flash Gun Flashgun  External link - opens new tab/page
This is a high quality but affordable photographic umbrella unit. The complete package includes everything you need except the off-camera flash unit. The inclusion of the small carrying bag makes the whole thing neat and well presented.

When it comes to the purchase of a soft box these too have the universal fittings for off camera flash units (although studio units are also available). Here is an example softbox…

24″ 60cm x 60cm EZ-Fold Studio Softbox Kit with 2 x Diffusers and Ballhead Bracket for Portable Flash and Speedlite  External link - opens new tab/page
This is a high quality, well produced softbox with easily adjustable fittings and a variety of ways to set up light diffusion within the unit.

Of course both these units are among many others in the field. You can see the various types of each on these search pages…
Photographic umbrella – Search page on Amazon  External link - opens new tab/page

Softboxes – search page on Amazon

These various examples include studio light units, always on bulb mountings and fittings for off-camera flash. Check for what you want before you buy. The most flexible is for off-camera flash when you are starting out.

No removable flash? Read this: Off-camera flash. It’s a great introduction and recommends an affordable flash unit.

Comments, additions, amendments or ideas on this article? Contact Us
or why not leave a comment at the bottom of the page…

Like this article? Don’t miss the next — sign up for tips by email.

Damon Guy - Netkonnexion

Damon Guy (Netkonnexion)

Damon is a writer-photographer and editor of this site. He has run some major websites, a computing department and a digital image library. He started out as a trained teacher and now runs training for digital photogs.
See also: Editors ‘Bio’.
By Damon Guy see his profile on Google+.

Simple portrait lighting for anyone to try (pt.1)

The basic portrait lighting set up

The basic portrait lighting set up
The umbrella represents the key light, the round reflector represents a fill light.

To do a basic light set up is easy.

Portraiture is a pursuit for photographers at all levels. Sometimes beginners shy away from anything but pop-up flash shots. They feel that they have an inadequate grasp of lighting techniques. Actually, the basic lighting for a portrait is very simple.

The essentials

In the diagram above there are four main components of the set-up plus the subject. There are…

  • The backdrop, represented by the roll of paper mounted on the wall, down to the ground and under the subjects feet.
  • The light, represented by the flash unit behind a photographic umbrella which diffuses the light.
  • The reflector, the upright round object to the right of the camera.
  • The camera itself, representing the position at which the photographer stands.
The light

In any photographic scene we refer to the main light as the “key light”. This is the main light source that brightens the scene and the subject. In most cases the basic set up will be using an off-camera flash. However, this type of flash is a very small light source. As such it tends to generate a very hard light. That is very unflattering light on the face. Hard, harsh shadows tend to create angular shadows. This is unflattering except in a dramatic mood or a shot emphasising maleness. To ensure that the light is more diffused the photographic umbrella is placed in front of the flash. This creates a soft light which is more flattering.

As you can see from the scene in the diagram the key light is angled on one side of the subject. Your portrait sitter will then be more strongly illuminated from one side. This leaves the other side of their face in shadow. You can fill out this shadow by using the reflector. It back-reflects the light from the flash. The reflected light will be more diffused and of a lower intensity than the flash-side of the face.

Alex Broad Light 01 by Photo Geek, on Flickr

• Alex Broad Light 01 •
The light on the camera-side of the face is from a key light. The other side of the face is a lower intensity light.
• Alex Broad Light 01 • by Photo Geek, on FlickrExternal link - opens new tab/page

The diffused flash on one side of the face and the slight shadow (filled by the reflector) on the other, creates a nice contrast. The difference in light across the face helps to create depth and structure. This is what photographers are looking for. We want to see nicely rounded features defined by the light-shadow relationship created by the gradient across the face.

In the diagram the angle of the key light and the reflector is a relatively shallow angle to the face. However, the angle can be varied. That variation will bring out the basic portrait lighting angles. You can read more about those in “Simple positions for classic portrait work”.

Get Photokonnexion tips by email!
We send you tips daily – find out more…

Start email subscription now!
#11030#

Lighting variations on a theme

This basic set up can be done even if you do not have off-camera flash or any kind of photographic light. The idea of a “key light” is that it is the main “light source”. In a studio that light could be a studio strobe light. In a house you might use the light coming in through the lounge window. An off-camera flash like above is another option or you could use some other form of lighting. In the outdoors the sun could be the key light.

In the case of the reflector you can use secondary sources of light instead. If you have a bright key light like flash or other light source you could use the lounge window as your secondary lower intensity light. I have seen fill done with a candle – lovely soft glow. Light from a reflector is only one way to create fill light.

The effect is all in the angles of the light relative to the face, and the gradient of light-to-shadow across the face. What you use to create the light is more about the way you take the photograph and the amount of light the camera needs to get a proper exposure. The motto is be creative with the way you create the light, and with the way you vary the angle of the key light and secondary light relative to the face.

Simplicity

The aim of this article has been to show how simple it is to set up a single light and a secondary source of light to create pleasing portraits. It is not difficult and it can be great fun if you have a good relationship with your portrait subject.

To get the most out of this tutorial you should also see: Simple portrait lighting for anyone to try (pt.2)

By Damon Guy (author and Photokonnexion editor)

Damon Guy - Netkonnexion

Damon Guy (Netkonnexion)

Damon is a writer-photog and editor of this site. He has run some major websites, a computing department and a digital image library. He started out as a trained teacher and now runs training for digital photographers.
See also: Editors ‘Bio’.

Can you write? Of course you can!
Write for Photokonnexion...

We would love to have your articles or tips posted on our site.
Find out more…
Write for Photokonnexion.