Tag Archives: Perspective

Photographers – don’t forget your feet!

Tug-o-war · The fun of the game is recreated by the close-to-distance balance - Use your feet to get the right position.

• Tug-o-war •
The fun of the game is recreated by the close-to-distance balance. Use your feet to move in close allows a large subject but a wide scene.
Click image to view large
Tug-o-war · By Netkonnexion on Flickr External link - opens new tab/page

Your zoom can’t do everything.

When you zoom into a shot you do get the close-up. Getting in close is important right? Well, yes, but you don’t always want to fill the frame with the subject. In this tip we look at another way to approach the shot. Use your feet to get the right position, not your zoom.

When you have an expensive and fun zoom lens you want to use it to the fullest extent. Most beginners go for a zoom because it gives them a flexibility that a prime lens does not. But then again, having that flexible zoom makes most photographers forget that they have feet!

What! Forget my feet? Ridiculous. OK, I am being flippant. But how many of you reading this would be inclined to stand off to one side in one position. Then using your zoom lens just take all the shots from where you stand? If you are a recent starter at serious photography I am willing to bet you will be taking a back seat and doing lots of zooming. What you are doing is waving aside a lot of composition opportunities. I urge you to stop zooming and use your feet.

If we don’t zoom in – what then?

Remember, when you zoom into a subject you are making the object of your focus bigger. Getting closer yes, but also you are narrowing the field of view – cutting out the background. That is the thing about zoom lenses. They get you in close to fill the frame.

What you might consider some times is to open up the zoom, go wide. And, instead of zooming into your subject walk up to it instead. Yup! Use your feet.

Use your feet to get into the shot

What this magical walking stuff will do is make your subject large, but allow you to retain a big chunk of the background at the same time. Wow! This gives you a great new perspective. Look at my picture above. I walked out of the crowd and got close to the team members. This gave me a nice big foreground object. Then looking down the line I get superb perspective as the line diminishes.

Composition is not about framing everything from one spot

When you are framing the shot consider doing it from a number of different places. Working the scene is about being dynamic and trying out all the angles. Walking into the scene and getting a close-up with your zoom wide open creates a great opportunity to develop perspective. On the other hand going really narrow and walking out of the scene gives you more context for you to select only those parts of the scene you want to show in your image. Walk in, walk out – use your feet to get you an advantage.

The zoom gives you half a story. Taking it for a walk around the scene is the other half. Use your feet to good effect and you will get more great shots than you would just using a zoom.

A great range of simple resources for landscape photography

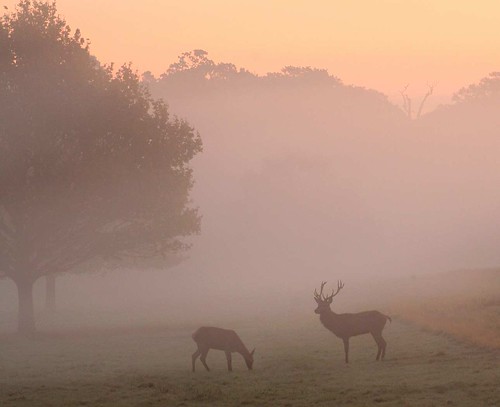
Early Morning in Richmond Park - Landscapes cover a wide range of different types of photography

• Early Morning in Richmond Park •
Landscapes cover a wide range of different types of photography

Click image to view large.
• Early Morning in Richmond Park • By Netkonnexion on Flickr External link - opens new tab/page

Landscapes provide us with some of the most enduring images.

Yes, and they perhaps present the greatest challenge too. Get it wrong, the scene looks flat and uninteresting. Get it right, the wow factor hits the viewer.

The principles and concepts behind landscapes

When we talk about landscapes we can actually be talking about a wide range of types of photographs – usually taken in the countryside. Of course that is pretty nebulous. But it is sensible to talk about the sort of principles that apply to the construction of a good landscape photograph and then relate them to the picture you are going to take.

I have compiled a list of links below. If you follow through on all these together you get a great introduction to landscape photography…

  1. The Third Most Important Piece of Kit
  2. Seeing the Quality of Light
  3. Easy introduction to ‘visual elements’ in photographs
  4. Simple ‘Principles’ of photographic composition
  5. Don’t Stick the Horizon Line in the Middle!
  6. Rule of Thirds
  7. Landscape loves – do you know why you are photographing this scene?
  8. Ten great tips for photographing landscapes
  9. The easy way to give depth to landscapes
  10. Simple ideas about perspective in photography

More after this…

Mastering landscapes

Like all photography mastering landscapes takes time and learning. It especially needs time. I have on occasion taken many return trips to one location, and, many hours there each time to get the shot I wanted. On the other hand, sometimes it all just comes together. That is both the joy and fun of landscape photography… you never know what you are going to get out of a shoot until you have seen the shots afterwards.

Damon Guy - Netkonnexion

Damon Guy (Netkonnexion)

Damon is a writer-photographer and editor of this site. He has run some major websites, a computing department and a digital image library. He started out as a trained teacher and now runs training courses ing digital photography.
See also: Editors ‘Bio’.
By Damon Guy see his profile on Google+.

Simple ideas about perspective in photography

Perspective is all about using visual clues to emphasise dimension

Perspective is all about using visual clues to emphasise dimension. Your picture needs to use defined edges, lines and direction to give the eye something follow into the image.
• Perspective • By Netkonnexion on Flickr External link - opens new tab/page

The concept of perspective is related to visual clues.

What we see in the world around us is created in our heads. We see things in the environment and from that build up a picture. Here we look at the sense of perspective.

Visual clues

Previously in ‘The easy way to give depth to landscapes’ and Easy introduction to ‘visual elements’ in photographs I introduced ‘visual elements’. These are strong signals in the world that help us see. They are mostly edges, lines, curves, shapes, form and so on. We see things because the edges of objects have a detectable contrast with something beside it. Our eyes spot that change and, in doing so, see depth. Edges give us strong clues about the nature of our world so our eyes are trained to follow them.

The nature of perspective

Our innate sense of perspective has always been there to enable us to function as biological animals. Perspective in art is a different matter. In terms of human history reproducing perspective has been a late arrival (see: Perspective – compositional ideas). What made the difference was understanding the relationship between lines, or in natural terms, edges.

Three dimensional geometry explained the way lines created depth. This geometric depth also mimicked form in nature. On mastering the idea of a cube or other geometric forms we see how the lines work. If you look at a cube corner you see three edges trending away from you. You are looking at depth created by the edges.

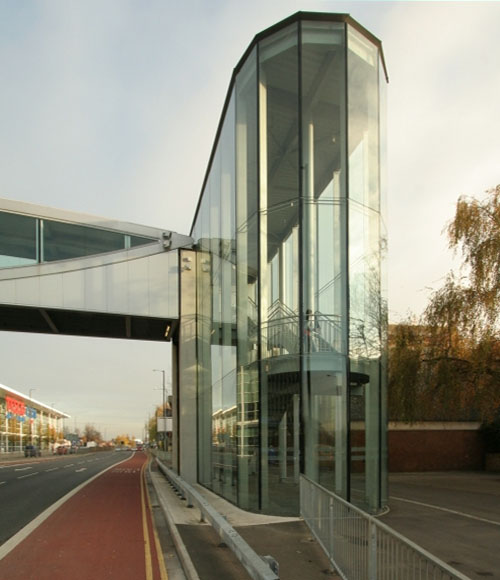
Parallel lines provide strong perspectives. In the picture above there are lots of parallel lines which give depth to the picture. The main red line – the bus lane – is a vanishing point perspective or ‘single point’ perspective. It is notable by its coming together (convergence of the lines) near the horizon. By experience we know this is a long distance away. The convergence has created distance into the picture.

In the bridge there is ‘two point’ perspective. You can see depth because the darker underside is defined by its lighter up-edge (the wall of the bridge). This two-point perspective exists for us even though we cannot see the roof or the other side to confirm ‘form’ (3D) rather than shape (2D).

Of course the glass stairway to the bridge has three point perspective. Like the cube we can see depth – the top edge of the building, the bottom edge of the building both converge (two point). The convergence imparts depth. However, the width of the building (shown by the top and bottom edges), and the height gives us the three dimensions. Our visual clue for this. on the front-face. is the non-convergence of lines in the width/height plane. Although this front-face is a curved glass wall we can still see it does not have a distance perspective away from us.

All the clues are there

You now have the clues, or visual elements to determine depth through perspective. Converging lines with distance from the eye impart a feeling of distance away from you. Parallel lines with no convergence give you flatness or non-distancing when they face you. This works with both height and width.

I chose the picture above for the strong perspectives that it imparts. The powerful lines make it easy to see the almost exaggerated proportions that contribute to perspectives. Sometimes its not so easy in nature. Have a look at the picture below…
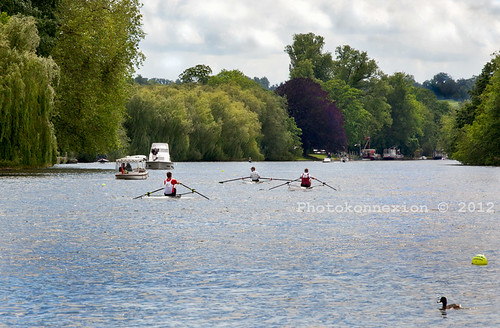
Looking up the River Thames from Marlow, Bucks, UK

Looking up the River Thames from Marlow, Bucks, UK. The perspectives are not as clear as direct straight lines. Yet the picture has depth because we are adept at seeing ‘edges’ and trends in lines when we look at nature.

Click image to view large.
• Looking up the River Thames • By Netkonnexion on Flickr External link - opens new tab/page

The edge on the right hand side looking up river barely exists – it disappears off the side of the shot. Yet the small part that is there at the top implies there is a bank all the way down the right. The left bank on the other hand is not well defined as a line. However, our eyes are trained to see it as a ‘trending’ line. The line of trees (left) and the implied line (right) therefore creates a converging pair of lines in the distance to where the river rounds the bend.

Despite there being no strong lines in this picture we can see a converging point perspective. Dimensionality is added by the height of the trees and the width of the river. The width diminishes between the two banks as we look progressively up stream, more evidence of distance and convergence. The height and width we intuitively know because our eye determines sizes by measuring them against boat and people sizes (known element sizes). Perspective is all in the visual elements.

Understanding is not precise

We do not all understand perspective in the same way. Some notable art schools have denied our innate understanding of perspective and space. The Cubists are an example of this, notable among them Pablo Picasso  External link - opens new tab/page the famous Cubist painter. Nevertheless, we all understand depth in the world around us. We don’t live in a two dimensional world. However, in our images we have to create the sense of depth in a two dimensional medium.

The second picture, the river scene, shows us how to define depth. We need, as photographers, to become observers of lines and trending lines. Similarly, we should be able to spot shapes and forms that are both defined and ill-defined. Then we need to be able to view them as if a geometric model. If we can see these lines, in nature and in man-made things, then we can find ways to compose our picture to bring them out. It is this last part that is the most important part of the composition process.

If we give the viewer a perspective in our shots, we create a world. We want it to be a three dimensional world that the viewer can imagine going into. When we choose compositions that emphasise these lines we dispose of the two dimensional picture and create an image to look into.

By Damon Guy (author and Photokonnexion editor)

Damon Guy - Netkonnexion

Damon Guy (Netkonnexion)

Damon is a writer-photog and editor of this site. He has run some major websites, a computing department and a digital image library. He started out as a trained teacher and now runs training for digital photographers.
See also: Editors ‘Bio’.

The simple secrets of the single subject shot

Cabbage - the single subject photo allows an in-depth study of the subject

Cabbage – the single subject photo allows an in-depth study of the subject. Getting the shot to work is a matter of how you present it.

Working with one item in a picture helps you get deep into the concept.

Using almost any perspective, you should be looking to bring out the character of your subject and explore its nature. To portray your subject well you should think of these simple ideas.

A while ago I asked members of the 365Project what I should consider when doing a single subject photograph. The ideas below are developed from that discussion.

Background

Many simple subject shots have no background. Put the subject into the centre of the viewers vision and fill the frame. My cabbage (above) is an example. However, if you have got a background make it simple. This is a great way to use a high-key shot. A bright featureless background throws the subject right into the foreground. The bright background highlights the subject and focuses the viewers attention. Alternatively, dark backgrounds can be good too. Remember that they also need a bright subject to carry them off if you are exploring the nature of your subject, and not just portraying its moodiness.

Focus, Lighting, colour and Texture

In a single subject photograph you explore your subject. The character of something is shown by its shape and form. Lighting and colour bring out the shape and form by exploring the shadows and textures. Lighting is key to the success of the shot particularly by creating texture. Remember, as you take a low angle of light across the surface of something you create more texture. The light and shadows are longer and darker with a small angle. Pay attention to the lighting and colours that make that texture stand out. Really accentuate the contrast of light and dark as well as colour variation.

Perspective or the angle of viewing

Perspective is particularly important in single subject shots. It is easy to make a single item look flat – especially if it has little surface texture. Consider what angle you photograph your subject. Try to show its perspective – the diminishing size with distance from the eye. If that is not possible show the form by exaggerating curves or by capturing angles.

Normally many of the objects we look at are seen from above. It’s natural really since we hold things in our hands and look down. To bring out the character of your piece viewing it from a different perspective helps to highlight its character. You are forcing the viewer to look at it in a new way. Show it from below. Or take a shot from the side – any angle showing shape and form which is different to a normal view. Try to show how the subject varies its shape with distance from your eye. Exaggerate it if necessary. I find using a wide-angle lens in close up often brings out the shape and perspective fully. You will need to experiment.

Composition

Filling the frame is not essential. The rule of thirds is a great way to display simple shots with one subject…

Composition is important to draw the viewer into the image.

'Rule of Thirds'
A powerful compositional tool.

Other placements work too. Normally central placement in a scene is boring. In single item shot a central placement with a square crop is quite fashionable at the moment. Try anything to increase the interest value and draw the eye.

Don’t show it all

A feeling of mystery is a great way to pull the eye to a subject. Consider cropping your subject hard so that some of the shape, form and texture of the subject is left to the viewers imagination. You don’t need to show the whole subject for it to become alive in the viewers mind. Unless you intend it, be careful not to create an abstract when cropping hard. A single subject photo is about your subject. An abstract is about the attributes of the subject. Often the eye cannot see the whole subject in an abstract and people may not know what they are viewing. This would not be showing the character of the object. It is a fine line. What you are intending to show should be clear. That is the key to success.

My thanks to the members of 365Project who contributed to this discussion and to my thinking on this subject. The discussion on this, including some excellent example pictures is still available. Please do visit: Single subject photographs External link - opens new tab/page.

Inspiration for sports photography

Sir Steve Redgrave - Winner of five Olympic Gold Medals

Sir Steve Redgrave – Winner of five Olympic Gold Medals

Great sportsmen inspire and so does great photography

The wonderful Olympic events in London this week has me reflecting on sports photography. I have learned some great lessons from watching television sports. I want to share some of these with you. They may not be what you expect.

Watch Television to improve your photography

Great technology and improvements in the quality of live video photography have produced some superb sports coverage. Today, there were some fantastic shots from the long jump competition. Watching these shots in high definition and slow motion was instructive. The best shots were taken from slightly below the level of the jumpers in the air and watching them come toward the camera. The camera was able to look up into the stadium and directly at the jumper coming toward them. It brilliantly captured the power of the jump and the power of the audience. A great upshot with a great backdrop. It shows that a near ground-level upshot can have strong visual power. Worth exploring further.

I have also enjoyed the high definition, slow motion photography in the Olympic Velodrome in London. Cycling is a great sport to photograph. Watching the champion-standard performances was amazing enough. But the composition of the video of the moving cyclists was phenomenal. The best shots were taken from just below and alongside the body-line of the cyclists. They had partially visible faces and we saw the entire action of each cyclic leg motion in full view. A great composition. The best shots were along a line of pursuit cyclists from this angle. The pursuit cyclists in a row demonstrated the discipline and strength of a team. The composition of the shot showed the visual power of a perspective down the line. Wonderful!

One of the enduring shots I saw yesterday was a high jump. The jumper was frozen with excellent clarity. Her body was contorted, straining every ligament to clear the bar. I was struck by this shot because there was absolutely no motion blur in the shot. The situation demanded fast and committed movement. Our eyes would only see a blur if we watched. Yet, this picture had a great impact because of its clarity. Sports images often convey power through the explosion of action. The lesson here is not to try for motion blur in every shot. There is sheer beauty in combining photographic clarity and sporting prowess.

Winners are loved by everyone. As a result it is sometimes difficult to get near to them. It is also difficult to get a great picture of a jubilant winner jumping up and down in a crowd. However, strong emotions abound at sports events. So be stealthy. Those who lose have very powerful emotions and reactions. Watch out for those. Strong emotions make for a great shot. You can communicate real power in a shot where someone is overcome with negative emotional energy or the grief of failure. These displays say as much about sports events as great sporting feats.

Although we may not be video photographers there are shared lessons in composition, positioning and perspective. While there are some great moving shots, there are also some brilliant frozen shots – stills just like the ones photographers take. These are often picked from the best of a video sequence. So some really excellently composed shots come out. Watch for those!

Watching sports television we can enjoy great sporting events and some great photographic lessons. So as you watch the Olympics look at some of the shots, analyze them, take a view on composition and content. There are some inspiring pictures. There are also some great images to keep in mind for our own future shots.

Television can inspire some great photography.

By Damon Guy (author and Photokonnexion editor)

Damon Guy - Netkonnexion

Damon Guy (Netkonnexion)

Damon is a writer-photog and editor of this site. He has run some major websites, a computing department and a digital image library. He started out as a trained teacher and now runs training for digital photographers.
See also: Editors ‘Bio’.

Perspective (Compositional ideas)

Perspective helps us to see depth, three dimensions, on a two dimensional page.

Perspective helps us to see depth, three dimensions, on a two dimensional page.

From babyhood we learn to see perspectives. Although today this seems natural to us it has not always been this way. Artists first began to consistently portray three dimensions during the Renaissance period. Before that time symbolism and the relative importance of elements defined art. People might be sized according to rank for example or defined by the clothing colour. In ancient art perspective was almost missing. Many of the worlds cultures had flat pictures depicting people and objects only in two dimensions (2D).

Today pictures are considered representations of the real world. We see this ‘reality’ so strongly that we are astonished if it turns out as an illusion. So what gives something 3D in a picture? It’s a simple trick. We employ elements in a picture that strengthen our view of depth or dimension. We use converging lines or relative sizes to give visual clues to our viewers. They see these clues and they ‘see’ distance and depth.

Successful photographers hunt for elements in a scene to help the viewer see depth. It’s part of composing the shot. Look for those visual clues. Deliberately pick out the lines of perspective, the relative sizes of objects or the position of smaller (distant) objects compared to bigger (near) ones.

In your compositions try to…

  • …pick out lines that convey perspective.
  • …emphasise the relative sizes of things near and far.
  • …use key objects to help viewers judge size/distance of other objects.
  • …use foreground objects as clues for size/distance to background objects.

In your photographs try to find as many things as possible to help the viewer see into your picture. If you give your viewer lots of these clues you will have an interesting and ‘alive’ picture.

The definition in our photographic glossary also provides a lot of information on perspective