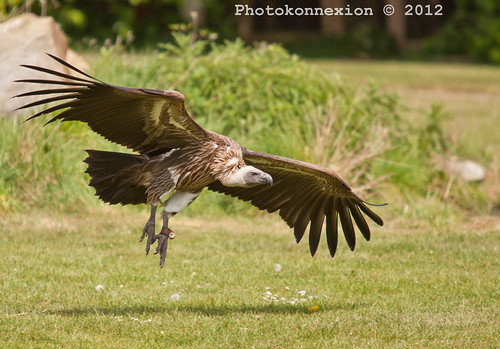
Vulture Landing – not a bad photo; some final adjustments are required. A little cloning work needed to tidy up loose ends. Click to view large.
Cloning allows you to clear up small problems – here’s how
Every picture starts its life with the composition. Once you have composed you take the shot. In those two simple actions is a world of experience and knowledge. It does not finish there – there is a third stage – post-processing (or just processing). Simplicity in your image is one of the keys to good photography. Often to achieve simplicity you need to remove unwanted elements of the picture. This is where cloning comes into play. In what follows I am going to look at simple cloning techniques using my photograph above.
Removing stuff
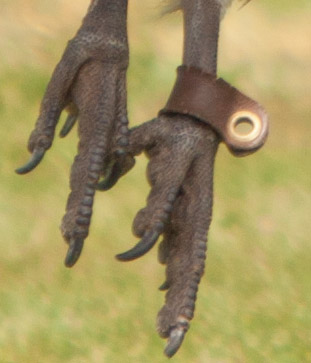
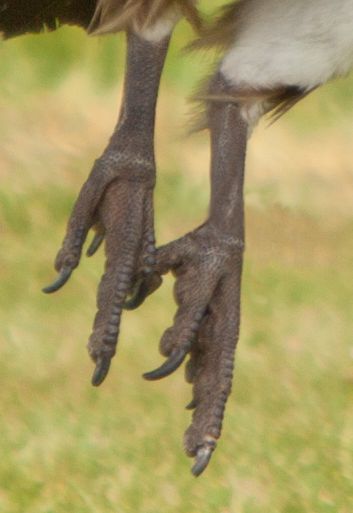
In this post we will concentrate on an essential technique… that of cloning in small strokes or spots. The essential element of any cloning job is the copying of the texture/pattern/colour (whatever) at the source point onto the destination point. The destination point is where you are hoping to remove something. Here is the first picture. It is an enlargement of the legs on the main image at the top of this article. The aim of this cloning work is to remove the leg harness from the bird.

The problem… an enlarged view shows the offending leg harness.
Two simple points of technique underlie about 75% of the work of cloning. First the spot technique.
The success of cloning usually depends on collecting the source texture or pattern from near to the destination point. This is because there is a better chance that the colours, textures and patterns are going to match if they come from close to each other.
Lets get started
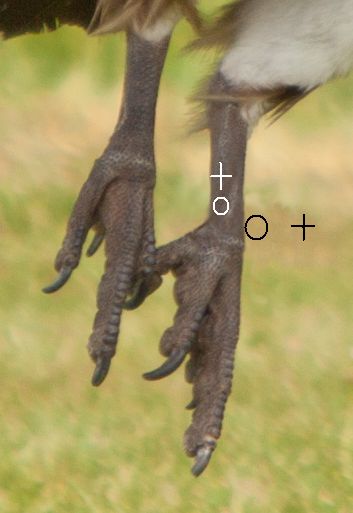
First, set up the source point. How the source point is selected depends on the application you are using. You will need to check the instructions. The idea is that there will be a cursor icon for sensing the source and a painting icon for where the cloning will be done. In the next picture you can see how I have cloned a little from the harness from the surrounding area. The round icon is the painting tool, the cross-hair is the source tool. As you move the painting tool the cross-hair moves with it.
To replicate textures, use near-by similar surfaces
You will see that I have done some cloning in two places. The cursor is currently cloning over the area of the harness, collecting the source from the surrounding green bokeh.
Placing your clone tool sensor
You can place the sensor cursor at any angle or distance to the painter cursor. You will see if you look carefully, that I have also done some cloning on the leg. Part of the harness has been removed there. You will notice that the leg has a scaly texture. I had to work close to the harness with the cross-hairs north of the area I was cloning. This allows me to pick up the texture and deposit it on the harness area. If you run over the same area as you have just cloned you get a repeating pattern. So, use short strokes. Change the sensor cross-hairs after each stroke or spot you clone.

The source point can be anywhere. The image shows the positions for the clone from the leg texture and the harness part sticking out from the leg.
Three common problems
When just starting it is easy to just clone away until the job is done. However, when you stand back there are frequently three things wrong – lines are not straight any more; repeating patterns show up; big clone spots show up. To counter all three of these errors it is best to work in very close to the area you are working on. Make tiny changes each stroke. They are less likely to be noticed. They blend in together better and have less impact on the picture as a whole.
As you can see from the black icons in the image the painting circle is very close to the leg edge. To get lines back you have to work with the edge of the circle, as I have done here. Just skim it along the line to straighten it from one side. Then, working from the other side (in this case on the leg) work that side too. Work from side to side. Gently skim it into a straight line. Keep working until you are satisfied your work will not be noticed when you zoom out. Here is the finished leg.

Now the tools are out of the way, you can see how the lines, shades, textures and colours are all blended and maintained.
Working zoomed-in is critical
One of the easy mistakes to make is to do your cloning large, at the image normal size. If you look carefully at the leg you will see that, even zoomed out, you can see some texture and areas of darker and lighter shading. However, you cannot see the detail of the cloning spots/strokes. If you work at normal image size you will find it very difficult to replicate those shades, tones and textures. They are delicate and subtle. But life is delicate and subtle. If you want it to look realistic you have to put those subtle differences in. Working in a highly zoomed state allows you to do that.
If you click here  , you can see the finished full sized image on a new page. Look carefully. The slight colour variations and texture changes look natural and fit in well. The variations are poorly integrated, clumsy and unrealistic if you work in at 100% image size.
What we have covered
- Make Small changes. They are less likely to be noticed. Also, work zoomed in and with small tool sizes. They blend in better and have less impact on the picture as a whole.
- A pattern/texture source close to the clone destination is more likely to match than distant sources.
- A continuous clone stroke will be noticed. Work with small spots and short strokes changing your clone source frequently.
- Avoid running over an area you have cloned already with your sensor. It creates highly visible repeating patterns.
- When working with lines/edges skim them gently from both sides until straight.
If this all sounds like quite a lot of time consuming work… well, it is. As you can see it is worth it. A good image improved in a natural way. And, like all your photography skills, it takes time and practice. It is fun and absorbing however, so enjoy your processing!
Useful links after the jump…
Irfanview – A free image viewer and basic image editor.
GIMP  – a full featured, open source, free image editor – download and install.
Photoshop (by Adobe) – Adobe Photoshop CS6 (PC) 
 – Industry standard post-processing professional software
Adobe Lightroom – Adobe Lightroom 4.0 (Mac/PC) 
 – Professional photographers workflow and post-processing software
Adobe Elements – Adobe Photoshop Elements 10 (PC/Mac) 

– Powerful editing system for amateur/semi-professional photographers.
Google listing for ‘online image editor  ‘
‘

Damon Guy (Netkonnexion)
Damon is a writer-photog and editor of this site. He has run some major websites, a computing department and a digital image library. He started out as a trained teacher and now runs training for digital photographers.
See also: Editors ‘Bio’.
