Tag Archives: Location

Island images – island life… a photographers approach

Callanish, Early Dawn - great island images

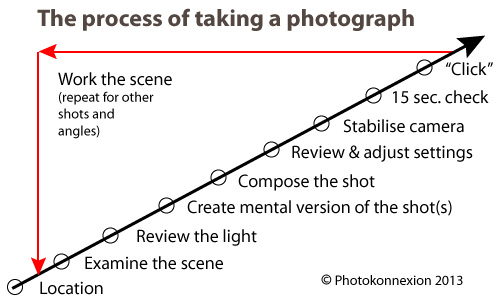
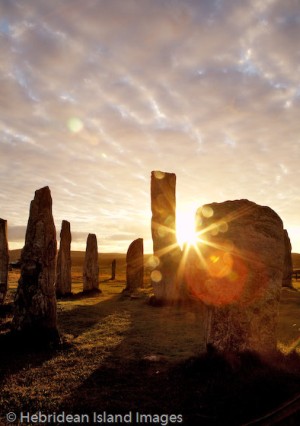
• Callanish, Early Dawn •
Taken on the Isle of Lewis – Callanhish stone circle.
Image from ‘©Hebridean Island Images’ by Ruari Cumming, ARPS

If tranquillity is what you want…

Many places in the world are still untouched, but few are so close to the bustle of the UK. The Hebrides is a chain of islands off the Scottish coast. What a pearl. I love this wonderful place. Many years ago I spent quite some time there. I fully intend to go back.

Wonderful island images

If you love rugged and interesting coastlines, old ruins and mysterious stone circles, then you will love the Hebrides. There are more than fifty larger islands and hundreds of smaller and uninhabited ones. There’s a lot to see. And, there’s plenty to offer the photographer.

There is a thriving local tourist industry. It does not ruin the isles. It caters well for those looking for the taste of some rugged island air. All levels of accommodation are available. Some of it all year round. It is mostly run by local people. It is low-key, in keeping with the local area. You can find out more about staying there on Visit Hebrides  External link - opens new tab/page.

There is so much to photograph in the Hebrides. Wildlife, people, the sea and the moods of the local weather. And, there are plenty of the latter! However, for me the most attractive thing about the islands is the rugged scenery. There are some fantastic scenes of mountains and coastline. The fact you can photograph them so close together makes it worthwhile visiting just for that. And, if you love a good walk you could not cover all of them if you went back every year!

Renewing a friendship

Last week I was fortunate to listen to a talk by Ruari Cumming ARPS. He has been an enthusiast of the Hebrides all his life. His talk charted his close relationship with the islands, the people who live there and the life they lead. We saw some great island photographs too.

As a photography club member I hear a lot of talks from enthusiastic photographers. Ruari always adds something new. His trade mark audio visual sequences and island images, with accompanying music, keep the audience captivated. This year his insight into life on the islands caught my attention.

The people

Ruari explored the lives of people he met, their work and the places they lived. Particularly interesting was to see them keep alive wonderful traditions. The local Harris Tweed  External link - opens new tab/page industry is known worldwide. It is based on these out-of-the-way islands. However, it is also a global export cottage industry. I asked Ruari if he had any difficulty getting cooperation from the Islanders for his photography. “No” he said, “In the twenty odd years I have photographed the Hebrides, I have never had an islander refuse me taking photos – they were warm and open”. A lesson there for photographers everywhere. Don’t be afraid to ask.

Island images gallery

I really enjoyed the presentation and the island images from all aspects. Ruari gave an interesting and beautifully illustrated talk. He has a website with a gallery of many of his island images  External link - opens new tab/page. The site also provides information about his talks, presentations and island images  External link - opens new tab/page.

 
Best selling book – Hebrides  External link - opens new tab/page

In Hebrides  External link - opens new tab/page, readers follow Peter May on an odyssey in prose and images, through a history of the Vikings’ ‘Long Island’ and his own deep personal connection with the islands that influenced his best selling work.

Travelling as if alongside his protagonist Fin Macleod, he describes the island life – as bewitching as it is treacherous – his encounter with the bird-hunters of Sula Sgeir, the savage seas of Ness and the churches of Eriskay. With extracts from Peter May’s other books and specially commissioned photographs, this book places his writing and characters within the land that gave them form. Hebrides  External link - opens new tab/page

Peter May is the author of the best selling “Lewis Trilogy”…
The Blackhouse: Book One of the Lewis Trilogy  External link - opens new tab/page
The Lewis Man: Book Two of the Lewis Trilogy  External link - opens new tab/page
The Chessmen (Lewis Trilogy 3) External link - opens new tab/page

Comments, additions, amendments or ideas on this article? Contact Us
or why not leave a comment at the bottom of the page…

Like this article? Don’t miss the next — sign up for tips by email.

How to take photos – each important step in making a photograph

Infographic download - How to take photos

• Infographic showing the various steps in how to take photos •
A guide to what you should doing to make great images.
• Click to download printable full page version

Getting down to the detail…

Yesterdays article was How to take photos – each important step in making a photograph. Today I want to share the detail behind each step. Be warned! You might need to think again about your existing knowledge. Unlearning old ideas will help you to move forward and improve.

How to take photos – The location

Lots of people think you can just turn up and take pictures. Well you can, but often they are not good ones. Getting the best out of your location involves understanding what you’ll find there. Find out about the weather on the day. An idea of light levels and times of sunset and sunrise etc. is useful too. There have probably been lots of visits by others at popular destinations. Check “Google Images” for that site. Google will help with other details too.

When you arrive don’t just fire off loads of shots. Settle down and get into the location. Don’t make photography mistakes that mean you miss great shots. The first time you do this consider a variety of shots. Think about more than one shot, think about the whole shoot.

How to take photos – Examine the scene

Considering the scene is an important part of the work-flow on site. Unless you have been there before you need to get to know it. Use all your knowledge about camera angles, composition, lighting, camera settings and so on. Take the time to examine your location while thinking of these things. Consider your feelings about the scene too. How you feel will help your shot be an impassioned response to the location. What you feel about the scene is the best guide on how to take photos at that location.

How to take photos – Review the light

Most photographers forget this step. They are too wrapped up in the scene and the camera settings or the passion of it all. This step will make or break your shot. Look at the light. If you don’t know what I mean read these:

Ask yourself some simple questions about the light…

  • Is it hard or soft?
  • Is it coloured or more neutral?
  • Is it at the right angle to best capture the location/scene?
  • What is the best time for the right light?
  • Is it very bright and intense or dull and diffused?
  • Do I need any artificial illumination (flash, diffusers etc)?
  • Is the shadow hardly defined (sun up high) or strongly defined (sun to the side)?

Lean about the properties and vocabulary of light. It helps give you a greater understanding of photography. These questions, and others, help you make decisions about lighting for your scene. For more on “How to take photos – Light and Lighting” see the resource page in the SUBJECTS/ARTICLES menu at the top of every page.

How to take photos – Create a mental version of the the shot

If you want to make a great image – have a great picture in your head of your intended outcome. Visualisation has helped athletes, artists, thinkers, inventors and others to achieve amazing things. Train your mind to visualise in detail. If you see what you want to achieve it will guide you when setting up your camera. Take the time to create that mental picture – in detail. Consider how you are going to make the best of the light when you consider how to take photos. More about visualisation… 80 year old secret of world class photographers revealed.

How to take photos – Compose the shot

By now you have an intimate photographic knowledge of your scene. Composing the shot is about realising that potential. Long-time followers of this blog already know something about composition. For first-timers you can get lots of information from our Composition resources page in the SUBJECTS/ARTICLES menu at the top of every page. Composition is a skill that evolves as you develop as a photographer. Knowing more about composition helps your awareness and skill develop. Read about it to gain insight. Think about it every shot.

How to take photos – Review and adjust the camera settings

Now you have a picture in mind, composed, and are ready to set up your exposure. The exposure is defined by your camera settings. Camera makers will have you believe that the auto-setting on your camera is the perfect exposure. The fact is they made informed guesses to arrive at that exposure. It is different for every model of image sensor. Modern cameras do make a good representation of the scene. It is not always what you want however. You can change the exposure by under-exposing, over-exposing and by using different apertures, ISO levels and shutter times. That is your interpretation of the shot. When you think about how to take photos, plan how you want the image to come out.

Having a visualisation in your head helps you set the camera up to make that mental image. You do it using ISO, Aperture and Shutter speed. Even using one of the ‘mode’ settings is still a way of regulating your exposure. They all adjust those three basic facets of the exposure.

Here are some other links to pull together ideas about exposure:

How to take photos – Stabilise the camera

You want the photo to be sharp, crisp and clear. The faster the shutter speed the easier it is to get a sharp shot. But often, especially for a good quality shot, longer exposures are better. You need a good stance to hand-hold the camera. You will need a tripod (or other method) to steady it for longer exposures.

Stance is down to basic technique and comfort. The stance you use will be a personal thing for you. I have found many photogs have to relearn their stance after many years of a poor stance. It is best to learn a good one early. Here is my recommendation: Simple tips for a good stance

The use of tripods or other supports is a wide subject. It is also one that many learners tend to ignore- at least at first. When learning how to take photos sharpness is vital. Become acquainted with a tripod (preferably a good one) as early as you can. Your images will improve a huge amount. Here is some advice about tripods:

And, here is some basic advice about improving sharpness overall – The Zen of sharpness – 12 easy ways to improve

How to take photos – 15 second check

OK, that may seem like a long time. However, it is actually the time you need. You can get faster at it, but if you are taking a serious attitude to your shot then give it the time. You can find out all about the the 15 second check by reading these in order:

  1. An old sailors trick to improve your photography
  2. The fifteen second landscape appraisal
How to take photos – “Click”

This is where you press the shutter button. How you press that button can make a difference to your sharpness. Earlier, I mentioned this link, Simple tips for a good stance. It also gives advice on pushing the button without affecting sharpness.

An essential element of your shot is about confidence in what you have done. Today we are lucky. We just look at the back of our camera. Your first “click” may be a test shot. If your settings need adjustment then a simple technique called “Chimping” will help. Chimp and adjust. You will only need to do it a few times to get the shot right. You will not need to machine-gun the site with hundreds of “just in case” shots.

How to take photos – Work the scene

Chimping helps you set up for the shot and compose it. To get other possible shots you visualised earlier, you should work the scene. Repeat all the steps you have just done for each of the shots you foresaw. Working the scene is a skill and takes practice.

How to take photos – Time line

What is not obvious from the diagram is that the diagonal arrow is also a time-line of the shot. Of course it is a different length for every shot. You will have different problems to solve and ideas to consider for every shot. That’s fine. You have just learned a more careful, precise method for how to take photos. As you practice will quickly get faster at taking shots. But you will also make better images.

A promise

I can guarantee that if you follow the steps on this page you will…

  • Take less shots;
  • Get a better hit-rate (more usable shots per shoot);
  • Spend less time in post-processing;
  • Have better composition;
  • Improve your photography overall.

What is less obvious is that you will also save a lot of time.

By Damon Guy (author and Photokonnexion editor)

Damon Guy - Netkonnexion

Damon Guy (Netkonnexion)

Damon is a writer-photog and editor of this site. He has run some major websites, a computing department and a digital image library. He started out as a trained teacher and now runs training for digital photographers.
See also: Editors ‘Bio’.

How to use camera angle to change body shape

How camera angle affects body shape.

How camera angle affects body shape.
[Image taken from the attached video].

Camera angle affects body shape

How you approach your subject can significantly affect their shape. The camera height affects the relative size of parts of the body. The part of the body nearest to the camera appears largest. So the angle you take to the body can affect emphasis and shape. Your lens can also affect body shape too. These two factors in your shots can really change the view of your subject.

Basic shooting positions that show camera angle affects body shape
  • Getting down low gives your subject height and presence.
  • At waist level the angle is even across the body placing no strong emphasis on any one part of the body.
  • At eye level the head appears more significant and you can really draw out the features of the face, focus on the eyes for best effect.
  • From above the head and shoulders are emphasised and the legs are foreshortened.

From these basic positions you can also use different camera lenses. A 50mm lens is the lens that most closely matches the visual abilities of the human eye. Using one of these will help you to see the body as the eye will see it. On the other hand a wide angle lens (around 24mm) will help to bring out the emphasis of the body length. If you use a wide angle lens in portrait view from below you will tend to make your subject look statuesque – tall and grand. If you view the subject from above you will shorten the body and legs and make them look squat. These forms of emphasis have powerful impacts in pictures where you are trying to portray a persons presence. Statuesque tends to convey power and presence. Bodies that appear more compact tend to emphasis a more physical presence.

How camera angle affects the body shape – a video

The video brings out in detail the above points. The shoot is on the Bonneville Salt Flats, which is a wonderful location – even if it is flooded! The white of the salt brings out some great high contrast shots. You really can see how camera angle affects body shape.

TheSlantedLens External link - opens new tab/page (Published: 02.Apr.2013)

By Damon Guy (author and Photokonnexion editor)

Damon Guy - Netkonnexion

Damon Guy (Netkonnexion)

Damon is a writer-photog and editor of this site. He has run some major websites, a computing department and a digital image library. He started out as a trained teacher and now runs training for digital photographers.
See also: Editors ‘Bio’.

Can you write? Of course you can!
Write for Photokonnexion...

We would love to have your articles or tips posted on our site.
Find out more…
Write for Photokonnexion.

Six things to consider for starting portraiture

A dear friend

• A dear friend •
Click image to view large
• A dear friend • By Netkonnexion on Flickr External link - opens new tab/page

Portraiture – the photographers passion.

Starting in portraiture can be daunting. We are going to look at the important things to consider when getting started with photographing portraits. There are also links to some of the portraiture resources available on Photokonnexion.

This post is aimed at introducing the portraiture resources found here…

Location

Choice of location can make or break a portrait. If you choose an outdoor location you have to consider a range of issues like the weather, how to pose your subject and exactly what you will be putting in the background. The problem with outdoor portraits is that there is potentially a huge number of composition decisions to make. Taking the shot can be quick. Deciding on what background is right can take a lot of effort and research.

If you are just starting out with portraits it might be better to focus on indoor shots. The environment and light is potentially simpler and the lighting more controllable. The essence of good indoor shots is to reduce the composition to a very simple background and lighting and to focus your attention on the subject. This gives you time to practice the posing, including expressions, and the lighting set up.

Lighting

Light and Lighting can be as simple or complicated as you make it. My advice is to make it as simple as possible. Most great portraits are done with one simple source light. Working with one light gives you the ability to try out shadow casts and hard light vs. soft light. Practice with simple ideas will help develop your skills more than working with confusing multiple light sources.

Background

This is not the same as the location (which is really more about the surroundings). When you are considering the background this could be as simple as a blanket suspended behind your subject. It could also be as complicated as a workbench that your subject works at. What you have to do is decide how to set it up, how to light it and how to place your subject in front of the background. You have to make a decision as to whether you are taking an environmental portrait (a large amount of the background is visible) or a simple portrait where the background is a minimalist setting, where you show very little of the environment and make it as simple as possible.

It is better to start simple. Placing your subject in front of a coloured, white or black background is a great way to get started. You will be able to focus on posing your subject and spend less time worrying about what to include or exclude in more complex backgrounds.

Posing

The best advice for starters is to work with your subject. He or she will be comfortable with certain poses. Get them to start the posing. Then, when you see how they like to pose, you can ask them to vary it to get your light right and get them showing their best side (the left side of the face is best).

Remember that that definition of the features of the face are defined by light and dark. Your poses should be aimed at using the shadow/light relationship to bring out your subjects facial and body features.

find out more...Photokonnexion tips by email
Enjoying this article? Please sign up for our
daily email service.
                                                Find out more…
#11030#

Props

It is difficult to provide resources about props. There are as many props as there are things people can hold, wear, sit on, stand next or or play with. Yes, props can be pretty much anything you want. However, one thing is certain. Your portrait subject will suddenly come alive when they have a prop to distract them from the daunting prospect of the camera. Try to get them to work with a prop they are familiar with – get them to tell you about it or show you how they use it while you photograph. These things will make the comfortable and help them to relax. It will also show you the character of the person they are.

Camera settings and lenses

Some people will tell you this is the most important point. Others will say the posing, still others will focus on the other things above. How you set up your camera, and how you place your subject are very closely related. But there is a lot to learn here. Start simple so you can feel in control. If you are not yet working with manual controls then be comfortable with auto mode – try to become aware of the types of settings that seem to work.

Exposure settings are an important study. There are some exposure links in the link box below. However, you should be concentrating on natural colours. The type of light you use is important to your exposure. I have one piece of adice on this. Beginners at portraiture almost always over-light. Keep your lighting soft and your exposure moderate and not over-bright to start. If you are using flash, turn it down. Bright flash always washes out flesh colours and sometimes causes nasty highlights on the face. It is worth reading up about how you can ruin your shots with flash.

I hope that this article has provided you with some options for getting started in portraiture. Please spend some time going through the links on the portraiture resources page to get more detailed information.

By Damon Guy (author and Photokonnexion editor)

Damon Guy - Netkonnexion

Damon Guy (Netkonnexion)

Damon is a writer-photog and editor of this site. He has run some major websites, a computing department and a digital image library. He started out as a trained teacher and now runs training for digital photographers.
See also: Editors ‘Bio’.

Three quick tips for photographing people at work for your employer

When you photograph people at work context is all important.

When you photograph people at work context is all important.

Photographers often have to photograph people at work.

It is easy to forget who you are photographing. Although these people may be your friends, you still need to put them into context. Work is not just about friendship, it is about production.

Why?

If you are asked to do photos at work you should know why it is being done. The most important thing, as with all photographs, is planning ahead. That means discussing with your employer what is expected of you. If you know that and you get your actions approved you should have fun doing the shot and make a great job of it. After all, it is about doing a good job right?

1. Portraits

Make sure the picture conveys the meaning you have been asked to fulfil. Often employers just want portrait shots so customers know who they are dealing with. If that is the case then you need to consider clothing, poses and backgrounds that are appropriate for your subjects. Plan the shots beforehand and approach your employer to see if your plan is appropriate before the shoot.

2. Context

If the photo is a record shot of the work situation, make sure you take the shot in the context of their work. The appropriate apparatus and background is important. In the work photo above the two girls served coffee in the front-of-house operation. A teamwork photo (heads together conveys closeness and camaraderie) was appropriate. Work with the people you are photographing to make sure you are portraying their true location and work situation.

3. Location

In a very diverse working environment a group shot might be more appropriate than individual shots. Make sure you work with your employer to find the best place to take the shot. Employers usually have very clear ideas about what they want to show their customers. It is important to get the final situation right. Your photograph will be saying a lot to its audience. A shot in the most presentable place in the factory is better than outside the toilets in a neglected yard! Use common sense to assess the location. Make it both relevant and appropriate. Make suggestions to help the composition, but make sure your employer is happy before doing the final shots.

An extra one for luck

If you are doing people-shots use a tripod. It is essential to make your shots sharp. Tripods will help you do that more than anything else.

By Damon Guy (author and Photokonnexion editor)

Damon Guy - Netkonnexion

Damon Guy (Netkonnexion)

Damon is a writer-photog and editor of this site. He has run some major websites, a computing department and a digital image library. He started out as a trained teacher and now runs training for digital photographers.
See also: Editors ‘Bio’.

Can you write? Of course you can!
Write for Photokonnexion...

We would love to have your articles or tips posted on our site.
Find out more…
Write for Photokonnexion.