Tag Archives: Light

Exposure changes the mood of your image

Exposure changes can affect many aspects of an image.

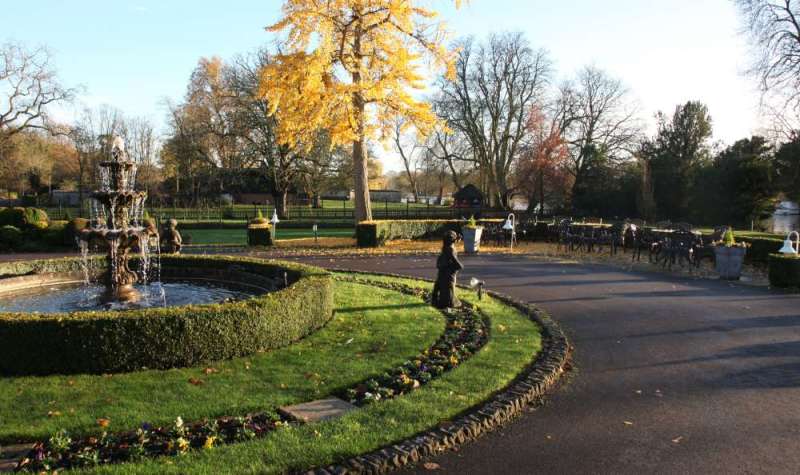
Exposure changes can affect many aspects of an image. Colour, mood, visual impact, contrast and others. The second image below show the differences.
Image better seen large. Click image to view large.

There is no such thing as a perfect exposure

The main goal of starter photographers is to control the exposure. The Exposure Triangle, or other models of balancing light, lead learners to pursue ‘perfection’. Once they grasp the concept of balancing ISO, Aperture and Shutter speed, the needle in the camera viewfinder is their guide.

In manual mode, that central needle is important. It shows that the three elements are balanced. The unwary learner is soon overwhelmed by that needle. They have learned how to keep it central. Now they are going to keep it there despite everything. They have learned that, if the exposure changes, the needle drifts off the middle position. When that happens it is no longer “perfect”.

That mid-position needle is useful. However, it is not ‘perfection’. It is just a guide. Modern camera manufacturers have made things easy for the camera user. The technology, sensors and controls on a modern camera mislead the unwary into a false position. Complex technology and controls give the user confidence that the camera must be right. They assume the central needle creates the perfect capture. That is simply not true.

The balance of light controls the quality of outcome you want. Your final image is created by that quality of light. The creative photographer uses exposure changes to to conjure up the result they want. A good photographer commands the camera to create the picture. The camera does not create the perfect exposure for the user. The user makes exposure changes to create the desired image. Deliberate under or overexposure is an important part of creating your image.

Exposure changes allow you to command the camera

In the image below we see (almost) the same picture as above…
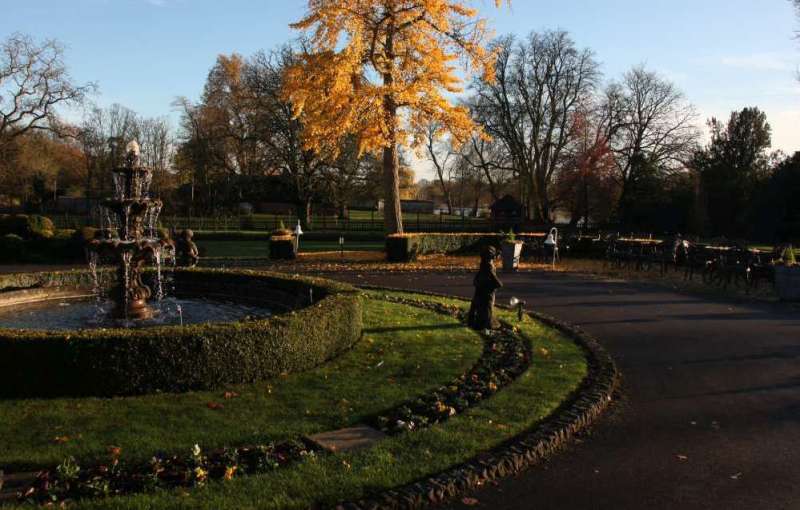
A different quality of exposure changes the whole experience of the picture.

This second image shows same scene as above. But the different quality of exposure changes the experience of the picture. This outcome is no more correct than the top picture. However, when it was taken this one was 1 and 1/3 stops underexposed on the camera viewfinder scale. It was taken within seven seconds of the first image.
Image better seen large. Click image to view large.

Exposure changes allow the user to create the mood of the shot. This is clearly shown by the deeper contrasts, more saturated blues in the sky and reds in the Autumnal leaves. The low sunlight brings out the shadows and colours more. It all adds up. Together they create a very different view of this fountain scene. A twilight feel perhaps.

I was trying to create an Autumn evening view and the deliberate underexposure gave me the key. Yes, I deliberately underexposed to create the effect. I was commanding the camera to create my “perfect” scene for what I wanted.

Experienced photogs make exposure changes regularly

For me, the darker version was right for the reasons I needed that photograph. The control of the intensity of shadows, colours, contrasts, and so on, can be done many ways.

For example, High key shots often use exposure changes. They are created by deliberate overexposure. That brings out the intense whites in a high key image.

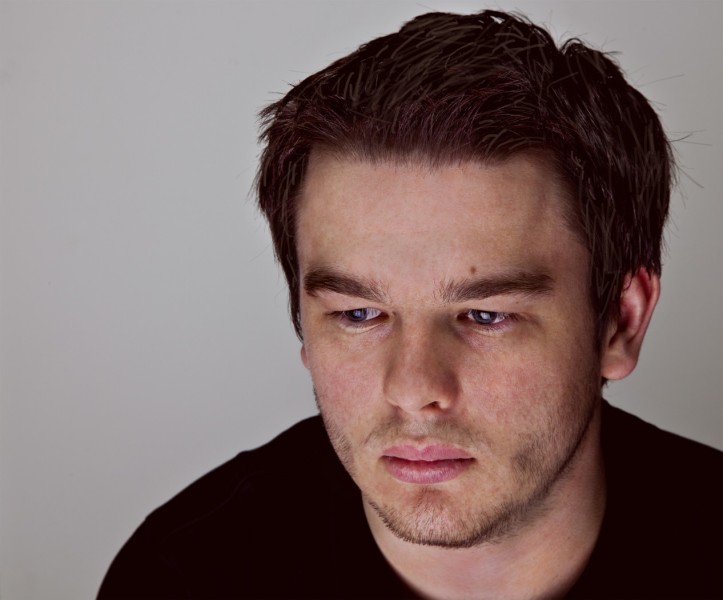
Many portraits are lit very brightly to the eye, but a very small aperture or fast shutter speed limits the light entering the camera. This will create an underexposure bringing out the facial features. This gives shadows a depth, without harshness, as can be seen in the next image. This use of exposure changes is a great mood enhancer.
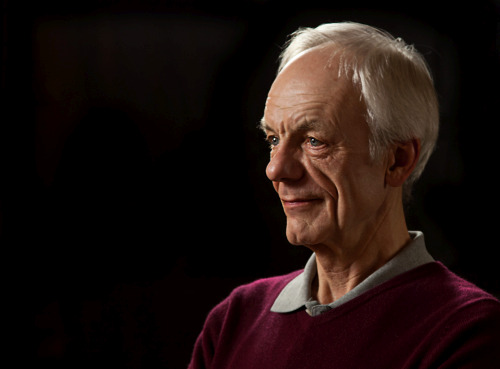
Portrait shot in bright light but underexposed in-camera.

Portrait underexposed in-camera creates a tonally controlled result.

Create the exposure changes you want

How do you create this effect of under or overexposure? Simple. There is a control that can do it in auto or semi-auto modes. While in an auto-mode use the “exposure compensation” dial. You can add or subtract one or two stops of light. You can find out how to use the dial in your manual.

For the learner going fully manual it is even easier. That central needle position is your guide to what the camera calculates as an optimum light level for the shot. To create a manual over or underexposure simply dial the exposure-meter back or forward. Move the needle away from the central position. Shocking I know. You actually create exposure changes by deviating from the central needle position.

Exposure changes of one stop halves or doubles the light entering the camera. So be careful. Take several test shots. Dial one third of a stop or more at a time. Look at the result and check if you have created the right effect.

Create your image in mind – then make exposure changes to suit

The way you want your image is a creative decision. The camera should not be allowed to dictate the outcome.

You have two choices. If you go with the settings the camera gives you, the result is an optimum of the balance of the settings. If you can foresee what you want to achieve, then create your own result. In this case, make the balance of settings so the exposure changes to your choice. Your choice will be different to the result the camera would give you. But with care and practice it will be what you intend for your shot. You have taken control.

So next time you are taking a photo consider this. If you think your picture would be more effective as a darker or lighter representation, then make the exposure changes you need. Do it – create. Really make your images – don’t just capture what is there.

Comments, additions, amendments or ideas on this article? Contact Us
or why not leave a comment at the bottom of the page…

Like this article? Don’t miss the next — sign up for tips by email.

Damon Guy - Netkonnexion

Damon Guy (Netkonnexion)

Damon is a writer-photographer and editor of this site. He has run some major websites, a computing department and a digital image library. He started out as a trained teacher and now runs training for digital photogs.
See also: Editors ‘Bio’.
By Damon Guy see his profile on Google+.

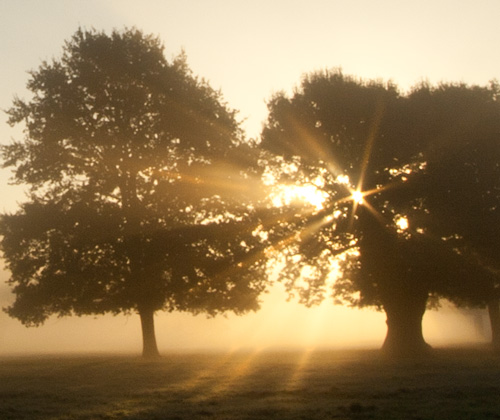
Using the sun to create shafts of light

Golden Morning - Light shafts pierce the mist

Golden Morning – Light shafts pierce the mist

Atmospheric shots – look for light shafts

Look out for the early morning or evening mist that creeps across the landscape. If the mist is with a clear sky, you are in for a photographic treat. This is one of the most atmospheric shots you can take.

What are light shafts?

We are talking about those lovely rays that pass through the air highlighted by the mist. They often pick up the golden colours of morning or the wonderful oranges/reds of dusk.

Misty conditions can arise in lots of ways. Early morning or evening chill after a warm day often creates mist. It’s best as a ground mist. Up above the rising or falling sun is bright, golden and low. Under these conditions you have the perfect situation for light shafts. It is the shafts of light falling through the mist that create the effect. Although often there does not need to be much more than a hint of mist. Sometimes only a moist air is enough. This is especially so if you are in a dark forest with bright light penetrating deep between the dense canopy. The strong contrasts will often pick out the light shafts.

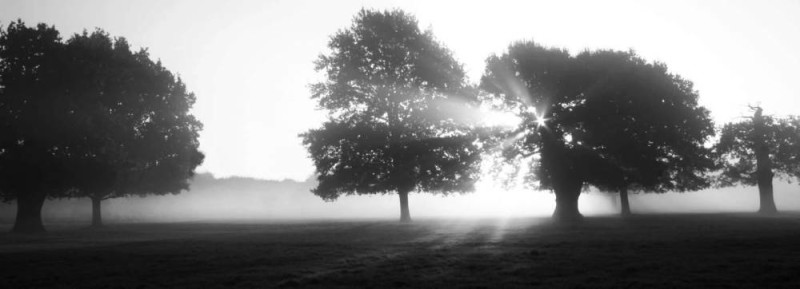
Misty Morning • Look for light shafts

• Misty Morning •
Look for the way the shafts of light cut through the mist

How do you capture light shafts

Actually, very easily. Be careful however, because you can damage your eyes or camera. Here is what you do…

Look for the shafts of light you can see with your eyes. If you can see them then you can often bring them out in-camera by slightly over exposing the light shafts. Set your camera focus to measure light using only the centre point of the viewfinder. Check your manual to find out how. Then, make sure you point it at a dark spot – like the trunk of a tree. The camera will measure for the darker areas of scene. This will brighten the scene and light shafts will stand out strongly. You will need to use one of the manual modes to do this.

You can also look for very bright spots coming through tree cover. This is often only the case if your camera is pointing directly at the sun. This can be dangerous so only do it if tiny points of light are coming through. NEVER look directly at the sun with your eyes or through your lens. If you can, use live view. Then you will not be looking directly at a bright light. If you are able to see a place where most of the light is blocked you could capture a few rays. Powerful as they are, they will cause strong lens flare. Often this will emphasis light shafts coming through the mist.

Light shafts – examples

You can check on this search on Google Images to see a whole page of light shafts. There are so many around the web that you cannot fail to be inspired…
Google Images :: Light shafts  External link - opens new tab/page about light shafts

Getting there on time

This is one of those techniques that work best with the Golden Hours of morning or evening. So you might need to get up early. Looking out for the right conditions is crucial. So is making sure you are in the right light/dark conditions. Forests and woodland are best. Most of all, be at one with nature. These shots make exciting images to look at. They are wonderful to experience too.

Comments, additions, amendments or ideas on this article? Contact Us
or why not leave a comment at the bottom of the page…

Like this article? Don’t miss the next — sign up for tips by email.

Damon Guy - Netkonnexion

Damon Guy (Netkonnexion)

Damon is a writer-photographer and editor of this site. He has run some major websites, a computing department and a digital image library. He started out as a trained teacher and now runs training for digital photogs.
See also: Editors ‘Bio’.
By Damon Guy see his profile on Google+.
Light intensity – estimating the light you need

Light intensity is about finding the natural look

• Computer user •
Get familiar with light intensity. Look for the right light intensity in every shot. It is not always easy – here’s how.

Aim for a light intensity that suites the subject.

When using artificial lights think about how light best suits the subject. Learners often use lights set too bright. We will explore the use of distance to reduce the light intensity.

What is light intensity

You might describe light intensity as the power that light has at a given place. A light is most powerful at its source. As it radiates away from the source it becomes less intense. Actually the light radiated still has the same total energy. As it gets further from the light source it is just spread out more.

At each point where you measure light travelling away from the source there will be less and less light. This is because the total light is more and more spread out. This relationship is called the Inverse Square Law. It is a bit of math which describes how light behaves. For our purposes we just need to know that as the distance from a light increases, the illuminated area also gets larger. The same amount of energy is spread out over a larger area. We can say this in a simple way…

As you move away from a light, the light intensity reduces by “distance squared”.

A camera only samples a small area of light. If the light is spreading out the amount of light it can gather is getting less. The light intensity it can capture reduces with distance. Less light is going to get into the camera.

So the light intensity gets less with distance?

At one meter from the light you can say light intensity is one unit. At two meters the light is spread out over four square meters (1 divided by four). If you take a photo you will get one quarter of the light entering your camera. Here is a table that shows how this goes…

1 M from source :: Light intensity per square meter = 1
2 M from source :: Light intensity per square meter = 1/4
3 M from source :: Light intensity per square meter = 1/9
4 M from source :: Light intensity per square meter = 1/16
and so on…
[M = Meter]

Here is a diagram showing how light intensity falls off according to the inverse square law.

How does this help?

When using artificial light of any kind you should remember light intensity. Good light should match the scene for a good image. It should look natural and the right sort of light (colour, intensity, etc). You also need to have enough illumination for the shot. Too little and the picture will be under exposed. Too much? The picture will be washed out, over exposed. All simple enough.

You need to know that light intensity falls off with the square of the distance for one reason. If you take a picture close to a light (1m) that may be bright enough to achieve what you need. If you move to three meters the light intensity will be reduced to one ninth of its previous amount. That is very different light to use. It changes your light levels in the scene. It will also affect your cameras ability to make an exposure. It may affect the colour of the light or other properties.

For someone using a flash on a camera it works the other way around. If you move to three meters from your subject the flash will light them at one ninth of the light intensity of a shot taken from one meter. They will appear much less bright.

Moving close to or away from a light source

The point is simple. Light intensity determines both the illumination and the brightness of a subject. You don’t need to move a lamp or flash very far for a significant loss (or gain) of light intensity. So guessing where to take your next shot is made easier. You can predict that fall-off now you know how the lighting behaves.

Now you can control your flash two ways. You can turn it down using the menus on your camera (check your manual). Alternatively you can move back. Even a short distance back will reduce the brightness of the shot by a lot.

Next time you are using a flash…

Why not test the theory. Put your camera in manual mode. Take a picture at one meter. Without changing the settings, move back. Try two meters, then three, and so on. Each picture will get dimmer. Quicker than you expect you will not be able to make an exposure. This is probably one of the most important lessons about the behaviour of light.

Comments, additions, amendments or ideas on this article? Contact Us
or why not leave a comment at the bottom of the page…

Like this article? Don’t miss the next — sign up for tips by email.

On-camera flash… advice for taming the beast

Taming on-camera flash

• Taming on-camera flash •
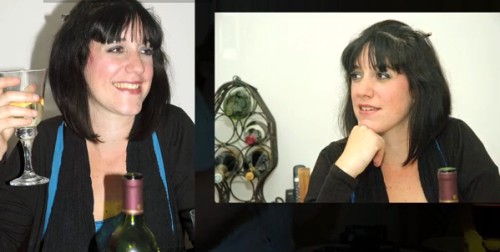
Left: harsh light and highlights are so unflattering!
Right: properly controlled you get proper skin tones and no highlights.
•••••||•••••
On camera flash can be a pretty tough nut to crack – learn how.
(Images taken from the video)

On-camera flash is pretty harsh…

In fact it’s often the source of ruined pictures from otherwise great dinner parties and family events. Dealing with with these little beasts takes a little work. You can make them do you bidding, you just need to know how.

A small powerful light source

The power of the little flash on your camera is misleading. For such a small light it puts out a lot of power. The learner is often caught off-guard. A great scene can be ruined by very unpleasant light, colour leached from faces, shiny reflections on faces and really hard-edged shadows. The whole thing is pretty ugly.

Here is some news. There are ways to control these little beasts and make them do your bidding.

Two of the most useful techniques for dealing with the problems are explained more fully in: Find out more about diffusing your on-camera flash. The other way is to help your flash work better in the room. Use the room itself as a way to bounce light around. Point your flash at a wall or ceiling so the light is reflected everywhere. It will make harsh flash into soft light – make it a more wrap-around light. This is always more flattering and shows the gentle curves of the face much better. It also means the light works its way around the back of the subject reducing harsh shadows cast onto the wall.

Practical use of the on-camera flash

For those quiet evenings where you are chatting with your friends and family here are some easy techniques. You can use your on-camera flash to good effect without the harsh shadows. You can escape the electric shock faces and startled expressions too. Have a look at the video and follow the sage advice of Mike Browne at a dinner party…

Using on-camera Flash Indoors – With Mike Browne


Mike Browne  External link - opens new tab/page

Using the proper tools is best

Let’s face it. On-camera flash is always going to be a bit difficult. As good as it looks in the video controlled results are always going to be difficult from such a little light source. Here is what Mike himself has to say about on-camera flash…

I’d suggest a speedlight is better because you can fit a diffuser and better still, turn the flash head in any direction and bounce the flash off a wall or ceiling.
Mike Browne  External link - opens new tab/page.

Have a look at some off-camera ideas. These are probably the most flexible options for moving your photography forward, especially for small intimate surroundings. Check out these options…

Off camera flash units

Canon Speedlite 430EX II Flash Unit – a great branded flash for general use  External link - opens new tab/page

Nikon SB-600 Speedlight – a great quality mid-range Nikon flash unit  External link - opens new tab/page

Special pick…

This high quality own-brand flash unit performs like branded units but is much more affordable. The unit provides a range of functions as well as being compact, light and robust. Great value for your money. YN560 III 2.4Ghz Wireless Flash Speedlite Support RF-602/603 YN560-III For Canon Nikon Pentax Olympus  External link - opens new tab/page

 
All these units will fire as normal when mounted on the camera. They will require an off-camera flash cord or wireless radio triggers for off-camera flash units  External link - opens new tab/page to connect to the camera when shooting off-camera.

Comments, additions, amendments or ideas on this article? Contact Us
or why not leave a comment at the bottom of the page…

Like this article? Don’t miss the next — sign up for tips by email.

Netkonnexion

Damon Guy (Netkonnexion)

Damon is managing editor of Photokonnexion.com with professional experience in photography, writing, image libraries, and computing. He is also an experienced, webmaster and a trained teacher. Damon runs regular training for digital photographers who are just starting out.
See also: Editors ‘Bio’
By Damon Guy :: Profile on Google+

The Exposure Triangle – An aid to thinking about exposure

The Exposure Triangle

• The Exposure Triangle •
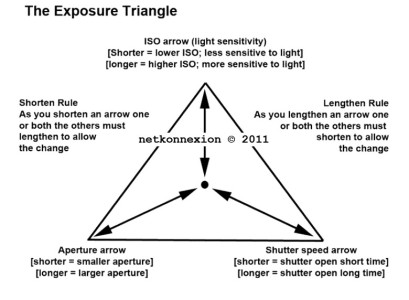
Click the image to download an A4 *.pdf version to print.

Going manual with your DSLR.

For many people exploring manual settings is a challenge. There is a lot to learn. Without guidance it is difficult to work it out for yourself. Here is my approach to the subject.

Why the exposure triangle

The “Exposure Triangle” is a memory aid to help us balance light for a good exposure.

One thing you should remember. The exposure triangle is NOT a calculator. The aim is to help you get used to using the settings. The ‘Triangle’ loses its importance once you understand the settings. Instead you will see your visualisation of the shot as more important.

Beyond auto-settings

“Auto settings” in modern cameras are average types of shot. They are pre-set in the camera programming. Sports mode freezes the action; landscape mode gives deep focus in the shot; portrait mode promotes close focus and so on. The pre-sets make credible pictures but take creative decisions away from you. Controlling exposure gives you artistic control over our photos.

It’s all about control

Photographs capture light reflected from objects in the scene. Too much light – the object is over-bright, or worse, blown out (completely white). Too little light and the light does not excite the sensor enough. Thnthe object is dark, sombre, or worse – black. At the extremes we have blown out or black. In between are a whole range of capture intensities.

The trick is to balance the incoming light so the sensor can make the picture as we wish it to come out. the idea is to control the light in-camera to create optimal light conditions for the sensor.

Three essential elements

There are three critical elements that control the incoming light…

  • ISO: controls the sensitivity of the sensor and how we capture the light brightness. A sensitive sensor allows a shot in lower light conditions (example: ISO100). High sensitivity to light is referred to as High ISO (example: very high ISO = 3000). The penalty is the picture becomes noisy (Definition: Digital Noise) as the ISO gets higher. Noise affects the quality of the picture. The lower you keep the ISO, the better quality the final image will be.
  • Aperture: controls the amount of light allowed through the lens. It also controls the depth of field. As the aperture increase the amount of light entering the lens also increases. However, as the aperture gets bigger the lens loses the ability to focus at infinity. As the focus shortens part of the picture is not so clearly defined. Taking a photo at F4 means you might be able to focus on a face beautifully and with sufficient light. But you may not be able to discern any detail behind the head. The depth of field has been shortened by the wide aperture.
  • Shutter value or Time value: How long the sensor is exposed to light affects the amount of light you collect. Leave the shutter open too long and the shot is too bright, blowing out parts of the picture. Close the shutter too quickly – the result is underexposed. Long exposures tend to exaggerate movement introducing blur. Fast shutter speeds tend to freeze an object in place.
What is exposure?

There is no right or wrong for achieving the outcome we desire. But there is only ONE point at which the exposure (all three elements combined) is right for your picture. That is the one to make your photo come out the way you want. You must find the correct exposure balance for your visualisation of the picture using all three elements.

Exposure is the right balance of ISO, Aperture and Shutter speed which provides for your intended depth of field, movement blur, brightness and representation of the scene. It is a unique response to the sensor settings you think will make your shot come out right.

The Exposure Triangle is a concept to help you adjust the balance to get the exposure right. The key to using the exposure triangle is that the three elements of exposure: ISO, aperture and shutter speed, must always balance.

It teaches us to understand how the three exposure elements play off one-another. Shorten one arrow the others will need to accommodate by adjusting their length. You can increase one or both of the other elements to accommodate the change.

If you increase one element you will need to decrease one or both of the other elements to accommodate the change.

Full Manual Control

Our exposure settings aim to balance the three elements in the camera. This needs to be done on the ‘Manual’ setting or ‘M’ setting to get the desired result. To gain full creative control we must do two things…

  • First we must have a clear idea of what we are going to achieve for each shot. Do we want the water blurred in our stream or not? Do we want the final picture to look bright and breezy or dark and sombre? Do we want movement blur or sharp, frozen action… and so on. So look at the scene and determine what you want.
  • Secondly, on the basis of what we want we must adjust the camera settings to achieve the desired result.

How do we adjust the settings to get the optimal exposure? Simple. The camera light-meter indicates when exposure is optimal.

The DSLR light sensor is the key

Inside every DSLR is a digital sensor. It detects light intensity. If the light is correctly optimised it will be indicated on the exposure meter.

With the camera set to “M” look through the eye-viewer. At the bottom of the screen you will see a scale. There should be a needle above the scale. This is the indicator of the current exposure. The centre of the scale is the correct exposure level for most shots.

If the needle is off to the right the sensor is getting too much light. If it is off to the left there is insufficient light. The trick is to balance ISO, aperture and shutter speed so the needle is centred.

Your camera manual will show you how to change each of the three settings. There are normally three controls somewhere on the DSLR body to change each of them. Again, your camera manual should have a diagram of the readings in your viewer screen when you look through it. Check out that diagram. You will see the location of the settings on the screen that will change when you alter the controls.

A trick to get you started…

Put the camera on full automatic (the ‘green square’ setting). Take a shot like the one you want. Now look at the settings for that picture on your camera screen. Your camera manual will show you which setting you can look at on the screen. This gives you a guide to what your manual settings should be for this shot.

Now switch to ‘M’ or manual to vary the results. If you want movement blur then slow down the shutter speed (longer exposure, more light let in) and/or decrease the aperture (reduce incoming light) to keep the needle in place. One click of longer shutter speed needs one ‘f-stop’ less of aperture to keep the exposure optimal. But now you get the movement blur!

The aim here is to balance a change in one element by changing one or both of the other elements. In the process you try to keep the needle over the centre of the scale in your viewer. The centred needle tells you you have an optimal exposure that your sensor can use.

Experience…

If you practice regularly with your camera on ‘M’ you will get control of your shots. Try to relate the settings to the type of results you get. Relate shutter speed to the resulting blur/sharpness. Similarly, relate depth of field to aperture size. Relate ISO to balancing light sensitivity to achieve the correct sensitivity for your intended exposure. Gaining experience with these attributes will help you remember settings to use in particular situations.

Comments, additions, amendments or ideas on this article? Contact Us
or why not leave a comment at the bottom of the page…

Like this article? Don’t miss the next — sign up for tips by email.

Netkonnexion

Damon Guy (Netkonnexion)

Damon is managing editor of Photokonnexion.com with professional experience in photography, writing, image libraries, and computing. He is also an experienced, webmaster and a trained teacher. Damon runs regular training for digital photographers who are just starting out.
See also: Editors ‘Bio’
By Damon Guy :: Profile on Google+

Umbrellas and softboxes

umbrellas and softboxes

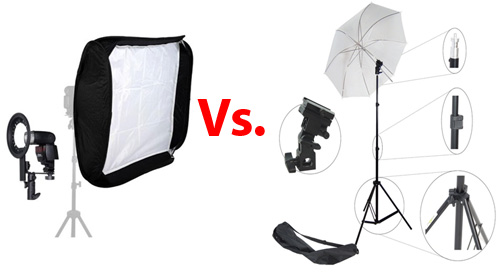
• Softbox Vs. Umbrella •
Umbrellas and softboxes seem to have similar characteristics… or do they?

What IS the difference?

Photographers learning to use lights find it difficult to understand the difference between a softbox and umbrella set-up. It is important to understand if you want to have control of light.

The nature of soft and hard light

Hard light is not some mutated form of ordinary light. It is a type of light that is focussed and which shows a hard transition from bright to dark. The shadow line is a sharp contrast. On the other hand, soft light wraps itself around curves and has a soft transition from light to dark.

The definitions of hard and soft light tell us much about the characteristics of the light but not how the light is formed. Well, it turns out that the light source, its shape, size and focus or diffusion as well as distance from the subject all have an impact on the characteristics of light.

Photographic umbrellas and softboxes

In the video Mark Cleghorn examines the characteristics of photographic umbrellas and softboxes. He does some great shots with both. Pay attention to the way he uses the lights and what characteristics he points out. Distance and size of the sources play an essential role in the formation of the softness and hardness of the light. His experiments are interesting and show you how the nearness of a large light source can create softness. It seems counter intuitive, but it is correct.

The first half of this video is very useful and you will learn a lot about Umbrellas and softboxes as light sources. The second half showcases advanced features of Photoshop. This is a less useful section if you are only interested in the practical issues for umbrellas and softboxes. You can safely skip it.

Lastolite Umbrella Versus Softbox from Lastolite on Vimeo  External link - opens new tab/page.

Types of lights

There are many types of light source that can generate light for umbrellas and softboxes. For most situations it is best to use off-camera flash units. The more expensive studio flash units are more for professional use. If you are just starting out they will be more powerful than required for most general purpose needs. Off camera flash helps give you flexible use. It is also easily controlled. You can work with both umbrellas and softboxes with an off camera flash.

Fortunately, most umbrellas and softboxes units designed for off-camera flash will mount most types of flash units. When looking to purchase lights think about what you want to achieve. Then buy the flash unit needed to meet your need.

Below is an example of a photographic umbrella set…

DynaSun W968S Professional Kit with Holder, Umbrella, Stand and Bag for Cold Shoe Mount Flash Gun Flashgun  External link - opens new tab/page
This is a high quality but affordable photographic umbrella unit. The complete package includes everything you need except the off-camera flash unit. The inclusion of the small carrying bag makes the whole thing neat and well presented.

When it comes to the purchase of a soft box these too have the universal fittings for off camera flash units (although studio units are also available). Here is an example softbox…

24″ 60cm x 60cm EZ-Fold Studio Softbox Kit with 2 x Diffusers and Ballhead Bracket for Portable Flash and Speedlite  External link - opens new tab/page
This is a high quality, well produced softbox with easily adjustable fittings and a variety of ways to set up light diffusion within the unit.

Of course both these units are among many others in the field. You can see the various types of each on these search pages…
Photographic umbrella – Search page on Amazon  External link - opens new tab/page

Softboxes – search page on Amazon

These various examples include studio light units, always on bulb mountings and fittings for off-camera flash. Check for what you want before you buy. The most flexible is for off-camera flash when you are starting out.

No removable flash? Read this: Off-camera flash. It’s a great introduction and recommends an affordable flash unit.

Comments, additions, amendments or ideas on this article? Contact Us
or why not leave a comment at the bottom of the page…

Like this article? Don’t miss the next — sign up for tips by email.

Damon Guy - Netkonnexion

Damon Guy (Netkonnexion)

Damon is a writer-photographer and editor of this site. He has run some major websites, a computing department and a digital image library. He started out as a trained teacher and now runs training for digital photogs.
See also: Editors ‘Bio’.
By Damon Guy see his profile on Google+.
A quick and simple method to make brilliant water droplet images

water droplet

• Water Splashes •
The most beautiful scenes in the world include water. Here you can make your own water droplet.
(Image taken from the video)

The close-up world of the water droplet – endlessly fascinating

The captivating thing about water is that it is ever changing and creates a sense of magic in every scene. When you get in close some simple techniques make wonderful images.

How to photograph water droplet impacts

Ever enthusiastic Gavin Hoey takes us through the simple process of creating wonderful water droplet photos. Colour, light/shade and magic water droplet sculptures are the result.

The best bit about this is that you can make these wonderful photos yourself. It is very easy and great fun. When I first did this I spent hours of time on it and got lost in a world of wonderful colours and effects. There are three things to remember that will help you make this a personal and effective shoot…

  • The more shots you take the more great effects you will see.
  • Background colour should be varied. I’ve used wrapping paper to brighten colours.
  • The angle of the camera can affect your shot (not mentioned in the video).
  • Try different camera heights with respect to the water.

After yesterdays blog, the way you see it is about your style. Don’t look for “new”, look for you!

This is a short video (six minutes 50secs), but one that will give you hours of fun and excellent images.
Gavin Hoey  External link - opens new tab/page

No removable flash? Read this: Off-camera flash. It’s a great introduction and recommends an affordable flash unit.

Comments, additions, amendments or ideas on this article? Contact Us
or why not leave a comment at the bottom of the page…

Like this article? Don’t miss the next — sign up for tips by email.

By Damon Guy (author and Photokonnexion editor)

Damon Guy - Netkonnexion

Damon Guy (Netkonnexion)

Damon is a writer-photog and editor of this site. He has run some major websites, a computing department and a digital image library. He started out as a trained teacher and now runs training for digital photographers.
See also: Editors ‘Bio’.