Tag Archives: Light modifier

Reflecting on ways to work with the best light

Reflectors

• Reflectors •
A session with reflectors is a way to control the sun
and get the lighting you want on your subject.
[Image taken from the video]

The control of light is not always obvious.

Reflectors and other shapers of light make a big difference to the scene. Often photographers go to great lengths to work with reflectors. Here are a few simple tips to bear in mind when you want to shape light – particularly outside.

When you need a reflector

You can use reflectors in any type of environment. They are best used where you need to even out the light on your subject. Remember that if you are using a reflector the source light is the main or key light. The reflection from your reflective surface is in proportion to the power of the key light. This proportionality is important. Often, more than one light is difficult to balance. Using only one light source you can create a natural balance with the reflectors. It is difficult to get reflected light out of proportion. There is always some loss in the reflection. This ensures that the light on your subject will be less intense than the key light but related to it by its proportion. The result looks more natural.

Shade is as important as light

When you are working in the fullness of light it is common to be confronted with strong reflections from the subject itself. Specular highlights, reflections off of curved surfaces and shiny areas are the most difficult to control. However, bright reflections on larger areas like flat areas of glass or even areas of flesh like bare arms can also be really difficult to control.

If you have these sorts of reflections you can reduce the worst of them using a polarising filter. Of course the only sure way is to reduce the intensity of light overall. This means creating shade. Again, the most important issue here is to reduce the light in proportion to the ambient light around you. This helps the light to remain looking natural because it is derived from the main light once again.

Don’t spend a fortune

For most of us expensive reflectors and shade creators are out of reach. As with most things however, the amateur can create the same effects as the professional without the expenditure.

Reflectors can be created from white sheets, curtains, even large pieces of card. These things can be purchased inexpensively and propped up easily to create the effect you want. What is more important than the material that creates the reflection is the way you use the reflections themselves. It is important in very bright light that the reflections are used to infill darker areas of shadow to even out the contrasts. Then your camera can cope and you will see a more controlled light on your subject.

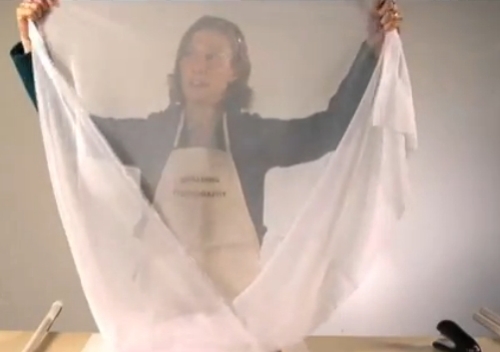
Shade too can be created easily. Use solid card sheets or even blankets on poles. I do quite a lot of car photography. Often specular highlights can be eliminated by hanging a thin white sheet on two poles in the line of the light. The main light – normally the sun – will penetrate a thin sheet so that a proportion of the light will continue to illuminate the subject. Again, the proportionality is important. Things always look more natural if the light is proportional to the surrounding ambient light.

Using Reflectors – Photography & Video Tutorial

In the video J.P. Morgan, a successful photographer, uses lots of resources and equipment to manipulate light in all sorts of ways. First, he looks at how the light is best exposed to the subject. He uses the light to create a rim light. This helps to reduce large, strong areas of reflection and helps to define the body shape.

When he has the light direction right and well controlled he uses a gold reflector to give the light a pleasant colour – an evening sunlight yellow. This lifts the colour of the faces in the shot.

The other thing that J.P. Morgan does is use the shade and reflectors to create fill. The sun provides the main light but the levels of light off the reflectors allows a lower level light intensity creating a natural light. This does not look like it has been deliberately projected at the subjects. It is a soft light that beautifully wraps around the children. It evens out the contrast between the brighter light and the darker areas.

Look at the way the equipment is used in the video. But spend your time afterwards thinking about how you can substitute affordable reflector materials and ways to create shade. Making your own kit can be fun and just as effective brand equipment.

The video is just over six minutes.

The Slanted Lens DSLR Lighting Tutorials  External link - opens new tab/page

If you want to buy an affordable reflector set, here is the one I use. These reflectors work very well and are flexible in the way they can be used. The whole set also folds away into a great compact bag. The pack contains five effects (silver, gold, white reflector/diffuser, grey and black)…

42″ Photographic light reflector set (5 in 1)
Ex-Pro 5 -in- 1 Photographic Light Reflector – 42″ (110cm) Silver, Gold, Black, White & Translucent, Collapsible.
This is an excellent reflector set, robust and effective as well as easy to store. I highly recommend this as a standard piece of equipment.


Comments, additions, amendments or ideas on this article? Contact Us
or why not leave a comment at the bottom of the page…

Like this article? Don’t miss the next — sign up for tips by email.

By Damon Guy (author and Photokonnexion editor)

Damon Guy - Netkonnexion

Damon Guy (Netkonnexion)

Damon is a writer-photog and editor of this site. He has run some major websites, a computing department and a digital image library. He started out as a trained teacher and now runs training for digital photographers.
See also: Editors ‘Bio’.

How to do DIY diffusion – great light from simple tips

 • DIY Ways to diffuse light •

• DIY Ways to diffuse light •
Image taken from the video.

Inexpensive photography equipment!

Following on from the Save money and improve your scene lighting yesterday, we have another video showing how you can provide yourself with an inexpensive light diffuser. It will be quite as good as any professional diffuser and in fact you make it have variable diffusion effects.

Professional and amateur alike use quickly and easily made DIY solutions for their photography. They know they can make things to the specification they require without the equipment costing the earth. In most photographers studios you will find materials and adaptations to be able to do all sorts of ‘quick makes’ with materials, frames and stands. It just makes sense to save money and do it how you need it, rather than spend a mint on something you only use once.

DIY Ways to Diffuse Light


Playgallery  External link - opens new tab/page

Comments, additions, amendments or ideas on this article? Contact Us
or why not leave a comment at the bottom of the page…

By Damon Guy (author and Photokonnexion editor)

Damon Guy - Netkonnexion

Damon Guy (Netkonnexion)

Damon is a writer-photog and editor of this site. He has run some major websites, a computing department and a digital image library. He started out as a trained teacher and now runs training for digital photographers.
See also: Editors ‘Bio’.

Can you write? Of course you can!
Write for Photokonnexion...

We would love to have your articles or tips posted on our site.
Find out more…
Write for Photokonnexion.

Easy introduction to light modifiers – don’t miss out (pt 1)

The "Honeycombe Grid" is a simple device to direct the light in a tight beam.

The “Honeycombe Grid” is a simple device to direct the light in a tight beam. It is an example of a range of grids used in front of lights to harden the light source and prevent the light from spreading out into a wider, more diffused beam.

We use light modification all the time.

Light bounces off everything. The unique light found in every location is from this bounce effect. We also deliberately modify light to create the right light for photography. Look at the options we have available…

Honeycombe

Shown above the honeycombe is a tightly arranged grid. It’s affixed to a studio strobe or an off-camera flash. The light shines through…

Softbox

There are very many different types of soft boxes. However, they have a lot in common. They create a really great soft light…

Ten important additions to your camera bag

After camera and lenses your camera bag should hold some other essentials.

The things you need are not always obvious. But things happen when out shooting. Some extra items in your bag help you to carry on without a hitch.

What people commonly carry in their camera bags

Well, camera and lens(es), of course, but also most people carry something to wipe the lenses clean and possibly a tripod. The latter being the third most important piece of photography equipment. Lots of people also carry an off-camera flash too – it is much more useful than the on-board flash.

Items that might save the day…

Here are some things that when the chips are down you will find most useful to have in your camera bag.
Spare battery: Everyone should have a spare battery or batteries. Batteries can be a problem for many reasons. I dropped one onto concrete once when trying to put it into the camera after charging. It split – and, well, it took three hours to buy another one. That was most of my shooting time gone. I learned a lesson there!
Modelling putty: or something similar. A small spot of putty can be used to stick things down while you photograph them. Wedding photogs use it for holding the rings in place for the ring shot. But there are dozens of other on-location reasons for holding something in a particular position. Small and easily hidden the putty can do the job and be out of sight. You can buy it in craft shops or there are sticky putty packs for putting pictures on walls. That works too.
Memory Cards: These get old and sometimes fail to work. If you get an error on your camera check the card. It may be the cause. They are also easily lost, damaged and stolen. You may lose your pictures, but if you have spare(s) on hand you can at least shoot some more. Check out theses articles for more on memory cards…
20 Ways to Protect Files on Memory Cards (Part 1)
20 Ways to Protect Files on Memory Cards (Part 2)
Always keep more than one memory card. I actually carry quite a few and rotate them. Memory cards on Amazon
Light modifier: if you use a pop-up flash or an off-camera flash you should have a way to diffuse or deflect light from the flash. It is often the case that you will want to create fill in light, especially on a bright day. It counteracts the contrast created by strong ambient light. A modifier can also be used to create deflected or diffused light for portraits. This helps to avoid nasty highlights or washed out colour on the face.
Two clothes pegs (clothes pins): I use these for a number of things. Most often I use them to pin back my camera neck strap when the camera is on a tripod. This stops the strap from blowing in the wind which reduces the vibration. However, they are also great for hanging reflectors up or clipping back wires so they don’t catch on things and damage the wire.
Remote button release: (essential) If you want your tripod shots to be sharp you will definitely want to be able to fire your camera without touching it. A cable release, or hand-held remote are quite cheap items and will make your shots sharper by a long way.
Spare lens caps: Lens and end caps for your camera are small, light and fit in a bag tucked away. If you lose one you will have to put your precious lens into the bag without a cap – against that harsh material. You can bet your lenses will be scratched. No fear if you have spares.

Macro extension tubes: You can buy them for most cameras. They weigh ounces, fit into a small place and are quickly fitted to any lens. They extend your capacity to be able to do macro work without carrying big, heavy and expensive lenses. They cost remarkably little and can be bought online. A full range of macro tubes can be found on Amazon for all cameras.

Camera manual: My dad used to say, “If all else fails, read the instructions!”. One of the best pieces of advice I ever heard. So keep your camera manual on hand. You never know when you need to use one of its functions and don’t know how. Or, this classic… your camera shows an error and you don’t know how to get out of it. The manual tells it all.
Compass/sunshine calculator: OK, this one is not for everyone. But I always carry a compass when out taking landscapes. You never know when you are going to get caught in fog, or just lost off-road. My compass is also set into a small card used to calculate sun angles so I can calculate sunset or dawn times. Again, not for everyone. But I like to be prepared!

There are probably some other wonderful things we could carry. If you have an essential item you think we should know about please leave a comment!