Tag Archives: Landscape

Photography mistake that means you miss great shots

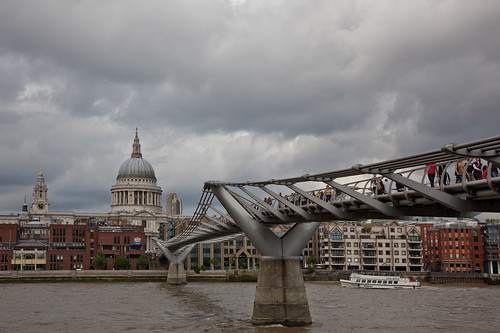
• Thames Crossing •

Focus. It’s too easy to fire off shots without thinking when arriving at a great location.
Click image to view large
• Thames Crossing • By Netkonnexion on Flickr External link - opens new tab/page

First impressions can overwhelm your photographic senses.

It’s so easy to turn up at a new location and start firing off shots. The machine gun approach will actually damage your results. This simple trick will help you focus your photography.

Great locations seem to have so much to offer. You want to open yourself up to the whole experience. The problem is the new location will offer you too much to take in at once. You simply cannot take pictures of everything. In fact to try will just make your shots boring – you will be diverted from really interesting shots.

Try this simple plan…

When you arrive take these simple steps to help you get great shots:

  1. Go take the postcard shot that everyone takes – get it out of the way.
  2. Sit down and consider the whole location in photographic terms (10 mins).
  3. Think how you might shoot for the unusual views of the location.
  4. Work the scene.
  5. Use the “fifteen second appraisal” to check your composition.

Now go and take the shots you have come up with above.

This simple procedure can be applied to any location. It pulls together different photographic skills into one smooth shoot. The result of taking the time to do this full photographic assessment will be properly considered shots. They will be photographs you will be proud of because you have taken the time to consider what is needed to make great images.

By Damon Guy (author and Photokonnexion editor)

Damon Guy - Netkonnexion

Damon Guy (Netkonnexion)

Damon is a writer-photog and editor of this site. He has run some major websites, a computing department and a digital image library. He started out as a trained teacher and now runs training for digital photographers.
See also: Editors ‘Bio’.
The advantages and disadvantages of live view

• DSLR Camera •

• DSLR camera diagram (side veiw) showing mirror down position •
Click image to view large
• DSLR Camera • By Netkonnexion on Flickr External link - opens new tab/page

Live view is here to stay.

What are the good and bad aspects of this technology? Should we be using it? What does it offer the DSLR user over the time honoured viewfinder system? In this post we look at the pros and cons.

The DSLR mirror system

If you are not familiar with the inner workings of the DSLR you can read more about it in this post: DSLR; Digital Single Lens Reflex Camera.

The essence of the mirror system is simple. The photographer peers through the viewfinder (see the diagram above) and the eye receives light directly from the main lens. Light reaching the eye has been redirected by the mirror up through the camera to the viewfinder eyepiece. When the photograph is taken the mirror flips up. Then the shutter opens allowing the digital image sensor to be exposed to light entering through the lens. While the mirror is up the photographer is unable to see through.

Live view…

When using live view the mirror is flipped up. You cannot see through the viewfinder. The view detected by the image sensor is instead created electronically on the camera screen on the back of the camera. In the most up to date mirrorless cameras the view is projected electronically into the viewfinder so you can use that instead of the screen-view on the camera.

The screens on the back of the DSLR, bridge cameras and point-and-shoot cameras provide a good, clear image on the screen. The displays offer a pretty good representation of the image seen through the lens. Reviews of the new mirrorless cameras suggest that electronic viewfinders are apparently not as good as those using mirrors. However, the technology is young and significant advances have been made recently. I think eventually electronic viewfinders will provide as good a view as the back screen.

Why do we need a viewfinder?

One of the problems of a back-screen is holding the camera steady. When you have a big lens on a camera the sheer unbalanced weight-in-hand makes it difficult to steady the camera with two hands held out in front of you. For a professional, or the keen amateur, the extra softness this induces is intolerable.

This is less important with light point-and-shoot cameras which can be held steady with one hand. Mirrorless cameras are smaller and lighter than DSLR counterparts. Bigger lenses still make them relatively heavy. Pressing a camera-lens combo to your eye while also held in both hands gives a third point of stabilisation to your camera – a steady position. So, a practical consideration for more substantial combinations of large camera and lens.

Retaining a viewfinder also ensures the “eye-view” is actually available to the photographer. By this I mean that the camera can be placed where the eye actually is on the body. Then the photographer sees through the camera in the same plane and level as the eye. I find this leads to better composition. We are more used to using eye-level views in our everyday vision. I acknowledge that the free-roaming screen composition may provide a more unusual point of view. However, artistic considerations aside, when composing an image I find close scrutiny of the scene leads to cleaner images and a rigorous composition. OK, this is not for everyone. It is a point to bear in mind for the more discerning photographer.

In my experience doing a back-screen composition is difficult because the eye is distracted from the screen. This leads to limited, incomplete composition, or missed details. I have been guilty of this sort of sloppy composition and have seen it in the images of others. Personally, I think the viewfinder helps me to compose accurately and cleanly allowing proper examination of detail.

What live view can offer…

Despite the shortcomings of back-screen composition and lack of steadiness there are good reasons to use live view.

On a tripod… While using a tripod to compose for landscapes, macros, wide angle and fish-eye shots do a quick check in live view before the shot. I suggest you do your initial composition using a viewfinder on the tripod. Once composed quickly check the live view simultaneously scanning your scene by eye. This enables comparison of the lens-distorted view against the scene as the eye sees it. This cross-checks your composition against your vision for the final outcome of the shot.

Mirror lock-up… When using a tripod use mirror lock-up to help sharpness. This mode sets the camera to flip-up the mirror ahead of the shot. The vibration from the ‘mirror-flip-up’ then passes before the exposure takes place. This reduces vibration enabling a sharper shot. Most DSLRs offer the mode which is found in the menu screens. Live view also performs a mirror lock-up action on many cameras. If you have a “live-view” button, do your composition, perform a live view check and take a mirror lock-up shot in the same sequence.

Access to the viewfinder is restricted… Yes, sometimes I simply cannot get to the viewfinder. When doing macro work, complex close-ups suspended under a tripod and when holding the camera high all create situations when the eye cannot easily get to the viewfinder. In this case the live view mode is a definite advantage and enable otherwise impossible shots.

Depth of field… The viewfinder has its own optical characteristics additional to the main photographic lens. Normally viewfinder lenses are pretty faithful and do not affect the view through the main lens. When using a fast lens, say f1.2 wide open aperture, the depth of field may be distorted by the viewfinder. It’s said live view helps you better see the areas of bokeh. I am sceptical. I have not seen this effect accurately on my Canon 5D MkII to make any difference. I am prepared to accept it works on other cameras. Try it and see.

Horizons, converging verticals and straight lines… Live view offers a set of lines dividing the screen up into thirds (nine segments). This “rule of thirds” grid is helpful in composition. I find it most useful when checking converging verticals when lining the camera up. However, a good electronic display of focus points laid out in your viewfinder is excellent for most compositions. The focus points usually allow for rule of thirds composition and more. So, live view offers an option, but no better than the viewfinder. Other cameras may differ on this, make your own choice.

Live view histogram… Some cameras allow the display of a live view histogram. This enables you to check your colour and light intensity prior to the shot. This saves later examination of lots of frames online. However, I prefer “Chimping”. The post-shot histogram review is the best way to tell if you have a good shot or not. If you do use the live view histogram beware of poor composition. The histogram takes up screen space I prefer to use for composition. So, not to my taste, but the opportunity is there on some cameras.

Live view can be useful

More cameras are providing good live view mode and offering more facilities with it. I think there are some good reasons to use this mode especially with a tripod. It certainly provides some useful functions. There are some severe shortcomings with live view composition and personal stance when using it. The good old viewfinder still wins the day for me. However, a lot depends on your camera. I hope these points have opened your eyes. I leave you to draw your own conclusions.

find out more...Photokonnexion tips by email
If you enjoyed this article please sign up for our
daily email service.
                                                 Find out more
#11030#

By Damon Guy (author and Photokonnexion editor)

Damon Guy - Netkonnexion

Damon Guy (Netkonnexion)

Damon is a writer-photog and editor of this site. He has run some major websites, a computing department and a digital image library. He started out as a trained teacher and now runs training for digital photographers.
See also: Editors ‘Bio’.

An old sailors trick to improve your photography

An old sailors trick can improve your photography

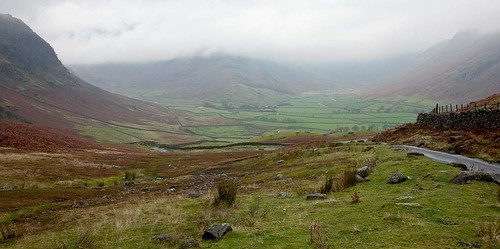
• Great Langdale •
• An old sailors trick can improve your photography •
Click image to view large
• Great Langdale •
• An old sailors trick can improve your photography • By Netkonnexion on Flickr External link - opens new tab/page

See also: • Great Langdale – no lines •  External link - opens new tab/page

Look carefully at your intended image.

Once you have your composition you should be able to check everything is correct. To do that effectively a good method for checking helps. We are going to look at a method to help you spot mistakes and problems.

What you need to check

In The fifteen second landscape appraisal I outlined a scheme for checking that the composition was all as expected. The scheme calls for a three step approach. First, check the frame. Next review the compositional elements. Finally, check the three D’s (Discordance, Disruption, Distraction). How you do that checking is critical.

I have often heard people say how they easily miss things when checking the viewfinder. Then, later in processing, the rogue element jumps off the image at them. So how can you carry out your ‘fifteen second appraisal’ and be sure not to miss anything.

A weird old sailors trick

My grandfather, a sea captain during WWII, ran freighters from Northern Ireland to London. These were most dangerous waters. They ran overnight up the English Channel to the Thames estuary hoping to escape enemy submarine patrols. They had a 24-hour watch on the ships bridge looking out for submarines. At night the chances of seeing a periscope was very low. Any search was better than nothing. The officers of the watch were taught that the most effective way to spot things that were out of place was to do the exact opposite to the way they normally read a book.

We are programmed to read left to right and as flowing as possible. We skip big sections of the text in interpretation jumps. According to research we actually use only the tops of letters to pick out the shape of the words. We read efficiently by missing out big chunks of the letters and text. Our eyes are actually trained to miss details when we scan as if we are reading.

It makes sense that if we need to look at things carefully and effectively we should be trying to do the opposite to reading. We should break the habit of skipping. In order to pick up the details, scan your composition through the viewfinder so that your eyes do the opposite to reading, scanning in the opposite direction. Work from bottom to top, right to left. As you sweep along unaccustomed routes through the scene you will be more likely to pick up details you would normally miss, things out of place and anything that falls within the realms of the three D’s.
More after this…

Can you write? Of course you can!
Write for Photokonnexion...

We would love to have your articles or tips posted on our site.
Find out more…
Write for Photokonnexion.

Routing diagram

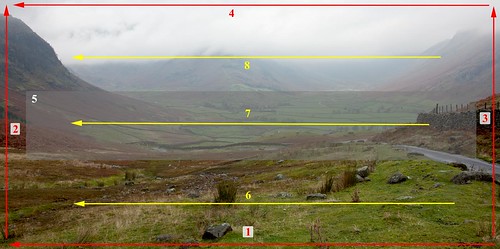
I have drawn an eye routing diagram in the picture above. Your eye-scan starts bottom right. From there you follow the numbering and arrows in the order of the fifteen second appraisal. First the frame. Check your frame composition following the arrows…

  1. Bottom right to left frame;
  2. Bottom left to top left frame;
  3. Bottom right to top right frame;
  4. Top right to top left frame.

In my composition the mountains either side, the wall on the right and the white sky above act as barriers. They prevent the eye from straying out of the picture. The idea is to hold the eye in the shot so it can drink in the aesthetics – the beautiful, mystery-laden, misty valley. If the frame achieves your compositional design move on.

The fifth step (no. 5) is to check your compositional elements. You are going to work the layers of your scene. Start with the foreground. Scan across the foreground looking for compositional problems and check your layering and any elements you have chosen to help the eye (line 6).

In the mid-ground look for the compositional elements that help the eye there. The mid-ground layer is important – it draws the eye into the landscape. I have zoned it as a shadowed grey box. The end of the wall marks where the eye leaps into the picture. The road draws the eye to the mid-ground. The wall across the scene from the number five right down to the bottom of the valley marks a mid-point for the picture, as does the sweeping ridge in from the left.

Line 8 check allows for the composition check for distance zone. We look to see if it works for, in this case, holding the eye in the picture.

In the final sweep we follow lines 6, 7, and 8 again. This checks these zones for the three D’s. We are looking for detail not composition – stand-out errors; the discordance, disruptions and distractions.

By the time you have done these sweeps, and the way you have done them, you should have spotted the problems, errors, and disharmonies that may spoil your shot.

The fifteen second appraisal is a process that take a little personal training. Those short seconds will make the difference to your outcome photograph.

By Damon Guy (author and Photokonnexion editor)

Damon Guy - Netkonnexion

Damon Guy (Netkonnexion)

Damon is a writer-photog and editor of this site. He has run some major websites, a computing department and a digital image library. He started out as a trained teacher and now runs training for digital photographers.
See also: Editors ‘Bio’.

The fifteen second landscape appraisal

• Looking into Great Langdale •

• Looking into Great Langdale •
Click image to view large
• Looking into Great Langdale • By Netkonnexion on Flickr External link - opens new tab/page

The classic landscape shot deserves one last look.

There’s nothing more frustrating than a poor landscape shot. You have the right light and place, the right angle too. Then the final shot looks wrong. Here is how to avoid the last moment mistakes.

Right up to the last moment…

You are on location and getting ready to take your shot. What do you do first? ‘Work the scene’, that’s what. Two things to remember about every landscape shot…
• The first location you put your camera down will be wrong
• The first time you compose the scene it will be wrong.
OK, these may not always be true, but they usually are true. If the first place you put your camera is where you take the shot you have missed the million other angles and places. You could have done a better job. So read the article on ‘Working the scene’ and then read the rest of this article.

Working the scene may involve a lot of different shots. In Landscape loves I pointed out that you can spend a great deal of time getting the final shot. When doing landscapes I often spend over an hour on working toward a final capture. Sometimes I may take 50 shots before I am ready for the ‘one’. Take your time. Think it through.
More after this…

You are ready…

Now to take the shot, the ‘one’. It’s time for the “Fifteen second appraisal”. You are going to do three things in this final check. Each will take five seconds.

  • The frame: You need to check all is well with your framing. Check you have included all the elements you want in the shot. Check the frame captures your scene as you intended it. Look for odd elements creeping into the scene that you have not spotted on the edges. Check that you have excluded all the undesirable elements on the edges of the picture too.
  • The compositional elements: Every picture is improved if you use compositional elements to help the eye see the scene. Make sure that you have a way get the viewer into the scene, leading lines, strong features, dramatic light and so on. Whatever you have identified will capture the viewers eye, make sure you know they are there. Dissect the scene, know why the composition pulls the eye into the scene and why the scene has depth and why the eye is held in the scene.
  • The continuity check: With this final check you are looking for a state of harmony and the absence of the three D’s…
    1. Discordance: Do all the elements come together? Is it complicated, can it be simplified? Do the colours clash? Is there anything in there that does not ring true with the rest of the scene? Is the scene harmonious or broken? Do the compositional elements pull the eye or split the view. Anything out of place?
    2. Disruption: Is there something in the scene that will change or disrupt the shot? Look for a moving car, a rolling fog bank, the wrong shaped wave, walkers stepping into the frame. You are checking for all things that might disrupt the shot.
    3. Distraction: Are there things in the scene that will spoil the view and draw the viewers eye away from the central message of the shot? Think of blown highlights, over-bright colours out of place, odd-items (bins? rubbish? pick-nick furniture? power lines?).

The fifteen second appraisal does not seem a long time. It is just right after practice. So take this check-list with you and practice it. After a while you should be able to do it in fifteen seconds without a check-list. Make it a habit and your landscapes will improve.

By Damon Guy (author and Photokonnexion editor)

Damon Guy - Netkonnexion

Damon Guy (Netkonnexion)

Damon is a writer-photog and editor of this site. He has run some major websites, a computing department and a digital image library. He started out as a trained teacher and now runs training for digital photographers.
See also: Editors ‘Bio’.

Can you write? Of course you can!
Write for Photokonnexion...

We would love to have your articles or tips posted on our site.
Find out more…
Write for Photokonnexion.

A great range of simple resources for landscape photography

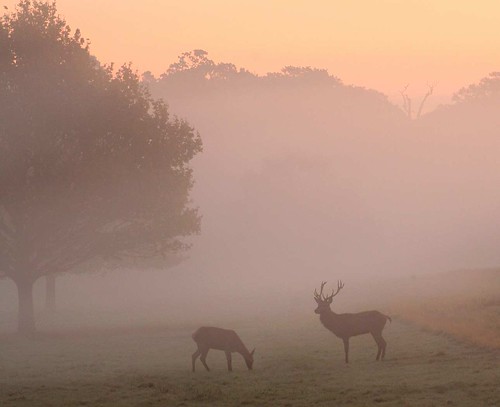
Early Morning in Richmond Park - Landscapes cover a wide range of different types of photography

• Early Morning in Richmond Park •
Landscapes cover a wide range of different types of photography

Click image to view large.
• Early Morning in Richmond Park • By Netkonnexion on Flickr External link - opens new tab/page

Landscapes provide us with some of the most enduring images.

Yes, and they perhaps present the greatest challenge too. Get it wrong, the scene looks flat and uninteresting. Get it right, the wow factor hits the viewer.

The principles and concepts behind landscapes

When we talk about landscapes we can actually be talking about a wide range of types of photographs – usually taken in the countryside. Of course that is pretty nebulous. But it is sensible to talk about the sort of principles that apply to the construction of a good landscape photograph and then relate them to the picture you are going to take.

I have compiled a list of links below. If you follow through on all these together you get a great introduction to landscape photography…

  1. The Third Most Important Piece of Kit
  2. Seeing the Quality of Light
  3. Easy introduction to ‘visual elements’ in photographs
  4. Simple ‘Principles’ of photographic composition
  5. Don’t Stick the Horizon Line in the Middle!
  6. Rule of Thirds
  7. Landscape loves – do you know why you are photographing this scene?
  8. Ten great tips for photographing landscapes
  9. The easy way to give depth to landscapes
  10. Simple ideas about perspective in photography

More after this…

Mastering landscapes

Like all photography mastering landscapes takes time and learning. It especially needs time. I have on occasion taken many return trips to one location, and, many hours there each time to get the shot I wanted. On the other hand, sometimes it all just comes together. That is both the joy and fun of landscape photography… you never know what you are going to get out of a shoot until you have seen the shots afterwards.

Damon Guy - Netkonnexion

Damon Guy (Netkonnexion)

Damon is a writer-photographer and editor of this site. He has run some major websites, a computing department and a digital image library. He started out as a trained teacher and now runs training courses ing digital photography.
See also: Editors ‘Bio’.
By Damon Guy see his profile on Google+.

The easy way to give depth to landscapes

'Reflections on a lake' - Landscapes need to have depth to be effective. Layering them is the key.

• ‘Reflections on a lake’ •
Landscapes need to have depth to be effective. Layering them is the key.
Click image to view large.
“‘Reflections on a lake'” By Netkonnexion on Flickr External link - opens new tab/page

Everybody loves an autumnal landscape.

Come autumn we are all making great images of the colours and the changes. To be successful a landscape has to look like it has some depth. In this post we are going to look at the simple way to impart depth to a landscape.

Layers

The easiest way to create depth with a landscape is to trick the eye. You are not trying to defraud your viewer. You are simply convincing the eye there is more than two dimensions. This is easy to do because your eyes expect to see depth. What you need to do is to enable the eye to actually pick up significant markers that would lead them naturally into a landscape.

There are lots of markers that you can use in composition. In fact in Easy introduction to ‘visual elements’ in photographs we identified lots of compositional markers called visual elements. When you compose a landscape using layers you are working with lines that create the markers for depth. The lines themselves are visual elements in the picture. They create boundaries for the layers in the picture.

The example picture above is chosen for its simplicity. In the immediate foreground there is a patch of rock strewn grass. Not of great interest in itself, but it provides two elements. The larger boulder provides a bit of interest drawing the eye into the picture. It also seeks to divide the picture providing a visual balance either side. I will come back to this later.

The grass-lake boundary is the first line we cross. It is a major visual element in the scene. Its existence creates the foreground layer out of the grass and marks the mid-ground layer as the lake.

The lake itself is the central interest. In this picture it’s also the mid-ground layer. Great reflections always draw the eye. Then, on the far side of the lake is the next significant element/marker – the far lake shore line. This is the demarcation for the background layer – the trees. It is where the reflections originate.

The three landscape layers, foreground, mid-ground and background create depth. As the eye, in 100ths of seconds, penetrates the picture your eye/brain system sees the lines marking the boundaries of these clear zones. Immediately, the visual elements become markers for the eye to measure its travel into the picture. Depth has been established. You now see into an image, rather than at a picture. Visually creating layers in your composition, like these, will impart depth to your landscape shots.

More after this…

What’s next?

Once the eye/brain system has seen depth it remains in the minds eye. Of course if you want to sustain the viewers interest you have to find other things of interest. In this picture there are other ways the eye works through the image. The colours and tonal range are important, especially in autumn. The eye loves reds and russets. So that helps, as does the eye working to sustain an interpretation of the reflections. The ‘principle‘ there is the visual harmony between the reflections and the background layer.

Two other compositional elements control the eye. Normally a central feature of a picture, like the boulder, would draw the eye and hold it there if it was substantial enough. In this case our boulder is of small visual weight. It is not a major compositional feature, but more of a visual element (a ‘form’). You will recall from Simple ‘Principles’ of photographic composition that the ‘Principles’ control the way the eye uses the visual elements. Here the eye flows into the picture by being drawn through the middle, having established depth the eye does not go out the other side of the picture. The trees hold the eye in the picture – they form a barrier. Naturally, the eye is now drawn to cycle around the reflections. Eventually the eye will pick up the next clue.

This spot was chosen for aesthetics as well as the point of view for the shot because a central entry for the eye established the emphasis of both depth and a major point of focus on the middle ground. If you look carefully the lines that create the lake sides are narrower at the left side than the right. This funnel-effect will eventually channel the eye out of the picture on the right. The eye has a natural tendency to follow trending diagonals – no matter how slight – toward the wider ‘escape’ end. Yet, the boulder maintains a balance in overall visual terms between left and right. Eye movement is therefore under a tension to stay central as well as wishing to follow the flow to the right. This tension keeps the eye focused around the centre of the lake.

Fickle!

Yes, it is not a surprise that composition is a fickle thing. This is how I see my picture. In reality we all see it different ways. I have shown you how I rationalised the shot when it was taken. It may not work that way for you. If you have a different view why not discuss it in the comments. I would love to hear your interpretation.

By Damon Guy (author and Photokonnexion editor)

Damon Guy - Netkonnexion

Damon Guy (Netkonnexion)

Damon is a writer-photog and editor of this site. He has run some major websites, a computing department and a digital image library. He started out as a trained teacher and now runs training for digital photographers.
See also: Editors ‘Bio’.

Ten great tips for photographing landscapes

Landscapes appear inherently attractive to the eye.

We all love taking landscape shots at some time or another. However, they are also quite a challenge. There are a few simple things that you can do to get a great landscape shot.

Use a tripod!

The most important landscape photography technique is to use a tripod. For your shot to be successful you need to get the sharpest and most carefully framed shot.

  • Framing: When you put up your tripod you give yourself the best opportunity to get the framing right because you can take your time. Look around the shot. check the edge of your frame. Make sure you have all the right composition elements and have a meaningful subject in your viewfinder.
    See more on framing here.
  • Stability: The tripod will give you the most stable platform for your shot. Most photographers miss this essential when starting out. Sharpness makes or breaks a landscape shot. Starter landscapers often think a hand held stance is good enough. It may be possible – sometimes. The chances are reduced. If you want to get right into the shot you must get pin sharpness.
    See more on why you should use a tripod here.
Vibration elimination

Beating the movement blur of the hand-held shot needs more than just a tripod. Your tripod technique is critical too. The most important part of using a tripod is to reduce the vibrations through it. Here are my ten tips for making your tripod-based landscape shot pin sharp.

  • Tip 1: Keep the legs as short as possible and don’t use the middle elevating column. The short legs and no-column policy keeps the tripod tight and that reduces any integral vibration in the tripod itself. The vibration is reduced because the tripod is stiffer overall if the legs are retracted. If you must elevate it, make sure you extend the thinner, vibration prone, bottom of the tripod legs last.
  • Tip 2: Use a cable release: Pushing the release button (shutter button) moves the camera and creates vibration in the tripod. A cable release of some type will set the camera off without your heavy finger involved.
  • Tip 3: Use mirror lock-up: Most DSLRs will have a menu setting that will lift the reflex mirror before the shot is fired. The number one source of vibration in a camera is that mirror twanging up and down! The mirror lock-up function will remove this vibration. Check the manual to see how it is done on your camera.
  • Tip 4: Turn off auto-focus: The engine and the act of the camera tuning its focus causes vibrations in the tripod. These set up a resonance up and down the legs – the vibration affects your shot. You will produce a much more accurate focus by hand anyway.
  • Tip 5: Turn off image-stabilisation: If you are on a tripod you don’t need it. However, the slightest breeze or vibration through the ground will set it off. The motor attempting to compensate for tiny vibrations in the tripod will in fact create more vibrations. All image stabilisation systems are designed to iron out natural hand movement. Vibration in a tripod creates its own peculiar vibration which just aggravates the stabilisation system.
  • Tip 6: Hang a weight on the tripod hook under the centre column: This weight adds tension to the legs and forces greater stability to the tripod. One more way to reduce movement.
  • Tip 7: Stay away from vibration sources: Its not always possible, but roads, railways, fairgrounds, airports, ferry terminals and ports as well as the obvious wind all create ground vibrations. Less obvious are underground trains and tunnels under your feet, tall buildings swaying in high wind, bridges vibrating from feet and vehicles… well it’s a long list. Think carefully. You may find you have put your tripod right in the centre of a major vibration source.
  • Tip 8:Remove your camera strap: or as a secondary measure peg the strap tightly to the tripod. If you let it hang loose it will catch the wind. That will move or vibrate the camera.
  • Tip 9: Longer exposures: The camera shutter is also a significant source of vibration. Nevertheless, it has to open. Using a longer exposure is better because the shutter is open completely with no movement for at least part of the shot. This reduces the impact of shutter shake. The shutter release and movement still creates a vibration profile. By design, it has been carefully calculated to reduce the impact of the shutter movement – but it does not reduce shutter vibration completely. So, longer exposures help reduce the vibration just a little more.
  • Tip 10: Use a wind-shield: Even a light wind will induce vibration in a tripod. So, shelter it from the wind. Hold your coat in front of the tripod (not touching it) to shield the wind. Better still, if you are going to be there for a while, put up a staked-out wind-shield to divert the wind properly. Alternatively, take the shot from cover of some sort.

Remember, these measures all add up. Sharpness in your shot is the result of working at all of these. Put all of the above in place and you will get a really sharp shot.

More you can do…

Here is a list of some more top tips to work on for your landscapes…

By Damon Guy (author and Photokonnexion editor)

Damon Guy - Netkonnexion

Damon Guy (Netkonnexion)

Damon is a writer-photog and editor of this site. He has run some major websites, a computing department and a digital image library. He started out as a trained teacher and now runs training for digital photographers.
See also: Editors ‘Bio’.

Can you write? Of course you can!
Write for Photokonnexion...

We would love to have your articles or tips posted on our site.
Find out more…
Write for Photokonnexion.