Tag Archives: Landscape tips

Ansel Adams – Master Photographer

Ansel Adams Video

• Ansel Adams BBC Master Photographers (1983 •
Ansel Adams speaks about his photography and his development.
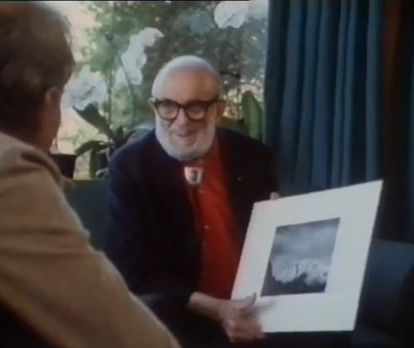
Picture taken from the video.

Exquisite insights to a legend.

The videos I show are usually for you to quickly watch and learn. This one’s different. It’s longer (34 mins.). And, there is so much in it that you will want to watch it over and over again. The wonderful insights run deep and some show us how much photography has changed.

Ansel Adams’ ideas, photographic insights and depth of feeling is magnetic. He was probably one of the first philosophers of photography. He was one of the undoubted masters too. I hope you enjoy this video as much as I did.

Ansel Adams – “BBC Master Photographers” (1983)

Uploaded by: Rob Hooley External link - opens new tab/page

Can you write? Of course you can!
Write for Photokonnexion...

We would love to have your articles or tips posted on our site.
Find out more…
Write for Photokonnexion.

By Damon Guy (author and Photokonnexion editor)

Damon Guy - Netkonnexion

Damon Guy (Netkonnexion)

Damon is a writer-photog and editor of this site. He has run some major websites, a computing department and a digital image library. He started out as a trained teacher and now runs training for digital photographers.
See also: Editors ‘Bio’.

Pure white featureless skys? How to tone them down…

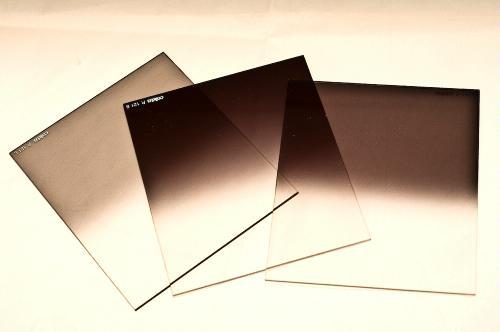
• Cokin neutral density filters (graduated) •

• Cokin neutral density filters (graduated) •
A quality set of filters that can be adapted to fit any lens size.
Buy: Cokin H250A ND Grad Kit

When your sky is too bright its a problem!

You lose all or most of the detail and your foreground is starkly highlighted by the blown out sky. The way to overcome blow out like this is to use various techniques with neutral density filters. All landscapers come across this problem at some time. The best way to overcome the issue is to tackle it head on in-camera. The best way to do that is to use “graduated neutral density (ND) filters”.

What are ND filters?

Neutral density filters are glass filters that you reduce the incoming light. They do this without affecting the colours in your shot. For blown out skies you want to reduce only the incoming sky light and allow the foreground to expose properly. The Graduated ND filter will allow you to achieve that.

In the picture above you can see the top half of each filter is dark. The bottom half is uncoloured glass. The trick is to place the filter in front of your lens. Place it in such a way that the line separating the dark and light lies on the horizon between the ground (proper exposure) and the bright sky which will be toned down by the filter.

If the sky is blown out in your picture the light is brighter than the camera can cope with. Normally that will be two stops of light or more above your exposure of the ground. The ND grads. normally come in three strengths. ND2 (two stops), ND4 (four stops) and ND8 (eight stops). Each stop of filtration is equal to half of the total light. An ND2 reduces the light by a quarter. An ND8 will cut down the incoming light to 1/16th of the light.

Video – Graduated ND filters for Landscape Photography

In this short video Tony Sweet demonstrates how he balances the dynamic range of a landscape composition using a graduated ND grad. filter working in a wooded valley. He wants to brighten the foreground with a long exposure. This would lead to the distant trees being too bright and would show burnt out spots. He uses a great technique to make the right light conditions…

Recommended purchase

I have been using Cokin filters for years. They are high quality filters that fit into a filter mount screwed onto the front of your lens. I prefer this type of fitting. It is simple to change filters and you can adapt graduated filters to the position you want quite easily. Round filters are far less adaptable and tend to be much more expensive.

If you want to buy an ND grad set of filters here is the kit I recommend…
Cokin H250A ND Grad Kit

You will also need to buy an adaptor for your lens to fit the filter mount. You can buy them singly…
Cokin filter mounts and lens adaptors

You can also buy a complete adaptor kit so you can adapt your filters to fit any one of your lenses…


If you feel like going the the whole way you can buy a kit that will cater for all your filter needs (including mount and adaptors) try this great kit…


By Damon Guy (author and Photokonnexion editor)

Damon Guy - Netkonnexion

Damon Guy (Netkonnexion)

Damon is a writer-photog and editor of this site. He has run some major websites, a computing department and a digital image library. He started out as a trained teacher and now runs training for digital photographers.
See also: Editors ‘Bio’.

Can you write? Of course you can!
Write for Photokonnexion...

We would love to have your articles or tips posted on our site.
Find out more…
Write for Photokonnexion.


An old sailors trick to improve your photography

An old sailors trick can improve your photography

• Great Langdale •
• An old sailors trick can improve your photography •
Click image to view large
• Great Langdale •
• An old sailors trick can improve your photography • By Netkonnexion on Flickr External link - opens new tab/page

See also: • Great Langdale – no lines •  External link - opens new tab/page

Look carefully at your intended image.

Once you have your composition you should be able to check everything is correct. To do that effectively a good method for checking helps. We are going to look at a method to help you spot mistakes and problems.

What you need to check

In The fifteen second landscape appraisal I outlined a scheme for checking that the composition was all as expected. The scheme calls for a three step approach. First, check the frame. Next review the compositional elements. Finally, check the three D’s (Discordance, Disruption, Distraction). How you do that checking is critical.

I have often heard people say how they easily miss things when checking the viewfinder. Then, later in processing, the rogue element jumps off the image at them. So how can you carry out your ‘fifteen second appraisal’ and be sure not to miss anything.

A weird old sailors trick

My grandfather, a sea captain during WWII, ran freighters from Northern Ireland to London. These were most dangerous waters. They ran overnight up the English Channel to the Thames estuary hoping to escape enemy submarine patrols. They had a 24-hour watch on the ships bridge looking out for submarines. At night the chances of seeing a periscope was very low. Any search was better than nothing. The officers of the watch were taught that the most effective way to spot things that were out of place was to do the exact opposite to the way they normally read a book.

We are programmed to read left to right and as flowing as possible. We skip big sections of the text in interpretation jumps. According to research we actually use only the tops of letters to pick out the shape of the words. We read efficiently by missing out big chunks of the letters and text. Our eyes are actually trained to miss details when we scan as if we are reading.

It makes sense that if we need to look at things carefully and effectively we should be trying to do the opposite to reading. We should break the habit of skipping. In order to pick up the details, scan your composition through the viewfinder so that your eyes do the opposite to reading, scanning in the opposite direction. Work from bottom to top, right to left. As you sweep along unaccustomed routes through the scene you will be more likely to pick up details you would normally miss, things out of place and anything that falls within the realms of the three D’s.
More after this…

Can you write? Of course you can!
Write for Photokonnexion...

We would love to have your articles or tips posted on our site.
Find out more…
Write for Photokonnexion.

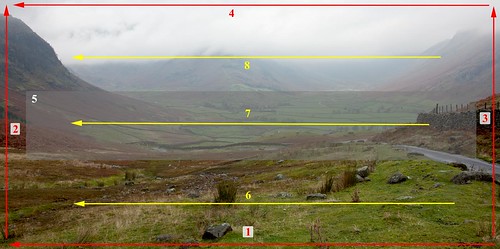
Routing diagram

I have drawn an eye routing diagram in the picture above. Your eye-scan starts bottom right. From there you follow the numbering and arrows in the order of the fifteen second appraisal. First the frame. Check your frame composition following the arrows…

  1. Bottom right to left frame;
  2. Bottom left to top left frame;
  3. Bottom right to top right frame;
  4. Top right to top left frame.

In my composition the mountains either side, the wall on the right and the white sky above act as barriers. They prevent the eye from straying out of the picture. The idea is to hold the eye in the shot so it can drink in the aesthetics – the beautiful, mystery-laden, misty valley. If the frame achieves your compositional design move on.

The fifth step (no. 5) is to check your compositional elements. You are going to work the layers of your scene. Start with the foreground. Scan across the foreground looking for compositional problems and check your layering and any elements you have chosen to help the eye (line 6).

In the mid-ground look for the compositional elements that help the eye there. The mid-ground layer is important – it draws the eye into the landscape. I have zoned it as a shadowed grey box. The end of the wall marks where the eye leaps into the picture. The road draws the eye to the mid-ground. The wall across the scene from the number five right down to the bottom of the valley marks a mid-point for the picture, as does the sweeping ridge in from the left.

Line 8 check allows for the composition check for distance zone. We look to see if it works for, in this case, holding the eye in the picture.

In the final sweep we follow lines 6, 7, and 8 again. This checks these zones for the three D’s. We are looking for detail not composition – stand-out errors; the discordance, disruptions and distractions.

By the time you have done these sweeps, and the way you have done them, you should have spotted the problems, errors, and disharmonies that may spoil your shot.

The fifteen second appraisal is a process that take a little personal training. Those short seconds will make the difference to your outcome photograph.

By Damon Guy (author and Photokonnexion editor)

Damon Guy - Netkonnexion

Damon Guy (Netkonnexion)

Damon is a writer-photog and editor of this site. He has run some major websites, a computing department and a digital image library. He started out as a trained teacher and now runs training for digital photographers.
See also: Editors ‘Bio’.
Ten top photography tips

Great photography comes from a few simple ideas.

When you are trying to make a great image it is the attention to the simple details that carry the greatest impact. This is a simple reminder… get the basics right and the rest will become a lot easier.

Rick Sammon’s Top Ten Digital Photography Tips


Created by PixelMagic