Tag Archives: JPEG

Avoid funny colour casts in your holiday pictures

White balance - grey card

White balance – grey card

Unnatural indoor colours?

Holiday time – out comes the camera and most daytime shots are great. However, indoor shots often get a funny colour cast. Odd yellowish, greenish or blue tones have appeared. The reason? Auto-white balance problems. The condition is curable.

Auto-white balance problems

Outdoors the auto white-balance function works reasonably well. But not in all cases. Auto-white balance aims to iron out colour casts in your photography. The problem is that the camera frequently gets it wrong. There are two main places that can happen…

  • Out of doors when there is a lot of one particular colour around (eg. lots of sky blue; orange/red sunsets or snow)
  • Indoors when there are artificial lights illuminating the scene (ordinary domestic lights, fluorescents and bulbs).

When a lot of one colour appears in your shot. The camera assumes that too much of one colour is a problem. So, it shifts something called the colour temperature toward a neutral grey colour. This takes out the colour cast.

Intentions ruined

If you intended to capture that colour cast (from a sunset for example), the auto-white balance mechanism will ruin your shot. Typically blue skies and white snow tend toward grey. And, the real classic, lovely orange and red sunsets look pink, cartoon-like and flat instead of saturated. Orange and reds are particularly badly affected. So if your sunsets look cartoon pink/grey instead of saturated fire-orange you need to adjust your auto-white balance.
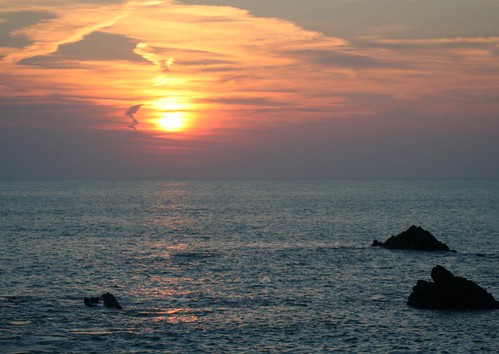
Auto white-balance fail!

• Auto white-balance fail! •

Cartoony pink-grey skies. The auto-white-balance function has colour shifted the orange/red tones toward greys.
Click image to view large
• Auto-white-balance fail! • By Netkonnexion on Flickr External link - opens new tab/page

Artificial light also creates a colour cast. Often the auto-white balance cannot properly adjust for this. The result is odd yellowish, blue or greenish tones in the picture where you did not see them yourself at the time. These also require an adjustment to your white-balance.

Why is there a problem?

Mainly the problem arises because we have made an adjustment in our heads without noticing. Most of the time we compensate for these colour casts and don’t see them. In fact, once we realise there is such a thing as a colour cast we can train ourselves to see it. We certainly see the heavy red colour casts of evening and early morning light. If we look carefully we can also see the yellows and blues from domestic lights – although less strongly.

Remedies

There are two possible ways to tackle the situation…

  • Compensate for colour casts by using a camera pre-set.
  • Correctly set the white-balance so it records the natural colours.

DSLRs have reasonably good pre-sets to tackle well known colour cast issues. On most cameras you will find white balance settings something like these below. The notes explain details…

  • Auto – The cameras best-guess colour match for what it senses. OK most of the time. Poor when there is a predominance of a strong colour.
  • Tungsten – (bulb icon) indoor, tungsten incandescent lighting using bulbs. Cools the colours – often bluish. This setting helps remove blues to warmer tones.
  • Fluorescent – for use under fluorescent lights – will tend to warm up the colours.
  • Daylight/Sunny – (sun icon) indicates the ‘normal’ white balance (may not be present if this is the default setting).
  • Cloudy – (cloud icon) Adds a warmer, yellowish colouration.
  • Shade – This light is cooler (bluer) than sunlight. Shade mode warms the colours a small amount.
  • Flash – (lightening icon) Stark and cool, flash desaturates towards blue. Flash setting compensates with a slightly warmer yellowish tone.
  • Custom – You do a little procedure to get an accurate setting to suit the situation.
Accurate colours

Colour accuracy is important. You really do want a bright blue sky or white snow or saturated red sunsets. The problem is that the pre-sets are averaged out for the “types” of situations encountered. The pre-sets will change the colours from dull flat colours to more representative ones. For example more saturated sunsets will be captured if you use the cloudy setting. However, to get it right you need to adjust the custom white balance.

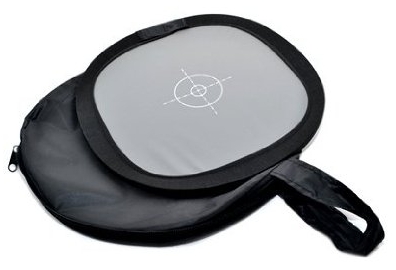
Setting the custom white balance is simple. The camera does most of it. You need a “neutral grey card”. This is simply a card or piece of material set at an average grey colour, normally at 12% grey, which matches the cameras accurate shade for neutral. You can buy these quite cheaply at most camera stores. (See: Range of photographic grey cards).

• The Lastolite Ezybalance •

  • collapsible; durable
  • wipe clean; very light
  • 12% grey; 30cm wide

An easy to use grey-card system. White on one side, grey on the other. The card doesn’t crease, the sprung border stretches the material tight. The card collapses into the supplied case, slipping easily into your camera bag. A great accessory to ensure colour accuracy in your pictures. You should not be without one.Spacer image

To set custom white-balance

It’s easy to set the white balance. However, there are lots of variations for how different cameras do it. Therefore it’s essential to use the right procedure from your manual. To get ready…

  • Place the card about 30cm/12 inches in front of your camera.
  • Zoom in or out to make the grey card fill the frame.
  • Now follow the camera manual “custom white balance” instructions.

To ensure complete accuracy you must do this procedure in the ambient light in which you will be shooting. This is the light the camera will sense and compare to the grey on the card.

More after this…

find out more...Photokonnexion tips by email
Enjoying this article? Please sign up for our
Tips by email service.
                                                Find out more

Shooting with RAW vs. *.jpg

I am sure lots of you are saying, “But I shoot with RAW and this is unnecessary”. OK, that is partly true. You can, with RAW format files change the white balance in the post-processing. Here are two reasons you should NOT do that…

  1. It is time saving to get as much right in the camera as possible. I like to spend my time shooting not computing!
  2. I have rarely met anyone who can remember colours so accurately that they get the post-processing colour and temperature balance right. I like to get them right in-camera as accurately as possible. Then I can safely change them later if necessary.

RAW format is excellent – you have complete control over colour temperature and hues. However, if the picture is wrong from the start, RAW is only as good as your own memory or colour awareness. Artists of many years may be able to remember colours accurately. Very few others can. Beginners especially have very poor colour memory/accuracy. So, use RAW, get it right in-camera – then do your artistic processing from a solid colour-base you know is accurate.

Compensation and accuracy

While both compensation for colour casts, and accurate representation of colour casts both rely on white balance there are differences in how they are treated. Strong colours or a strong colour bias through the picture needs some special treatment. Think about the two different methods above and practice them.

Comments, additions, amendments or ideas on this article? Contact Us
or why not leave a comment at the bottom of the page…

By Damon Guy (author and Photokonnexion editor)

Damon Guy - Netkonnexion

Damon Guy (Netkonnexion)

Damon is a writer-photog and editor of this site. He has run some major websites, a computing department and a digital image library. He started out as a trained teacher and now runs training for digital photographers.
See also: Editors ‘Bio’.

Give your holiday landscapes a little extra punch

How to make a digital camera

How to make a digital camera

Do something different with your summer shots.

Holiday times always give us a chance to capture a few landscapes. Often they are a more difficult to get right than is appreciated. In fact a little thought can make all the difference. Think about your composition and your colours. The key to a good landscape is to find impact and contrast. In the video below Gavin Hoey shows you two things. First he shows how to think about your composition and colours. Next in the context of colours he shows how to turn your landscape into black and white in Photoshop (actually you can use any full featured image editor to do the same thing).

B&W Landscape Tips


AdoramaTV

Making black and white images

In the video Gavin Hoey made a great point about shooting in RAW. Landscape pictures often look great to the eye when in the field but they lose their appeal when the image is created on-screen. So in order to make your landscape pop some post processing is essential.

This video shows how to bring out contrasts to make the scene look great in black and white. However, he makes an important point about shooting in RAW. You don’t lose the original colour, it is retained in a RAW file. Then you convert to black and white afterwards. This is not possible in *.jpg. That format does not have the colours stored like the RAW format. If your black and white *.jpg is less than successful you lose the colour option too.

Gavin Hoey points out that you should test that your camera will process a RAW file in monochrome mode on its screen, but still leave a full colour RAW file. It is possible your camera converts the RAW file to a *.jpg file in the colour scene mode. So cover your options and try it before going in the field.

Gavin showed the conversion method to black and white using the colour sliders. Most image editors have two basic ways to create monochrome shots. Your shot can be simply colour converted to shades of grey, or you can use the colour slider method where you have some control over the intensity of colour which greys are created from. This latter method gives you much greater control over the contrasts in the picture. When working in monochrome that is the most effective way to ensure the picture has visual impact. So always choose the colour slider method to get better control of the conversion.

There are some additional links below to show how to improve your black and white shots in other ways.

Comments, additions, amendments or ideas on this article? Contact Us

find out more...Photokonnexion tips by email
If you enjoyed this article please sign up for our
Tips by email service.
                                                 Find out more

By Damon Guy (author and Photokonnexion editor)

Damon Guy - Netkonnexion

Damon Guy (Netkonnexion)

Damon is a writer-photog and editor of this site. He has run some major websites, a computing department and a digital image library. He started out as a trained teacher and now runs training for digital photographers.
See also: Editors ‘Bio’.

Getting to know file types intimately…

Here at Photokonnexion we try to provide genuinely useful tips, tricks and tutorials, as well as background information and technical supplements. We are gradually building up a small glossary of articles on photography. It is not our intention to do in-depth technical descriptions and detailed technical analysis. We want you to enjoy what you learn and share it with others. So our definitions are aimed to learning rounded facts and interesting background. We hope this helps your understanding of our shared passion without drowning you in techno-info.

In the last two days I published two articles on file types. Knowing your files helps you know your photography! These introduce you to the two classes of files that digital photography uses in general…
Important File formats – JPG
Important File Formats – RAW

Today I have published a more in-depth introduction to RAW files intended as a background reference…
Definition: RAW; RAW format files; TIFF; DNG; NEF; CR2; CRW. There is more to the RAW file than meets the eye!

File types like JPEG (*.jpg) and RAW are distinguished by the techniques used at their creation…

  • RAW files are raw data collected directly from the digital image sensor. The unprocessed file provides a very flexible data-set allowing a wide scope for interpretation of your image.
  • Ready-to-use files like *.jpg are pre-processed. You get an idealized picture produced how the camera manufacturer thinks it should be processed. Any data that does not contribute to that is discarded with little scope for change.

Raw files can be very large. The file integrity relies on all the data from your exposure being available. So to make the file smaller any file compression must not discard data. We have published a reference on ‘Lossless file compression’ so you have a little background on how RAW files might be made more compact. Read…
Definition: Lossless compression; Lossless format

On the other hand *.jpg files are compressed by dumping image data from the file. This ‘Lossy compression’ discards vast amounts of data in order to make the files smaller. Read…
Definition: Lossy compression; lossy format; lossy

Enjoy! Please leave comments and other information below. We would love to hear what you think about these new resources.

By Damon Guy (author and Photokonnexion editor)

Damon Guy - Netkonnexion

Damon Guy (Netkonnexion)

Damon is a writer-photog and editor of this site. He has run some major websites, a computing department and a digital image library. He started out as a trained teacher and now runs training for digital photographers.
See also: Editors ‘Bio’.

Important File Formats – RAW

Highly flexible; ultimate control – unwieldy and unprocessed

Understanding the basics of file formats is important. Your photography may depend on it. In this article I am discussing RAW files. These files give you ultimate control over your image processing and help you to ensure your images come out just the way you want.

Digital cameras of all types collect their data from the digital image sensor. The RAW data collected by the camera can be treated in a number of ways. Normally that data is used to create one of two classes of files…
Processed image file:
This type of file is generally written in a ready-to-view format direct from camera. The file is normally processed in the camera with the photographer having little control over the way it is done. These files are normally compressed (lossy or lossless) to make them faster to move, send, store and display. The most common type is the JPEG (.jpg) file format available from most digital cameras and directly usable in a wide range of applications. However, the potential for you to rectify exposure problems is minimal and you can do very little processing with them.

RAW image files:
The other class of file type is written directly from the raw data collected at the image sensor of the camera too. It contains file data which has not been processed and all the data from the digital image sensor is retained. These files are normally uncompressed, none of the data is discarded as it is with lossy formats like .jpg. Normally these files are generically referred to as RAW files.

RAW files provide you with ultimate control over your post production work. It is here that these files really score. As all the data is retained in the file you can use a range of applications to change the file in infinite ways. You can also access a wide range of changes, not just a few minor ones as with preprocessed files.

When RAW files are output from the camera they tend to be rather dark. JPEG files on the other hand tend to be typically pre-brightened by the camera by about 50 points. However, the RAW file is able to darken the file or brighten it in a dynamic range which is much wider than preprocessed files. So darker than normal areas can be recovered to normal levels. Almost white areas of over exposure can also be toned down so the detail in the white areas can be bought out. Colour saturation, hues, contrast and exposure are all controllable by the photographer, as well as other controls over tonality. In other words the photographer has full control over the portrayal of the light in the photograph. This allows the mood, contrasts and emphasis to be bought out in a controlled and artistic manner.

RAW files act as the raw material from which other processed files are produced. The RAW file acts like a negative of the days of film. Negatives were not actually useable as images. Instead they acted as a mask for the printing process to chemically develop a positive image to paper. The development process was used to create a print. In digital photography the RAW file is used to create a finished image in another file format. The photographer can produce high resolution images for printing; low resolution images for previewing; .jpg files for screen or Internet display… and any number of other purposes including archiving. Through the full range of options the original file is available to reproduce other formats. RAW files therefore provide a resource rather than an image, but the output you can produce from that resource is very flexible indeed. Photographers are offered the full range of options for editing in post processing.

RAW files: Advantages
  • Higher image quality. A one step data collection and file creation process preserves data.
  • The in-camera’s processing including colour control, sharpening and noise reduction is not applied.
  • No data is lost like in lossy compression formats like JPEG.
  • Changes made to a RAW file do not change the original data content. The original data is always retained so changes are considered non-destructive to the file.
  • Finer exposure control in post processing. Raw conversion software allows a wider range of changes to specific controls like colour, brightness, contrast etc.
  • RAW files have actually have more information available than files which have a lossy format.
  • The colour control is much more precise than other file types because all colour data is retained and available to applications so photographers can apply settings as required.
  • Lost detail in very dark areas or very bright areas can be adjusted to bring back the detail because of the large range of changes available.
RAW files: Disadvantages
  • The retention of all the collected data makes RAW files much larger than compressed file formats like JPEG.
  • Storage space required to store the larger files affects how many files can fit on a memory card.
  • Larger file sizes mean that file creation takes longer. Typically, in high speed photography RAW files cannot be produced as fast as .jpg files which dump unwanted data.
  • There are a very wide range of RAW formats. There is also no agreed standard for formatting them. This means that individual manufacturers have tended to maintain their own standard. There are some standards available but not universally accepted. So archiving may require some thought and commitment.
  • Serious archiving for future generations is possible since all data is retained. As jpeg files do not retain all data the format future research or use may be severely limited.
  • RAW files may require specialized or proprietary format software because of the lack of a universal software standard.
  • Post processing work is time intensive. However, the results are determined by the photographer.

RAW files provide great advantages for post processing. If you really want to make your images pop off the page then you need to learn how to work with RAW. There is no doubt about it, despite the disadvantages, your photography will be able to move to the next level.

By Damon Guy (author and Photokonnexion editor)

Damon Guy - Netkonnexion

Damon Guy (Netkonnexion)

Damon is a writer-photog and editor of this site. He has run some major websites, a computing department and a digital image library. He started out as a trained teacher and now runs training for digital photographers.
See also: Editors ‘Bio’.

Important File formats – JPG

Quick and easy – not very flexible

Digital images come in a range of standard file types which computers, cameras, mobiles and scanners are able to understand. However, they are not able to interpret all image file types. Only those they are programmed to use. It is important that you know about the file types you use because they can seriously affect your photography. I am going to introduce you to .jpg files. They are the most common file types used in digital cameras.

Which file type you have is labeled by the file extension. That is the three characters after the last dot in the file name. If you cannot see this file extension refer to your computer help files to find out how to display extensions.

A file with a .jpg extension, for example ‘myimage.jpg’, is what we call a JPEG file (pronounced – ‘j’- peg). That stands for the “Joint Photographic Experts Group” who formulated the .jpg image standard published in 1992. In digital terms that is a long time ago. However, the JPEG standard has been highly successful and has proved robust. It is not perfect, neither does it do everything.

First and most importantly .jpg files are what is called a ‘lossy compression‘ format. Media files contain a lot of data – very large quantities in fact. Most of that data is used to create colour variations and tones that are very subtle. In a photograph a lot of tones and hues are not noticed by the eye. To save storage space and speed things up your camera dumps a lot of that unseen data when it creates .jpg files. That’s fine as long as the lost data is stuff the eye cannot see in the photograph. The benefit is that the lost data makes files smaller, as well as quicker and easier to move, send and store.

There is a down-side to .jpg files. Every time you open, edit and save a .jpg file it goes through the compression routine – dumping more data. For files you are going to edit on a regular basis this is bad news. Each save will lose some of the data that creates the image. As a consequence the quality of the image will be damaged over a series of edits.

Lossy compression in .jpg files damages the file each edit/save cycle

Lossy compression in .jpg files progressively damages the file each edit/save cycle. Eventually, the loss of data becomes visible. The image is a composite of four versions showing increasing compression left-to-right. Left hand side – the image shows low compression with 60% of the original data still in the file. Right hand side – only 2% of the original data is left. Over-compression, various edits and resizing all have an effect on final quality of the image.
Best viewed large. Click image for full size.

As you can see from the images the damage ruins the picture. However, a low compression is a good optimum. The file is smaller and still of acceptable quality. The small size allows easy use for things like posting on the Internet.

There are other implications of a lossy format. The lost data seriously reduces your options for editing the image. Other file formats keep that data. Most notably these are the ‘RAW’ formats from your camera manufacturer. RAW files are created by the camera directly from each of the sensor points in the digital image sensor in your camera. A RAW file stores all the data. In doing so, the file is preserving the data for you to make significant changes to the image later. These changes are often not possible with a .jpg file. While some small colour changes, brightness and other aspects of the file can be changed in a .jpg file, the degree of change is limited. When editing a RAW file you have a considerable amount of potential to recover over exposure, underexposure, colour casts, hues, tones and other attributes of your photograph.

The JPEG standard has produced a robust file standard that is widely used. The compressed size means a lot of data is dumped. This reduces the editing flexibility for the photographer. On the other hand the file is small and easy to store. It produces a good image as long as it is not over-compressed. However, to guard against loss of quality always retain an original copy of your file. Only edit your file copies so that you can go back to the original .jpg file if things go wrong.

By Damon Guy (author and Photokonnexion editor)

Damon Guy - Netkonnexion

Damon Guy (Netkonnexion)

Damon is a writer-photog and editor of this site. He has run some major websites, a computing department and a digital image library. He started out as a trained teacher and now runs training for digital photographers.
See also: Editors ‘Bio’.

Can you write? Of course you can!
Write for Photokonnexion...

We would love to have your articles or tips posted on our site.
Find out more…
Write for Photokonnexion.