Tag Archives: ISO

Shutter speeds – An easy guide

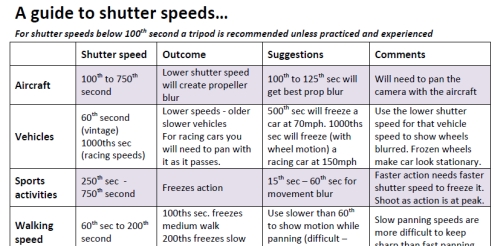
Shutter Speeds Cheat Sheet

• Shutter Speeds Cheat Sheet •
Click on image to download full .pdf cheat-sheet.

Shutter speed is easier with a start point.

One of the difficulties with shutter speeds is knowing what sort of setting to use with various speeds of an event in the real world.

Here is a short guide to get you started :: A guide to shutter speeds.

There are no rules about shutter speed

The actual speeds of real world events vary a great deal. In a race one car may move at 90 miles per hour (mph) and another at only 70mph. You should vary the shutter speeds depending on the objects speed, light intensity and the aperture you are using. Remember, the download cheat sheet is a guide not a set of rules. It’ll get you started, then it’s down to good old experimentation.

There is no substitute for experience

I do a lot of panning with race vehicles. I have learned to assess the speed and light then make quick guesses to set my camera up for a few test shots.

Once I took an experienced bird watcher to a drag race event. He was used to panning fast moving birds in flight. It took him time to adjust his eye for working with cars at up to 250mph. The best way to get good at doing shutter speed settings is to practice with a wide variety of moving objects so that you can get a general feel for the shutter speeds at each speed of your object.

Experience is the best master. So practice different settings a lot to get the settings and speeds for your interest properly fixed in your mind. This gives you a head start when setting up for a new subject.

Test shots

If you are going on a shoot where shutter speed is important, practice at the likely shutter speed for a few days before going. Try out different light conditions too. This will get your eye into the subject and help you know what variations you can use to get the best shots on the day. This post might help too… How to overcome frozen movement in panning.

The difference between freeze and blur

If you freeze the action you show some amazing stuff the eye does not normally see. Facial expressions and body movements as well as other details can be stunning. It can also look a little artificial. It is strange to see, for example, water droplets fixed in mid-air or a fast car with its wheels not blurry.

You can lower the shutter speed off the peak-action speed for freezing until you get some very slight blur in critical areas. Wheels on moving vehicles or propellers on aircraft are typical examples. They look artificial as frozen features, but give life and movement to an otherwise sharp rendering of high speed action.

Work your blur in naturally and show it as you would see it. Be especially careful where you have a lot of blur. Ensure there are still sharp elements in the picture. If everything is blurred it looks like a bad case of hand-shake.

The key

The key to controlling blur or freezing and other shutter speed effects is… practice! Lots of it. So, just get out there and have a go. Gradually you’ll forget the cheat sheet, you will have it in your head from practice.

Comments, additions, amendments or ideas on this article? Contact Us
or why not leave a comment at the bottom of the page…

Like this article? Don’t miss the next — sign up for tips by email.

By Damon Guy (author and Photokonnexion editor)

Damon Guy - Netkonnexion

Damon Guy (Netkonnexion)

Damon is a writer-photog and editor of this site. He has run some major websites, a computing department and a digital image library. He started out as a trained teacher and now runs training for digital photographers.
See also: Editors ‘Bio’.

How many types of blur are there in photography?

Blur by Netkonnexion - types of blur

Blur by Netkonnexion
Click image to view large
Blur By Netkonnexion on Flickr External link - opens new tab/page
There are many types of blur in photography.

Not all blur is equal.

There are various types of blur. It sounds odd. In fact there is a lot more to blur than most people realise. It is quite a varied subject. It is used in nearly all aspects of photography. From abstracts to zooming, we will find some aspect of blur. Lets take a look…

Okay bokeh…

First up, and one of the best known types of blur, is Bokeh. This Japanese word means haze or blur. It originally referred to the quality of blur. Today we use it to describe the actual blur. A sharp subject and a blurred background is created by a blur of tiny circles where each of the tiny points of light are not focused, that is bokeh. It is created by the lens and aperture.

When you use a wide aperture, say f4.0 (or wider) you get a shallow depth of field. The depth of field is the sharp part of the picture. The rest, the out-of-focus part, is blurred. That blur is the bokeh.

Bokeh can add a whole range of composition effects. It is also has its own aesthetic quality. The quality of the little ‘circles’ varies as does the true circular shape of the circles themselves. Photographic lenses with apertures that are more circular produce the best bokeh. Some apertures are more like regular polygons (say a hexagonal). Polygon bokeh is not as pleasing to the eye as circular bokeh. Fewer sides on the polygon forms a less circular bokeh circle. It may even form an obvious bokeh polygon. Manufacturers go to some lengths to make the bokeh pleasing. One way to make the bokeh more circular is to add blades to the aperture diaphragm. That can raise the cost of the lens.

Subject-movement types of blur

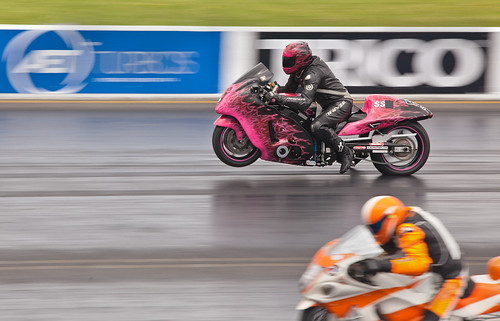
When a subject moves in front of your stationary camera the resulting image has a blurred subject. This is movement blur. The types of blur which include movement can be varied. In the picture above the motor bikes are moving at around 90 miles per hour. When taking this shot I was panning with the far bike resulting in that bike being sharp. The pan meant that my camera was not paced at the same speed as the nearest bike. As a result its movement was relatively out of synchronisation with my camera. The nearest bike was in relative movement and thus blurred.

In “The Barber”, below, I have set my camera to capture the blur of his working hands. As with any movement shot, you want some of the shot blurred and some sharp. If it is all blurred it just looks badly taken.
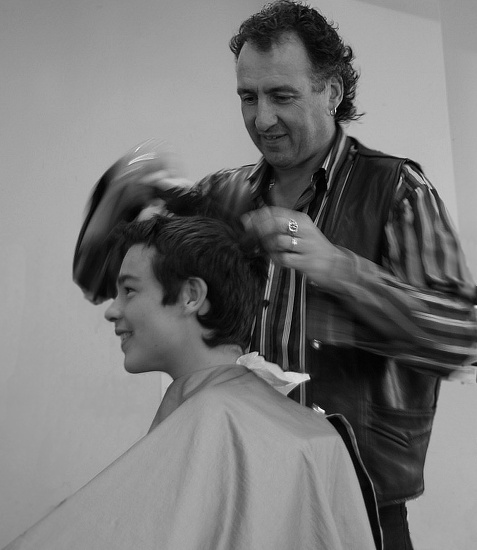
The Barber

• The Barber By Netkonnexion in 365Project •
Click image to view large
The Barber By Netkonnexion in 365Project External link - opens new tab/page
The movement of the hands is blurred to simulate his hair cutting work. Types of blur created in-camera are most effective.

Movement of the subject is controlled by shutter speed. To get it right you have to practice with the speed of that subject. Try the subject at slow speed first. Once you have an idea of the settings, speed the subject up. As you develop a feel for the speed-of-movement versus the shutter-speed you will be able to get a sharp background but a blurred subject.

More types of blur… Camera movement

When a subject is moving pan your camera with it. I did that in the bike picture at the top of the page and got a sharp bike placed against a blurred background. That is not bokeh in the background. As the camera panned with the bike it captured a stationary background. However, as the camera was moving it created a movement blur on the background.

Movement blur of the background normally occurs when panning. If you hold a stationary camera out of a car window and take a long exposure and the same type of blur will result. However, nothing will be sharp in that case (unless something next to you is travelling at your exact speed).

Done right background blur from camera movement has great impact. In the motorbikes above it gives a race feel. It looks really fast.

Some blur is not so good

Hand movement during a shot causes all sorts of blur. You get blurred shadows, blurred faces, possibly jerky tracks… not good at all. However, you can have some fun with this sort of movement. Some famous pictures have been created by deliberate hand movements. There are lots of shots, like tree shots  External link - opens new tab/page, where the movement of the camera creates a surreal or abstract view of the subject. Some people have tried throwing their camera and triggering it in mid-air – some bizarre results can be obtained (including a smashed camera).

Out of focus types of blur

Of course it is possible to completely blur a shot quite deliberately. Some pleasant aesthetic effects can be achieved. Wedding and romantic photographers love the “soft focus” shot. This is a deliberate very slight lack of sharpness. It emphasizes the romantic, soft nature of something… kittens, brides, the first kiss, baby and so on. Google images of soft focus shots provides quite a good range of possibilities for this type of blur.

The soft focus shot can be created different ways. Each give slightly different types of blur. You can literally set the lens to manual focus. Then when properly focussed pull the focus slightly back. so as to create a small amount of blur. Another way to do it is to use a soft focus filter. These are simply screwed to the end of the lens and give the same effect. When I was first starting out in photography many wedding photographers carried a flesh coloured or white nylon stocking. Pulled tight over the lens while the photograph is taken it creates a soft focus effect. Others like a skylight (ultraviolet) filter with a tiny amount of grease smeared on it. All these work, but give you a slightly different soft focus effect. Experiment… have fun!

Zoom blur

One of the less well known types of blur – zoom blur. You need a steady hand or better, a tripod. It makes the picture look like the world is rushing toward you very rapidly.

Adjusting the zoom during exposure creates zoom blur. Set your camera to have a long exposure – around one second is good. Balance the shutter speed with the ISO and aperture to get a proper exposure. You will need to use manual focus to adjust the zoom in the shot. Press the shutter button and rotate the zoom focus ring. A short turn or through its full arc – the amount of turn gives different effects. With a bit of practice you can reduce hand-shake blur. A smooth zoom throughout the exposure creates some great effects. Look through this page of zoom blur images on Google for some ideas…  External link - opens new tab/page.

Artificial blur

Most image editors have software filters to create types of blur. In fact there are a variety of different software filtersavailable. Gaussian blur is one common type. It softens or smooths the image, but also causes loss of detail. There is also rotational blur (self explanatory); linear blur or movement blur – you choose the direction of the blur. Other editng packages will have other blur types too.

Artificial types of blur do not have the same effect as blurs created in-camera. Artificial blur tends to lack depth. Whereas, blur using depth of field gives depth to a picture. The bokeh and movement blurs both have the impact of realism and depth as they vary throughout the depth of the image. Applying a uniform artificial blur can affect the realism. Applied with care and artful work you can make artificial blur look real. It is all about care and attention.

Are there more blurs?

There are probably other types of blur. They may fit into one or more of the categories above. Why not let us know about others. I would like to hear of new ideas and types of blur.

Comments, additions, amendments or ideas on this article? Contact Us
or why not leave a comment at the bottom of the page…

Like this article? Don’t miss the next — sign up for tips by email.

By Damon Guy (author and Photokonnexion editor)

Damon Guy - Netkonnexion

Damon Guy (Netkonnexion)

Damon is a writer-photog and editor of this site. He has run some major websites, a computing department and a digital image library. He started out as a trained teacher and now runs training for digital photographers.
See also: Editors ‘Bio’.

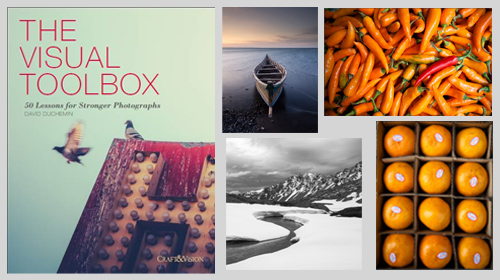
Visual toolbox for photographers

Sharpen up your creative photography…

It’s easy when starting photography to over emphasis the importance of gear. In fact it’s ‘photographers eye’ that really makes the difference. Your vision and insight into a scene are critical to producing a wonderful image.

Sage advice from a world master

The Visual Tool Box by David duChemin is all about the skills of composition. He goes into depth around the background ideas which help you look at a scene. The ultimate success in photography is to make your image a pleasure to view. Aesthetics rule – it’s as simple as that. This book is dedicated to teaching you the tools you need to develop the ‘eye’.

David duChemin says,

These are the lessons I wish I’d learned when I was starting out.
The Visual Tool Box by David duChemin

This is my kind of book. He writes superbly, in simple, readable form. His examples are excellent and the pictures are just amazing. But most of all the book is organised for learners to extend their knowledge in easy, well structured steps. This book is all about putting new tools in your photographic tool box and it achieves that with an ease that any beginner will find a joy.

Composition

The book is packed with examples of the sort of compositional ideas that really work – for anyone. Just look at some of the topics covered…

  • Manual
  • Optimize Your Exposures
  • Master the Triangle
  • Slower Shutter Speed
  • Learn to Pan
  • Use Intentional Camera Movement
  • Use Wide Lenses to Create a Sense of Inclusion
  • Learn to Isolate
  • Use Tighter Apertures to Deepen Focus
  • Use Bokeh to Abstract
  • Consider Your Colour Palette
  • Lines: Use Diagonals to Create Energy
  • Lines: Patterns, Lead my Eye, Horizons
  • See the Direction of Light
  • Light: Front Light, Side Light, and Back Light
  • Quality of Light: Further Consideration
  • White Balance for Mood
  • Light: Reflections, Shadow, Silhouettes, Lens Flare
  • People
  • Experiment with Balance and Tension
  • Use Your Negative Space
  • Juxtapositions: Find Conceptual Contrasts
  • Orientation of Frame
  • Choose Your Aspect Ratio
  • Use Scale
  • Simplify
  • Shoot from the Heart
  • Listen to Other Voices (Very Carefully)

And there is plenty more content to complement and extends these ideas. What’s not shown in a list is the excellent and sage advice throughout the book. I will let David duChemin have the last word…

Pace your-self. Anyone can master a camera; that just comes with time. It’s the other stuff — learning to think like a photographer — that takes so much work and allows this craft to become the means by which you create art.
The Visual Tool Box by David duChemin

And it is thinking like a photographer that you will quickly learn from reading this book.

How to buy this great book

This book was originally published as an ebook. However, it is no longer available in that form. The book has moved into the real world. It will be available on Amazon as a Paperback From 31 Mar 2015.
The Visual Toolbox: 60 Lessons for Stronger Photographs (Voices That Matter)You can per-order the book from Amazon.

Comments, additions, amendments or ideas on this article? Contact Us
or why not leave a comment at the bottom of the page…

Like this article? Don’t miss the next — sign up for tips by email.

Damon Guy - Netkonnexion

Damon Guy (Netkonnexion)

Damon is a writer-photographer and editor of this site. He has run some major websites, a computing department and a digital image library. He started out as a trained teacher and now runs training for digital photogs.
See also: Editors ‘Bio’.
By Damon Guy see his profile on Google+.

Getting the right shutter speed

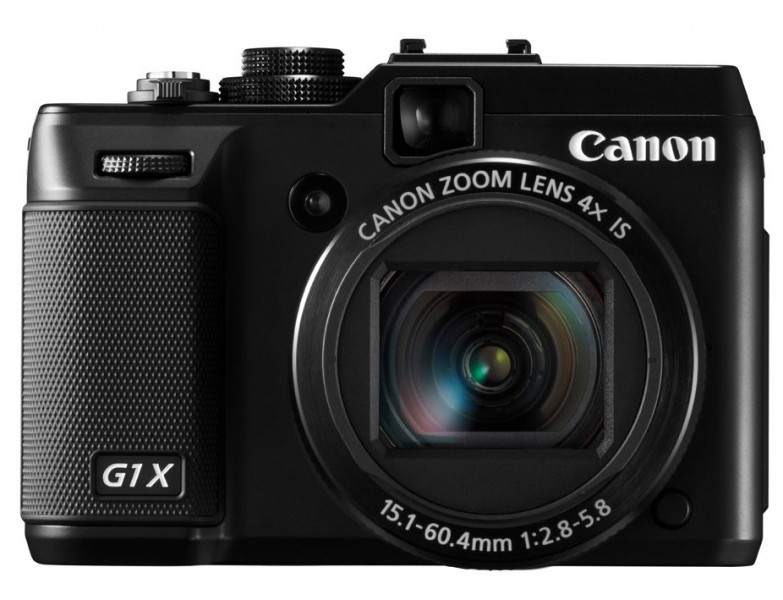
New Canon Powershot G1X Digital Point-and-Shoot With SLR control

The Canon Powershot G1X Digital Point-and-Shoot With SLR control. Billed by Canon as the “Highest Image Quality Powershot Digital Camera”

Getting sharpness right…

It’s not just about the right camera. It is also about technique and knowing the best way to set up your shot. Getting the right shutter speed takes a little knowledge when you are starting from scratch. Here are some pointers to help you make choices about shutter speed.

Why set your own shutter speed?

Getting full control of your camera is an important aspect of gaining creative control over the outcome of your photographs. Despite what the manufacturers say, you can only achieve so much by messing around with their ‘modes’. Capturing pictures using camera modes other than the basic photographic modes (ISO, aperture, shutter speed) is going to give you a programmed result. In other words ‘modes’ are what some boffin back at the lab has formulated as ‘about right’ for the average photos people take. But, you are not average are you? You want to produce the shot your way. So gaining control over your shutter speed is important.

The long and short of it

Shutter speed gives us creative control in a number of ways. A very shallow depth of field will give great bokeh in the background. But it is difficult to create on a bright day unless you have a fast shutter speed (to reduce the incoming light). Bokeh is created by a wide aperture. A wide aperture lets a lot of light in. If the shutter is open too long the photograph will be overexposed. So a shorter shutter speed is required.

Shutter speed also controls movement blur. If you are taking a photo of a moving object a relatively long shutter speed will create greater blur (example 1/15th sec). A very short shutter speed will tend to freeze the action preventing blur (example 1/500th second).

Sharpness counts

Starting to control your shutter speed is often about finding the best shutter speed that you can handle for a sharp result. So what is the lowest hand held shutter speed you can apply?

Actually, in practical terms, the slowest hand-held shutter speed is reliant on a number of factors…

  • Physical fitness: If you are not strong enough for using your camera weight it is more difficult to hold it steady. Regular practice with your camera will help you build muscles to steady your hand and therefore shoot at lower shutter speeds.
  • Focal length: Longer focal lengths tend to need higher shutter speeds. As you shoot further into the distance the angle of movement seen at the point of focus is more exaggerated.
  • Optical stabilisation: If your lens is optically stabilised this means it will compensate for the tiny movements of your hands. This compensation will help you to reduce hand shake and therefore give you potentially longer shutter speeds.
  • The picture you want to create: Obviously, the picture you want to produce is dependent on how much blur you want in it. So if you want no blur (for the sharpest result) you want a fast shutter speed.
  • The amount of light: Brighter light allows you to have a shorter shutter speed. Knowing when to use a tripod instead of hand-held is the crucial issue here. Most people simply give up if a low shutter speed demands a tripod… For the accomplished photographer many of the best shots are found in low light situations. So shutter speed control is of crucial importance – as important as using a tripod at the right time.
Rule of thumb

Those factors aside here is a rule of thumb. In practice most people do not shoot with a steady enough hand to produce sharp hand-held shots below 1/60th second. Of course, optical stabilisation on the lens will help you get longer shutter speeds. But even then a practical limit of 1/30th of a second is about as low as you can go and be sharp. That is not a shutter speed I would suggest you work with regularly when hand-held.

Best guide to shutter speed

The shutter speed you need to work to is often related to the focal length you are working with. There is a reasonable rule that can help you get a good guide to picking the best shutter speed for your focal length. It is said that the longest shutter speed you can use hand-held for a lens or zoom setting is:

1 divided by the Focal length times 1.5

So, if your lens is a normal lens at 50mm it will have an effective lowest hand-held shutter speed of 1/(50 x 1.5) or 1/75. The nearest (rounded up) setting on your camera is likely to be 1/80th second.

If you are working at 200mm then, 1/(200 x 1.5) or 1/300th of a second will be your lowest working shutter speed. The nearest setting on most cameras will be 1/320th second.

These apply if you are not using optical stabilisation. You can of course work one or maybe two stops faster if you are using stabilisation. You will need to check that figure against your lens specification. Most optical stabilisation systems will give you between one and two stops extra control.

Shutter speed standard

shutter speed is standardized on a 2:1 scale. When you open the aperture on single aperture stop and at the same time reduce shutter speed by a single step the result will be an identical exposure. This table shows the shutter stop standard steps…

  • 1/2000 sec
  • 1/1000 sec
  • 1/500 sec
  • 1/250 sec
  • 1/125 sec
  • 1/60 sec
  • 1/30 sec
  • 1/15 sec
  • 1/8 sec
  • 1/4 sec
  • 1/2 sec
  • 1 sec

The scale extends up above these figures to very high shutter speeds. Up to date DSLRs may allow have shutter speeds of less than 1/5000ths of a second. Very fast indeed. While at the other end cameras will allow long shutter speeds of up to 30 seconds in manual modes (M mode; or Manual) and longer in “bulb mode”.

Each of the steps in the table above will be equal to a change of one stop of light up or down. A change of one stop of light will double the amount of light entering the camera.

As one stop of light is quite a large amount, cameras have become more sophisticated. Most are now marked off with thirds of a stop for ISO, aperture and shutter speed. So your calculations can be quite precise and lie between these values in the table above.

You can read more about stops of light here: Definition: f number; f stop; Stop

Doing it right

Gaining control over your camera is of importance if you want to become a creative master of its full potential. Learning about shutter speed and other aspects of exposure are critical to learning that control. You can have great fun creating bokeh and controlling movement blur. At the same time you can remove that other type of blur – ugly hand-held shake-blur.

Please leave questions and issues for us to discuss if you want to take this further…

By Damon Guy (author and Photokonnexion editor)

Damon Guy - Netkonnexion

Damon Guy (Netkonnexion)

Damon is a writer-photog and editor of this site. He has run some major websites, a computing department and a digital image library. He started out as a trained teacher and now runs training for digital photographers.
See also: Editors ‘Bio’.
The power of light and shadow

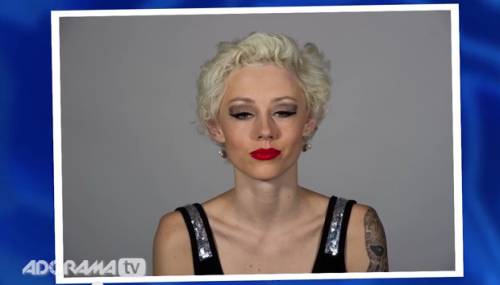
Facial shadows

• Facial shadows •
Image taken from the video.

Great portraits rely on shadows

Shadows define a portrait. So it is no surprise that good lighting to get the shadows right is a wonderful idea. But what most people don’t realise is that, almost every time, more lights make things more complicated. One light is almost all you will ever need to get a face right. The rest can be done with a reflector.

Shadow work

In the video Mark Wallace shows us how the face can be properly illuminated, how to do it and more important how to make it look beautiful. He looks at ugly shadows and hard light and explains how to remove them and subdue them using soft light. In all, this is one of the best best portrait lighting tutorials I have seen on video. Enjoy it. There is some really useful stuff presented in a simple and understandable way.

Adorama TV  External link - opens new tab/page

Comments, additions, amendments or ideas on this article? Contact Us
or why not leave a comment at the bottom of the page…

Like this article? Don’t miss the next — sign up for tips by email.

By Damon Guy (author and Photokonnexion editor)

Damon Guy - Netkonnexion

Damon Guy (Netkonnexion)

Damon is a writer-photog and editor of this site. He has run some major websites, a computing department and a digital image library. He started out as a trained teacher and now runs training for digital photographers.
See also: Editors ‘Bio’.

Three minutes of peace and tranquility and endless fun later!

Ink Drops

• Ink Drops •
The feeling of peace and tranquillity can come with many aspects of photography. This is something you can think about and possibly do yourself.
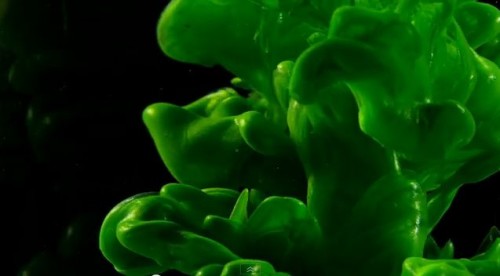
Image from the video.

Seeing and capturing

Every interest has its peaceful side. Photography is no different. For a change here is a video which delivers three minutes of peace and tranquillity. It is possibly something you can have a go at yourself…

Whats going on – can I do it?

What you see in the video is very simply drops of ink into water. The water is sometimes still and sometimes moving very gently. It is simple to do but infinitely complex in the outcomes. Anyone can do it.

There are literally hundreds of different inks on the market. Have a look at this…

Drawing Inks Assortment Set of 12  External link - opens new tab/page
A great set of varied colours. Can be used to create coloured water and for droplet mixes. Great for experimentation.

Here are a few other types of ink you can choose.  External link - opens new tab/page

I have a range of colours I use for water work. You can also use food colourings. Basically the technique is like this…

  • Set up a glass jug, vase or small tank (flat sided is best).
  • Make sure it is very, very clean.
  • Have a dry cloth available to wipe the glass dry if you spill.
  • Use a remote flash or domestic lamp set to the side.
  • Place a black or white card behind your glass vase.
  • Mount your camera on something solid. A tripod is best.
  • Set your camera to auto-white balance.
  • Set the ISO to 100.
  • Use Shutter Value [Sv, Tv etc.] as your shooting mode
  • Use f11 as your setting to shoot right through the water.

You will need to have the light on from the side of the shot. An on-board flash will cause the ink to appear very flat with the light coming from the front. This will ruin the effect.

If you want added brightness from behind you can add a light shining onto the background card. This will lift the internal colours.

Then, as with everything in photography you will need to experiment with the light and conditions you are working with to get the best shots.

The technique

Your water should ideally be about six inches deep. Drop the ink into the water and start clicking your shutter button. You can do it quite a few times as the ink forms up the shots. Once you are satisfied there is no more shots to be had then replace the water and start again.

People spend literally years working with this sort of effect. It is not only great fun for everyone from beginners onward, it is also great art. There are many fine art photographers who work on this sort of image for a living. There is also endless amusement, beauty and some wonderful images. The technique works for both still photography and videography.

INK DROPS

And now for your three minutes of peace and tranquility – enjoy!

Jacob + Katie Schwarz  External link - opens new tab/page

Comments, additions, amendments or ideas on this article? Contact Us
or why not leave a comment at the bottom of the page…

Like this article? Don’t miss the next — sign up for tips by email.

By Damon Guy (author and Photokonnexion editor)

Damon Guy - Netkonnexion

Damon Guy (Netkonnexion)

Damon is a writer-photog and editor of this site. He has run some major websites, a computing department and a digital image library. He started out as a trained teacher and now runs training for digital photographers.
See also: Editors ‘Bio’.
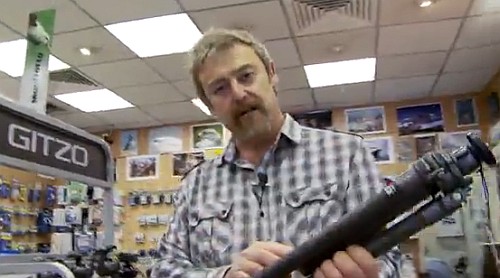
Buying a tripod – the essentials

Buying Tripods

• Buying Tripods •
Buying a tripod? There are a lot to choose from. So what should you look for?
Image from the video.

Why would you buy a tripod?

Because a tripod is of the central pillar of your sharpness strategy. Without a tripod you are denying yourself the opportunity to use a large proportion of the settings on you camera. Let’s look more closely at what this means…

Settings

Your camera has three primary controls…

  1. ISO – Controls how sensitive your camera image sensor is to light.
  2. Shutter speed – Controls how long your sensor is exposed to light.
  3. Aperture – controls how much light is allowed to reach the sensor.

These are inter-related. As we want a high quality result (with low digital noise) we set the ISO to around 100. Therefore, for our purposes here we are particularly interested in two of those settings.

  1. Shutter speed – movement blur created with long exposure; movement frozen at short shutter speeds.
  2. Aperture – Wide aperture, shallow depth of field; small aperture gives a deep depth of field.

Looking at these you need to consider how you do photography where only low levels of light enter your camera. Here are some examples:

  • Landscape – Use aperture f11 or higher. Small aperture gives Depth of Field, but lowers the light influx. Therefore you need to have a longer shutter speed especially during the Golden Hour. Hand-holding is not an option.
  • Portraiture – In bright sunlight a shallow depth of field (wide open aperture – blurred background) would overexpose the shot the shot.Use a Neutral Density Filter. This reduces light influx but means a ling exposure. A tripod stops handshake.
  • Still life: You are doing a still life requiring low light for the mood shadows. To get the exposure you need a longish exposure. You do some test shots. Your best exposure is with a shutter speed of one second. Tripod needed!
  • Fireworks: You need to hold the camera steady for about 1/20th of a second to get the full spread of the explosion. Tripod – essential.
  • A disco dance floor – If you want to capture movement you will need to work at around 1/60ths of a second. But you also need sharpness right through. You will need an aperture of f8 or f10. A Tripod is essential if you want the movement blurred and the rest of the room sharp.
  • Photographing a baby. Flash changes the mood and invites crying. It’s also harsh light. Baby skin loves natural light. Use a fast shutter and tripod. Make the composition right then watch the baby. Pick your moments and take several shots. A tripod helps you can concentrate on the right moment while baby is still and happy. You don’t have to recompose for every button push.
  • Family photo – Set the timer, join the group! A tripod is essential.

I could go on… there are dozens of everyday scenarios requiring a tripod. These are just the obvious ones. For sharp, quality shots I need to use a tripod around 75% of the time. My tripod is essential to my business.

If you are an amateur you probably cover more varied situations than me. You need a tripod for a high quality result. It is not uncommon for me to hear students say, “I never use a tripod, I don’t need one”. Then in almost the same breath, “Why are my pictures always blurred or dull?” The answer to the question is – to get a proper exposure you need a tripod.

Lots of people say, “A tripod just slows me up!” My response is simple. Most amateurs take ten shots to get one – and are not necessarily successful. A tripod actually saves you time. You can rely on one shot being sharp. In post production you review one shot for each composition, not dozens.

What to look for…

In general the main considerations are:

  • Well designed: smooth operation, strong leg clips so you can set the tripod at various leg heights.
  • Centre column: Solid, little movement, clamps solid.
  • Legs – variable wideness: You can spread the legs out wider and at different angles to each other.
  • Tripod provides a platform for different heads: Do not buy a tripod with one type of head pre-fitted. It may not be suitable for your camera and there are different heads for different types of photography.
  • Weight or lightness: Solid and heavy tripods mean a good platform. Lighter carbon fibre tripods are more expensive, but the carbon fibre has the ability to reduce vibration (especially when stressed by a weight bag hanging on it to steady it).

For general work I use this tripod…

Of course you need a good head on a good tripod. This head is my mainstay for most work…

A good tripod will last you years. It will be stable and steady even in wind. It will not wear out easily. A worthwhile investment. Don’t be tempted to go cheap. Look for quality brands with after sales parts and good design. Spend more and you will have a flexible friend that helps you in all aspects of your photography.

Have a look at these ranges of tripods. I use a Manfrotto for most situations, but there are other quality ranges. My Benro tripod is very rugged and nothing beats it on a beach or mountainside. Check out these links for a range of ideas…

Manfrotto tripods  External link - opens new tab/page

Gitzo Tripods  External link - opens new tab/page

Giottos Tripods  External link - opens new tab/page

Benro Tripods  External link - opens new tab/page

Which Tripod Should I Buy?

Mike Browne introduces this video with the basics of how to think about what you want in a tripod. What he says is good thinking. At the end two other photographers add their advice. I was impressed with the comments of both. There is a lot of great advice in this video.

Mike Browne  External link - opens new tab/page

Comments, additions, amendments or ideas on this article? Contact Us
or why not leave a comment at the bottom of the page…

Like this article? Don’t miss the next — sign up for tips by email.

By Damon Guy (author and Photokonnexion editor)

Damon Guy - Netkonnexion

Damon Guy (Netkonnexion)

Damon is a writer-photog and editor of this site. He has run some major websites, a computing department and a digital image library. He started out as a trained teacher and now runs training for digital photographers.
See also: Editors ‘Bio’.