Tag Archives: Insight

Visual toolbox for photographers

Sharpen up your creative photography…

It’s easy when starting photography to over emphasis the importance of gear. In fact it’s ‘photographers eye’ that really makes the difference. Your vision and insight into a scene are critical to producing a wonderful image.

Sage advice from a world master

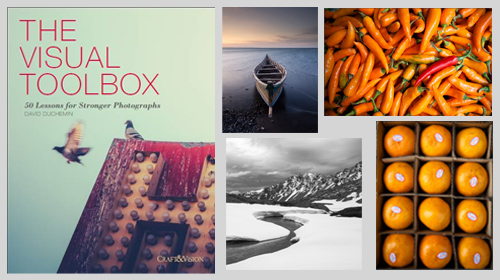
The Visual Tool Box by David duChemin is all about the skills of composition. He goes into depth around the background ideas which help you look at a scene. The ultimate success in photography is to make your image a pleasure to view. Aesthetics rule – it’s as simple as that. This book is dedicated to teaching you the tools you need to develop the ‘eye’.

David duChemin says,

These are the lessons I wish I’d learned when I was starting out.
The Visual Tool Box by David duChemin

This is my kind of book. He writes superbly, in simple, readable form. His examples are excellent and the pictures are just amazing. But most of all the book is organised for learners to extend their knowledge in easy, well structured steps. This book is all about putting new tools in your photographic tool box and it achieves that with an ease that any beginner will find a joy.

Composition

The book is packed with examples of the sort of compositional ideas that really work – for anyone. Just look at some of the topics covered…

  • Manual
  • Optimize Your Exposures
  • Master the Triangle
  • Slower Shutter Speed
  • Learn to Pan
  • Use Intentional Camera Movement
  • Use Wide Lenses to Create a Sense of Inclusion
  • Learn to Isolate
  • Use Tighter Apertures to Deepen Focus
  • Use Bokeh to Abstract
  • Consider Your Colour Palette
  • Lines: Use Diagonals to Create Energy
  • Lines: Patterns, Lead my Eye, Horizons
  • See the Direction of Light
  • Light: Front Light, Side Light, and Back Light
  • Quality of Light: Further Consideration
  • White Balance for Mood
  • Light: Reflections, Shadow, Silhouettes, Lens Flare
  • People
  • Experiment with Balance and Tension
  • Use Your Negative Space
  • Juxtapositions: Find Conceptual Contrasts
  • Orientation of Frame
  • Choose Your Aspect Ratio
  • Use Scale
  • Simplify
  • Shoot from the Heart
  • Listen to Other Voices (Very Carefully)

And there is plenty more content to complement and extends these ideas. What’s not shown in a list is the excellent and sage advice throughout the book. I will let David duChemin have the last word…

Pace your-self. Anyone can master a camera; that just comes with time. It’s the other stuff — learning to think like a photographer — that takes so much work and allows this craft to become the means by which you create art.
The Visual Tool Box by David duChemin

And it is thinking like a photographer that you will quickly learn from reading this book.

How to buy this great book

This book was originally published as an ebook. However, it is no longer available in that form. The book has moved into the real world. It will be available on Amazon as a Paperback From 31 Mar 2015.
The Visual Toolbox: 60 Lessons for Stronger Photographs (Voices That Matter)You can per-order the book from Amazon.

Comments, additions, amendments or ideas on this article? Contact Us
or why not leave a comment at the bottom of the page…

Like this article? Don’t miss the next — sign up for tips by email.

Damon Guy - Netkonnexion

Damon Guy (Netkonnexion)

Damon is a writer-photographer and editor of this site. He has run some major websites, a computing department and a digital image library. He started out as a trained teacher and now runs training for digital photogs.
See also: Editors ‘Bio’.
By Damon Guy see his profile on Google+.

Three street photography tips – a moment of history

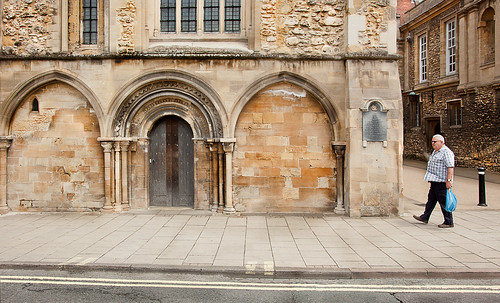
Moment out of time - a thread of history - Bring out the historical context of street photography

• Moment out of time – a thread of history •
There’s so much history on the streets. Yet, we walk past it apparently oblivious. Bring out the historical context of street photography to add interest to your shots.
Click image to view large
• Moment out of time – a thread of history • By Netkonnexion on Flickr External link - opens new tab/page

Sometimes you just have to shoot.

It is what street photography is about. Getting out on the street, watching the street scene and capturing the moment. Sometimes it doesn’t happen the way you want. I went to Abingdon, UK, to collect some photography equipment. As the town centre is steeped in history I thought I’d capture some street scenes while there.

Three tips for capturing the moment – consider the historical context of street photography

While in Abingdon, I had several important insights…
1. It is not just about the moment: In the historic town centre of Abingdon on a very hot weekday lunchtime not much happens. It occurred to me that there is an important principle about street photography… everything is part of the environment. If you cut out your human subjects in Photoshop you would lose the essence of the street scene. An important component of the scene is in the environment itself. Think of the historical context of street photography when you consider your scene.

Don’t lose sight of the environment. A shot is interesting because of the people… and it’s interesting because of where they are. There is an inextricable link between a street moment and the street itself. Abingdon town centre has some wonderful historic buildings. The character of the history brings out the moments as effectively as the hustle and bustle in the down-town area of a big city. When Englishmen venture out in the mid-day sun, there is not much to smile about – but it makes for a scene in a historical context. View image above large.

2. An important part of the moment: Capturing expressions is essential. It speaks character and mood. It is a general point about street scenes and something to seek out in your pictures. However, not all street photographers are forgiving about all expressions.

I know of one street photographer that will tell you…

Make sure people aren’t smiling. Otherwise you end up with a snapshot
Martin Parr – Documentary Photographer

Hmmm! Maybe Martin Parr is right. But not always. Years ago in France I saw two elderly guys playing dominoes in an old town square. They were having a whale of a time – they did not stop laughing the whole time I was there. They laughed more when I photographed their mirth.

For me it was a defining moment. My shot, taken on an old Pentax (back in the days of film), became my first really successful street scene. It spurred me on. I was young, and I can’t even find that picture now. Actually the moment was so vivid in my mind I remember its detail many years later. The lesson? Capture the moment in all its glory, not just the moment you think is right. Martin Parr would have missed a great moment in a street game. I was the lucky one! I got a great set of expressions in the wonderful, historical context of street photography. That old French square came alive with that laughter.

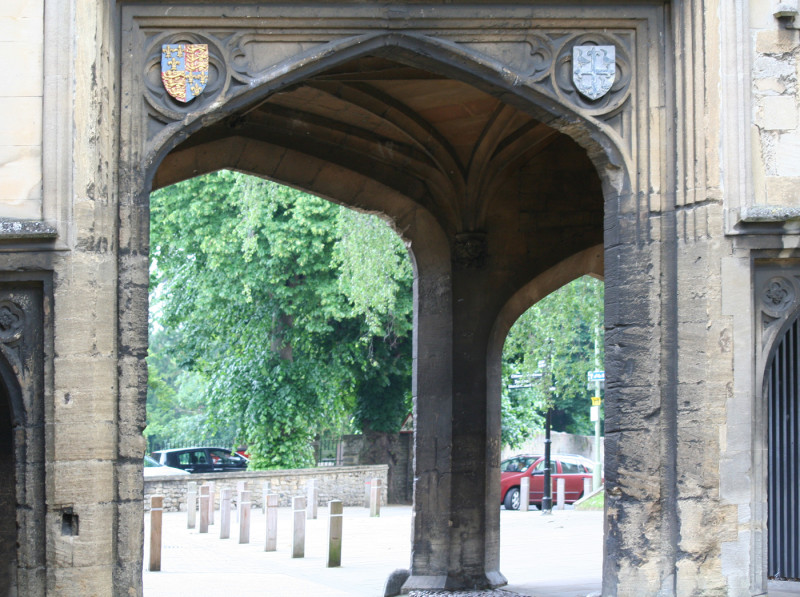
3. The environment and historical context of street photography Street photography is about the people you meet, but never let a moment of interest slip away. Here is a picture of an old stone gateway into the market square in Abingdon…

Hidden Human History Revealed - the historical context of street photography

• Hidden Human History Revealed •
The damage on the columns of the gate reveal the historical context of street photography.
• Click image to view large •
Stone arch by Neven Guy.

The essence of street photography is about the character of the people you see. But here is a unique moment in human history that is so much a part of the street scene. Look at the deep gouges and scratches in the sides of the gate columns. Those marks have been made over centuries of use. Carts, trucks and all sorts of other objects and implements have banged off those stone columns and left an historical imprint.

I felt privileged to walk around those columns feeling the stonework and letting the history wash over me. As I did so I could see in my minds eye the busy street scene of a market square bustling with peasants and farmers of three or four hundred years ago.

Street photography is not just about pictures, its about you too

The moment you get out and into the street you are revealing yourself and discovering your boundaries. I did not engage with the people of Abingdon as I had hoped. But I did engage with their history. The historical context of street photography helped me gain some important insights into the history of the town. I also had some interesting thoughts about street photography. A powerful day of learning! It has made me want to go back and witness a busy Saturday market there. Those pockmarked columns would be a great backdrop to a busy street scene.

Comments, additions, amendments or ideas on this article? Contact Us

By Damon Guy (author and Photokonnexion editor)

Damon Guy - Netkonnexion

Damon Guy (Netkonnexion)

Damon is a writer-photog and editor of this site. He has run some major websites, a computing department and a digital image library. He started out as a trained teacher and now runs training for digital photographers.
See also: Editors ‘Bio’.

Will I get my images stolen online?

• Transparent Covers •

• Transparent Covers •
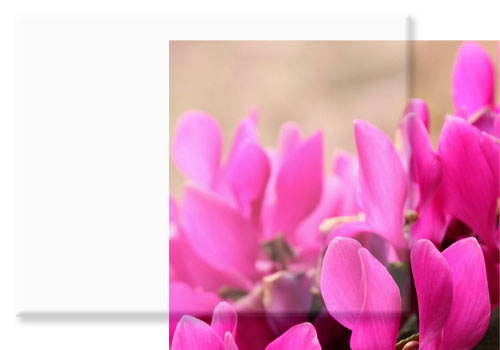
The picture shows a transparent image slightly lifted off the page demonstrating how a transparent image can be stacked on top of the image below. It is normally invisible when set up properly – it’s shown lifted here only for effect. If you right click/copy the on an actual transparency you only copy a transparent shape not the image you want below.

Can images be protected online?

There are a number of ways to steal an image off of a website. And, yes, there are a number of ways to protect an image on a website. How effective is that protection? When it comes down to it we lose sleep over our images being stolen. So if that protection is not 100% we have a problem.

What protection is available?

Probably the most common protection for images on a website is a programmed solution. A small piece of code detects a right mouse click over an image. The code disables the right click preventing you saving or copying the image or the image address.

The picture above shows another method of protecting images. It is possible to place images on top of each other on a page. If the top image is transparent the image below it can still be seen. When you right click the image you are actually only able to get the top transparent image not the image below. This is an interesting method because it also masks the internet address of the image below. If you try to copy the location of the image you get the location of the transparent image.

Press and grab!

Both the methods above, and similar ones, are sufficient to prevent the casual, non-technical user from stealing images. However, they are absolutely ineffective against one simple theft method – the screen grab. If you click on the window where an image is displayed, hold down [Alt] & press [PrtScrn] the image selects a copy of the window that is currently selected. You can then paste that image into an image editor. If you use [Ctrl] & [PrtScrn] you grab the whole screen as an image. Some web designers have used code to disable these button combinations but it is not reliable. It is also completely ineffective against selection tools. There are many little applications that you can download which will give you the ability to select any section of your screen and copy it. The copy is then pasted into an image editor for saving.

The ultimate solution…

When it comes down to it there is no full-proof method of preventing image theft. If you can see it online, you can steal it. The ultimate solution to preventing image theft online is not to put your images onto a website.

Of course this is not an answer really. If we cannot publish then we cannot get sales, acclaim, support… whatever. These days, if you are not online then your images are not seen. Are there other practical methods of protecting images?

Water marking

One of the more common methods of protecting images is to put a watermark on it. This effectively renders the image unusable on another website or for printing. However, it also makes it difficult to fully appreciate the art in a picture if it has a trade mark or copyright symbol plastered across it.

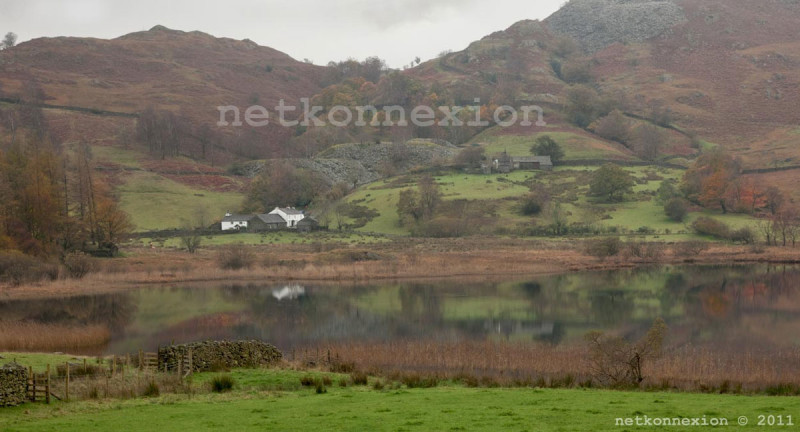
• Little Langdale •

• Little Langdale •
Watermarks can be rather obtrusive like the large one here (centre). Less obtrusive placement and size is easily cloned out or cropped out (the small watermark bottom right).


Generally speaking the smaller or less obtrusive a watermark is on an image the less effective it is against theft. On the other hand the more obtrusive it is the more impact it has on the viewer looking at the image. Writing in particular draws the eye very strongly. So you are in danger of the viewer having to peer around/behind your watermark because the eye is drawn to the watermark before the subject of your image. This is not satisfactory and rather destroys the point of putting the image online.

Copyright and copyright registration

Copyright refers to the established right of the author of a picture to maintain control over the image. However, the law of copyright differs worldwide. So how it applies in your country is something you will have to research. In basic terms a country like the UK has an assumed right of copyright ownership. So the original image file would stand as proof of ownership. In this case it is best to ensure that you also embed your copyright data in the image data (see: Exif data). The Exif data will then reveal the owner. However the data is not secure so the method is not full-proof.

In a country like the USA copyright owners can protect themselves against theft by registering their image with the Library of Congress  External link - opens new tab/page.

Copyright is good protection in that the force of the law lies on the side of the copyright owner. However, in many countries a dispute over copyright involves a lengthy and expensive legal process. This may be beyond the means of the small artist/photograph. This renders it an ineffective method of protection. However, recent legislation in the UK has made it easier for authors to make small claims for disputes covering them for up to £5000 pounds fine. This could change the balance in favour of the photographer/artist seeking remedy for stolen images.

Show the useless image!

It sounds daft, but if you present your images as a low resolution small size image this is a simple and effective protection against most theft. Image thieves want a quality image to use on their own site or to print or to sell to others. If you limit your image longest side to 500 pixels as a *.jpg image compressed to around 60% you will provide partial protection for your image. This size and compression is an acceptable size on a web page for the purpose of viewing. However, the thief cannot blow the image up larger without damaging it. The low resolution at 500 pixels will make print sizes too small. In effect this makes the image perfectly viewable for your site users, at the same time it renders it pretty useless for the image thief. This is a practical and simple method of protecting against theft. It is not full proof – since thieves can still use it small size. However, it does at least limit the possibilities for commercial exploitation by others.

There is no 100% protection – its about risk

When it comes down to it you have to take a risk. There is no method of absolutely protecting your images online. However, there are enough different types of protection to be able to protect most images enough to feel confident that your images ‘probably’ will not be stolen. In the end you have to decide if you are going to gain more by displaying online than you would lose by having an image stolen. It is a very personal decision.

By Damon Guy (author and Photokonnexion editor)

Damon Guy - Netkonnexion

Damon Guy (Netkonnexion)

Damon is a writer-photog and editor of this site. He has run some major websites, a computing department and a digital image library. He started out as a trained teacher and now runs training for digital photographers.
See also: Editors ‘Bio’.

Can you write? Of course you can!
Write for Photokonnexion...

We would love to have your articles or tips posted on our site.
Find out more…
Write for Photokonnexion.

The secrets of good backgrounds

• Backdrops •

• Backdrops •
Wallpaper can be used extensively as a backdrop. There is plenty of variation and the material is relatively cheap.

Get more out of less.

One of the central ideas behind photography is to reduce the “clutter” especially in the background. We want to simplify our shots to help focus the viewers attention on the subject we have chosen. Often, by way of controlling the scene we use backdrops. For the modern photographer a backdrop provides a simple uncluttered background that can be used to off-set the colours of the subject, or to complement them or remain neutral.

Backdrop secrets

Modern backdrops have a wide range of finishes. However, strong patterns and fussy details draw the eye off the subject. So most backdrop patterns are designed to reduce the impact on the eye. Rather than regular strong lines or shapes these back drops will tend to have random and subdued variations in the theme. Other backdrop types are solid colours. The best backdrops are minimalist.

Black backdrops are often used for darkening and absorbing the light. White backgrounds are frequently used for high-key photography. Reds, purples and blues are often used for different types of shots, but can also form effective variations for monochrome work (single tone shots or a single colour and white).

Bright green backdrops are called chroma-key (chromakey). They are often used to provide a set colour ready for post processing technique called compositing. This is where new colours or entire images are to swapped into the image. The subject is retained but the green colour is replaced with an entirely new image. This technique is the digital replacement of the old ‘back-projection’ or painted backgrounds techniques used to make it look like there was something solid in the background in the days of film. Actually there was a blank screen behind the subject. This technique is also known as “green screen”.

Backdrops can be used anywhere but are used extensively in two particular branches of photography. Portraiture and fashion photography use backdrops to simplify the scene as much as possible. This allows the person or model to be the strongest element in the scene. The eye is therefore drawn to the person which is where the photographer wants people to look. A fashion or portrait shot where the eye is not on the person is a disaster!

Still life

The other area where backdrops are used extensively is in various types of still life. Again the intention is to create a simple scene so the subject is the centre of interest. However, in still life the relatively close up nature of the work can allow the use of stronger elements in the backdrop.

Heart in hand

Heart in hand • By Damon Guy
In smaller scenes or still life backdrops can be stronger. The diagonal wallpaper pattern here helps the flow of the eye.


In the picture above the hands are the centre of attention. The backdrop is used in this case to provide a dynamic feel (from the strong diagonal) and to direct the eye along the line of the phrase in the heart. Eyes naturally tend to follow lines like that.

Wallpaper

While solid colours and simple patterns are well catered for in the market, specific patterns on backdrops are limited. However, in the picture at the top of this page you can see that I have arranged a variety of different wallpaper samples. Wallpaper is easy to find – it is in every DIY store and great patterns, plain or textured can be found at relatively cheap prices. If you are working at small, still life, sizes one piece of wall paper might be sufficient. However, I have sometimes worked with wallpaper on a full sized portrait backdrop. In this case I use strong tape to stick the wallpaper sheets side by side to make the backdrop wide enough. Then, I staple the wall paper to two light wooden battens, top and bottom. This helps hold the papers together with less damage. It also helps pull the paper out so it hangs flat. Wallpaper has a tendency to curl. Then the top batten is clamped to the backdrop cross bar. Hey presto! You have a cheap but patterned backdrop.

Other patterns, shapes and marks can be used to do other things in a picture. In fact if it is used properly the use of backdrops can be complementary, can be contrasting, can form effective reflections, light dampening, and many more things. Understanding backdrops is a great way to ensure that you can control what is going on behind the main subject.

Decor

Backdrops have rich history in the theatre. Today, in modern still photography they are relatively simple and uncluttered. However, if you have a specific scene in mind you can use wall paper to provide fun and varied backdrops to complement or change your scene. While proper cloth or paper backdrops can be quite expensive; wallpaper is a relatively cheap way to use fun patterns and interesting backdrops.

By Damon Guy (author and Photokonnexion editor)

Damon Guy - Netkonnexion

Damon Guy (Netkonnexion)

Damon is a writer-photog and editor of this site. He has run some major websites, a computing department and a digital image library. He started out as a trained teacher and now runs training for digital photographers.
See also: Editors ‘Bio’.

find out more...Photokonnexion tips by email
If you enjoyed this article please sign up for our
daily email service.
                                                 Find out more
#11030#

How to improve your photography by talking about it

Mum - the loving supporter

♥ Mum – the loving supporter ♥
The problem is loving feedback is not honest Joe advice…

Sometimes we should ignore the love option.

The people you love are wonderfully supportive but probably won’t give the appraisal of your photography that you need. An informed, impartial and analytical opinion will help you understand what you need to improve.

It seems hard, but your family or great friends are probably going to like your work or conceal that they don’t like it. They don’t want to offend you or spoil their relationship with you. If you want to improve your photography you need an objective assessment of your work. You want someone to sensitively point out the good, the bad and the potential.

So just how do you find people who can help you. Here are some ideas…

  • Join a photography club and ask other members to look at your photos.
  • Enter competitions at a club, the judges often give a technical appraisal.
  • Find a professional/semi-pro who is prepared to do a little mentor work.
  • Find someone on a photography website or forum who is prepared to swap candid appraisals with you.
  • Find an artist who would be able to give you composition help and advice.
  • Get to know an art or photography graduate who understands the principles of photography.

What you should look for from these people is advice that…

  • is sensitive and supportive – with your best interests at heart.
  • objective, trustworthy, honest and informed.
  • will not belittle or trash your work.
  • will be positive and upbeat about the successes and good points.
  • won’t pull any punches – will tell you if there is a problem or issue.
  • will give you ideas about how to tackle your mistakes/problems.
  • is able to command your respect.

It may not be easy to find these people. So you should get to know a range of people in photography. You will find people who fit these profiles in lots of places. You just need to be determined and interested in developing your photography. They will help you because they want to, you will both be of like mind, and ultimately it is to the benefit of photography if we all share. Besides, it is fun if we help each other.

The broad approach

Your family and friends opinions are valid and useful. So are the opinions of those you work with and even people you do not know. Everyone is entitled to have likes and dislikes about photographs they see. However, these are people who may not understand photography is an art. They…

  • may not be positive about your work.
  • might say upsetting things without realising the impact they are having.
  • might not like your photograph, but may not be able to tell you why.
  • come out with erroneous reasons for their dislikes.
  • may not be supportive or may even be openly hostile.
  • might make silly or inappropriate suggestions about how to improve.

Yet, despite these shortcomings they have a valid opinion. You need to make your own judgement about how much attention to pay to them. You also need to make up your mind about how valuable it is to have uninformed opinion. In short, if you want to improve your photography you need to understand that opinion in art (photography) is a broad spectrum. And, it is your call as to how much criticism or support you will take from the different people on that spectrum.

With time…

In the long run you will make up your own mind about the opinions you hear about your work. Other peoples’ opinions help you – no matter what their background. It is also important to understand the diversity of opinion how that impacts on you, the photographer. Learning about varied opinions helps you to pick out the good advice form the less useful. Understanding the different types of people and opinion involved is not something you will understand any time soon. It is something that artists and photographers think about every time they meet someone with an opinion. How you handle those opinions is a personal approach and one you develop with experience. Actively seek opinions and you will get the experience quicker.

find out more...Photokonnexion tips by email
If you enjoyed this article please sign up for our
daily email service.
                                                 Find out more
#11030#

By Damon Guy (author and Photokonnexion editor)

Damon Guy - Netkonnexion

Damon Guy (Netkonnexion)

Damon is a writer-photog and editor of this site. He has run some major websites, a computing department and a digital image library. He started out as a trained teacher and now runs training for digital photographers.
See also: Editors ‘Bio’.

Can you write? Of course you can!
Write for Photokonnexion...

We would love to have your articles or tips posted on our site.
Find out more…
Write for Photokonnexion.

Simple explanations of camera exposure modes

Choose your settings from a range of modes.
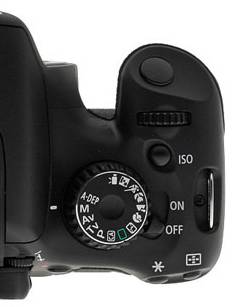
Canon550DModeDial

Camera Mode Dial
Choose the most suitable setting for your shot.


The DSLR contains a sophisticated computer providing a wide range of exposure options. They may seem bewildering. In this post we will provide simple explanations for the most common exposure modes to help you choose the best method for your next shot.

Exposure…

The modern Digital Single Lens Reflex (DSLR) can accommodate so many options that it is often difficult to know how to get started. So it is helpful if you have some idea of what exposure is about.

As photographers we are concerned with the use and manipulation of light. Everything else is secondary. We need to understand the concepts relation to how the camera detects light and the impact that has. Basically there are three controls which affect way the camera uses light. These controls are:

  • ISO – controls how sensitive the camera is to light. However, at high ISO levels there is an increase in digital noise.
  • Shutter speed – controls how long the camera sensor is exposed to light. The shutter speed also affects the amount of movement blur in the shot. The slower the shutter speed the more blur.
  • Aperture – controls how much light is allowed into the camera. Aperture also controls the depth of field. The wider the aperture the shallower the sharp zone in the picture.

(The links above take you to a full explanation of each control).

Between them these three provide control over your exposure. Co-ordinating them requires a little practice. Nothing too difficult. It is about balance. For the camera to create an exposure it has to collect a fixed amount of light. Too much light and the picture will be over-exposed. Too little light and the pictures will be underexposed. Getting it right requires a little knowledge of your camera light meter and how to change the controls to create the balance that makes the exposure.

In addition to the direct controls listed above there are the others called “modes” found on most cameras. These have been developed by the camera manufacturers to try and assist beginners who don’t understand the exposure process. The modes are intended to provide easy pre-selections for certain situations.

The different modes range from fully controlled by the camera (fully automatic mode) through to fully controlled by you (full manual mode). That is a range of controls from where the camera does everything for you through to where you make all the decisions. These modes differ from camera to camera but in general terms they are described below. The names may be different with each manufacturer too…

Full Auto: Basically this puts your camera into “point-and-shoot” mode. The camera uses its sensors to make an exposure. It responds to its programming and creates a picture which is of good quality but which you have no creative control over at all. It will even activate the flash if the camera detects insufficient light to create a balanced exposure.

Auto with No Flash: This is the same as the full auto setting, but the flash will not work under any circumstances. This leaves the camera to make the exposure without the additional light from the flash.

Program: The camera responds to its programming and makes an exposure by controlling the settings on your behalf. However, you have the option to make changes to that pre-programmed exposure – small adjustments that allow you to have a small amount of creative control.

Scene settings:
The scene settings on your camera includes a number of scene variations. These are likely to vary widely between the manufacturers and various models they make. Here are some of the more popular options:
• Portrait (for taking portraits)
• Landscape (landscapes shots and long distance shots)
• Night-time (night and dark shots)
• Sports and/or Action
• Macro
The above are standard modes. In most recent cameras these may be extended to include other additional modes to cover children, pets, specialised filters for colours and vintage settings for example. All sorts of other modes may be included depending on the target market for the camera.

These automatic modes above are pretty much camera controlled. Aside from tweaks, the camera has all the control. The problems with all of these is that the manufacturer is calling the shots. You can compose the shot, but have little control over what it looks like in the exposure. The discerning photographer wants to take creative control and use the main three controls mentioned above. Then they will be able to use the depth of field, movement blur and sensitivity to light to create the exposure that expresses their interpretation of the scene they are shooting. As a result there are three modes to deal with this. The first two are “semi-automatic” and the third gives you full manual control of the camera.

Aperture Priority:
The aperture semi-automatic mode relates to the manual control of aperture and the automatic control of the shutter speed and ISO. When you are in ‘A’ or ‘Av’ (aperture value) mode you are able to change the size of the aperture. The different sizes of the aperture are measured in “f-stops”. You can find out more about f-stops in this Definition: f number; f stop; Stop. The term aperture relates to the size of the hole which allows light into the camera. As the aperture varies the depth of field changes. Controlling the depth of field gives you discretion over the sharp area of the picture. The sharp parts of the picture attract the eye. Controlling where the sharpness is in the picture therefore affects where the viewer looks. This makes aperture control a valuable aspect of your composition.

Aperture also determines how much light is allowed through to the digital imaging sensor. A wide aperture allows more light in (say, F2.8) and has a shallow depth of field. A narrow aperture allows less light through (say, F22) but has a deep depth of field – at F22 sharpness will be more or less right through the picture.

Aperture priority allows you true control over the creative aspects of the light levels in the exposure. However, the camera balances your exposure control to make a good quality exposure because it sets appropriate ISO and shutter speed. You have creative control, it provides the quality exposure you need to make a great image.

Shutter Priority: This too is a semi-automatic mode. However, using this mode you have access to the shutter speed. Nominated as S, T, or Tv (time value) mode allows you creative control over the length of the exposure. Using this mode you can set yourself up for longer or shorter shutter opening. If the shutter is open for longer anything moving in the field of view will tend to blur. If the shutter is open longer the movement will be more blurred.

Shutter speed allows for control over the creative aspects of the total amount of light allowed to influence the exposure. While using the shutter speed the aperture setting and the ISO are under the control of the camera so it can balance the overall exposure while you control the creative part.

Manual or Full manual setting: The manual setting or “M” setting on the modes dial of your camera is used to give you full control. If you do it right your exposure will allow for depth of field control as well as creative use of movement blur. This mode gives you full control of all three aspects of the exposure.

So which mode do you choose?
In essence the automatic modes and scene modes are manufacturers programming – they do all the work for you. They represent an attempt to create classic ways of doing certain shots without you needing to take part in the exposure control. However, as a result these modes respond to make a picture that is not of your vision. Instead it is the suggested settings that manufacturers have researched about what the average shot of that type. These modes are in effect telling you how to take the shot.

On the other hand, the semi-automatic modes allow you to take control of major aspects of the control of the camera. As you have control of only one of the controls it allows you to concentrate on working on the creative part of the shot. That leaves the camera the make a balanced exposure to support your creativity. As this mode gives you an important aspect of the control without upsetting the outcome of the exposure it is an excellent mode to learn control of the camera.

Likewise, when using the shutter speed as a way of controlling the camera. You have the creative control over the length of exposure and any movement blur. This too is a great mode to learn control of the camera.

Both Av and Tv modes are affected by the other controls when in use. So, it stands to reason that you do not have the total control needed to get an exact overall exposure. However, for you to make full use of such a full manual control you should also have quite a sophisticated vision of what you want to achieve in your final exposure. While that is quite a normal requirement for a picture it does require some practice. The semi-automatic modes allow you to learn about the use of these controls and to develop the vision you need to start using the full manual mode. Learn to use these semi-automatic modes and you are not only on the way to full manual control, but also learning about how to envision your final exposure.

find out more...Photokonnexion tips by email
If you enjoyed this article please sign up for our
daily email service.
                                                 Find out more
#11030#

Winter photography inspiration – colour, texture and tone…

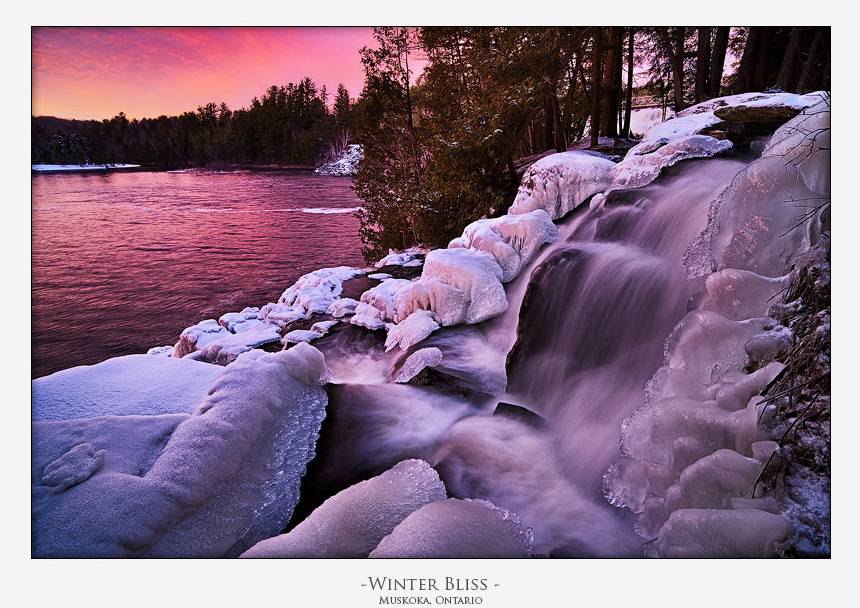
• Winter Bliss • By Kyle McDougall

• Winter Bliss • By Kyle McDougall

Winter photogrpahy – free your vision.

Too often the dull, dim and dank days of Winter leave us cold. Venturing out? Winter photography? Noooo! Yet Winter offers a world of inspiring colours, textures, sights and light not there at other times of the year.

Not grey, great!

Like any other time of the year sunset and sundown are times of the day when the most amazing colours are revealed. The magic of the golden hour pinks and golds is just as exciting in the winter as it is in the summer – and you don’t have to be out so early or so late with shorter days. What is not so obvious to the inexperienced, Winter photography is the power of the winter colours. There is amazing colour, strong colour. However, especially in snowy environments, the golds, pinks and blues are mellowed into a softness that you don’t see at other times of the year. The wonderful pink tones in the image above show the point beautifully.

I have mentioned before in these pages that often the best pictures are captured just after the sun has gone down or just before it comes up. This “blue” period of the day provides infinite tonal blues that caress the eye. I just love these times of day. The great thing is that most photographers have packed up and gone home as the “blue” time starts… you have the stage. Make the best of this time as you will be among the few who use it well.

In Winter, texture wins the day

The lower light levels, and lower angle of light in the sky, often puts off photographers in Winter. But this is the best time to capture some wonderful textures. Muted winter colours and low light combine to create excellent contrasts and micro-shadows. Along with the soft light these environmental factors are a gift to the seeing photographer. Ice, snow and even water take on an almost ethereal glow punctuated by texture. If you can capture that with a good composition your pictures will create wonderful and lasting images in your viewers mind. Look for opportunities to get the sun low in the sky and those lovely early morning or evening tones and shadows from the side.

Opportunities

In your winter photography look for opportunities to express the colours and contrasts that appear. They are different to those you find in the Summer. The subtleties of tone, texture and colour are there for all to see, but only the insightful photographer will make good use of them.

My thanks to Kyle McDougall for his permission to use his photographs.

find out more...Photokonnexion tips by email
If you enjoyed this article please sign up for our
daily email service.
                                                 Find out more
#11030#

By Damon Guy (author and Photokonnexion editor)

Damon Guy - Netkonnexion

Damon Guy (Netkonnexion)

Damon is a writer-photog and editor of this site. He has run some major websites, a computing department and a digital image library. He started out as a trained teacher and now runs training for digital photographers.
See also: Editors ‘Bio’.