Tag Archives: Horizon

Ten simple ideas to improve your photography (and a fun quiz)

Ten Tips

Ten Tips and 12 fun quiz questions.

Simple things help you…

We should all take a step back and think about the basics sometimes. It helps us remember essential techniques and keeps us on our toes. Here are the basics with some fun quiz questions too.

The simplest techniques in photography are often the most important ones. In this post we make sure we don’t forget them…

10 essential things to know; 12 fun quiz questions
  1. Not knowing your camera: This is really bad news. If you are hoping to improve your photography make sure you learn what every lump, bump, dial, screen, lens and twiddly bit does. Read your manual regularly. Practice with each function until you have got it right. Then practice it in the dark so you can do a night shoot.
    Quiz Question 1: How many lenses are there on a camera? Answers at the end!
  2. Poor stance: Most people when starting photography don’t realise that the way they stand and hold the camera creates all sorts of problems and poor performance. If you are a keen photographer a good stance can contribute to improved sharpness (hand-held shots), better focus, more steady hand and better shot timing. Learn to stand properly right at the start and you will save yourself lots of re-training time later.
    Quiz Question 2: At what point in the breath cycle is it best to take your shot?
  3. Not using a tripod: classic mistake. Tripods save you lots of time and give you pin sharp photographs. They give you an opportunity to set your camera up properly and ensures that your are ready for your shot.
    Quiz Question 3: A monopod has one leg, a tripod has three legs. What is, and how might you use, a bipod?
  4. Not giving the camera time to focus: When you press the shutter button halfway down it causes the auto-focus to cut in which focuses the camera. But if you punch straight through that to the shot the focus has not had time to do the full focus. This normally happens on the first focus attempt when the focus is right off. After that the lens in nearly focused and will adjust more quickly. So don’t make your first focus attempt too close to the shot or it will be blurred.
    Quiz Question 4: Why do you have two rings on a modern auto-focus/zooming photographic lens? What do you call each of them?
  5. Taking pictures against a bright light? Cameras don’t like very bright lights. Especially if there are also very dark spots nearby. Shooting indoors while looking at a window out to a bright sky will cause a strong white spot. This is very distracting and draws the eye away from the subject. Not good. There are Light and Lighting resource pages on Photokonnexion for you to learn more.
    Quiz Question 5: How many stops of light can healthy human eyes see (20:20 vision)? How many can the camera (rough generalisation) cope with?
  6. Relying on flash (especially pop-up flash): Pop up light has a very small concentrated source. It discolours faces, washes out colours, creates harsh, sharp-lined shadows and is badly placed (too close to the optical axis) creating nasty highlights on faces. Try to use natural light more. It is much more forgiving and does not produce such harsh shadows most of the time.
    Quiz Question 6: What is often the result of using pop-up flash with respect to two parts of the face?
  7. Dead centre subject: If you put the subject of your picture in the centre it will usually be boring. If you off-set your subject the eye will be looking to see why the symmetry is broken. That keeps the eye hunting around the screen. Learn about the “Rule of thirds” and other Composition principles. That will help you make the shot more compelling to the eye.
    Quiz Question 7: What type of compositional perspective would you be working with if you want to promote a three dimensional feel to your picture composition?
  8. Horizon control: Make sure your horizon is level, especially if it is a seascape. If you leave it on an angle the picture will be ruined because it will look like the sea is sliding off the page! Horizons also induce mid-picture viewer-stupor. Make a decision. Either shoot for the sky in which case place the horizon in the bottom third of the picture. Or, shoot for the ground in which case the horizon goes in the top third of the picture. An off-set horizon is more dynamic and keeps the viewers eye moving.
    Quiz Question 8: If your main choice is to shoot for the sky, where would you take your exposure from? (Where would you point your viewfinder focus point?) a. The sky? b. The ground?
    Quiz Question 9: Describe autofocus hunting and why it happens?
  9. Simplify, simplify, simplify: The most effective way to show a subject to your viewer is to de-clutter the picture. Take out of your composition everything that is nothing to do with the subject. The more you make the viewers eye go to the subject the more effective your shot will be.
    Did I mention that you should simplify your shot?
    Quiz Question 10: What is it called when you paint out something from your picture in post processing to simplify a shot?
    By the way, did I mention that you should work really hard to simplify your shots?
  10. Go manual: Auto-modes on your camera are really best guesses about what the manufacturer thinks will be suitable for the average shots most snappers will take. Buy you are a keen photographer. To get the camera to do exactly what you want, and to make discerning choices about your images you should work on improving your manual control. Your understanding of photographic principles will improve, your skill at exposure will improve and you will find yourself making informed choices about how you want your picture to come out. You will turn from a snapper into a photographer.
    Quiz Question 11: What does the ISO control do? a. Adjust the sensitivity of the digital image sensor or b. Change the aperture size?
    Quiz Question 12: Does ‘shutter speed’ or ‘aperture’ control movement blur?
Answers to quiz questions
  • Quiz Question Answer 1: I am talking about any camera that has a lens, not just DSLRs. the number of lenses is a matter of variation. If you are discussing photographic lenses then only that one will count (but read on). Some people think of each glass element in the photographic lens as an independent lens. Technically that is not true. They are optical lenses or glass elements, not photographic lenses. However, if the photographic lens (and elements if you included those) were all you counted you would be wrong. Here is a short list of Possible lenses on a camera of any sort…

    There may be others.

  • Quiz Question Answer 2: You should take a shot at the full inhale point or full exhale point before inhaling or exhaling in the next part of the cycle. You can choose which is best for you. All you do is delay the next part of the cycle while you take a shot. This is the point in the breath cycle when there is least movement of the shoulders/chest. Read more about it in Simple tips for a good stance
  • Quiz Question Answer 3: A bipod is photographically uncommon. Understandably, it has two legs. Find out more here… Definition: Bipod
  • Quiz Question Answer 4: The two rings on an auto-focussing photographic lens allow one ring to focus the image – the focus ring. The other ring is for zooming the lens. The latter changes the focal length and is called the focal length ring.
  • Quiz Question Answer 5: Human eyes can see about 18 to 20 stops of light when healthy. However, by contrast the best commercially available cameras have to operate with a dynamic range of 8 to 12 stops of light. Research is pushing the boundaries but there is still a big gap to meet the dynamic range of the human eye (in 2013).
  • Quiz Question Answer 6: Pop-up flash is very likely to cause red-eye.
  • Quiz Question Answer 7: To make things look three dimensional in your image you should be working with three point perspective. Look for lines in your image that promote cube-like structures. For example buildings, walls and other objects with lines and shapes that have a solid feel in real life. This will trick the eye into believing that there is a solid object in the picture. Read: Simple ideas about perspective in photography and: Definition: Perspective
  • Quiz Question Answer 8: If you shoot for the sky you will need to be taking your exposure from the sky as that is the brightest point. This will leave the ground darker in your exposure than you would see it with your eye. You can use one of a number of techniques to correct that later.
  • Quiz Question 9: Auto-focus hunting is when the auto-focus in the lens cannot focus and will keep going up and down the focus range trying to get a focus. This is a common problem at night, in darker conditions, low contrast conditions and clear or totally grey skies. You can read more about it in: Auto-focus ‘Hunting’ Definition: Hunting, Auto-focus

  • Quiz Question 10: when you paint out something from your picture in post processing to simplify a shot? You normally use a cloning tool. You can find out more in: Definition: Cloning; To Clone; Cloned; Clone Tool.
  • Quiz Question 11: What does the ISO control do? It adjusts the sensitivity of the digital image sensor allowing you to work in bright light (low ISO setting) or low light (high ISO setting). There is an article on ISO here: ISO.

  • Quiz Question 12: Shutter speed controls movement blur. Aperture controls blur (bokeh) created by the loss of sharpness outside the zone of acceptable sharpness. This is traditionally known as the depth of field. More reading on: Definition: Exposure and related to aperture: Definition: f number.

find out more...Photokonnexion tips by email
If you enjoyed this article please sign up for our
Tips by email service.
                                                 Find out more
#11030#

By Damon Guy (author and Photokonnexion editor)

Damon Guy - Netkonnexion

Damon Guy (Netkonnexion)

Damon is a writer-photog and editor of this site. He has run some major websites, a computing department and a digital image library. He started out as a trained teacher and now runs training for digital photographers.
See also: Editors ‘Bio’.

Don’t get lucky, get great photographs

Random or 'splatter' tactics when shooting are not going to make you lucky.

Random or ‘splatter’ tactics when shooting are not going to make you lucky.

Ever taken a few more shots, just for luck?

I think we all have if we are honest. We know that approach is really about random shooting and not about getting good shots. Here are some ways to help you get over blasting off shots just for luck.

The tell-tail signs

You always come back from a shoot with hundreds of shots. A high percentage of them are throw-aways. It’s difficult to know what to point your camera at when shooting. Your shots appear to be random. It is difficult to know what settings to use… feel uncertain while out shooting. You suffer photographic stress. Simple, you need to get organised about your shoots.

Here’s a plan…

To move forward, you need work on a plan to get past the randomness and work toward taking consistent shots.

Increase your confidence: Low hit-rates are pretty demoralising. You need to find ways to increase the successes. Go back to basics. BUT, you need to do it in a way that will help you move on. When in a new situation set your camera to auto-settings. Take a few test shots. Note what settings your camera uses. Once you have the measure of things, swap back to the settings that give you creative control. You will be more confident – you know what settings to return to if your settings don’t work out on a shot.

Learn about light: Light is a very fickle entity. Just when you want great light it’s not there. Other times it’s there but you are not sure how to use it to best effect. Well, here are two pieces of advice. First, shoot late or early – long shadows help define your subject and with better colours in the light. Second, learn the difference between hard light and soft light. Hard, harsh light will tend to be less forgiving and less aesthetically pleasing. Once you know these things, you are on the path to improvement. Check over our other Light and Lighting resources on light to continue your improvement.

Learn about settings on your camera and exposure: The most important ideas in photography rest on getting a good exposure. Start with simple shots, simple light. Learn the settings on your camera, in particular about ISO, Aperture and Shutter speed. Together these form a golden triangle for photographers. Read your manual so you know how to control them. Then read up on exposure. Here are a range of links to get you started on exposure…
Definition: Exposure
Definition: Aperture
Definition: f number
Definition: ISO
Definition: Shutter Speed

Portraiture: Friends or family expect you to do it right and you are under pressure. To make the situation more controlled ask a supportive member of your family, or a good friend, to try out a few poses. There are quite a few posing guides in books. Here are a list of books on Amazon that I have found particularly useful to get you started…

Start simple and work on a set of poses to commit to memory. Memorise about five or six poses for a male and the same for a female. These will let you get a session going. After that you rely on your intuition while working with your subject – work out what will suit them. Watchwords here are: Keep it simple; keep it well lit. To get under way read this article to get you thinking about portraiture… Simple positions for classic portrait work.

Finger off the trigger: I know it is easy to punch away at that button and hope something comes out. Take it from me you need to do just the opposite. Stop. Consider. Compose. Frame. Fire. Make sure you get into the habit of thinking each shot through before you push the button. Visualise your shots so you have a good idea for your picture before you even raise the camera to your eye. Pre-visualisation in most pursuits is how you can focus your energy and skill. It is no different in photography. Try improving your stance too. Most people improve their shots a huge amount if they take time to get the stance right. I have a system I teach my students. Read about it in: Simple tips for a good stance.

Composition: There are simple things you can do to improve immediately. Here are three posts on the fundamentals:

  1. Rule of Thirds
  2. Golden Hour; Magic Hour;
  3. Don’t Stick the Horizon Line in the Middle!

Follow up with more composition reading: Composition – resource pages on Photokonnexion.

Planning your shoot and being productive: It is best to do a bit of planning. Get some ideas going before you start shooting. Read about planning a shoot without the scatter-gun approach: Shoot Less – Keep More.

Putting it all together…

That is the fundamental plan. To do it you need to work on one bit at a time. Practice the simple principles above, work with the camera, make sure you look at good photographs daily. Oh! And, one further thing… you are not alone. We all went through this stage. With practice you will soon be making great images regularly.

By Damon Guy (author and Photokonnexion editor)

Damon Guy - Netkonnexion

Damon Guy (Netkonnexion)

Damon is a writer-photog and editor of this site. He has run some major websites, a computing department and a digital image library. He started out as a trained teacher and now runs training for digital photographers.
See also: Editors ‘Bio’.

Simple ideas about perspective in photography

Perspective is all about using visual clues to emphasise dimension

Perspective is all about using visual clues to emphasise dimension. Your picture needs to use defined edges, lines and direction to give the eye something follow into the image.
• Perspective • By Netkonnexion on Flickr External link - opens new tab/page

The concept of perspective is related to visual clues.

What we see in the world around us is created in our heads. We see things in the environment and from that build up a picture. Here we look at the sense of perspective.

Visual clues

Previously in ‘The easy way to give depth to landscapes’ and Easy introduction to ‘visual elements’ in photographs I introduced ‘visual elements’. These are strong signals in the world that help us see. They are mostly edges, lines, curves, shapes, form and so on. We see things because the edges of objects have a detectable contrast with something beside it. Our eyes spot that change and, in doing so, see depth. Edges give us strong clues about the nature of our world so our eyes are trained to follow them.

The nature of perspective

Our innate sense of perspective has always been there to enable us to function as biological animals. Perspective in art is a different matter. In terms of human history reproducing perspective has been a late arrival (see: Perspective – compositional ideas). What made the difference was understanding the relationship between lines, or in natural terms, edges.

Three dimensional geometry explained the way lines created depth. This geometric depth also mimicked form in nature. On mastering the idea of a cube or other geometric forms we see how the lines work. If you look at a cube corner you see three edges trending away from you. You are looking at depth created by the edges.

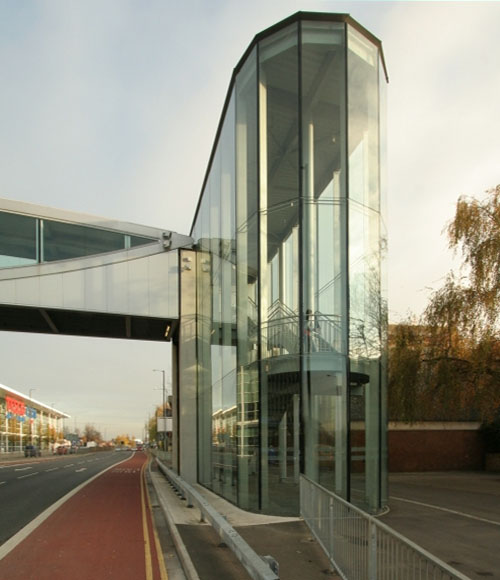
Parallel lines provide strong perspectives. In the picture above there are lots of parallel lines which give depth to the picture. The main red line – the bus lane – is a vanishing point perspective or ‘single point’ perspective. It is notable by its coming together (convergence of the lines) near the horizon. By experience we know this is a long distance away. The convergence has created distance into the picture.

In the bridge there is ‘two point’ perspective. You can see depth because the darker underside is defined by its lighter up-edge (the wall of the bridge). This two-point perspective exists for us even though we cannot see the roof or the other side to confirm ‘form’ (3D) rather than shape (2D).

Of course the glass stairway to the bridge has three point perspective. Like the cube we can see depth – the top edge of the building, the bottom edge of the building both converge (two point). The convergence imparts depth. However, the width of the building (shown by the top and bottom edges), and the height gives us the three dimensions. Our visual clue for this. on the front-face. is the non-convergence of lines in the width/height plane. Although this front-face is a curved glass wall we can still see it does not have a distance perspective away from us.

All the clues are there

You now have the clues, or visual elements to determine depth through perspective. Converging lines with distance from the eye impart a feeling of distance away from you. Parallel lines with no convergence give you flatness or non-distancing when they face you. This works with both height and width.

I chose the picture above for the strong perspectives that it imparts. The powerful lines make it easy to see the almost exaggerated proportions that contribute to perspectives. Sometimes its not so easy in nature. Have a look at the picture below…

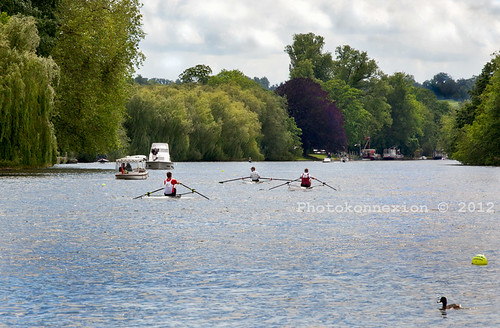
Looking up the River Thames from Marlow, Bucks, UK

Looking up the River Thames from Marlow, Bucks, UK. The perspectives are not as clear as direct straight lines. Yet the picture has depth because we are adept at seeing ‘edges’ and trends in lines when we look at nature.

Click image to view large.
• Looking up the River Thames • By Netkonnexion on Flickr External link - opens new tab/page

The edge on the right hand side looking up river barely exists – it disappears off the side of the shot. Yet the small part that is there at the top implies there is a bank all the way down the right. The left bank on the other hand is not well defined as a line. However, our eyes are trained to see it as a ‘trending’ line. The line of trees (left) and the implied line (right) therefore creates a converging pair of lines in the distance to where the river rounds the bend.

Despite there being no strong lines in this picture we can see a converging point perspective. Dimensionality is added by the height of the trees and the width of the river. The width diminishes between the two banks as we look progressively up stream, more evidence of distance and convergence. The height and width we intuitively know because our eye determines sizes by measuring them against boat and people sizes (known element sizes). Perspective is all in the visual elements.

Understanding is not precise

We do not all understand perspective in the same way. Some notable art schools have denied our innate understanding of perspective and space. The Cubists are an example of this, notable among them Pablo Picasso  External link - opens new tab/page the famous Cubist painter. Nevertheless, we all understand depth in the world around us. We don’t live in a two dimensional world. However, in our images we have to create the sense of depth in a two dimensional medium.

The second picture, the river scene, shows us how to define depth. We need, as photographers, to become observers of lines and trending lines. Similarly, we should be able to spot shapes and forms that are both defined and ill-defined. Then we need to be able to view them as if a geometric model. If we can see these lines, in nature and in man-made things, then we can find ways to compose our picture to bring them out. It is this last part that is the most important part of the composition process.

If we give the viewer a perspective in our shots, we create a world. We want it to be a three dimensional world that the viewer can imagine going into. When we choose compositions that emphasise these lines we dispose of the two dimensional picture and create an image to look into.

By Damon Guy (author and Photokonnexion editor)

Damon Guy - Netkonnexion

Damon Guy (Netkonnexion)

Damon is a writer-photog and editor of this site. He has run some major websites, a computing department and a digital image library. He started out as a trained teacher and now runs training for digital photographers.
See also: Editors ‘Bio’.

Do you make this one awful mistake in your photos?

The horizon has only got to be off a little bit to make things look odd.

The horizon has only got to be off a little bit to look odd. It’s not just the horizon – other lines may cause problems too. In this image a quick shot meant the beach line across the bay was off the horizontal. After straightening, the black cut-outs show how much the picture was skewed. View large External link - opens new tab/page

The horizon is a main focus of viewing.

It’s a strong feature to orientate yourself in the image. When the main line in the shot is wrongly positioned it irritates your audience. This mistake is easily fixed in-camera or in processing later.

A major line like the horizon needs careful presentation. Strong lines catch the eye. You tend to match them to the edges of the image frame. They look peculiar when slightly out of line. That is not to say you should not take dynamic or action shots at interesting angles. It is the slightly skewed angle that is irritating. Interesting angles is about something special, not slight photographic inaccuracy. Make your special angle shots a statement.

Get the horizon straight in-camera

Being aware of strong lines is half the battle. When composing your shot, watch out for them. Line them up. There are two ways to do this…

  1. Use your focus points in the viewfinder. Make the strong line lie across two or more of the focus points. If you have a grid, line up with the lines on it. Many compact cameras and recent DSLRs also have an electronic level on the screen. Check in your manual how to activate it. This will enable straightening too.
  2. Using a tripod? Many have a spirit level built into the tripod head. It’s invaluable for setting up and saves making the mistake from the start. If you don’t have one built-in, you can buy cheap hot-shoe mounted spirit levels.
Later, back at the computer

Sometimes a quick shot prevents perfectly lining things up. Straighten the picture in post-processing. Image editor applications have straightening tools. Normally they are really easy to use.

In Adobe Photoshop the straightening tool is used on importing the image. It looks like an angle bracket on the tool bar in the developer module (RAW format only). Drag it along the straight line you want straight. You can also swivel the picture when using the crop tool. Just go to a corner and move the cursor away from the corner at 45°. A quarter-curve cursor arrow appears. Hold down the right button and swivel.

In Irfanview the straightening tool is in: Edit Menu | Show Paint Dialogue. When the paint toolbar comes up hover over each tool. The tooltip will pop-up and tell you which is the straighten tool. Drag the cross-hairs along the line you wish to straighten. The image will swivel to fix the problem (see the image above with black infill showing the reorientation). Then you crop the image to get rid of the odd edges.

By Damon Guy (author and Photokonnexion editor)

Damon Guy - Netkonnexion

Damon Guy (Netkonnexion)

Damon is a writer-photog and editor of this site. He has run some major websites, a computing department and a digital image library. He started out as a trained teacher and now runs training for digital photographers.
See also: Editors ‘Bio’.