Tag Archives: High Key Lighting

Simple photography in the bath – high key shots

Use a bath for quick and effective high key shots.

Here’s a quick tip. High key shots, with brilliant white backgrounds, are popular. With a white bath you can do high key shots without setting up an infinity wall.

If you would like to do high key shots here is a way to get started if you are doing individual or small items. I have previously covered the subject of high key photography with these two articles… A simple way to make and use a seamless white wall and How to shoot bright white backgrounds. Also there is a definition for high key from our Photographic Glossary: Definition: High Key lighting/photography. If you have read these articles you should have a pretty good idea of how to go about this type of work. Here are some examples of high key images from Google…
High Key lighting/photography images on Google External link - opens new tab/page.

The quick tip

A white bath is, in photographic terms, an infinity wall. It’s a seamless white background. The object of the exercise is to create a distance between the subject and the white background of the bath. If you can find a way to suspend items into the bath, or hold them above it, you have a way of holding your item for the shot. Then you can illuminate the bath around your subject, or below it, without lighting the subject itself. Using a bath is simply an extension of the same principles in the articles mentioned above.

In essence, all you need to do is to create a little distance behind the subject so you can light the bath (within that distance) to about two stops more than the subject. Then you will create a white seamless background behind your subject. There are two main ways to do this…

  1. Suspend the subject above the bath and illuminate behind it into the bath from each end. Shoot directly down on the subject.
  2. Place the subject in the bath bottom about half way down the length of the bath. Illuminate the back end wall of the bath from above the subject and shoot from the tap end down the length of the bath.

You will need to consider the same principles in the bath as those in the article “A simple way to make and use a seamless white wall“.

Some things to consider…

  • DO NOT USE ELECTRIC MAINS LIGHTS in the bath! The proximity to water is a health and safety hazard. Please be sensible.
  • Make sure the bath is clean and dry. That will preserve your equipment.
  • Place thin wood strips across the bath from which you can use fine white sewing cotton to suspend your subject. I am working on a frame to do this so I can photograph between the wooden crossbars directly at the suspended item.
  • It is best to shoot downward into the bath and illuminate along the length of the bath.
  • If shooting an object that is standing in the bath, shoot along the length of the bath and light the bath from above.
  • The bath technique is great for small items, but you get side-shadows if you try to photograph large items. A large item is too near the side and cuts down the illumination around the object.

It is fair to say the high-key bath technique is limited in its usefulness to small items that you can easily suspend. Having said that, the set up is easy and the results are good. Why not give it a try. Like any photographic techniques, experiment until you become good at it. I have had some fun with this today. Enjoy!

By Damon Guy (author and Photokonnexion editor)

Damon Guy - Netkonnexion

Damon Guy (Netkonnexion)

Damon is a writer-photog and editor of this site. He has run some major websites, a computing department and a digital image library. He started out as a trained teacher and now runs training for digital photographers.
See also: Editors ‘Bio’.

Can you write? Of course you can!
Write for Photokonnexion...

We would love to have your articles or tips posted on our site.
Find out more…
Write for Photokonnexion.

A simple way to make and use a seamless white wall

The infinity wall is a way of completing a seamless white background

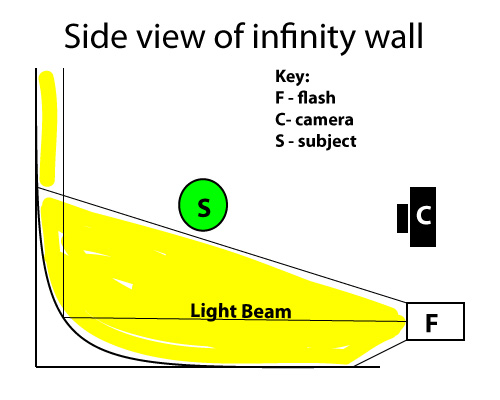
The infinity wall is a way of completing a seamless white background. Notice the flash (F) lights the background NOT the subject (S). The latter needs to be separately lit.

Seamless white backgrounds are popular and fun.

White is the perfect background for high brightness shots. Sufficient brightness will blow out the white image areas to pure white. The white highlights your subject giving it prominence. To produce this High Key effect you need to create a curved wall to project light onto. As the wall is made from a curve no lines will be apparent on the shot. It is only lines and shadows that show up. So the curve, if brightly lit, will create a seamless wall. When you look at it in the shot it will appear to go on for an infinite depth. The brightness in this technique will create a high key shot. This is a popular technique in photography and is enjoying great popularity in fashion and magazine media.

Creating the wall

As you can see from the diagram above (simplified) the principle is easy. It can be applied at any scale. I create a small table-top studio for product shots and still life. Here is how it is done…

  1. Create a flat surface up against an upright surface. I push a table against a wall.
  2. Use a large piece of white card say, European size ‘A0’ 1189 x 841 mm (46.8 x 33.1 in); or ‘A1’ 841 x 594 mm (33.1 x 23.4 in.).
  3. Fix it so the card is bent gently into a curve between the table and the wall. The side-diagram above shows the approximate shape.
  4. The diagram shows the flash below the camera. This position is for diagrammatic reasons. Normally the light will be alongside the setup or the subject (more on this below). The light beam shows the direction of light. This illuminates the card along the table and bounces off the curve lighting the wall above. This provides a well illuminated white surface.
  5. If the flash is about 2 stops brighter than the subject it will show as brilliant white in your photo. If you don’t have a light meter you can test the brightness with a few shots. If the white is brilliant white and seamless in your test shots you can start to set up the subject.
  6. The ‘subject’ in the diagram is your photo-target. Find a way to mount it, hang it or support it off the white surface. The aim is to make the light pass under, behind or around the subject. You are NOT trying to illuminate your subject. The light or flash is for the background curve only, to create a shadowless white depth. If you need to illuminate the subject do it separately – see below.
  7. Place the subject a clear distance from the infinity wall. Too close and the bright light reflecting from the wall creates a hazy white back-light on the subject. Experiment to position it away from the bright background. About 2 or 3 feet separation on a small wall is good. In a studio with people or larger objects the subject can stand about 2 to 3 Meters (6 to 12 feet) from the wall. This allows sufficient space to illuminate the wall clear of the subject.
  8. Placing your subject on something will create a shadow. Place the flash to the side of the subject. The idea is to create a light that goes around or between the wall and the subject. The reflecting back light will illuminate the space between the wall and the subject and over-ride any shadow created by the subjects own light.
  9. The illumination of the curve and white areas is created by an off-camera flash. If you don’t have one you can use any bright light(s) that you can direct at the curve/white areas behind the subject. Beware of any colour cast it may create. If you get the light bright enough the colour cast will go white anyway. You should make sure you compensate for any colour cast you detect.
  10. Positioning light(s) for the background is a matter of experiment. Try out different positions to get the optimum lighting. Sometimes you can place the light completely behind the subject. Other times you might place them either side of the subject. It could be just one side of the subject. In fact you can place the lights anywhere as long as they don’t illuminate the subject. It all depends on:
    • The size of wall/curve you are lighting
    • How close you can get the lights without illuminating the subject
    • The power of the lights

    Each shot is different. A few test shots will reveal the best position(s).

Illuminating the subject

Since the subject is not illuminated by the infinity wall light(s) you will need to consider separate flash or light sources for that. You could use a pop-up flash on your camera, the ambient light or off-camera lights.

Creating the blown-out brilliant white effect is the result of bright light on the infinity wall AND the difference in light intensity to the subject. You may need to experiment. A light meter will help you judge for about a two stop difference between the two. However, you can do it by experimenting. Your subject should look normally exposed. It should not be over-bright. Skin tones should be normal if photographing people in a larger set-up.

Using artistic licence is of course up to you. Some photographers like high-key shots to be almost all white. In this case a white sheen is found all over the shot including the subject. Others like to have the subject in a moodier lower light situation to create a strong contrast. This latter approach is difficult. A very dark subject and a very bright background creates a silhouette. So, again, try experiment. Here are some examples on Google…
High Key lighting/photography images on Google.

Taking the shots

Once you have illuminated your subject you can take the shot in the normal way. If you are using a manual mode you should be careful to meter off your subject. If you meter too close to the bright white area the meter will expose for the white background. This will create a silhouette of your foreground subject. If you are using auto-mode you must make sure your focus points in the viewfinder are pointed at the subject.

You can set your aperture as you would normally. You are working relatively close. So with bigger subjects and people working at f5.6 is great. Working with larger apertures (say f4.0 or larger) gives you a shallow depth of field. This is an advantage because the white background will not reveal bokeh but will make the blown-out white a more even colour. If you find you need to work with very small apertures (say f14 or smaller) you are probably over-lighting your subject.

To master the high key technique takes practice like all other photography work. However its fun and interesting to get this technique right. Please leave comments or questions below. I would be happy to provide feedback too. Please send links so I can look at your shots.

How to shoot bright white backgrounds

Shooting with a high-key background

Shooting with a high-key background – a two stage process.

Simple shots focus attention on the subject.

The bright-white background technique, known as high-key, is used in a wide variety of different photographic situations. It’s fun, easy to do and produces great shots. Here is how it’s done.

The technique is always the same if you are photographing a car or person in a big studio, or a tiny table-top still life. The aim of the technique is to get the subject surrounded by a seamless white surface. This will mean your subject is thrown up in stark contrast to the background. Then the viewer’s attention is directed at the subject because the eye has nowhere else to go. Effective, powerful and bright, the technique really makes your subject pop off the page.

There are two basic methods of doing high-key backgrounds. The first is to spend a long time in photoshop with masks, cloning and painting. You can, with some skill, make your image look like it was produced in camera. Good luck with that. It really does take a lot of time and effort.

The other way to do high key shots is create the bright-white background effect using lights and a white background.

Setting up

You will need something to create the white background. You can use a painted wall, white wallpaper, white card, sheets or pretty much anything else that is white. The brighter the white the easier it is to use.

You need a bright white light. An off-camera flash unit is great. If you don’t have one then you can use very bright house lights. Be careful there is no colour cast. It is advisable to consider some test shots to get the colour right.

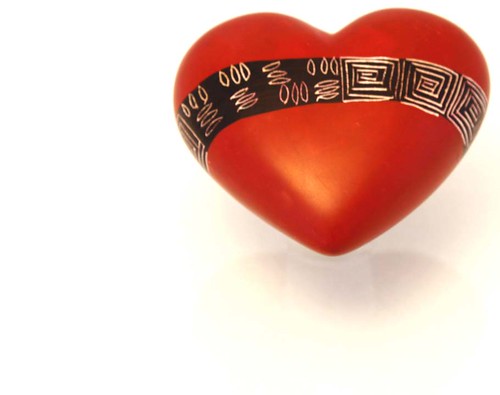
To set up your shot you will need to put your subject in front of the white background. In the case of the shot above I was shooting downward onto a piece of card. In this case I put a small support under the hand-carved soapstone heart. This lifted it off the background a bit.

If you want no shadows at all, like the shot below, then you must present the subject far enough off the background that you can get a bright light in behind it.

High key shot with no shadows

High key shot with no shadows. The background is strongly lit up so it blows out to a perfect brilliant white. The subjects in the foreground are lit as they would be normally.

Lighting

Next, you need to position the light so it is pointed directly at the white background. In most cases you will want to point it so that the brightest point is immediately behind the subject. In the shot above it was positioned slightly at the top of the image because I was trying to create a little shadow under it. This made it look like it was floating. However, if you want no shadows then you must have all the bright light behind the subject.

Now take a test shot. The idea is that when the camera sees the white it will be so bright that it burns out the image wherever the white is exposed. If your white looks grey… then you need to brighten the white with more light (or take a longer exposure). If your subject is so overwhelmed with white from the background, you need to reduce the intensity of lights pointing at the background.

As with most photographic lighting, its a balance. To get your background just right you need to play with the light intensity up/down until you have a nice bright seamless background.

Now for the subject

Now you can, if necessary, adjust the lighting on the subject. If you are working with a person, ideally they would be one to two meters in front of the lighted background. So they might need to be lit with a separate light like a flash. Or, if you are working with a still life, the ambient light might be fine.

You are aiming at lighting the subject so the background is much brighter. The idea is that the contrast between the two is so great that the white is blown out… it becomes pure white because of the intensity of the reflected light. The subject needs to be lit normally so it is just how you would like it to look. To achieve that you might need to turn off the back light. You can use the normal exposure mode you use on your camera. Take the picture using flash if you want. Do a few test shots to get the lighting right on your subject with the back-lighting off.

The high-key shot

By now you have hopefully got some blown-out white background shots. You should also have some normally lit subject shots – just how you want it to look. Now it is time to switch on the background lights and, using the lighting you set up on the subject, take the shot with the bright background.

In photographic terms, you are aiming for the background light to be about one or two stops of light brighter than the subject you are shooting. An increase in light of one stop is a doubling of the light intensity. You will need to test that with a few shots.

To get it right you can test the lighting of the subject and background separately with a light meter, or with your on-camera light meter. You could just experiment using test shots and changing the lighting around. Or, you could use the ‘blinkies’ and ‘chimping’ method.

Whatever you choose, a few minutes experimenting will give you some idea of the brightness. Have fun!

By Damon Guy (author and Photokonnexion editor)

Damon Guy - Netkonnexion

Damon Guy (Netkonnexion)

Damon is a writer-photog and editor of this site. He has run some major websites, a computing department and a digital image library. He started out as a trained teacher and now runs training for digital photographers.
See also: Editors ‘Bio’.