Tag Archives: Exposure Compensation

Exposure changes the mood of your image

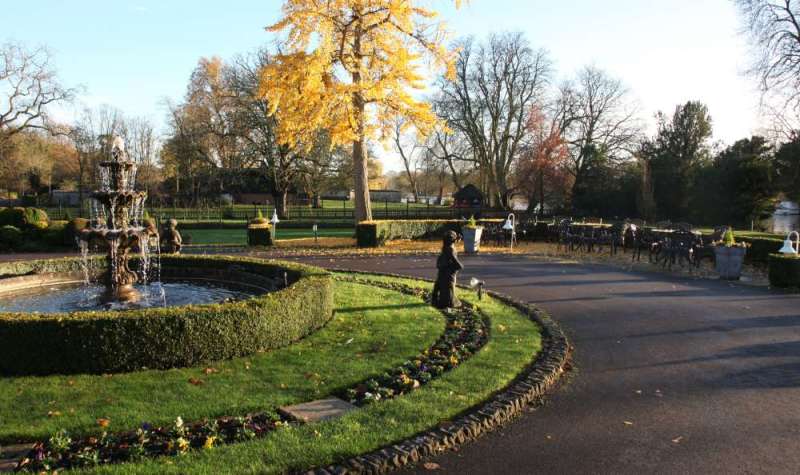
Exposure changes can affect many aspects of an image.

Exposure changes can affect many aspects of an image. Colour, mood, visual impact, contrast and others. The second image below show the differences.
Image better seen large. Click image to view large.

There is no such thing as a perfect exposure

The main goal of starter photographers is to control the exposure. The Exposure Triangle, or other models of balancing light, lead learners to pursue ‘perfection’. Once they grasp the concept of balancing ISO, Aperture and Shutter speed, the needle in the camera viewfinder is their guide.

In manual mode, that central needle is important. It shows that the three elements are balanced. The unwary learner is soon overwhelmed by that needle. They have learned how to keep it central. Now they are going to keep it there despite everything. They have learned that, if the exposure changes, the needle drifts off the middle position. When that happens it is no longer “perfect”.

That mid-position needle is useful. However, it is not ‘perfection’. It is just a guide. Modern camera manufacturers have made things easy for the camera user. The technology, sensors and controls on a modern camera mislead the unwary into a false position. Complex technology and controls give the user confidence that the camera must be right. They assume the central needle creates the perfect capture. That is simply not true.

The balance of light controls the quality of outcome you want. Your final image is created by that quality of light. The creative photographer uses exposure changes to to conjure up the result they want. A good photographer commands the camera to create the picture. The camera does not create the perfect exposure for the user. The user makes exposure changes to create the desired image. Deliberate under or overexposure is an important part of creating your image.

Exposure changes allow you to command the camera

In the image below we see (almost) the same picture as above…
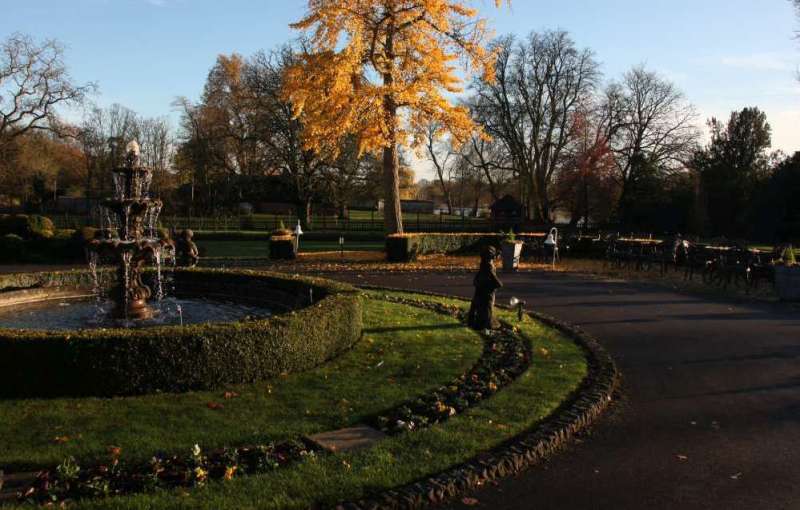
A different quality of exposure changes the whole experience of the picture.

This second image shows same scene as above. But the different quality of exposure changes the experience of the picture. This outcome is no more correct than the top picture. However, when it was taken this one was 1 and 1/3 stops underexposed on the camera viewfinder scale. It was taken within seven seconds of the first image.
Image better seen large. Click image to view large.

Exposure changes allow the user to create the mood of the shot. This is clearly shown by the deeper contrasts, more saturated blues in the sky and reds in the Autumnal leaves. The low sunlight brings out the shadows and colours more. It all adds up. Together they create a very different view of this fountain scene. A twilight feel perhaps.

I was trying to create an Autumn evening view and the deliberate underexposure gave me the key. Yes, I deliberately underexposed to create the effect. I was commanding the camera to create my “perfect” scene for what I wanted.

Experienced photogs make exposure changes regularly

For me, the darker version was right for the reasons I needed that photograph. The control of the intensity of shadows, colours, contrasts, and so on, can be done many ways.

For example, High key shots often use exposure changes. They are created by deliberate overexposure. That brings out the intense whites in a high key image.

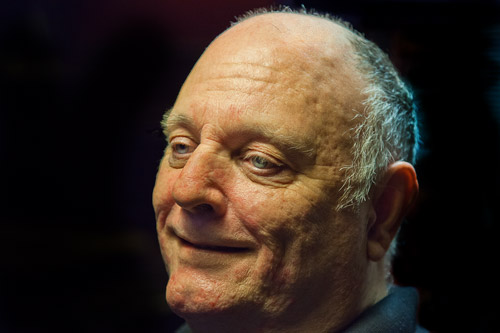
Many portraits are lit very brightly to the eye, but a very small aperture or fast shutter speed limits the light entering the camera. This will create an underexposure bringing out the facial features. This gives shadows a depth, without harshness, as can be seen in the next image. This use of exposure changes is a great mood enhancer.
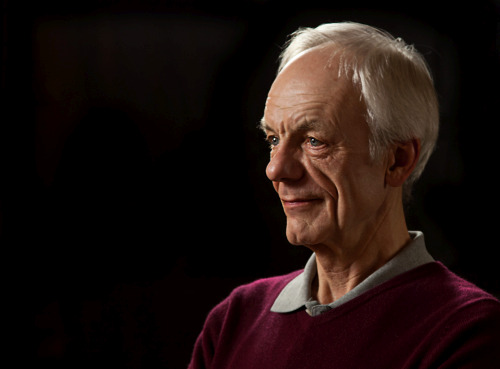
Portrait shot in bright light but underexposed in-camera.

Portrait underexposed in-camera creates a tonally controlled result.

Create the exposure changes you want

How do you create this effect of under or overexposure? Simple. There is a control that can do it in auto or semi-auto modes. While in an auto-mode use the “exposure compensation” dial. You can add or subtract one or two stops of light. You can find out how to use the dial in your manual.

For the learner going fully manual it is even easier. That central needle position is your guide to what the camera calculates as an optimum light level for the shot. To create a manual over or underexposure simply dial the exposure-meter back or forward. Move the needle away from the central position. Shocking I know. You actually create exposure changes by deviating from the central needle position.

Exposure changes of one stop halves or doubles the light entering the camera. So be careful. Take several test shots. Dial one third of a stop or more at a time. Look at the result and check if you have created the right effect.

Create your image in mind – then make exposure changes to suit

The way you want your image is a creative decision. The camera should not be allowed to dictate the outcome.

You have two choices. If you go with the settings the camera gives you, the result is an optimum of the balance of the settings. If you can foresee what you want to achieve, then create your own result. In this case, make the balance of settings so the exposure changes to your choice. Your choice will be different to the result the camera would give you. But with care and practice it will be what you intend for your shot. You have taken control.

So next time you are taking a photo consider this. If you think your picture would be more effective as a darker or lighter representation, then make the exposure changes you need. Do it – create. Really make your images – don’t just capture what is there.

Comments, additions, amendments or ideas on this article? Contact Us
or why not leave a comment at the bottom of the page…

Like this article? Don’t miss the next — sign up for tips by email.

Damon Guy - Netkonnexion

Damon Guy (Netkonnexion)

Damon is a writer-photographer and editor of this site. He has run some major websites, a computing department and a digital image library. He started out as a trained teacher and now runs training for digital photogs.
See also: Editors ‘Bio’.
By Damon Guy see his profile on Google+.

Your exposure is simply the way you want to see the image

IMG_0232_v03_500px

There is no such thing as the perfect exposure, only the one you favour.

Expose to see what you want to see.

The truth is, your exposure can be anything you want. The issue is what do you want it to be? Are you a technical photographer or an artist? Lets look at the options…

The technical photographer

The technical photographer tends to put the emphasis on exposure being “correct” at the balance point in the triangle of exposure. The aim of the exposure is to produce a bright representation of the scene. The technical photographer is concerned with getting the settings “right” and the scene summed up in a “realistic” representation of what they saw. The technical photographer tends to be more concerned with recording the scene.

The artistic approach

For the artistic photographer there is more interest in composition and representation of the scene as as they want to depict it. They are more intent on passing a message to the viewers of the image. They want to create a picture that stimulates emotion and strong feelings. The artistic photographer has an idea. They want to make a photograph to fulfil the idea, express the emotion, tell the story. The artist is concerned with communication, not representation.

The spectrum of types

Of course these two extremes are not really as polarised as I have made out here. We all have elements of both of these personalities in our photography. The artist needs to know about the technical side in order to have artistic control over their work. The technical photographer needs to make the picture to suit the light and the scene. At least some interpretation is needed in the technical approach.

The issue here is about exposure. Sometimes we want to present a shot with the exposure on the darker, more subdued side. We are going for mood maybe, or using light to express itself strongly through shadow. The extreme is the very dark shot, what we might call a low key shot. On the opposite end of the scale is the high key shot – bright, white – strong bright, tending to over-exposure.

When we take an exposure with a DSLR we normally centre the camera meter reading. Supposing we want to take a picture like the portrait above, slightly underexposed. If we are working with the camera in full manual mode we can simply under-expose by doing one of the following: narrowing the Aperture, lowering the ISO or using a faster Shutter Speed. The opposite is also true. You can over-expose too. In other words you can creatively make what you want out of your shot by controlling the exposure. In the portrait above I wanted to emphasis the strong maleness of my subject. The strong shadows provided the vehicle for that. So the slight under-exposure complemented the already low lights… just what I was looking for.

In the case of the semi-manual modes, the option for full control of the exposure is not available. However, the exposure compensation dial can be called into play. If you want to under expose you can dial to the negative side. If you want to over expose slightly then dial to the positive side. This frees up your exposure to bias the result in favour of your creative idea. Check out the manual for your camera to see how the exposure compensation dial works.

The whole complex of variables that affect exposure, ISO, Shutter speed and Aperture settings are an interaction of functions that allow us to control our image. If we ignore the “ideal” exposure indicated by the camera light meter we actually have a whole world of potentially creative controls. There is no such thing as the perfect exposure. If you are a technical photographer you can still free up your exposure to make a photograph that expresses what you see in a scene. If you are an artist, you can be quite technical about exactly the exposure you want.

Enjoy your exposures. There is no such thing as perfection, and that applies to photographic exposure too. But there is a perfectly good exposure for every photograph… that is the one you want.

find out more...Photokonnexion tips by email
If you enjoyed this article please sign up for our
daily email service.
                                                 Find out more
#11030#

By Damon Guy (author and Photokonnexion editor)

Damon Guy - Netkonnexion

Damon Guy (Netkonnexion)

Damon is a writer-photog and editor of this site. He has run some major websites, a computing department and a digital image library. He started out as a trained teacher and now runs training for digital photographers.
See also: Editors ‘Bio’.

Correct snow scenes using exposure compensation

Bright snow scenes create a problem with the auto-settings for exposure

Bright snow scenes create a problem with the auto-settings for exposure
Click image to view large
Green shoots through the snow By Netkonnexion on Flickr External link - opens new tab/page

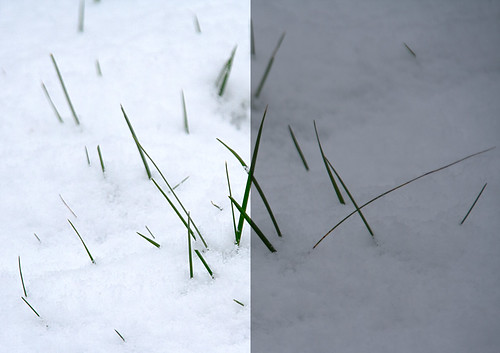
Snow reveals a problem with auto-modes.

The brightness of a snow scene throws off exposure. Cameras in auto-modes work to a “normal” type of scene. When unusually bright scenes are encountered the camera cannot compensate. It leaves the scene grey. This is because the camera is calibrated to work with a mix of colours, light and darks that represent the sort of scene we encounter every day. It senses the luminance levels in the scene and sets exposure to the middle of the range between light and dark.

If the camera senses an unusually bright scene, like the snow scene above, it is unable to compensate properly. The brightness is outside its normal range of compensation. The camera responds by underexposing the shot, and the snow turns grey. The photograph above shows the scene as shot in the right hand panel. It is grey. The left hand panel shows the correct exposure after the underexposure is compensated by an exposure compensation of 1.66 stops (one and two thirds stops). (See: Definition: f-stops)

Photographers are more accurate than camera auto settings

In these bright (or dark situations) we can dial in exposure compensation to manually set the scene to be brighter. Using the exposure compensation we can increase the exposure to brighten the scene (+ settings) or even darken the scene (- settings) as appropriate. Then, we take another picture. By looking at the screen on the camera (“Chimping”) we can get the exposure correct by adjusting the exposure compensation to correctly whiten the scene.

This exposure compensation principle applies to the camera modes which are automatic or semi-automatic. In full auto, the camera calculates the exposure by balancing the ISO, shutter speed and aperture settings. However, in the semi-automatic modes the photographer changes one of the settings while the camera changes the other. In these modes, as in full-auto, the camera can still make the mistake of under-exposing (or over-exposing). Only the photographer can judge the exposure correctly.

When using aperture priority mode, you the photographer, makes the decision on the aperture size (f-stop setting). The camera calculates the appropriate shutter speed. If your camera cannot correctly interpret the scene, as with snow for example, then you will need to dial the exposure compensation to correct for the under-exposure. If you are using shutter priority, same again, the camera calculates the aperture (f-stop) setting. If the camera makes a wrong exposure decision, you can manually set the exposure compensation to over-ride the f-stop setting the camera would set.

Full manual mode, where the photographer sets all the settings directly, cannot use exposure compensation. In this mode the photographer makes all the decisions. The camera does not interfere with the exposure settings. In this case the photographer is free to make decisions to fix the exposure setting for all three factors of exposure – ISO, aperture and shutter speed. There can be no element of compensation for a failed camera decision. The photographer stands by their own settings and has full discretion to control the exposure as they wish. Deliberate over or under-exposure as well as accurate exposure are all possible. It is for this reason that I urge you to work in full manual where you can. You have far more control over the outcome of the shot. You also as a consequence have more artistic control over your image.

If you are working in RAW, the native data mode of image files in camera, it is possible to correct for camera exposure errors in post-processing. As I have argued elsewhere it is better to try and get all the settings correct in camera than to spend time processing afterwards for a number of reasons. So, no matter what file type you are using, try to set the shot up correctly from the start.

There you have it. Exposure compensation is a camera setting which is wholly dedicated to compensating for the mess-ups that the camera makes with its exposure calculations in auto or semi-auto modes. But when using auto-modes, and/or using *.jpg files, it is essential to be able to compensate for the cameras’ failings by using exposure compensation – otherwise your snow will be grey!

find out more...Photokonnexion tips by email
If you enjoyed this article please sign up for our
daily email service.
                                                 Find out more…
#11030#


By Damon Guy (author and Photokonnexion editor)

Damon Guy - Netkonnexion

Damon Guy (Netkonnexion)

Damon is a writer-photog and editor of this site. He has run some major websites, a computing department and a digital image library. He started out as a trained teacher and now runs training for digital photographers.
See also: Editors ‘Bio’.

Great snow photography in easy ideas

We had our first snow fall today.

Now the deep Winter is here the opportunities are looking good for some great snow shots. Here is a short introductory video to help you get to grips with the subject. Its easy and fun. However, you need to set your camera up right so you get white snow and not grey. That is a key point for snow photography (explanation is given in the video).

How to take amazing photos in the snow


PhotoGavin

find out more...Photokonnexion tips by email
If you enjoyed this article please sign up for our
daily email service.
                                                 Find out more…
#11030#

Winter inspiration pictures

Winter photography is great fun once you have the camera settings correct. It is always helpful to get some inspiration however, so try looking on a few websites to get you started. Here is a search on Flickr: “snow photography”  External link - opens new tab/page. Have a browse and check out some of the possibilities.

Exposure metering and exposure compensation

Start to get control of your exposures

Many beginners do not realise that the photograph they take on auto-settings is an auto-programed response by the camera. The camera senses the light and makes a decision on the exposure. It takes into consideration the lens, the ambient light and if the flash is set to auto. Then it takes its exposure according to some pre-programed instructions in its on-board computer. As this requires no intervention by the user it looks like the exposure is fixed. However, nothing can be further from the truth.

The user has quite a lot of control over exposure. In fact there is no such thing as a perfect exposure. There is only the exposure you prefer. The camera manufacturers have done a pretty good job of creating a ‘typical’ exposure for the layman photographer. Set the camera on auto and away you go. You get credible shots, they look bright and lifelike. What more do you want? Well, the keen photographer soon realises that the programed exposure is a bit limited.

Book Suggestion…
If you want to improve your exposure get into manual control. This book gives you lots of interesting insights and great pictures. A clear narrative and a well organised book. The most important point? It encourages you to get away from auto and get control of your camera.
 
A great book – a recommendation from me!
Damon Guy – Photokonnexion Editor

 
What if you want to introduce a romantic tone into your shot. A little under-exposure does wonders for adding atmosphere. The brooding shadows of an underexposed shot brings out the mood. On the other hand, a high-key shot (very bright and very vibrant) often requires a little over-exposure. The programed response cannot do that. Alternatively, in very bright or very dark scenes you can also compensate, using exposure compensation, to help the camera out and brighten a dark scene or darken an over-bright scene.

In the two videos below you will learn about how to use your camera meter. Then, how to affect your exposure using exposure compensation. These two features of the DSLR provide you with the tools to start influencing your exposure. It is a great way to start learning about your camera light meter too. So follow these through and you will be on the way to gaining greater control of your camera.

Digital Photography 1 on 1: Metering Part 1…

Digital Photography 1 on 1: Metering Part 2: Exposure Compensation

By Damon Guy (author and Photokonnexion editor)

Damon Guy - Netkonnexion

Damon Guy (Netkonnexion)

Damon is a writer-photog and editor of this site. He has run some major websites, a computing department and a digital image library. He started out as a trained teacher and now runs training for digital photographers.
See also: Editors ‘Bio’.