Tag Archives: Editing

EXIF Data – Understanding Your Shots

Image files hold hidden data about the file and the image itself
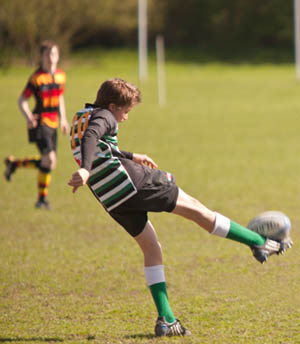

'The Kick' - an image file has EXIF data stored inside

'The Kick' - image files store EXIF data about the file itself. See below for data in this image file.
 
Make - Canon Model - Canon EOS 5D Mark II
Orientation - Top left
DateTime - 2011:04:09 11:04:14
Artist - Damon Guy (Netkonnexion)
Copyright - Photokonnexion 2012
ExposureTime - 1/640 seconds
ISOSpeedRatings - 100
ApertureValue - F 4.00
Flash - Flash not fired
FocalLength - 280 mm
ExposureMode - Manual
White Balance - Manual
SceneCaptureType - Standard

In your image files is information about your photos. The aperture value, shutter speed and ISO settings are three important pieces of data. However, there is a whole lot more.

The stored data is called EXIF. It stands for Exchangeable Image File Format. The EXIF data is stored by a number of image formats including JPEG, JPG, Tiff, RIFF and WAV files. It’s also found in many camera RAW formats. EXIF data is not supported by JPEG2000, PNG or GIF image formats.

EXIF is a great source of information. Once you understand it you can find out how the shot was make. Look at images by other people. It is an insight into the way they made a that image. When you see a picture you like view the EXIF data. You can tell from the values what settings were for that shot. Bear in mind EXIF data can be removed from a photo. So, it may not always be there.

EXIF data is a great learning aid. You can look at the EXIF data in your own image files. Check out the settings at the time your shot was taken. If the shot did not go well you can analyse what went wrong. Next time you will know better.

Getting the EXIF data

EXIF data is available in a number of ways. You can get it from most image editors when you open your file. Irfanview, an image viewer and editor, has a dialogue box for reading and copying EXIF {press ‘altgr’ & ‘e’ together}. Photoshop and Elements have read and edit tools for EXIF data. GIMP External link - opens new tab/page has the same facility. To use these editors to see EXIF data consult the help pages for your version.
More after the jump…

You can also get the EXIF data using Windows Explorer…

  • Windows XP: Right click the image file; left click “Properties”; click the ‘Summary tab’; click the ‘Advanced button’
  • Windows Vista/Windows 7: Right click the image file; left click “Properties”; click the ‘Details tab’
  • Mac OS X: view EXIF data with ‘Finder’. Do a ‘Get Info’ on a file; expand the ‘More Info’ section

In some versions of Windows you can edit the EXIF data as well as read it. However, the data about the file itself remains in the file. You can remove the private data and edit the camera data. Although you can edit the information in Windows XP it is inadvisable as a bug sometimes corrupts the data in JPEG/JPG files.

Editing your EXIF data

Data from EXIF files includes camera settings data stored when the shot was taken. There is also copyright data you can edit in-camera or add while editing.

Being able to edit your EXIF file is useful. You might want to put extra data into the file that’s not collected by your camera. For example you may want to save contact and copyright details. Or, you might want to remove some of the data. Some photographers do not publish EXIF data to prevent publishing information about the shot.

Not all cameras support all fields. The EXIF format is supported by at least the Japanese camera makers. There are many other cameras supported too.

EXIF data – many ways to use it

There are many ways to use the EXIF information. The first stage is to look at the data in your own image files.

You can also set up your camera to create EXIF data. It will store your copyright information and other data in your images when you make a photo. You can also add other types of data beyond the pure EXIF data. See your camera manual for instructions.

Have fun with your EXIF data!

Getting Started With Cloning

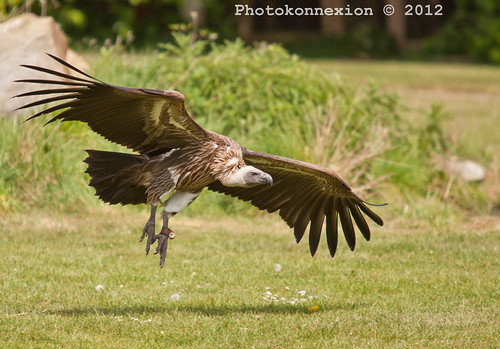
Vulture Landing - not a bad photo; some final adjustments are required

Vulture Landing – not a bad photo; some final adjustments are required. A little cloning work needed to tidy up loose ends. Click to view large.

Cloning allows you to clear up small problems – here’s how

Every picture starts its life with the composition. Once you have composed you take the shot. In those two simple actions is a world of experience and knowledge. It does not finish there – there is a third stage – post-processing (or just processing). Simplicity in your image is one of the keys to good photography. Often to achieve simplicity you need to remove unwanted elements of the picture. This is where cloning comes into play. In what follows I am going to look at simple cloning techniques using my photograph above.

Removing stuff

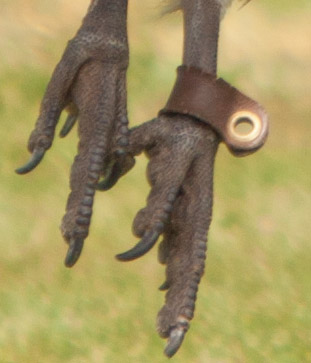
In this post we will concentrate on an essential technique… that of cloning in small strokes or spots. The essential element of any cloning job is the copying of the texture/pattern/colour (whatever) at the source point onto the destination point. The destination point is where you are hoping to remove something. Here is the first picture. It is an enlargement of the legs on the main image at the top of this article. The aim of this cloning work is to remove the leg harness from the bird.

The problem... an enlarged view shows the offending leg harness.

The problem… an enlarged view shows the offending leg harness.

Two simple points of technique underlie about 75% of the work of cloning. First the spot technique.

The success of cloning usually depends on collecting the source texture or pattern from near to the destination point. This is because there is a better chance that the colours, textures and patterns are going to match if they come from close to each other.


Lets get started

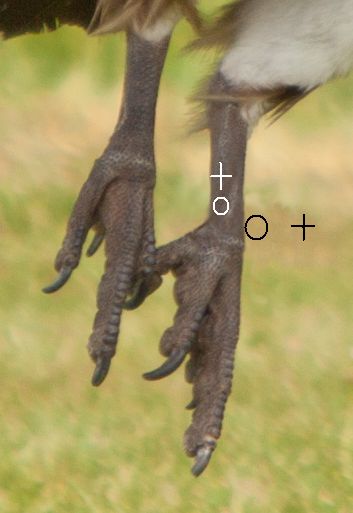
First, set up the source point. How the source point is selected depends on the application you are using. You will need to check the instructions. The idea is that there will be a cursor icon for sensing the source and a painting icon for where the cloning will be done. In the next picture you can see how I have cloned a little from the harness from the surrounding area. The round icon is the painting tool, the cross-hair is the source tool. As you move the painting tool the cross-hair moves with it.

To replicate textures, use near-by similar surfaces

You will see that I have done some cloning in two places. The cursor is currently cloning over the area of the harness, collecting the source from the surrounding green bokeh.

Placing your clone tool sensor

You can place the sensor cursor at any angle or distance to the painter cursor. You will see if you look carefully, that I have also done some cloning on the leg. Part of the harness has been removed there. You will notice that the leg has a scaly texture. I had to work close to the harness with the cross-hairs north of the area I was cloning. This allows me to pick up the texture and deposit it on the harness area. If you run over the same area as you have just cloned you get a repeating pattern. So, use short strokes. Change the sensor cross-hairs after each stroke or spot you clone.

The source point can be anywhere. In this image I have shown the positions I took the clone from for the leg and the harness part off the leg.

The source point can be anywhere. The image shows the positions for the clone from the leg texture and the harness part sticking out from the leg.

Three common problems

When just starting it is easy to just clone away until the job is done. However, when you stand back there are frequently three things wrong – lines are not straight any more; repeating patterns show up; big clone spots show up. To counter all three of these errors it is best to work in very close to the area you are working on. Make tiny changes each stroke. They are less likely to be noticed. They blend in together better and have less impact on the picture as a whole.

As you can see from the black icons in the image the painting circle is very close to the leg edge. To get lines back you have to work with the edge of the circle, as I have done here. Just skim it along the line to straighten it from one side. Then, working from the other side (in this case on the leg) work that side too. Work from side to side. Gently skim it into a straight line. Keep working until you are satisfied your work will not be noticed when you zoom out. Here is the finished leg.

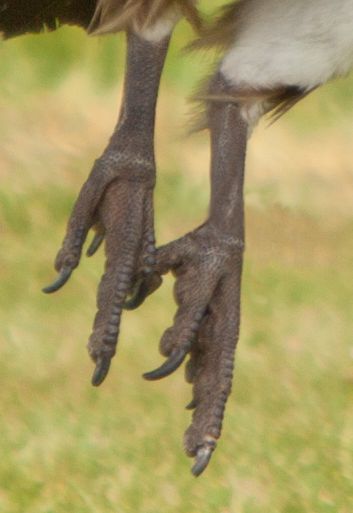
Now the tools are out of the way, you can see how the lines, shades, textures and colours are all blended and maintained.

Now the tools are out of the way, you can see how the lines, shades, textures and colours are all blended and maintained.

Working zoomed-in is critical

One of the easy mistakes to make is to do your cloning large, at the image normal size. If you look carefully at the leg you will see that, even zoomed out, you can see some texture and areas of darker and lighter shading. However, you cannot see the detail of the cloning spots/strokes. If you work at normal image size you will find it very difficult to replicate those shades, tones and textures. They are delicate and subtle. But life is delicate and subtle. If you want it to look realistic you have to put those subtle differences in. Working in a highly zoomed state allows you to do that.

If you click here  External link - opens new tab/page, you can see the finished full sized image on a new page. Look carefully. The slight colour variations and texture changes look natural and fit in well. The variations are poorly integrated, clumsy and unrealistic if you work in at 100% image size.

What we have covered
  • Make Small changes. They are less likely to be noticed. Also, work zoomed in and with small tool sizes. They blend in better and have less impact on the picture as a whole.
  • A pattern/texture source close to the clone destination is more likely to match than distant sources.
  • A continuous clone stroke will be noticed. Work with small spots and short strokes changing your clone source frequently.
  • Avoid running over an area you have cloned already with your sensor. It creates highly visible repeating patterns.
  • When working with lines/edges skim them gently from both sides until straight.

If this all sounds like quite a lot of time consuming work… well, it is. As you can see it is worth it. A good image improved in a natural way. And, like all your photography skills, it takes time and practice. It is fun and absorbing however, so enjoy your processing!

Useful links after the jump…

Irfanview – A free image viewer and basic image editor.

GIMP  External link - opens new tab/page – a full featured, open source, free image editor – download and install.

Photoshop (by Adobe) – Adobe Photoshop CS6 (PC) External link - opens new tab/page – Industry standard post-processing professional software

Adobe Lightroom – Adobe Lightroom 4.0 (Mac/PC) External link - opens new tab/page – Professional photographers workflow and post-processing software

Adobe Elements – Adobe Photoshop Elements 10 (PC/Mac) External link - opens new tab/page
– Powerful editing system for amateur/semi-professional photographers.

Google listing for ‘online image editor External link - opens new tab/page

Damon Guy - Netkonnexion

Damon Guy (Netkonnexion)

Damon is a writer-photog and editor of this site. He has run some major websites, a computing department and a digital image library. He started out as a trained teacher and now runs training for digital photographers.
See also: Editors ‘Bio’.

Processing Your Images… New Resources

New resources dedicated to processing images now online

We have been preparing for doing more posts about processing images in the future. To make it easier to find these resources on post-production techniques we have prepared a resource page on processing. You can find it here…
Post Processing Images.

Also online today is an interesting new entry in our Photographic Glossary on Cloning…
Definition: Cloning; To Clone; Cloned; Clone Tool;

Tomorrow the post will be on cloning techniques. Be sure to check back for that!

By Damon Guy (author and Photokonnexion editor)

Damon Guy - Netkonnexion

Damon Guy (Netkonnexion)

Damon is a writer-photog and editor of this site. He has run some major websites, a computing department and a digital image library. He started out as a trained teacher and now runs training for digital photographers.
See also: Editors ‘Bio’.

Contribute A Definition?

Send us a definition of a photographic word or phrase...

Send us a definition for our list of photographic words and phrases. Simply write a clear definition and send it in. Include an original picture if you wish. Give us your name and a link to your website and we will credit your work.

Are Your Colours Too Colourful? Don’t Over-Saturate!

What IS wrong here... too much colour! Horrible.

Picture one: What IS wrong here? Too saturated! Horrible.

When your picture is dull…

A common mistake made by photographers doing their first few post-processing jobs is to over-saturate the colour. It’s very easy. You have a photograph that for some reason just does not seem to stand out. When something fails to stand out it is natural to want to pep it up. Should you change the saturation?

A picture with no vibrancy rarely has colour saturation issues. Usually it is something else. The light may be poor. The contrast between the blackest blacks and the whitest whites may be limited. There is also a high chance there are few tones between the colour variations (flat colours). Yet, when you put the picture into an image editor you can seem to make it pop off the page by raising the colour levels.

Well, here is a piece of advice. Don’t change the saturation except in very, very rare situations. Even then keep it to a minimum. In perhaps only one picture in 500 do I consider adding any saturation and then rarely more than one point on the scale.

Picture one (above) has poor, flat lighting. It has not been improved by bombing it with colour. In fact I have strongly over-saturated to make an example. However, even adding one or two points of saturation with your editor can really ruin the natural colours.

Here is another revelation. Many photographers getting started in post-processing often cannot spot their own over-saturation errors. Their eye is not well trained in colour matching. It takes very little to really unbalance the colours. Worse still, everyone else can see the colours are too strong. Whats going on?

Have you ever written a paragraph and someone tells you there is a mistake? Did you spot it straight away? Did you read it several times and still not see it? Wow! That’s happened to me dozens of times. And, it has happened to most writers. When it comes down to it – we are not good at spotting our own mistakes. In fact over many years working with writers and photographers I have found the same thing many, many times. Looking into your own work somehow makes you go a little blind. Colour vision is very much like text vision… you go a little blind when you are doing your own editing.

Here is the original of the picture above…

It is just poor light. Lack of contrast and flat lighting make this picture dull.

Picture two: Poor light, lack of contrast and flat lighting make this picture dull. It is not going to be improved by colour bombing!

If the light is poor, you are pretty stuck. Picture two above is straight out of camera. The subject is mundane with flat lighting and poor contrast and limited colour tones. Colour bombing it would not help. However, for those with little colour editing experience it might look better when you raise the colour saturation. But this is because you cannot spot the dizzy tones that come with over-saturating the colours. It is an illusion. You want to be proud and pleased with your picture. Sadly, it is just not a good picture – and you refuse to admit it to yourself.

What can you do about it?

Editing your pictures is a difficult task. Your pride-of-authorship is strong. You have a lot invested in your shot and you want it to work. So the first tip is… be very harsh with yourself.

Harsh editing is something that only comes with a lot of practice. One way to get that practice is to find someone who you trust and respect to be a critical friend. Ask them about your edits. Make sure they actually do tell you what they think is wrong. Train them to tell you what is right too. Ask them to be honest but supportive. Try not to judge them if they don’t like a shot. Find out what they suggest to improve it. There is no right or wrong here. Their opinion is valid even if you disagree. Try to see their point of view, and question your own actions in editing. Once you are able to ask yourself questions about your own editing you will be on the way to spotting your errors.

The second tip I give you is to check against the original as you work. When editing I normally have a copy of the original file open while doing the edits. It is then easy to have a point of reference. You can look from one to the other and see if you have strolled too far into the realms of editing fantasy. It helps you see what you have changed and how much those changes have impacted the original.

Editing is a skill. It takes time and effort to get right. No editing is perfect. Edits are judged by the viewer which is sometimes hard to accept when just starting out. Someone will always find fault. However, with time and the help of trusted critics you can gain a great insight. You will learn to spot the right and wrong moves when doing your processing. When getting started try to keep it real. Develop your skills from there.

By Damon Guy (author and Photokonnexion editor)

Damon Guy - Netkonnexion

Damon Guy (Netkonnexion)

Damon is a writer-photog and editor of this site. He has run some major websites, a computing department and a digital image library. He started out as a trained teacher and now runs training for digital photographers.
See also: Editors ‘Bio’.