Tag Archives: Diffuser

Reflecting on ways to work with the best light

Reflectors

• Reflectors •
A session with reflectors is a way to control the sun
and get the lighting you want on your subject.
[Image taken from the video]

The control of light is not always obvious.

Reflectors and other shapers of light make a big difference to the scene. Often photographers go to great lengths to work with reflectors. Here are a few simple tips to bear in mind when you want to shape light – particularly outside.

When you need a reflector

You can use reflectors in any type of environment. They are best used where you need to even out the light on your subject. Remember that if you are using a reflector the source light is the main or key light. The reflection from your reflective surface is in proportion to the power of the key light. This proportionality is important. Often, more than one light is difficult to balance. Using only one light source you can create a natural balance with the reflectors. It is difficult to get reflected light out of proportion. There is always some loss in the reflection. This ensures that the light on your subject will be less intense than the key light but related to it by its proportion. The result looks more natural.

Shade is as important as light

When you are working in the fullness of light it is common to be confronted with strong reflections from the subject itself. Specular highlights, reflections off of curved surfaces and shiny areas are the most difficult to control. However, bright reflections on larger areas like flat areas of glass or even areas of flesh like bare arms can also be really difficult to control.

If you have these sorts of reflections you can reduce the worst of them using a polarising filter. Of course the only sure way is to reduce the intensity of light overall. This means creating shade. Again, the most important issue here is to reduce the light in proportion to the ambient light around you. This helps the light to remain looking natural because it is derived from the main light once again.

Don’t spend a fortune

For most of us expensive reflectors and shade creators are out of reach. As with most things however, the amateur can create the same effects as the professional without the expenditure.

Reflectors can be created from white sheets, curtains, even large pieces of card. These things can be purchased inexpensively and propped up easily to create the effect you want. What is more important than the material that creates the reflection is the way you use the reflections themselves. It is important in very bright light that the reflections are used to infill darker areas of shadow to even out the contrasts. Then your camera can cope and you will see a more controlled light on your subject.

Shade too can be created easily. Use solid card sheets or even blankets on poles. I do quite a lot of car photography. Often specular highlights can be eliminated by hanging a thin white sheet on two poles in the line of the light. The main light – normally the sun – will penetrate a thin sheet so that a proportion of the light will continue to illuminate the subject. Again, the proportionality is important. Things always look more natural if the light is proportional to the surrounding ambient light.

Using Reflectors – Photography & Video Tutorial

In the video J.P. Morgan, a successful photographer, uses lots of resources and equipment to manipulate light in all sorts of ways. First, he looks at how the light is best exposed to the subject. He uses the light to create a rim light. This helps to reduce large, strong areas of reflection and helps to define the body shape.

When he has the light direction right and well controlled he uses a gold reflector to give the light a pleasant colour – an evening sunlight yellow. This lifts the colour of the faces in the shot.

The other thing that J.P. Morgan does is use the shade and reflectors to create fill. The sun provides the main light but the levels of light off the reflectors allows a lower level light intensity creating a natural light. This does not look like it has been deliberately projected at the subjects. It is a soft light that beautifully wraps around the children. It evens out the contrast between the brighter light and the darker areas.

Look at the way the equipment is used in the video. But spend your time afterwards thinking about how you can substitute affordable reflector materials and ways to create shade. Making your own kit can be fun and just as effective brand equipment.

The video is just over six minutes.

The Slanted Lens DSLR Lighting Tutorials  External link - opens new tab/page

If you want to buy an affordable reflector set, here is the one I use. These reflectors work very well and are flexible in the way they can be used. The whole set also folds away into a great compact bag. The pack contains five effects (silver, gold, white reflector/diffuser, grey and black)…

42″ Photographic light reflector set (5 in 1)
Ex-Pro 5 -in- 1 Photographic Light Reflector – 42″ (110cm) Silver, Gold, Black, White & Translucent, Collapsible.
This is an excellent reflector set, robust and effective as well as easy to store. I highly recommend this as a standard piece of equipment.


Comments, additions, amendments or ideas on this article? Contact Us
or why not leave a comment at the bottom of the page…

Like this article? Don’t miss the next — sign up for tips by email.

By Damon Guy (author and Photokonnexion editor)

Damon Guy - Netkonnexion

Damon Guy (Netkonnexion)

Damon is a writer-photog and editor of this site. He has run some major websites, a computing department and a digital image library. He started out as a trained teacher and now runs training for digital photographers.
See also: Editors ‘Bio’.

How to do DIY diffusion – great light from simple tips

 • DIY Ways to diffuse light •

• DIY Ways to diffuse light •
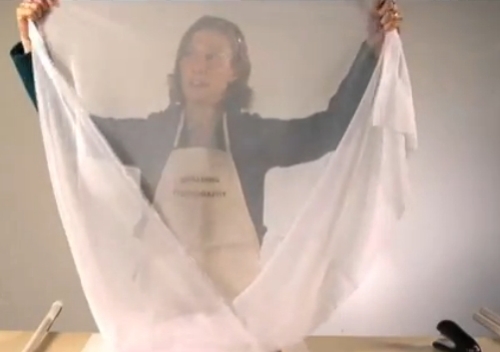
Image taken from the video.

Inexpensive photography equipment!

Following on from the Save money and improve your scene lighting yesterday, we have another video showing how you can provide yourself with an inexpensive light diffuser. It will be quite as good as any professional diffuser and in fact you make it have variable diffusion effects.

Professional and amateur alike use quickly and easily made DIY solutions for their photography. They know they can make things to the specification they require without the equipment costing the earth. In most photographers studios you will find materials and adaptations to be able to do all sorts of ‘quick makes’ with materials, frames and stands. It just makes sense to save money and do it how you need it, rather than spend a mint on something you only use once.

DIY Ways to Diffuse Light


Playgallery  External link - opens new tab/page

Comments, additions, amendments or ideas on this article? Contact Us
or why not leave a comment at the bottom of the page…

By Damon Guy (author and Photokonnexion editor)

Damon Guy - Netkonnexion

Damon Guy (Netkonnexion)

Damon is a writer-photog and editor of this site. He has run some major websites, a computing department and a digital image library. He started out as a trained teacher and now runs training for digital photographers.
See also: Editors ‘Bio’.

Can you write? Of course you can!
Write for Photokonnexion...

We would love to have your articles or tips posted on our site.
Find out more…
Write for Photokonnexion.

Thinking about different types of diffusion and reflection

• Diffusers and reflectors are important tools for using light •

• Diffusers and reflectors are important tools for using light •
Not all diffusers and reflectors are the same. Watch out for the different characteristics.
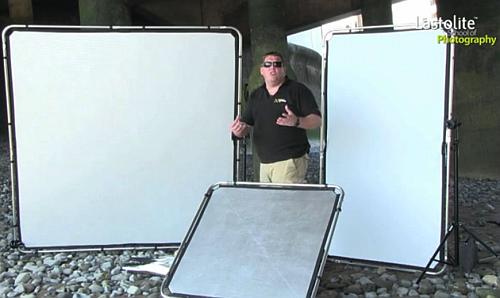
Photograph showing Mark Cleghorn of the Lastolite School of Photography
and three Lastolite reflectors/diffusers from the Skylite Rapid System.

Using light – creative fun…

Many photographers assume light is passive in the scene. I get really excited about working light. You can use two methods, modify or add light. Diffusers and reflectors are powerful modifiers to manipulate light. To add light you can use flash or continuous light sources. I want to expand on modifying light.

Modifying any light

You can use a modifier of any kind to change light and make it illuminate your scene the way you want. Light modifiers can include the use of gels, softboxes, and all manor of diffusers connected directly to the light source. However, reflectors and diffusers can also be free standing. Free-standing diffusers can be used to change the light from a natural source or an artificial one. However, remember that light falls off to a quarter of its intensity each time you double the distance from the source. Using a diffuser at a distance from an artificial source is going to significantly reduce the light intensity compared to using it at the source.

Using free standing diffusers and modifiers

I have previously written about table top still life photography and using modifiers. I mentioned that you can use white card as reflectors to bring light around the back of a table top subject. You can also use diffusers to reduce the natural light from a window. I use net curtains. The point is that actually there are a range of modifiers in you home and other places near at hand. Here are some simple household items I have used…

  • Diffusers: Net curtains, white blinds, paper, tissue paper, greaseproof paper, tracing paper, plastic bottles and containers frosted glass, drinking glasses, acrylic glass, white bed-sheets…
  • Reflectors: white walls, towels, card, silver paper, silvered insulation block, mirrors, white plates, white bed-sheets, white boxes, a slide projection screen, various white materials (cotton, nylon, wool)…

You might ask why I use such a wide range of different things as modifiers. That is a crucial point. Each and every one of those items in the list have different properties. For example reflectors with very course surfaces have very soft reflections indeed – towels are an example. A large sheet of white paper can be used as both a reflector and a diffuser in different ways and it has different properties too. People often don’t realise that light coming through glass is reduced by anything up to 40%. It is also scattered. So plain, see-through glass can actually be used as a diffuser and light reducer – depending on the properties of the glass. Frosted glass is an even better diffuser.

More after this…

find out more...Photokonnexion tips by email
Enjoying this article? Please sign up for our
Tips by email service.
                                                Find out more
#11030#

Most of these different materials and objects can be used by stretching them out, hanging them up or propping them up around or near your subject. All of them have a different impact on the final image. Some of the materials are better for table tops. Others are better for hanging and using for say, portraiture.

It is the properties that count

Modifying light is NOT about buying expensive equipment. While it is nice to have great tools for the job, for the photography enthusiast there are lots of other ways of getting a great result. Amateurs, enthusiasts and beginners alike can benefit from thinking about how the light is changed rather than by which equipment. It is the end result that is important, not the method or equipment used to do it.

Look for different properties and how to use the modifiers

In the video Mark Cleghorn shows us how to use a range of professional diffusers and deflectors. I would like you to think about the different properties of each of them. He shows us silvered ones, a semi-diffuser/reflector and lots of ways to use reflectors. He also makes various points about the way to use both reflectors and diffusers. The different properties have an impact on the shot – including light intensity, colour and reflective type. Overall Mark is showing us a variety of different types of modifying properties and how to use them.

You can use this knowledge to think about the things you have around the house. Once you have used something to modify light a few times you will have a knowledge of the type of light it creates. Then, you can experiment with other objects and materials. After a while you will develop a feel for creating different types of light for your various subjects. Becoming a master of light is about knowing what you can do with the materials at hand.

Using the Skylite Rapid system from Lastolite  External link - opens new tab/page

By Damon Guy (author and Photokonnexion editor)

Damon Guy - Netkonnexion

Damon Guy (Netkonnexion)

Damon is a writer-photog and editor of this site. He has run some major websites, a computing department and a digital image library. He started out as a trained teacher and now runs training for digital photographers.
See also: Editors ‘Bio’.

Can you write? Of course you can!
Write for Photokonnexion...

We would love to have your articles or tips posted on our site.
Find out more…
Write for Photokonnexion.

Two great gift ideas for photographers

Christmas Bonanza

Gift Bonanza


Love and friendship is about giving!

The lead up to any major festival is always a bit frenetic. So you can use these ideas to take the pressure off. See what you think. I can recommend these things from my own personal use. I think you will find they will make great gifts.


Within the Frame: The Journey of Photographic Vision (Voices That Matter)
David DuChemin is not only a great photographer he is also a visionary. In this book he speaks about his vision and how it relates to his photography. It is much more than a personal journey however.

DuChemin is a talented and sensitive photographer who has a compelling vision passionately expressed in every photograph. His book is aimed at helping the reader to understand what photographic vision is and how it relates to the photograph. He looks carefully at the way each of his images is created and provides some excellent photographic tips and his professional advice too.

The essence of the book is aimed at helping the reader get past the purely technical aspects of photography. His main point is that any photographer can learn to visualise great images and then go on to create them. DuChemin is giving away a gift in this book – how to see your photograph with a passion and create it with a passion and vision of your own.

The book is a pleasure to read and is filled with many of his wonderful images. His emphasis on street and travel photography makes the book all the more colourful. The current interest in street photography also helps make the book a relevant buy.

The book was published in 2009 and it has already become a classic. He has written a number of other books which follow on from this one. All are worth reading. The book provides a great grounding for beginner and expert alike. Great tips, great photographs and wonderful insights make this book the perfect gift for a photographer. Within the Frame: The Journey of Photographic Vision (Voices That Matter)

Rogue large Flashbender
I just love this great flash diffuser. If you have an off-camera flash this is the best. It is the most adaptable diffuser I have ever used. You attach it to the flash with a wrap around grip. The big diffuser stands up above the lens of the flash.

The white fabric diffusion surface is used to reflect the light where you want it to go. It is really controllable. The fabric is reinforced with very versatile but highly bendable backbones. These can be bent to give any shape of deflection so you can point your diffused light almost anywhere. It will allow you to point the deflection up, down or to either side. More to the point you can control the light intensity because you can wrap the sides in a bit to control how much light can get out of the gap. You can even roll it up and make it a snoot, a really directional focus for your flash.

While this diffuser is only of use for off-camera flash, it is very simple to use. It is a great way to prevent those nasty highlights that spoil flash shots. It is also a daylight matched colour so the diffused light will not have any colour cast.

I have used this in many different types of portrait and group shots. I have also used it in studio and still life situations. The material is very robust and resistant to damage. The white diffusion surface can be wiped clean and is very durable too. The whole thing is extremely light and I keep it rolled up in my camera bag ready for any time I need it. I would not be without this diffuser now. Another great gift for a photographer. Rogue large Flashbender

By Damon Guy (author and Photokonnexion editor)

Damon Guy - Netkonnexion

Damon Guy (Netkonnexion)

Damon is a writer-photog and editor of this site. He has run some major websites, a computing department and a digital image library. He started out as a trained teacher and now runs training for digital photographers.
See also: Editors ‘Bio’.

Some things you should know about on-camera flash

On-camera flash suffers with a number of problems

On-camera flash suffers with a number of problems. It is best to know what you can and cannot do.

On-camera flash can be harsh and unforgiving – use sparingly.

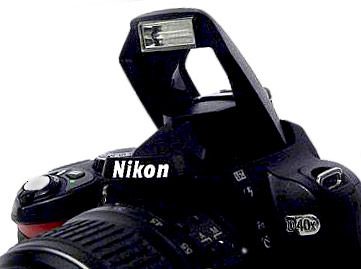
The flash that comes on-board of most cameras is small, tightly focused and very close to the optical axis of the camera. These things cause problems for your shots.

On-board flash problems with portraiture

The small size of the on-board flash makes it a source of hard light. While that may be fine for some shots, it creates hard, sharply defined shadows. These are particularly unflattering for faces which makes portrait photography difficult. The light from flashes is coloured to imitate the bright bluish light of a sunny day. That colour gives the face a harshly blue tinge – making a person look like they could do with a couple of good nights sleep! On-board flash is also directly in line with the optical axis of the camera, and it is close to the axis as well. Light that is straight-on like that also tends to flatten the face in the image. Worse still, it is in an ideal position to create red-eye. On-board flash is also quite strong when used close up. This tends to create ugly highlights on the face. These large white spots of light on the cheeks, possibly the chin, nose and forehead, are pretty distracting for the viewer.

All these problems add up to pretty unflattering results in portraiture.

On-board flash problems in the open

Happy snappers often don’t realise that they have 100% control over their on-board flash. In fact, most probably only ever use auto-settings. The result? The on-board flash will pop up whenever the camera thinks it is needed. A lot of the time it is not needed or in fact it is a nuisance.

While flash is quite strong close up (for portraits say), light falls off pretty rapidly. With light, as you double the distance the illumination reduces to one quarter of its intensity. The tiny on-board flash will therefore have a strong effect close up. In a large room, or a church for example, it will light everything within a few feet very brightly – then everything after that will be black or very dark. That’s because the light does not have much power after a short distance. So, using flash in a dark church for example will have irritatingly bright fittings and people close up, and you will see little else in the background. As an aside, you will also annoy the people nearby who are worshipping or looking around too.

In an open space on-board flash can be pretty bad news. What you tend to find is that in darker situations the flash will provide a perimeter of illumination very close to you. This will be a bright glow on the ground in front of you and some illumination of the trees and bushes (or buildings etc) around about. The rest will be black or very dark. In brighter situations, well suffice to say, you get the highlight issues again if there is any shiny surface nearby. Both these cases cause artificial light that spoils the shot.

In domestic rooms, smaller spaces and shadows on a brighter day, the on-board flash can be useful if carefully used. However, beware. Any flash in a shadowed place will blow the shadows back in an artificial way. So the charm of the shadowed area is lost where the flash fires. As a result of the bright foreground you also get a deepening of the shadows in the background. This amounts to a pretty contrasty scene. It can therefore look gloomy in your picture.

Some solutions

I don’t have a downer on flash. It’s just that on-board flash is very difficult to work with and it is placed in the worst possible place to generate a flash. Ideally I would advise you to buy an off-camera flash. Even moving the flash away from the camera by one arms length removes many of the problems mentioned. Setting the flash to one side, by only several feet, creates its own shadow texture in your shot. This removes much of the blow-out and shadow flattening effect you get when the flash is in-line with, and close to, the optical axis of your camera.

I know that many people will say they cannot afford to buy an off-camera flash. Well, maybe so – but some of the unbranded ones are really quite cheap. I have two unbranded off-camera flash units and they are excellent. You have to get used to manual adjustments (which you should be doing anyway), but they are just as effective as branded flash units costing up to ten times more. So, maybe you should be thinking about looking around. Here are some units which I have used. Buy one now and improve your flash photography straight away!

If you want to improve your use of on-board flash there are two things to can do to improve the situation…

Turn it off: This is an improvement because, for example, in a church situation you don’t want to create that deep black pit in the background. Many people don’t realise that you can turn off the flash. If you look in your manual it will tell you how. On many point-and-shoot cameras you can turn off the flash on the screen. In most DSLRs, its on the screen too. But it may be a button in its own right, or you can find it in the menus. However it is done, the on/off is easy. Then you can take the shot using one of the other settings, or your camera will calculate a longer exposure. The result will be less contrasts, shadows or black areas. If you find you get more camera shake or softness, use a tripod or rest your camera on something.

Reduce the power: It may seem odd to reduce the power to get a better shot, but you will gain a lot from controlling the light intensity. In portraiture you will reduce the highlights. Less power will also create less of a blue pallor on faces too. Oddly, a lower power shot will also light the background better. It is the contrast of foreground to background light that causes bright close things and black distance. If you lower the power the contrast will not be so steep. Your camera will choose settings (or you can) that will enable it to see into the background with less dark areas.

To reduce the power of your flash look in your manual. It will tell you how to do it. Most flash power settings are available in the menu or on the main control screen of the camera. Most of the time I use the bottom setting. On-board flash is so harsh that I find it is the light touch that is best.

There are two more things you can do. One is to use reflectors, or bounce to change your light in some rooms (See: Does Pop-Up Flash Ruin Your Shots?.

The other idea is to further diffuse your flash. A quick trick is to tape a piece of white tissue paper lightly in front off your flash lens. I leave a gap to allow air to circulate so it does not overheat. The tissue lowers the power and causes greater diffusion. You will have to experiment to see the effect on your camera. I use this to great effect on my little Canon G12.

One possible way to use on-board flash to good effect is as fill-in light. This is a useful way to use your on-board flash, and can be used in conjunction with other off-camera lights. However, it does require practice to get it right. It is almost always used with lower flash power levels too. So it is definitely worth learning how to reduce the flash power.