Tag Archives: Depth

Photographing the wonder of churches

Churches have a lot to offer the photographer...

Churches have a lot to offer the photographer… magnificence, detail, contrast, art, history and more. Click the image to view large.

Churches are really photogenic places.

They provide a wide range of interesting materials, textures, contrasts and subjects. The architecture is often magnificent and feature rich. They are tidy, well tended and active social centres. Photographers can find a lot of interest and endless ways to express it.

The approach

Not all churches allow photography. Check that you can use a camera and if so under what circumstances. You might be allowed to use a camera, but not flash. Sudden bright lights are disturbing and invasive in a place of peace and worship. All cameras can turn off the flash so check the manual to find out how. Quite often you are not allowed to use tripods either – they might present a trip hazard or block passage. If photography is not allowed this is usually so that you do not disturb worship or block through-ways. Ask the person in charge if there is a time when you could come back and take some shots. Offer them copies of your pictures so they can use them for literature and newsletters. Be polite, accommodating and helpful. If you are willing to work on their terms most people are reasonable in return.

It is equally important to remember you are in a place of worship. Churches are places of emotion and feeling. You should respect the privacy, commitment and activities of the worshippers and other visitors. Be courteous, respectful and deferential, don’t disturb others. This will help you enjoy the peace and atmosphere as much as it will enable people to go about their worship undisturbed.

Churches and places of worship are not state maintained. It is worth remembering that the congregations raise the money for the upkeep of the staff, buildings and equipment. If you are in a church and taking pictures please consider donating a few pounds to the church funds. It helps the church to stay open and keep the buildings in good condition.

A word about lenses

The magnificent proportions of churches and cathedrals is intended to awe people who visit. And it works on me. Even small chapels are more cavernous than the the local houses, a fact not lost on worshippers. To capture these proportions and to convey this same feeling in an image is best done with wide angle lenses or lenses which mimic the human eyes. Broadly speaking a wide angle lens will be 24mm or less on a full frame camera, or 16mm down to about 6mm on cropped sensors or point and shoot cameras. We use wide angle lenses to exaggerate the proportions in the longest dimension of the picture. A wide angle landscape emphasises the broadness of the architecture. A wide angle shot in portrait view will really bring out the height and the magnificence of the cavernous roof spaces, arches and supports.

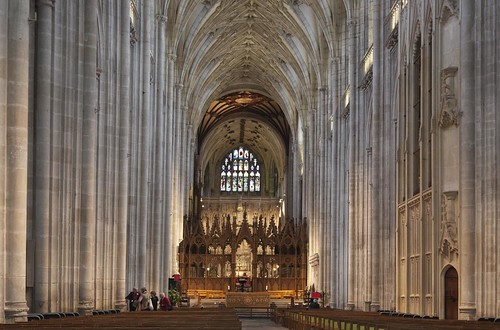
The shot above was taken with a 50mm lens on a Canon 5D. The 50mm on a full frame camera mimics closely the way the human eye sees. The design of churches and cathedrals is meant to impress and awe the human eye so a 50mm prime lens is ideal to convey that sense to the image. On a cropped sensor the same can be achieved by using an 80mm Lens.

Longer focal length lenses like a 200mm lenses have the tendency to foreshorten the scene. This will cause distances to be less exaggerated. A fact that will make the scene less impressive. Of course careful use of perspective in the composition will help. You can achieve this by placing something close to the camera in the foreground so it appears large compared to the rest of the scene.


Exposures

Shooting in low light and no flash means long exposures to get sufficient light to make an image. If you are not allowed to use tripods there are alternatives. A Gorillapod, a sort of gripping-tripod can be used on the tops of pews. But don’t try to mount your camera on sculpture or features. Bean bags can be purchased cheaply and used to rest your camera on things.

One way to take photographs in low light is by adjusting your camera for high ISO levels. This will allow you to have shorter exposures for hand-holding your shot. However, this will introduce digital noise. There is a fine balance, so practice beforehand.

You can also open up the aperture to increase the light entering the camera too. Of course this will reduce your depth of field. You will get some nice shots with bokeh in churches. However that will reduce the potential for showing the magnificence of the building since deeper into the scene will be blurred.

Exposures in churches are sometimes difficult. However, longer exposures tend to promote the shadow, contrasts and dimensions that emphasise the wonderful proportions of the church environment. It is therefore worth trying to find ways to keep your camera stable long enough for a great shot.

Light

Often the light in churches and cathedrals is low level. Try to visit at times when there is great light coming into the building. Often a sunset or bright sunlight at a low angle through stained glass will really stand out. These will lift the mood and bring colour to the stonework.
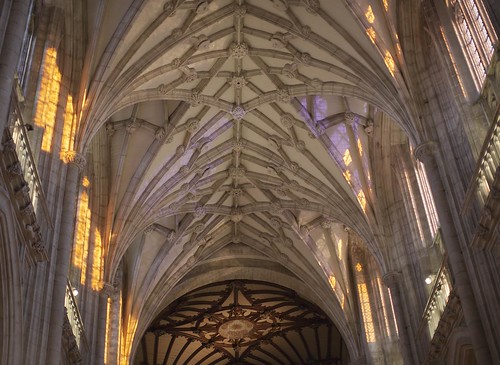
Great light lifts the mood and brings out texture and colour

Great light lifts the mood and brings out texture and colour. Look for sunset times or bright sunlight through stained glass windows.


Great light helps bring out colour, texture and contrasts. Try to avoid high contrast light. Very bright illumination from a window will often make it pure white and everything inside around it very dark. You need to control that. Focus on the window and press the button – you will get the stained glass – everything else will be lost in white or darkness. Focus off the window and shoot and you will lose everything in the brightness from the window. Instead, look to accommodate both bright and dark by focusing on the places where the light falls, rather than its source. That way you get the colours and textures without the brightness.

What to photograph

The astonishing range of things to photograph is great for the photographer. You can exercise a lot of artistic interpretation. The architecture is impressive on the larger scale. On the other hand the the stone-work, detail and carvings are worth following up on the small scale too. There are art works, carvings and textures as well as people and activities. All are worthy of photographic attention.

You have to start somewhere. The outside of the building tells its own story. To tell it properly shoot inside first. You gain a sense of history and find more about the building. While inside look for clues about what is important in the building, the design and the build history. This will help you pick out the best features of the outside later.

I like to sit quietly for a while and take in the view of the inside of a church before shooting. I am looking for the strong lines in the architecture that lead the eye. Tall columns lead the eye upward. Often these lead to buttresses and arches that create a sense of power and support. If you can incorporate this perspective with a long view of the inner space you will convey proportion and depth – the essential magnificence of the church. There are two ways I have found that achieve these layers.

  • A concourse of columns, arches and chambers give the eye a repeating pattern into the depth of the church. In the picture above the columns and arches in a converging pattern down the length of the nave provides a sense of depth and height.
  • Picking out different activity areas provides a clear definition of depth in the church. In the picture above this is shown by the pews in the foreground, the altar area in the mid-ground and the depth of the ceiling into the distance after that.
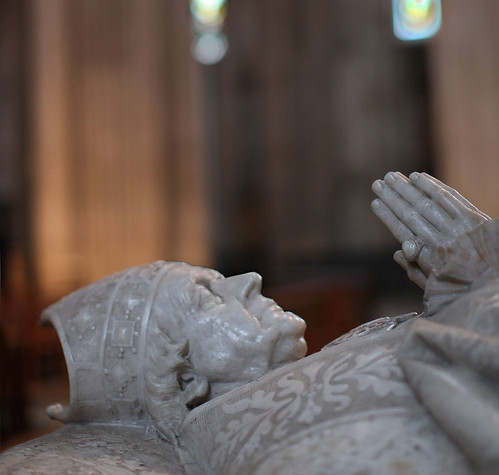
Individual features of the church make a great study

Individual features of the church make a great study. It is worth taking time and effort to get clear features, textures and detail.


Distinct features of the building also provide great shots. Side chapels, sculptures, carvings tombs, artworks all mark specific areas. While they have an interest value on their own, the context is also important. Often the wonder in a place of worship is the history and commitment invested in it over time. When looking in chapels and side chambers try to show the sense of history and the love that has lead to its character today. Of course each place like this has its own character so you need to bring out meaning of historical events, the people involved and the dedications shown there.

The central feature of most churches and cathedrals is the altar and the space around it. This is where the architecture often comes into its own as a focal point for the eye. So use it. Look for features, lines, supports and other compositional properties that make it impressive. The altar piece itself is often simple. However, it is also a place of colour too. Show it off so that all the best of the features stand out. Try to find ways to catch the light so all the architectural features are well defined by shadow and light contrasts. If they are flat you will lose the power in the artwork.
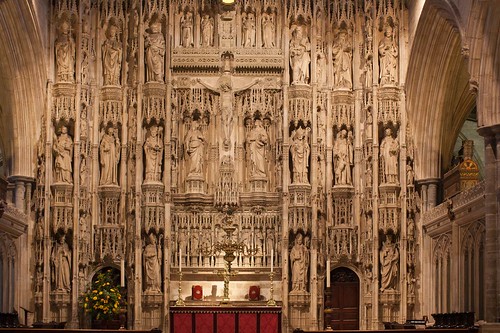
The altar is a central place, look for the ways the art and architecture bring out its importance

The altar at Winchester Cathedral… The altar is a central place, look for the ways the art and architecture bring out its importance


Other points of interest include the people, candles, floor coverings, tiles, carvings, sculpture, coverings, clocks, bells, exhibitions, books of dedication and remembrance… the list is pretty long. It is easy to just snap at these, especially carvings or artwork. Don’t end up making a record shot unless that is the point. Try to get some sense of awe into your pictures so they tell a story. When you shoot these things put them in context. Show a close-up of a carving. Do it close up and powerful, but show the distance away to the next wall too – invite the eye to be impressed. Or, show features like these as part of the whole, so they fit in but have individual character.

Outside the building the overall design is important. Often getting a shot from some distance away is a good way to show the magnificence of the building, especially if there is a nice contrast in size, shape or design with nearby buildings or features. Again, a wide angle lens will help with this.

Churches are often in urban areas with little space around them. With a shorter view the outside of the building will often look good from close to the walls, looking steeply upward. This will exaggerate the tallness. Make the most of the proportions of the building. Especially follow the lines of the height and depth of the architecture.

If you take a shot further from the walls you will get converging verticals. This will take a lot of time to correct in post processing unless you do it artfully. Try to avoid that. Plan your shot so the camera is level, not pointing upwards. The level angle will minimise the convergence but you may find it difficult to get the whole building into the shot. You can still find great views on most churches. So try to concentrate on great features and lines instead.

Churches and cathedrals are wonderful places of peace and magnificence. I am amazed at the beauty and awesome architecture. In your photography try to show the commitment and love that has gone into creating these great places and what they represent.

By Damon Guy (author and Photokonnexion editor)

Damon Guy - Netkonnexion

Damon Guy (Netkonnexion)

Damon is a writer-photog and editor of this site. He has run some major websites, a computing department and a digital image library. He started out as a trained teacher and now runs training for digital photographers.
See also: Editors ‘Bio’.

Landscape loves – do you know why you are photographing this scene?

Do you know why you are shooting the landscape you are looking at?

Do you know why you are shooting the landscape you are looking at? If not then you will probably not make it exciting for your viewer either. Shoot for impact.
(Click the image to see large)

A landscape ‘snap’ just does not seem to cut it…

Many landscape photos are really stimulating for the author, but few other people. The problem? It’s too easy to ‘snap’ a shot that will bring back the moment. You really need to think about what will stimulate someone else when they see the picture.

One of my favourite landscape photographers once said,

Landscape photography is the supreme test of the photographer, and often the supreme disappointment.

Ansel Adams
…and he was right. Most people do not have a reason to take a landscape shot that will satisfy someone else.

Insights to landscapes

Personal perspective is all important, but it can misrepresent the situation. I studied the environment when at university, including geology. I loved landscapes and knew how to read them. I could take them apart and tell you their geo-history, rock types, erosion… well, you get it, I was a geek! I loved taking pictures of landscapes. I found them beautiful and interesting. It was many years before I realised they were interesting to me because of my geeky knowledge. I realised I was taking geeky geology pictures of landscapes. I thought they were beautiful. Everyone else just did not get it. That’s the point. You should be finding elements in the landscape that capture the scene for what is attractive and what it means to everyone, not just you.

Themes

There are a number of themes that successful landscape photography hinges upon.

As with any photo, light is the key. Great light, great attraction. Early morning, sunset, dramatic weather – they all have their place. Flat mid-day, blue sky light, not so good. But even then, combined with other composition elements you can make it work.

The angle of light is important because of the creation of shadows. They define the landscape by creating bright and dark spots which really brings out the contrast in the landscape. The camera is not as versatile as our eye and a good contrast brings out the depth in a landscape picture that we can see naturally but needs to be strong for the camera.

Drama is another theme that helps a landscape picture. Think of the primal drivers of our inner being. Sunsets, uplifting because of the promise of a new day tomorrow. Storms, threatening our existence, fascinate and drive us to shelter. Dawn, captures our hopes and fears of the unknown in the new day. We all respond to these drivers. So, pick them out.

Aesthetics, what we find stimulating and uplifting. Yes, beauty is a factor. You need to find elements in the picture that are truly attractive to everyone, not just your feeling of the moment. Don’t take a shot because of a lovely moment shared with your love. Look for the attraction for everyone in this scene and capitalise on that. Show what is attractive by using composition to focus the viewer on the subject. Take a moment to consider where to take the shot to show it best. Look all around you, consider high and low, left and right. The perspective of the shot is important.

The subject is the thing you want to show most. So make sure you find ways to bring it out. Is it the danger, the beauty, the vista, the awe? Look at the landscape and sense what it is doing for you – then hunt it down with your camera. If you know why it is stimulating you, and it is a primordial driver, then you have isolated the essence of it.
More after this…

Composition

Just taking a snap is a kind of composition – even if a negative one. Remember that you are trying to create an impact others will find attractive. So, look for compositional elements that bring out your theme and then frame the shot for them.

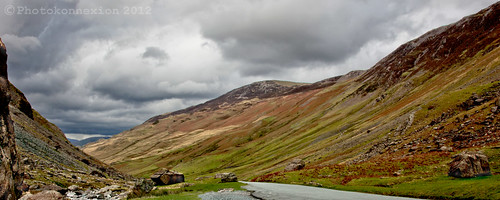
In the shot above I was looking for ways to draw the viewer into the picture. The essence of this shot lies in the drama and the layers of the landscape. These layers make you want to go into the shot to see how the landscape changes as you go in. They give the shot depth and invite you to see what is around the next bend in the valley.

Knowing these were the reasons for my attraction to the scene informed my composition. I wanted foreground emphasis. This lead to the capture of foreground objects giving a sense of being there. In the shot on the other side of the road I could see round the corner. The scene there lost the mystery of implied discovery. The drama in the sky drew me into the distance because of the mystery in the unseen there too. Closer to me the drama in the sky created an implied threat. That was too good to lose. So I had to take several exposures so I could capture the sky without blowing it out and the hills without underexposing them. The contrast between the two was too much for the camera to capture both at once as my eye saw it. This meant I had to think about my post-processing too, including my crop. The shot was taken so I could bring out a panorama to enhance the feel of awesomeness in the landscape. A ‘letterbox’ crop gives right-left depth to complement the depth from the contrast as well as foreground, mid-ground and distance layers in the picture.

I know there are other things that made me stand right there and create this shot. The point is that I knew why I was doing it that way. I knew what it meant to me. I knew what the drivers were that would impart meaning to others. Then I composed and shot for the post processing.

One more thing. It might not surprise you to know that this photo represents a lot of time working the scene at this location. There were about 35 pictures of the general location. More takes on the exact spot of the shot. In all, there was about 50 minutes work, with tripod, to get this one shot. A ‘snap’ it was not!

Use window light for portraits

You don’t have to have strobes or flash for great light.

The quality of your shot is not proportional to how much equipment you have. You can create great shots with simple equipment and great light. Got a camera and window? You are nearly there.

In the video below you can see simple steps to create great shots often come from simple set-ups. It is the simplicity that often makes these shots work well. A great portrait shows off the subject and if the environment is understated they become the main focus. Simple light and simple props are the key.

The photographer, JP Morgan, uses lighting contrasts, hard and soft light with reflectors to manipulate the light in this portrait session. The use of the light is constantly aimed at creating shadows that flatter the face and colours that bring out the skin tones.

Although he does not mention it, look out for highlights on the skin of the subjects. Did you see any? Well, he used the light at a natural level to control the highlights. Flash often creates nasty bleached highlights on prominent features of the face. That distracts from the overall view of the face and destroys the balance. Natural light, especially soft light helps to minimise highlights and that brings out the character of the face more.

Notice that he explored the different potentials of the two girls to suit them. Skin tone, hair colour, clothes and posture were all considerations. Notice too that most of the poses were ones that suited the girls individual character. They probably had a lot of input to those positions. Remember to involve your portrait subject, they will respond better and photograph better if you work with them and make it about them.
More after this…

He worked the scene continuously. He used reflected light a lot to prevent the camera creating a silhouette against the window light. The reflector brought the natural light to the front of the shot, but toned it down. This meant there was a difference between the intensity of the window light and the subject lighting.

The creative use of shadows is great. They are endlessly fascinating to work with and they make a scene look deeper and more natural. The window frame on this shoot also made the shadows more dramatic which complemented the girls own shadow.

This video is an interesting insight to shooting with natural window light. There is also a lot about how to work with a model there too. Watch out for the way the girls seem to be enjoying themselves.

What is the ‘Background’

When we take a photograph we are almost always going to capture our main subject plus something else behind it. The fact that something looks like it is behind our subject gives the photograph at least some depth. The background is an important part of the shot. So here is a definition…

Definition: Background; Backgrounds

Definition: Background; Backgrounds | Glossary entry

Background

 In photography the background is the part of the overall scene. It’s behind the main subject of the photograph. Proper design and use is crucial to photographic success. Recent trends minimise backgrounds, where possible, to focus on the main subject. Designs try to reduce clutter and distraction to avoid drawing the eye from the subject.

Backgrounds have a long history of careful design. They can involve great artistry, grand constructions or be very simple. It’s best to keep the background and the subject consistent. Styling the subject and the theme with different contexts creates an artistic imbalance. This will lessen the impact of the subject and confuse viewers. When designing scene and lighting consider making the theme consistent and complete. Creating continuity throughout helps the viewer to see a more harmonious and aesthetic image rather than a discordant mess.

A background is normally considered secondary to the subject. This is by virtue of its relative importance compared to the main subject. The main emphasis is placed on the central subject. Nevertheless in landscape photography the background is considered an essential part of the main picture. Landscape photographers try to layer the landscape. They use a foreground, mid-ground and distance (background). Layers provide a feeling of depth. In landscapes the distance may also be the showcase of the shot. It’s both the background AND the main subject.

Comments, additions, amendments or ideas on this article? Contact Us

Like this article? Don’t miss the next — sign up for tips by email.

[refdefB]#3249#

Contribute A Definition?

Send us a definition of a photographic word or phrase...

Send us a definition for our list of photographic words and phrases. Simply write a clear definition and send it in. Include an original picture if you wish. Give us your name and a link to your website and we will credit your work.

Abstract photography – what it is and how to do it

Abstract photography - great pictures and lots of fun!

'Red' - In the style of Rothko
Abstract photography can produce great pictures and be lots of fun!
Concentrate on colour, form, shape and focus for best effect.
Click to view large.

What is Abstract Photography?

“Abstraction forces you to reach the highest level of the basics.”

Alan Soffer

Abstract photography concentrates on the very simplest of components in a piece of art. Those are are known as the “Elements of Art”. They are…

  • Line;
  • Two dimensional shape (2d);
  • Three dimensional (3d) form;
  • Colour;
  • Space;
  • Tone, and
  • Texture.
Extra dimensions in abstract photography

Two extra dimensions are often found in abstract photography. One is the use of ‘movement’ – mostly through movement-blur. Perhaps, used more often is the use of focus, especially by controlling the depth of field. In addition, abstracts often incorporate “pattern”, which is a more complex structure from the “Principles of Art”.

Photo abstracts take the viewer away from knowing or recognizing the subject. Instead they invite the viewer to almost ‘feel’ the textures, forms and other elements of the subject. Often abstract photography makes the object unrecognisable as an object in its own right. Instead it directs attention to the look and feel – the essence of the object.

For a more detailed definition of Abstract Photography check this page in our Glossary…
Abstract Photography – a Definition

How to Shoot Abstracts

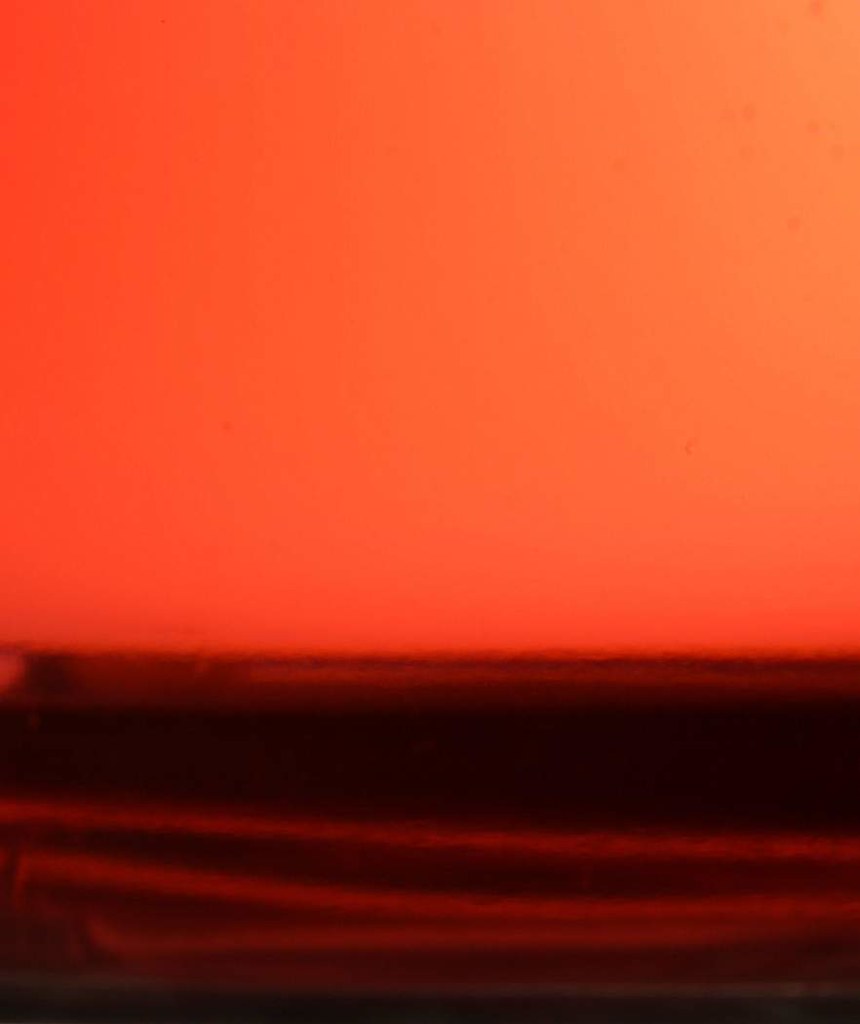
Abstracts are about our creativity and not about the object. The simple shot above, with its rich emotional orange, is a glass of water coloured with red dye and slightly backlit with a desk lamp. Many abstracts are created using the simplest things – often they are found around the home. Abstract photography is all about simplicity. Getting down to the basics is often the best route to a good abstract.

Using the “Elements of Art”

The list above is perhaps difficult to think about in terms of actually creating an image. However, think carefully about what you see in the frame for your shot. Often you can see these simple elements in your subject. Try to simplify your shot so that you see only one, two, or at most three of those elements. If you manage to get the image to remain simple, you will make the shot more understandable. If you also manage, through that simplicity, to capture the readers eye, you will excite the viewer. Simple components, simple connections, simple insight to a subject – all these give you effective abstract material.

Study the Elements of Art, at length. Try to see the simplicity within your frame. That is the key to developing your insight into abstraction.

Other techniques…

To help you shoot a few abstracts I have put a list of things you can try below. Try one, or a few at a time. Compare them to some of the examples in the links below the list. Reduce or remove clutter. Keep your shot as simple as possible.

  • Look for patterns – especially very close up.
  • Textures – show the ‘feel’ of surfaces and faces of an object.
  • Try unusual or unique angles.
  • Use a macro lens, macro tubes, or get really close.
  • Crop very tight to an interesting/unrecognisable part.
  • Concentrate on multiple colour variations without showing the whole object.
  • Concentrate on tonal variation – minimise colours.
  • Use long, low light exposure to bring out subtle shadow variations.
  • Use soft or hard light variations on close-ups.
  • Emphasis the ‘shape’ (2d) of an object – keep it from being recognised.
  • Exaggerate the ‘form’ (3d) of something – keep it from being recognised.
  • Concentrate on curves and rounded shapes or forms.
  • Concentrate on angular and geometric shapes or forms.

Many of these can be applied to everyday objects or common items. Once you become aware of the shapes, forms, patterns and textures in the things around you a new world opens up. So try to take one of the above and spend a few days looking at everything around you for ways to see that item. Then move on to others. Before long you will be an abstract photographer!

Damon Guy - Netkonnexion

Damon Guy (Netkonnexion)

Damon is a writer-photographer and editor of this site. He has run some major websites, a computing department and a digital image library. He started out as a trained teacher and now runs training for digital photogs.
See also: Editors ‘Bio’.
By Damon Guy see his profile on Google+.