Tag Archives: Control

Visual toolbox for photographers

Sharpen up your creative photography…

It’s easy when starting photography to over emphasis the importance of gear. In fact it’s ‘photographers eye’ that really makes the difference. Your vision and insight into a scene are critical to producing a wonderful image.

Sage advice from a world master

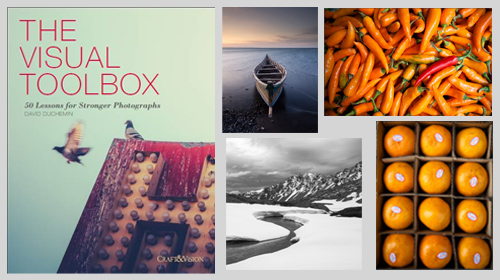
The Visual Tool Box by David duChemin is all about the skills of composition. He goes into depth around the background ideas which help you look at a scene. The ultimate success in photography is to make your image a pleasure to view. Aesthetics rule – it’s as simple as that. This book is dedicated to teaching you the tools you need to develop the ‘eye’.

David duChemin says,

These are the lessons I wish I’d learned when I was starting out.
The Visual Tool Box by David duChemin

This is my kind of book. He writes superbly, in simple, readable form. His examples are excellent and the pictures are just amazing. But most of all the book is organised for learners to extend their knowledge in easy, well structured steps. This book is all about putting new tools in your photographic tool box and it achieves that with an ease that any beginner will find a joy.

Composition

The book is packed with examples of the sort of compositional ideas that really work – for anyone. Just look at some of the topics covered…

  • Manual
  • Optimize Your Exposures
  • Master the Triangle
  • Slower Shutter Speed
  • Learn to Pan
  • Use Intentional Camera Movement
  • Use Wide Lenses to Create a Sense of Inclusion
  • Learn to Isolate
  • Use Tighter Apertures to Deepen Focus
  • Use Bokeh to Abstract
  • Consider Your Colour Palette
  • Lines: Use Diagonals to Create Energy
  • Lines: Patterns, Lead my Eye, Horizons
  • See the Direction of Light
  • Light: Front Light, Side Light, and Back Light
  • Quality of Light: Further Consideration
  • White Balance for Mood
  • Light: Reflections, Shadow, Silhouettes, Lens Flare
  • People
  • Experiment with Balance and Tension
  • Use Your Negative Space
  • Juxtapositions: Find Conceptual Contrasts
  • Orientation of Frame
  • Choose Your Aspect Ratio
  • Use Scale
  • Simplify
  • Shoot from the Heart
  • Listen to Other Voices (Very Carefully)

And there is plenty more content to complement and extends these ideas. What’s not shown in a list is the excellent and sage advice throughout the book. I will let David duChemin have the last word…

Pace your-self. Anyone can master a camera; that just comes with time. It’s the other stuff — learning to think like a photographer — that takes so much work and allows this craft to become the means by which you create art.
The Visual Tool Box by David duChemin

And it is thinking like a photographer that you will quickly learn from reading this book.

How to buy this great book

This book was originally published as an ebook. However, it is no longer available in that form. The book has moved into the real world. It will be available on Amazon as a Paperback From 31 Mar 2015.
The Visual Toolbox: 60 Lessons for Stronger Photographs (Voices That Matter)You can per-order the book from Amazon.

Comments, additions, amendments or ideas on this article? Contact Us
or why not leave a comment at the bottom of the page…

Like this article? Don’t miss the next — sign up for tips by email.

Damon Guy - Netkonnexion

Damon Guy (Netkonnexion)

Damon is a writer-photographer and editor of this site. He has run some major websites, a computing department and a digital image library. He started out as a trained teacher and now runs training for digital photogs.
See also: Editors ‘Bio’.
By Damon Guy see his profile on Google+.

A simple introduction to tripod sharpness and tripod heads

PhotographyPhactoids

Photography Phactoids number 006.

Buying a decent tripod can be quite taxing. Getting a quality result requires a quality tripod. Many photographers do not realise how important the tripod head is that fits on top of a good tripod. Today we have included a new article in our Photographic Glossary that explains all about tripod heads, how they work and the different types.

Photographic accuracy and sharpness

It is surprising how accurate your photography becomes as you develop. After all, improving your sharpness (see: The Zen of sharpness – 12 easy ways to improve) is about tightening up your camera control and minimising any movement in the process of taking the shot.

Most starter photographers rarely use a tripod. After a while they realise that the softness they suffer is down to poor control of the camera and lack of a tripod. What they do not realise is that a poor tripod is as bad as no tripod at all. I know many, many people who have bought cheap and then had to buy again – because with tripods, cheap is rubbish!

Well, the same can be said of tripod heads. A poor piece of engineering on a tripod head, or one that is too flimsy will give you as many problems as a poor tripod. Almost certainly you will get poor accuracy, bad alignment, wobble, poor locking and damage. Working to improve your sharpness is about being accurate, tightly controlled and stable in all aspects of the shot – including the tripod and tripod head combination. When everything is tight and there are no weak links you can expect tight and sharp photographs.

Make sure you understand about tripod heads… they are an essential item. You may have a great tripod, but a poor head will let the whole combination down.

See: Definition: Tripod Head for a detailed examination of how the heads work, the different types and some example pictures.

By Damon Guy (author and Photokonnexion editor)

Damon Guy - Netkonnexion

Damon Guy (Netkonnexion)

Damon is a writer-photog and editor of this site. He has run some major websites, a computing department and a digital image library. He started out as a trained teacher and now runs training for digital photographers.
See also: Editors ‘Bio’.

Portrait vs. Candid – overcome the fear

When is a portrait not a portrait?

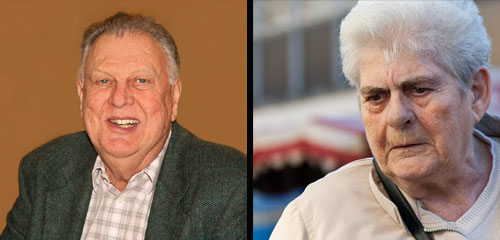
Portraits and candids are two types of photography that showcase people. A planned photograph taken in a controlled location is known as a portrait. On the other hand, a spontaneous photograph in an uncontrolled location is known as a candid.

A portrait is…

A portrait is a good way for someone to present an idealized picture of themselves to the world. It is a composite result between the direction of the photographer and the wishes of the portrait sitter. From this co-operative effort comes a synthesis that represents how the sitter wants to be seen and how the photographer wants to bring out their character. It is in essence an artificial situation. The trick that the photographer seeks to pull off is a realistic representation of the sitter. That is where they need to be careful to pick the right moments to take the shot and the right props and background to emphasise the character of the sitter.

The candid is less controlled…

A candid is more of a snapshot of someone when they are behaving in a normal every-day situation. The element of control is limited. True the photographer can pick the time and place to stand and take a candid. They can also pick who they photograph. Exactly what they photograph is a matter or luck. They have to pick the people they see and hope that something special will be the result. The essence of candid photography is to capture the subject in a way that shows their character or a particular mannerism or their features in a realistic way. Again, the photographer has to pick the right moments to take the shots. However, they do not have the power of direction to ask for poses or expressions.

What’s the issue?

There is a very big point here, at least for some. You have to take the candid in a stranger-to-stranger situation! THAT, for most starters in street photography and photography in general is a big deal. Getting out there in the street and capturing people in their everyday lives is difficult. It makes you feel vulnerable. You are out of your element. You feel the lack of control and are sensitive to potential hostilities. Here are Five things to help you get into the candid…

  • Go out with a friend the first few times.
  • Be obvious. Snap away so people don’t fear you.
  • Snap lots of things, not just people. So you capture a few people at first.
  • Try lots of different angles and ideas. Doing the photography will take the edge off your fear.
  • Be you, enjoy yourself, meet people. Talk to some. They are ordinary folk. It’s OK.

find out more...Photokonnexion tips by email
If you enjoyed this article please sign up for our
daily email service.
                                                 Find out more…
#11030#


By Damon Guy (author and Photokonnexion editor)

Damon Guy - Netkonnexion

Damon Guy (Netkonnexion)

Damon is a writer-photog and editor of this site. He has run some major websites, a computing department and a digital image library. He started out as a trained teacher and now runs training for digital photographers.
See also: Editors ‘Bio’.

Get your settings right with all file types

File-formats and settings

The power of the file format you use…

Most photographers don’t think about settings and file formats when starting. First off, most people just want to take pictures. Down the road you need to think about what you are doing more carefully. You will need to get into RAW processing to overcome the shortcomings (but also, see my comment after this article)

File formats

When you think about settings and file formats it appears very technical. It’s not easy to work out what you need to know. Here are the basics. There are two in-camera file types for photographers…

  • RAW = a file type for capturing all the data from your camera, but which needs developing (post processing) after the file is downloaded. There are many manufacturer-specific versions of the RAW format.
  • *.jpg = a specific file type created in-camera from a RAW file. It is processed by the camera. The *.jpg format was originally designed only for transmitting and displaying files. It is extremely limited for post processing and easily degraded.

Both file types are useful for certain things. The RAW format is ultimately the most useful for photographers because it is so flexible. It allows you to develop the image you want from the picture you have taken. The *.jpg file on the other hand is processed for you, in a limited auto-processing system over which you have little control. It is confusing for beginners because *.jpg files create reasonably good images. But it is difficult to make them do what you intend. Beginners eventually find they cannot create the excellent images that RAW users produce. Nevertheless, starters use *.jpg because they don’t understand RAW and processing – they are stuck without help.

The processing is already done for *.jpg files by the time they are downloaded. Most beginners think they have something special when they get a great image straight out of the camera. Actually they are getting something processed according to someone else’s ideas. So it is not entirely their creation.

How do you break out of this situation?

The easiest way is to do a course or join a club or both. Then you can gain the experience and techniques you need to learn while having fun with others who share your interests. There are lots of courses and clubs around. More specifically you will have three goals. You need to learn how to…

  • Control your camera to get the picture you want.
  • Do post processing to produce great images.
  • See great scenes and compose them to create great images.
Along the way…

At some point every aspiring photographer is told, “why not try moving to RAW, that format gives you greater control over your processing”. This is true and a worthwhile pursuit.

What most beginners also hear along the way is something like this… “It is easier to shoot in RAW because you don’t need to worry about your settings so much”. “You can sort it out in post processing”.

This whole “sort it out later” attitude is a recipe for disaster. Here is my reasoning…
Most beginners:

  • Have an underdeveloped sense of colour.
  • Are not sensitive to light intensity or brightness variations.
  • Have an underdeveloped sense of the quality of light.

And crucially…

  • Cannot properly remember the colours shades, tones and brightness levels at a scene until they can start the post processing hours or days later.

The result is that during processing colours, brightnesses, tones and shades get over/under processed owing to no reference point. The resultant image is often a long way from reality. Incidentally, as your eye/mind system develops the “photographers eye” you begin to remember these details much more.

I urge you to cultivate the habit of fine control of your camera. Every shot, or at least every set of similar shots, should be set up individually. Be obsessive about it. Then, when you get your work into the computer, your post processing has a realistic starting point. It is easier, and more realistic, to process a picture that starts out very close to your intended image.

There is another reason to be obsessive and accurate about controlling settings from the start. Bad habits are really, really difficult to break. If you get into the habit of sloppy settings from the start you will almost certainly be a lazy photographer. I can assure you that will condemn you to many hours in front of the computer doing menial development tasks. It is much easier to get it right in-camera from the start. Then you can slightly tweak it later. Breaking a sloppy habit to get fine control of your camera later is a long, hard road.

Professional photographers are obsessive about getting the settings right. They know that the difference between an amateur and a professional is getting EXACTLY the image they want. And, they know they will not get that exact image by being sloppy. Precise, accurate and pre-set control is the name of the game if you want to create sharp, and realistic images.

So, forget about ‘rescuing images later’. Do your photography correctly from the start and do it using RAW files.

Addendum:
It is important to consider the tools you work with. If your camera does not offer the opportunity to save RAW files you have to work with what you have got. Nothing wrong with that. It is worth reading my comment after this article.

By Damon Guy (author and Photokonnexion editor)

Damon Guy - Netkonnexion

Damon Guy (Netkonnexion)

Damon is a writer-photog and editor of this site. He has run some major websites, a computing department and a digital image library. He started out as a trained teacher and now runs training for digital photographers.
See also: Editors ‘Bio’.

New verses the old – photography in flux

The photographs of the past have suffered from lack of contrast depth, but they are still precious.

Photographs of the past are still precious. Old style photography has given way to the great technology of today. We should want more for the future of photography. However, we should not forget the roots of our skills.

Photography has changed a lot in a short time.

As a result there has been a global image revolution. Photography is the latest form of communication that has moved into the public realm. Sometimes we need to be careful about what we have lost as well as what we have gained.

Contrast depth

For many years I waited for digital to become a reality. I have been doing computerised image editing since 1988 and photography for much longer. Waiting for digital camera technology became frustrating. Today, digital is here to stay, but it still suffers from its problems. Readers of this blog will know that I am concerned about the poor contrast depth in digital cameras. Digital image sensors are getting better. Nevertheless the eye is still better than the camera for seeing into the depth of a scene.

Today manufacturers want to keep selling on the basis of real improvements in the technology. They sell the latest upgrades on the basis of technical steps forward. In my opinion most of the technology upgrades in the last two years have been about tweaks, not real technology leaps. What we need the manufacturers to do is tackle the real problems. More realistic photographs will have to come from getting pictures that more closely resemble what the eye sees. for that reason contrast depth is something that will have to improve. It is one of those problems never solved by film, it is still weak in digital images.

Great new technology

We have seen some wonderful leaps forward. Night-time photography has seen the biggest improvement over film. The digital sensor is a great improvement over early photographic night work. The ability to produce images using incredibly low levels of light is a real leap forward. Its a pity that most people don’t do more night photography.

Another great leap forward in modern photography equipment is auto-focus. While I personally enjoy using manual focus it is not very often that I have to resort to doing so. In the main macro photography is best done with auto-focus. When you are working with a very shallow depth of field you should be careful to ensure that what you want in as the subject is where the focus is centred.

Auto-focus has its problems. On a tripod the action of the auto-focus motor actually creates movement and vibration. The vibrations reverberate up and down the tripod and cause movement-softness while the shutter is open. So beware of this issue and work with manual focus on a tripod.

In general auto-focus, for me, beats manual focus for most things. It is with the thorny issue of poor contrast that forces me to use manual focus. Sensors are so poor at reading contrast in a scene (which the eye can see easily) they often hunt for a focus match in twilight. Of course that is prime shooting time. So the issue is something of a problem.

Often forgotten from past photographic experience is the single focus point in old film SLRs. The big round circle where the focus point lay has now been replaced by a range of pinpoints where we can arrange the focus to be placed. This has been a revelation for the improvement of composition, especially for amateur photographers. Being able to focus off centre and control the focus to meet the need of the shot in that area is excellent. Many digital photographers without the experience of the old SLRs may not recognise this issue, so just rejoice in the AF points array.

What have we lost?

I am for learning and changing with the technology if it improves the shot, but definitely go for the old school where digital cannot cope. Are there places where we can still be better off using the old skills?

Once upon a time photographers were limited by their equipment so they could control only three things. The depth of field, the length of exposure and the sensitivity of their film. Keen photographers know these today as Aperture, Shutter Speed and ISO. They are the key components of exposure. Despite those being so important in the past, today the vast majority of people taking pictures have probably never heard of them. If they have they do not know what they mean. I am talking here of your average happy snapper. They will probably never read this blog or any like it. They just get pictures they like from a camera that is pretty automatic. People are right to be happy with that if that is as far as they want to go.

For me, the expression of my photography is in the power of the images I produce. If I enrich my viewer through an image, then I have succeeded in communicating. I personally don’t feel that using the automatic functions of a modern camera can help me much. I believe they are set up to please the person who expects a picture to be representative. I want my images to go beyond representative. I want them to be individual, the result of what I see, an expression of the way I see the world.

To meet my personal aspirations for an image I want to have control over the elements of exposure. That means falling back on those old settings… Aperture, ISO and Shutter speed. If I succeed in mastering these essentials of exposure then I can make my image fit the vision I have for it. I don’t want to ‘snap’ and get just a picture. I want to breath life into an image so it tells a story. Only the old skills can really do that.

By Damon Guy (author and Photokonnexion editor)

Damon Guy - Netkonnexion

Damon Guy (Netkonnexion)

Damon is a writer-photog and editor of this site. He has run some major websites, a computing department and a digital image library. He started out as a trained teacher and now runs training for digital photographers.
See also: Editors ‘Bio’.

Is your shot ruined by bright white spots?

Lighting is about the balance between contrast and intensity.

Lighting is about the balance between contrast and intensity. The camera does not have the same range of light tollerance as the eye.

Lighting only works if the camera can cope.

To retain all the detail in a picture, light levels must be within the capability of the image sensor. Eyes see detail in a wider range of light intensities. The camera is quite limited in its range.

If you want to be able to see, for example, detail under the trees in shadow, and detail in the cloud, you need to take two exposures. One for the sky and one for the shadow. Then you can combine them in post processing. This is because a bright sky and a dark shady area is too much of a range of contrasts for the sensor to cope.

The image sensor can see the detail in the shadows perfectly well. It can see the brightness in the sky perfectly well. If you expose your shot for either you will get a great shot. Expose for both and you will get either a blown out sky or a black shadow. The dynamic range is too large.

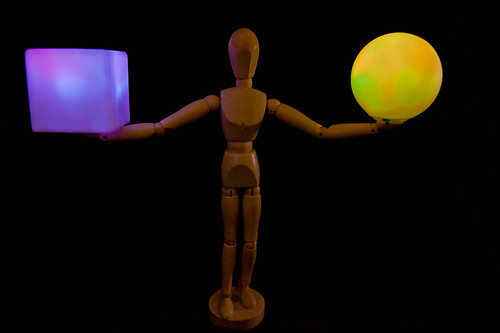
In the photograph above the artists dummy is unlit directly. The orbs it holds are self-lit. This was a difficult photo to take. The dummy was too dark and the lights too light. The light intensity between the two was too great for the sensor to cope with. Without independently lighting the dummy I had to rely on post processing to fill the light on the dummy without increasing the light in the orbs. Easy enough in PhotoShop. But how do you do it in camera?

If the contrast between the lightest part of your scene and the darkest part of your scene is too large you simply cannot take the shot and keep all the detail. You have to find a happy medium. The way to do that is use the blinkies!

Look up in your camera manual how to turn on the blinkies (often associated with the camera histogram). When you look at the back of the camera after a shot the blinkies will show. They blink-to-white if the detail is lost in very bright spots. They blink-to-black in the very dark spots. These are the areas of your shot that the detail is lost. They are also the most distracting part of the shot. If a shot has large areas of blown out white you will draw the eye away from your subject to the white spots. Your shot immediately loses impact.

The answer is ‘chimping’. Take the shot you want to take. Take a look at the shot (Chimping). If it has blinking areas you need to find another way of doing it. Try to find a way of taking the shot so there is no blinking (either black or white). What you are looking for is to reduce the contrast. Take the shot in a brighter place altogether, or take it in darker place. The aim is to reduce the contrast between bright and dark. Then the sensor can cope.

By Damon Guy (author and Photokonnexion editor)

Damon Guy - Netkonnexion

Damon Guy (Netkonnexion)

Damon is a writer-photog and editor of this site. He has run some major websites, a computing department and a digital image library. He started out as a trained teacher and now runs training for digital photographers.
See also: Editors ‘Bio’.

Exposure metering and exposure compensation

Start to get control of your exposures

Many beginners do not realise that the photograph they take on auto-settings is an auto-programed response by the camera. The camera senses the light and makes a decision on the exposure. It takes into consideration the lens, the ambient light and if the flash is set to auto. Then it takes its exposure according to some pre-programed instructions in its on-board computer. As this requires no intervention by the user it looks like the exposure is fixed. However, nothing can be further from the truth.

The user has quite a lot of control over exposure. In fact there is no such thing as a perfect exposure. There is only the exposure you prefer. The camera manufacturers have done a pretty good job of creating a ‘typical’ exposure for the layman photographer. Set the camera on auto and away you go. You get credible shots, they look bright and lifelike. What more do you want? Well, the keen photographer soon realises that the programed exposure is a bit limited.

Book Suggestion…
If you want to improve your exposure get into manual control. This book gives you lots of interesting insights and great pictures. A clear narrative and a well organised book. The most important point? It encourages you to get away from auto and get control of your camera.
 
A great book – a recommendation from me!
Damon Guy – Photokonnexion Editor

 
What if you want to introduce a romantic tone into your shot. A little under-exposure does wonders for adding atmosphere. The brooding shadows of an underexposed shot brings out the mood. On the other hand, a high-key shot (very bright and very vibrant) often requires a little over-exposure. The programed response cannot do that. Alternatively, in very bright or very dark scenes you can also compensate, using exposure compensation, to help the camera out and brighten a dark scene or darken an over-bright scene.

In the two videos below you will learn about how to use your camera meter. Then, how to affect your exposure using exposure compensation. These two features of the DSLR provide you with the tools to start influencing your exposure. It is a great way to start learning about your camera light meter too. So follow these through and you will be on the way to gaining greater control of your camera.

Digital Photography 1 on 1: Metering Part 1…

Digital Photography 1 on 1: Metering Part 2: Exposure Compensation

By Damon Guy (author and Photokonnexion editor)

Damon Guy - Netkonnexion

Damon Guy (Netkonnexion)

Damon is a writer-photog and editor of this site. He has run some major websites, a computing department and a digital image library. He started out as a trained teacher and now runs training for digital photographers.
See also: Editors ‘Bio’.