Tag Archives: Contrast

Using the sun to create shafts of light

Golden Morning - Light shafts pierce the mist

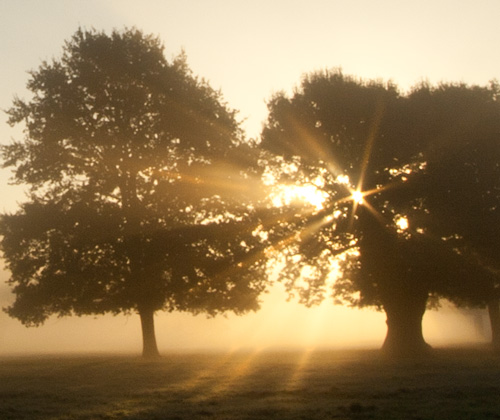
Golden Morning – Light shafts pierce the mist

Atmospheric shots – look for light shafts

Look out for the early morning or evening mist that creeps across the landscape. If the mist is with a clear sky, you are in for a photographic treat. This is one of the most atmospheric shots you can take.

What are light shafts?

We are talking about those lovely rays that pass through the air highlighted by the mist. They often pick up the golden colours of morning or the wonderful oranges/reds of dusk.

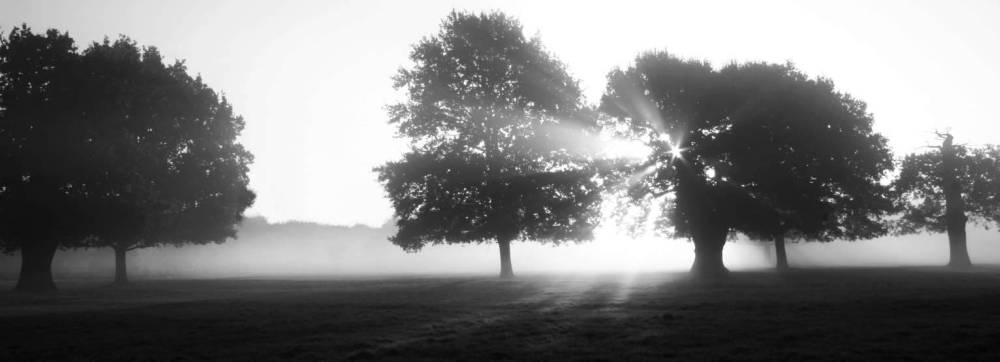
Misty conditions can arise in lots of ways. Early morning or evening chill after a warm day often creates mist. It’s best as a ground mist. Up above the rising or falling sun is bright, golden and low. Under these conditions you have the perfect situation for light shafts. It is the shafts of light falling through the mist that create the effect. Although often there does not need to be much more than a hint of mist. Sometimes only a moist air is enough. This is especially so if you are in a dark forest with bright light penetrating deep between the dense canopy. The strong contrasts will often pick out the light shafts.

Misty Morning • Look for light shafts

• Misty Morning •
Look for the way the shafts of light cut through the mist

How do you capture light shafts

Actually, very easily. Be careful however, because you can damage your eyes or camera. Here is what you do…

Look for the shafts of light you can see with your eyes. If you can see them then you can often bring them out in-camera by slightly over exposing the light shafts. Set your camera focus to measure light using only the centre point of the viewfinder. Check your manual to find out how. Then, make sure you point it at a dark spot – like the trunk of a tree. The camera will measure for the darker areas of scene. This will brighten the scene and light shafts will stand out strongly. You will need to use one of the manual modes to do this.

You can also look for very bright spots coming through tree cover. This is often only the case if your camera is pointing directly at the sun. This can be dangerous so only do it if tiny points of light are coming through. NEVER look directly at the sun with your eyes or through your lens. If you can, use live view. Then you will not be looking directly at a bright light. If you are able to see a place where most of the light is blocked you could capture a few rays. Powerful as they are, they will cause strong lens flare. Often this will emphasis light shafts coming through the mist.

Light shafts – examples

You can check on this search on Google Images to see a whole page of light shafts. There are so many around the web that you cannot fail to be inspired…
Google Images :: Light shafts  External link - opens new tab/page about light shafts

Getting there on time

This is one of those techniques that work best with the Golden Hours of morning or evening. So you might need to get up early. Looking out for the right conditions is crucial. So is making sure you are in the right light/dark conditions. Forests and woodland are best. Most of all, be at one with nature. These shots make exciting images to look at. They are wonderful to experience too.

Comments, additions, amendments or ideas on this article? Contact Us
or why not leave a comment at the bottom of the page…

Like this article? Don’t miss the next — sign up for tips by email.

Damon Guy - Netkonnexion

Damon Guy (Netkonnexion)

Damon is a writer-photographer and editor of this site. He has run some major websites, a computing department and a digital image library. He started out as a trained teacher and now runs training for digital photogs.
See also: Editors ‘Bio’.
By Damon Guy see his profile on Google+.

Background check – simple is best, then check it

Creating Perfect Backgrounds

• Creating Perfect Backgrounds •
Bryan Peterson looks at one of the simplest lessons in outdoor photography – but one that gets effective results.
[Image taken from the video]

Perfect backgrounds…

It’s easy to spoil a great subject by picking the wrong background or using one with distractions. Taking the time to look around is worthwhile – then do a background check. Here are some pointers to help.

Great images include great backgrounds

A wonderful subject is not the only thing that makes a successful image. It is the whole image that the eye sees. With a great subject but a distracting background you will lose the viewers eye to the background. Equally if the background is too cluttered it will draw attention away from the subject. Strong contrasts, clashing colours, peculiar events or something ugly in the background all take their toll.

Simplify, simplify, simplify…

Try to find interesting textures, colours and scenes for the background. Keep the contrasts to a minimum. Make sure no one is going to walk into the shot or create another type of distraction. In other words make it as easy as possible for your viewer to concentrate on the subject. It is all about showing off the best – and that is what you want the subject to be.

What to look for at the back of your shot

A certain amount of uniformity helps. If what lies in the back of the shot is too diverse the eye looks to see what the background is all about. Therefore, it becomes a distraction. Then the subject is lost to the eye.

If it is too consistent the same is true. You risk losing the viewer because there is no background interest to off-set your subject. So there is a balanced artistic decision required. But with practice your eye will begin to see when something draws the eye once you become alerted to the impact of the background.

The background check

No, it’s not about identity papers. The background check is all about looking around your viewfinder to see what you think of the back of the scene. When you frame up the shot it is easy to think of the composition and placing the subject in an interesting position. But forgetting to check the quality of the background is fatal. Parked cars, flying balls, litter blowing in the wind – a whole range of distractions – can all suddenly appear. Worse, they can be there all along and you have just not seen them.

The background check is simple. Look around the edge of the frame. Make sure no odd items are sticking into the shot. Look for an interesting texture and colour range. Make the colours complementary and well defined, but not too contrasting. Check to see there are no very bright or dark zones. Brightness drags the eye off the subject. Darkness tones down the interest in the shot.

Clean, tidy and well composed…

When you have checked everything, the back of the shot should be clean, tidy, well composed and not distracting. Then you can do one last quick check on your subject. If all is well press the Definition: Shutter Button. Presto – a great shot.

Creating the Perfect Background with Bryan Peterson

By way of example Bryan talks us through a situation in a park where he makes the best of the back of the shot – checking for problems and emphasising his subject.
Adorama Photography TV  External link - opens new tab/page

Comments, additions, amendments or ideas on this article? Contact Us
or why not leave a comment at the bottom of the page…

Like this article? Don’t miss the next — sign up for tips by email.

Ansel Adams – Master Photographer

Ansel Adams Video

• Ansel Adams BBC Master Photographers (1983 •
Ansel Adams speaks about his photography and his development.
Picture taken from the video.

Exquisite insights to a legend.

The videos I show are usually for you to quickly watch and learn. This one’s different. It’s longer (34 mins.). And, there is so much in it that you will want to watch it over and over again. The wonderful insights run deep and some show us how much photography has changed.

Ansel Adams’ ideas, photographic insights and depth of feeling is magnetic. He was probably one of the first philosophers of photography. He was one of the undoubted masters too. I hope you enjoy this video as much as I did.

Ansel Adams – “BBC Master Photographers” (1983)

Uploaded by: Rob Hooley External link - opens new tab/page

Can you write? Of course you can!
Write for Photokonnexion...

We would love to have your articles or tips posted on our site.
Find out more…
Write for Photokonnexion.

By Damon Guy (author and Photokonnexion editor)

Damon Guy - Netkonnexion

Damon Guy (Netkonnexion)

Damon is a writer-photog and editor of this site. He has run some major websites, a computing department and a digital image library. He started out as a trained teacher and now runs training for digital photographers.
See also: Editors ‘Bio’.

Five easy tips for better photos in difficult weather and light

Its easy to make weather excuses, but….

We can actually find a way to shoot in almost any weather situation. Here are some tips to get the shot even though the weather conditions are not ideal for a photograph.

1. Rain…

Cameras hate water. If there is a sure fire way to ruin your equipment, get it wet. So we want to dodge the rain shots. Actually rain is fun. You don’t need to be shooting right in the rain. Most of the time there is cover you can use to work from for your shot. Shop fronts, cars, through open windows, under canopies… you can think of thousands of rain hides if you try. And, rain provides lots of great things to shoot too. Rain is a great cleanser. The pavements and side roads are dust-free, shiny, or with splashing drops and running water. Yet life goes on. Street photography becomes dynamic, frenetic and full of new behaviors. People are doing things they normally do not do. They run, they put up umbrellas, they crowd under cover… lots of great behaviors that often do not get photographed. Look to catch people in the puddles, jumping, dashing for cover. Look for colours and reflections. Look for droplets, wet surfaces, running water. Most of all try to catch the reactions of people as they try not to get wet. Rain is great fun. Don’t hide your equipment away. Get out and take some great shots. After the rain look for skyward glances, great reflections, splashes and people emerging from cover.

2. High noon…

A high and harsh sunlit situation is not good for any kind of photography. Normally we think of it as pretty awful for any kind of portrait shot. The direct light creates washed out, over-exposed areas of the shot. The faces look flat and colours lose the subtle tonality. You can still get a great shots though. Seek out some cool, even shade. Under the canopy of shops or malls is ideal, or maybe within the shade of a substantial tree. Look for anything that provides enough shade for you and your subject to get out of the direct sunlight. However, stay near to the main sunlight area. The direct sunlit area will act as your main light source. The shade will act as a diffuser. Now, make sure you do not shoot into the direct sunlight or deeper darkness of deep shade. Try to keep your shot on your subject and make sure any background you use is also in the same light-shade level of intensity. That way your contrasts and colours will all be within the same dynamic range of light – which your camera deal with. However, the main light source will be diffused – creating a lovely soft, bright light source. Remember, if you shoot out of the shade into the sun you will find the contrast range too high. You will get bright highlights and over-exposure which will draw the eye away from your subject. So keep the shots tight to the light level you are working within and your shots will be fine and bright. Don’t shoot in mixed or dappled light.

3. Insufficient shade?

Avoiding very hard light or direct sunlight makes sense but what if you cannot find enough shade for you and your subject to be in the same light. If you are trying to photograph a person the impact of this direct light is particularly hard on their face and unflattering. Unfortunately putting your subject into the shade can make the situation worse. The darkness in the shade contrasts strongly with the bright light outside where you are standing. So you get bright spots in your shot and harsh darker areas in the deeper shade – very distracting. To overcome this high contrast situation take your shot on the shadow line. Line up the person you want to shoot on the shadow edge so the bright light is softened. In this intermediate place your subject gets the golden glow from the brighter light but it is softened by the slight shadow.

To help your camera to cope try to shoot from the same half-in half-out of shadow position too. The contrasts will not overpower your sensor there. If you get it right you will split the light to make it just right. Carefully placed you will capture the lovely sky and background but not lose detail in the shadow-darkness under the shade. Be careful not to get dappled light from sun through the leaves, and make sure the shadow line does not cross your subject. Bright contrasts and sharp shadow lines on the subject are very unflattering. Instead shoot along the half shade into the brighter light utilising the foreground weaker light as your main source for the subject.

4. The sun flattens the landscape

Often, particularly on holiday or when out on a shoot, we cannot wait for the golden hour. We are in a place where there is a deadline to move on and you want to get the shot. Unfortunately the high, direct sunlight flattens everything, eliminating shadows and ironing out colour tones. The light is boring and harsh and the shadows minimal.

How do you get the landscape? Include more sky than usual. Often in these situation the most interesting lighting is for the sky. The clouds and far away places look good. So expose for the sky and reduce the amount of landscape you include. This means using the sky as the main bright source of light. Point your focus point to a cloud. If the auto-focus ‘hunts‘ and will not focus turn it off and focus manually. Make the sky your subject and concentrate on the distance and sky. This may mean some of your foreground will be slightly underexposed. However, it is easier to brighten the foreground or a near subject later in post-processing if you have exposed for the sky.

#11030#

5. Dreary, grey diffused sky light

Another bad light situation for the photographer is the dreary grey day. Uniform light from across the sky leaves little or no shadow detail anywhere. Everything looks flat and dead. The problem here is there is nothing in the landscape that provides relief for the greyness. The sky is difficult too – you cannot do foreground shots as the uniform lack of colour or shadow means everything is pale and uninteresting. The distance has lost its sky appeal too. Even exposing for the sky creates almost uniform grey.

Well, this is the time to get out the flash. Off-camera flash is best, although pop-up flash will also do the trick. Get close to the ground or a surface with great texture. Then, shoot along the surface with the flash. If the flash is off-camera set it off to one side so it exaggerates ground shadows. If you are working with pop-up flash then make sure you work with the shadow at its maximum. This may mean shooting with your camera upside down so the light is really close to the surface and the optical axis is across the surface lit by the flash. If you use a relatively wide aperture, these low-level flash shots will bring out shadow detail in the foreground and leave the distance in bokeh and out of focus.

Some places to find great surfaces for this type of shot are low grasses, sandy or gravelly surfaces, tarmac, along road lines, autumnal leafy forest floors, bare rock… well, you get the idea. Seek out any surface that provides texture for you to capture. Lots of small to medium undulations and detail is best. Large objects will block the foreground so reserve them for the middle distance.

Remember the five rules…

The key to difficult weather and light situations is…

  • Find the right vantage point to shelter/shoot from
  • Maximise the opportunities for spotting unusual behavior
  • Make the most of the weather opportunities (sky, puddles, splashes etc)
  • Keep the light where you are shooting within approximately the same dynamic range
  • Look for, or create, light situations that exploit texture detail

By Damon Guy (author and Photokonnexion editor)

Damon Guy - Netkonnexion

Damon Guy (Netkonnexion)

Damon is a writer-photog and editor of this site. He has run some major websites, a computing department and a digital image library. He started out as a trained teacher and now runs training for digital photographers.
See also: Editors ‘Bio’.

How to make your monochrome shots moody

Honiston Tops - The English Lake District. Mono shots are so open to moody interpretation.

Honiston Tops – The English Lake District. Mono shots are so open to moody interpretation. Click the picture to view large
By Netkonnexion on Flickr External link - opens new tab/page

The contrasts in monochrome make it suited to moody scenes.

Yes, we see so much in the gloom! Mono is a great way to express the deep, dark and threatening. It is also uplifting in many ways. Look at how we can enhance our shots…

Landscapes

The beauty of a landscape is not about the weather. It is in the character of what we see in the country and the shapes and forms. However, the weather can complete it. A beautiful day in the scene above can equally light up the sky and uplift the sole, even in this desolate place. Surely colour is more suited to that uplift? Probably. Weather is the icing on the cake. If you can capture it with the contrasts fully expressed you have a winner. The depth of the cloud darkness has expressed the awesomeness of those wonderful clouds. What is great about this type of shot is the depth of the greys and blacks, as well as the highlights of the whites and bright spots. In a landscape the moodiness lies in the contrast through that spectrum. Try to express the full range of blacks right through to whites to bring out the mood.

Subjects

The use of a great subject is really the key to a moody monochrome. Some subjects really lead us to the moody feeling. Candles are a great example. If we are to express a deep gloom the candle is perfect. Candles express our fears of shadowy corners and the lurking danger just out of our sight. They seem to sum up a real essence of the past and the primeval fear that they were meant to chase away.

The moodiness of candles is often created by the type of exposure you take.

The moodiness of candles is often created by your exposure.
Click image to view large.
Moody Candles
By Netkonnexion on Flickr External link - opens new tab/page

Again, it is the contrastiness that does the trick. The brightness of the flame and the luminous glow that hugs so close to the wick really exaggerates the darkness in the background. To take a shot of a candle you need to focus on the flame so that you can expose for the bright spot. This is wonderful for monochrome since the exposure will leave the background really dark that way. Other subjects that bring out the moodiness include dark alleys, dim corners, and the contrasting brighter spots – safe havens in the darkness. Again, look for the deep blacks right through to the bright spots to bring out the moody and threatening in your monochrome.

Faces

It is great to find deep expression in faces too. It’s often contrastiness of the lighting in a portrait that brings out moodiness in the shot. The archetypal villain in the wide brimmed hat, hiding in the darkness underneath it, or on the dimly lit corner, is a great example. Think of the dark and uninviting holes where you see villains portrayed in stories and films. You too can express these things in your photography. It is about the contrasty blacks through to whites again. More black – moody. More white – uplifting! The timeless battle between good and evil.

The moody face, of course, can be more than just deeply-dark to brightly-bright lighting. Often moodiness in the face can be highlighted through sheer expression. It is important to make sure that if you are going for moody that the expression supports the scene. Remember nothing will work if you break the mood. Dark, dim and dank, is trumped by jumping for joy!

By Damon Guy (author and Photokonnexion editor)

Damon Guy - Netkonnexion

Damon Guy (Netkonnexion)

Damon is a writer-photog and editor of this site. He has run some major websites, a computing department and a digital image library. He started out as a trained teacher and now runs training for digital photographers.
See also: Editors ‘Bio’.

A composition tip to make you look like a pro…

"Old and new" - one of the many ways to make a contrast

“Old and new” – one of the many ways to make a contrast.

A punchy composition gets attention every time.

The way you make your audience sit up and look at your work is to catch their eye. It is not always easy. However, a strong composition helps. One way you can really make them look is to use sharp contrasts.

What is a contrast?

In photographic composition a contrast is when we see a striking difference between one thing and another. We want to identify something that may have the same origin as things around it. Yet, despite that, it’s strikingly different, or strikingly out of place. We picture it because it is extraordinary that it should be there and at odds with its surroundings or others of the same origin.

Often when we compose a photograph we are looking to maintain a consistent approach to the scene. We want it to look as if all the elements in the frame belong there and fit in. Beauty or aesthetic success depends on the composition being well adjusted and contains the things we expect to be there. In a photograph with a contrast we are trying to do the opposite. We are pulling out the strong differences, opposites; the extraordinary among the ordinary.

How to find contrasts

Contrasts are difficult to spot simply because they hide within the range of our everyday lives. The familiarity we have with them makes them almost mundane. Yet when they are pointed out the power of the contrast comes out. Here are a few things to look for…

  • Category contrasts: Modern buildings in a business park with one very old building (like my picture above)… These are where you show something of the same type, but demonstrate they are very different in the shot.
  • Colour: A picture with strong tonal variations throughout on one colour invaded by just one contrasting colour at some point in the picture. Black on white; red on green.
  • Opposits: right-way-up verses upside-down; many of one opposing one of another; back to front; normal vs. inside-out.
  • Same but different: People – man vs. woman; Cars – old against new; Young vs. old
  • Objects: soft vs. hard; strong vs. weak; round vs. angular; broken vs. complete
Where are all these contrast?

Its true to say that the most striking contrasts are often missed. They are so much a part of our modern life that it’s often only photographers and comedians who see them. Comedians explain them simply – the absurdity makes them funny. Photographers depict them simply and make them stand out.

Because many of the best contrasts hide in plain site there is one really good way to bring them out. Separate them from the surroundings. Isolate the contrast so it can be openly seen. For example, a tiny tree in a forest is normal and not striking. But, a bare windswept and rocky hillside with one huge tree and one tiny one amongst the desolation brings out the contrast.

It is your job as a photographer to look for things that are ordinary, but different. Look for things that are the same, but strikingly displaced from the normal. These contrasts are fun. They make great subjects. They catch the eye and challenge the mind of your viewer.

Six tips for photographing silhouettes

"Figures on the dunes"

“Figures on the dunes” – the art in silhouettes is about shape
Click the image to view large

Shooting silhouettes is about photographing contrasts

The only difficulty with silhouettes is seeing them. Our eyes often see detail in scenes that the camera cannot. We take a shot at something and a silhouette comes out – what’s happening? The difference between the brighter and darker areas of the shot creates a silhouette.

1. How a silhouette is created

Humans, and cameras, see a silhouette when there is a foreground-object placed in front of a strongly lighted background. The foreground-object looks black if it is not lit from the front. The strong back-light just looks bright behind the black and this creates the silhouette. In other words, the contrast between the bright background and the dark foreground object is so large the camera image sensor, cannot resolve details in it, leaving it black. In photographic terms, if there is more than two stops difference in the light between the foreground object and the background lighting there will be a silhouette.

"Cows Grazing" - Creating silhouettes is fun and easy.

“Cows Grazing” – Creating silhouettes is fun and easy.

In the picture above the tiny cows on the brow of the hill are black (dark) objects because they are not lit from the front. The sky behind them is relatively bright compared to them. So, a silhouette is created.

Clarity of the image is everything. So, in addition to ensuring the edges of your silhouette are well defined and not confused with clouds and other objects, make sure they are sharp. The shape is important, so is the focus. The simplicity and purity of the silhouette is lost if the sharpness is not there to support it.

2. You can ensure something becomes a silhouette

A silhouette will be created every time a dark foreground object is placed against a brighter background. However, sometimes you can still see some detail in the foreground object, which is not a true silhouette. There are some things you can do about this.

  1. Lower the foreground lighting to darken the foreground object
  2. Brighten the background increasing contrast between front and back.
  3. Underexpose the foreground making it go black so the background stands out.
  4. Overexpose the background so it darkens the foreground object.
  5. Post-process the image to blacken the silhouette and brighten the background

In effect the techniques increase the contrast between the front and back. That blows out or brightens the background. This relatively underexposes the foreground object so detail is lost making it black. If you do any of these, or more than one of them, you are controlling the light to create a silhouette. You can do these to a lesser or greater extent with a scene you create, or one you see when you are out and about.

3. The art in is in the shape

The silhouette art form has been used to strongly characterise shape since the time of the Greeks. The stark and well defined edges in a silhouette are simple and attractive. Dating from around 1750 onwards, the method of making silhouettes was to cut them from thin black cardboard and mount them on a white background. This established a strong tradition of high contrast silhouette art. In the last 150 years the cut-out form of the art has mostly been replaced by photography silhouettes.

A powerful silhouette is about shape. The more graphic you can make it the more the image stands out. The best silhouettes are two dimensional although modern photographic techniques allow for the scene to have depth and apparent texture. The trick in producing a successful image as a silhouette today is therefore to provide a clear image, a traditional shape-format for the silhouette shape itself, and a great photograph in which the silhouette has context.

4. Sunset and sunrise

These are ideal times for creating silhouettes. The darkening sky still has sufficient intensity of light for making a photograph. The sky often has great colours too. Highlighting objects of interest against the sky at these times gives not only the drama of high contrast in the image, but also dramatic or attractive colours. Any great sunset or sunrise can be used for a silhouette. The best ones are against a clear sky because the colours are more intense and there is no cloud to confuse the edges of the silhouette.

When working at these times you will need to be working with longer exposures to compensate for the darker tones and colours. Make sure you set out with a tripod. Also read up on night photography because the same settings and techniques apply in these low-light conditions.

5. Bright sunny days

The hottest mid-day light is often a disaster for the photographer. The sun beats down from above and drives out the colours as well as flattening the shadows. Everything looks flat. However, guess what? This is a great time for silhouettes.

Photographing objects against strong, blue, mid-day sky creates great silhouettes. You can lie on the ground shooting straight up at things, or just pick out objects in the environment. Just make sure the contrast between the silhouette object and the background is high. This usually means exposing your shot for the sky itself.

To expose for the sky get the camera to focus on the brightness of the sky. Point it so your focus point in the viewfinder is in the bright area but your silhouette shape is still in the frame. If the sky is very bright, or featureless, the auto-focus may ‘hunt’ and fail to focus. Auto-focus works by matching contrasts of tones. If it does not see a contrast it has nothing to focus upon. So try to find something that can be used. You can try to put your focus point near the silhouette subject, but not on it. That sometimes works. Or, you can focus on a cloud, bird or other object that is still mainly very bright. Once you have managed to get your camera to focus on the sky the silhouette subject will be relatively darker and you have your silhouette. The darker your subject the better it will be in silhouette.

The picture with the cows on the brow of the hill above was taken at about 1.30pm on a bright sunny day. When a few dark clouds passed over the hill nearby I exposed for the clouds. They came out with lovely detail. The cows were little black silhouettes as they were underexposed.

6. Wind and movement

Wind is the enemy of the silhouette – outside anyway. There is nothing worse than your tree waving its branches when you are doing a longish exposure. Even a slight wind can ruin things. The image will look blurry and there will be ill defined edges for the actual shape. So look carefully at everything around you and make sure that you have no movement. If you do have wind blowing, find something solid and immovable with which to do your silhouette. For the same reason, it is not easy to do silhouettes of anything moving, like cars or people.

Do you have any great tips to add to this? Please enter a comment below and we will write them up!