Tag Archives: Composition

Three creative jump start ideas

Post by Ann H. LeFevre

A creative jump start – get going again.

It happens to all of us at least once. Our creativity runs down and we feel uninspired. Those are the times when our cameras feel like they weigh a thousand pounds and our brains seem like they are stuffed with cotton. There are many ways to combat such a slump. What you need is a creative jump start. Here are three suggestions to help you the next time you come up against that photographic brick wall.

The 30 second game

Pick a room in your home at random to try the first creative jump start. With camera in hand, walk into the room. Select a subject (perhaps the first thing you see) and start shooting. Don’t “think” about it; just do it. Make it quick and no longer than 30 seconds. The idea here is to be loose.

The Strat • By Ann H. LeFevre • Three creative jump start ideas

• The Strat •
By Ann H. LeFevre (Click to view large)


Creativity can be blocked by over-thinking about the “next shot”. This little game helps to bring back some spontaneity into your picture taking.

Take Another Look

We get used to seeing things the way we always see things. In this exercise the object is to take something common, perhaps something you see all the time. Then, to look at it from a different perspective.

• Wooden Spoon • <br />By Ann H. LeFevre • Three creative jump start ideas

• Wooden Spoon •
By Ann H. LeFevre (Click to view large)


Look at your chosen object from all different angles. Take a shot from each one. Look up. Look down. Look close. Look all around, taking pictures as you go. Looking at a common object from a new vantage point can loosen up the creativity block. A creative jump start works best with a simple views of things.

Play with Processing

Take one of those “Why did I even take this picture?” photos. Make a copy of the original. Put it into your photo processing program and play around with some special effects. Go all out and experiment. Don’t worry about whether or not you’ll actually keep the picture when you’ve finished. Simply spend time playing around on it for as long as you want. Let your processing ideas flow.

• Sunflowers •<br />By Ann H. LeFevre •  Three creative jump start ideas

• Sunflowers •
By Ann H. LeFevre (Click to view large)


Laugh at what you create. Laughter loosens up your creativity. And who knows? One of those crazy effects may trigger an idea! Processing can also transform an ordinary picture into something that is visually pleasing. Playing with the way a photo looks is a great way to charge up your creativity.

Beyond routine and distraction

Shooting slumps occur because we become anchored to routine or distracted by our busy lives. A creative jump start serves to break those habits and change our perspective. Try one out the next time you’re in a rut and see what happens!

Ann H. LeFevre – contributing author

Ann holds a B.A. in Fine Arts from Bethany College. She is a member of the Pocono Photo Club Pocono Photo Club | External link - opens new tab/page, and participates in the 365 Project Ann H. LeFevre - contributing author on 365Project.org | External link - opens new tab/page an on-line photographic community. She has enjoyed the artistic aspects of photography for many years and enjoys exploring a variety of photographic subjects in her work.

Top ^

Comments, additions, amendments or ideas on this article? Contact Us
or why not leave a comment at the bottom of the page…

Like this article? Don’t miss the next — sign up for tips by email.

Can you write? Of course you can!
Write for Photokonnexion...

We would love to have your articles or tips posted on our site.
Find out more…
Write for Photokonnexion.

Using polarising filters

The polarising filter helps reduce glare in the photograph| Photokonnexion.com

• Beach Huts •
Using polarising filters reduce glare, reflection and colour fade in your photograph. These filters are easy to use and produce great results.
[Image from the video]

Filter with a hidden impact

Photographic filters are light modifiers. They have a variety of different effects. Polarising filters are just one type of photographic filter. When you look at one it appears dark. It looks as if it would have no effect except to reduce the light in your image.

What does using polarising filters do for your photo? Light from the sun tends to be scattered by the atmosphere. The waves of light are out of alignment. When the light is very bright the glare causes a bright haze of light. This over-brightness can act to overwhelm a photograph. It especially tends to wash the colour out of the sky, whitening it. Using polarising filters helps reduce the glare. It filters out some of the light that is not aligned. Only the polarised light passes through the filter. This aligned light has reduced glare allowing the colours to come out. Skies are darkened. Reflections are reduced.

The results of using polarising filters

The result of darkened skies, reduced reflections and better colours can be dramatic. Here are a whole range of images on Google using polarising filters Images on Google using polarising filters | External link - opens new tab/page.

Worst and best case scenario for using polarising filters | Photokonnexion.com

• Worst and best case scenario for using polarised filters •
Careful positioning and using polarising filters dramatically affects the outcome.

Using polarising filters can have a dramatic effects on your image. The top picture shows the worst case scenario. Light is almost directly into the lens. It is bouncing off glass and polished surfaces into the lens too. The sky is very bright with scattered light from direct, harsh sunlight. There is a hazy glare from brightness. There is also flare and very bright spots from reflections. This photo was taken without using a polarising filter.

In the second (lower) photo the position is different. The direct sunlight is not directly entering the lens. Even so, without using a polarising filter there would be problems. Notice the bright blue sky. This would have been a very washed-out blue on this very sunny day. Notice the windscreen is almost transparent? The polarising filter has reduced the bright reflections and specular highlights. The reflections on the bonnet are also pleasant and not over-white. The car paintwork has a quality colour-depth. The whole quality of the lower photo seems better. All this despite the harsh direct light.

Actually using polarising filters

In the video Mike Browne shows how to use these useful filters. In particular you need to remember three things of particular interest…

  1. Using polarising filters is most effective when the light is coming at the lens from about 45° off the optical axis.
  2. While using polarising filters you will need to rotate the filter to find the most effective polarising position. You need to re-adjust it every shot. Each shot will have a different angle of light to the lens.
  3. Using polarising filters reduces the light able to enter the lens. Your light may be reduced by over two stops with a poor quality version.


Mike Browne

Quality

High quality Polarisers are more expensive. They are time consuming and expensive to make. They also use expensive materials. However, the better ones maintain photographic quality. So it is worth spending the extra money. Poor quality polorisers may increase the digital noise from light scatter in the filter. They may also create aberrations and distort the image.

All photographic filters reduce the light entering the lens. A quality polariser will also reduce the light. But, they will affect the light much less than a poor quality polariser. Using polarising filters of a low quality may reduce the incoming light by as much as three stops. A quality polariser will tend to reduce light by only two stops (or less). So think carefully about what you purchase.

Buy now…

When buying a circular polarising filter make sure you get one that is the right size. The filter size of your lens is normally written on the inside of the front of the lens.

Recommended!

Circular polarising filters  A range of circular polarisers on Amazon | External link - opens new tab/page

When using polarising filters buy the size that fits your lens. Also remember that the quality of the filter can affect the photo. High quality polarisers reduce aberrations. A higher quality filter will not reduce the light as much as a poor quality one.

Review a range of different filters here…
Circular polarising filters  A range of circular polarisers on Amazon | External link - opens new tab/page


Comments, additions, amendments or ideas on this article? Contact Us
or why not leave a comment at the bottom of the page…

Like this article? Don’t miss the next — sign up for tips by email.

Damon Guy - Netkonnexion

Damon Guy (Netkonnexion)

Damon is a writer-photographer and editor of this site. He has run some major websites, a computing department and a digital image library. He started out as a trained teacher and now runs training for digital photogs.
See also: Editors ‘Bio’.
By Damon Guy see his profile on Google+.

Panorama photography – an introduction

Panorama photography | Photokonnexion.com

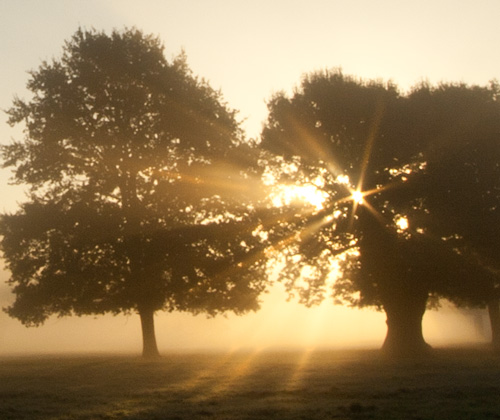
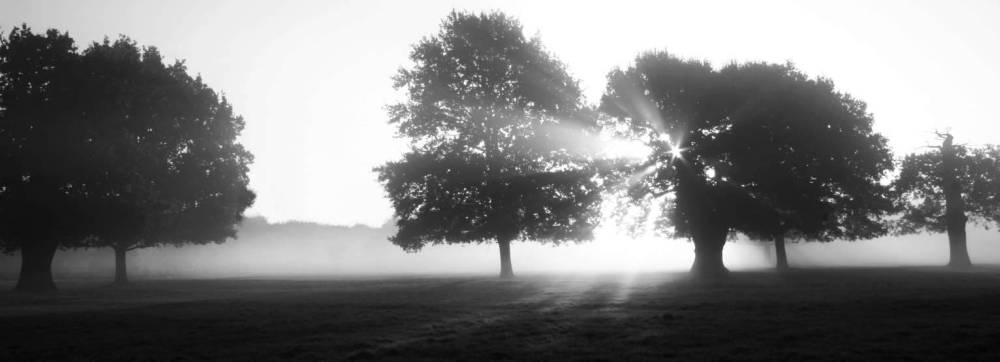
• Panorama photography •
There are a few important essentials to think about.
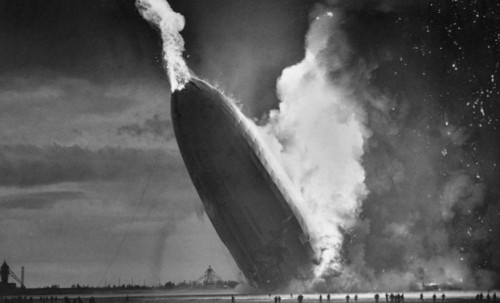
(Image taken from the video)

Getting started is easy…

Panorama photography is a great way to extend your photography skills. To make a panorama you take a whole string of shots. Then later you match them up in software and “stitch” them together to make one long image. The photographic variables are all fixed. You take lots of photos. But, only have to set the camera up once. This means you can concentrate on the scene.

Examples of panorama photography on Google images xxxx | External link - opens new tab/page

The essentials of panorama photography

Like any aspect of photography you need to have some essentials. Your camera and a lens get you started. But a tripod will give you more consistent results. It provides you with a firm platform. One that you can use to line up all the shots. A tripod is recommended because hand holding the shots can leave you with a whole bunch of badly aligned frames. Panorama photography is all about getting the full range of a scene. If you miss bits or fail to get neat alignment the image will loose its continuity. The eye is drawn a way from the image to the imperfections of the stitching.

To use a tripod properly you should also use a good tripod head. Set the camera up to get the scene you want. In this composition phase you will need to sweep through the shot. Look through the viewfinder and pan around the full scene. Get the tilt of the camera right. Have a clear idea of your sweep. Then, fix your tripod head so the camera will sweep through an arc without moving up or down. It will only pan “left <---> right” as needed. In the video you will see him using a “pan and tilt” tripod head. Once the scene is selected the tilt aspect is fixed.

Using the tripod and head means you will get an aligned sweep through your scene. This makes it easy to line up (stitch) the pictures together later. The fixed camera angles helps make alignment easy. But fixing the other settings also helps get consistent results.

Settings for the shots

There are some things that make panoramic photography easy. To get the best effect make each shot simple. Each should have settings the same as its neighbour. Wide variations of settings between shots make colours, brightness, tone and even focus create bad matches. The joins between images will show where the settings change. This disturbs the flow of the eye through the image. Here is a list of steps you go through to set up the camera – and why.

Focal length: As with the other critical settings set focal length to a fixed position. You should switch your auto-focus to manual so the focus does not change in each shot. Then, manually focus into the scene at a place that will give you good sharpness and depth. Then this should be left unchanged throughout the panorama photography sequence.

The exposure dial: Auto exposure settings change as you pan across different light levels. To avoid each frame being a different exposure use the “M”, or manual setting. Set up the exposure for the first shot. Then, keep that exposure setting through the the entire string of images. This means you will need to fix the settings for the full range of shots.

Aperture: Panorama photography is mainly about wide sweeping scenes. Landscapes are ideal. To make the scene realistic it is best to have sharpness right through the scene. Picking F11 is a good option for that. Practice your panorama photography with that F-stop to start. Once you have the techniques you can get more creative later.

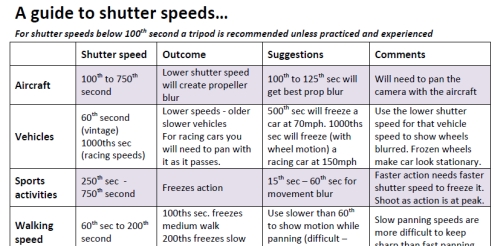
Shutter speed: Hold the shutter speed fixed too. Your shutter speed depends on how you set your ISO, and the aperture too. However, don’t just think about the first frame. Study the entire scene. Is there going to be any variations in light intensity across all the shots? You want all the shots to have a similar exposure level. So do some test readings or shots with your camera light meter. Work out how much the scene varies. Avoid big light variation. It will make consistent exposure levels difficult. Look for even light across the scene. Then, find a shutter speed that will work well for all the shots.

ISO: As with the other settings, you want to hold the ISO. Choose a setting which suits the scene and ambient light overall. Fix it for all the shots.

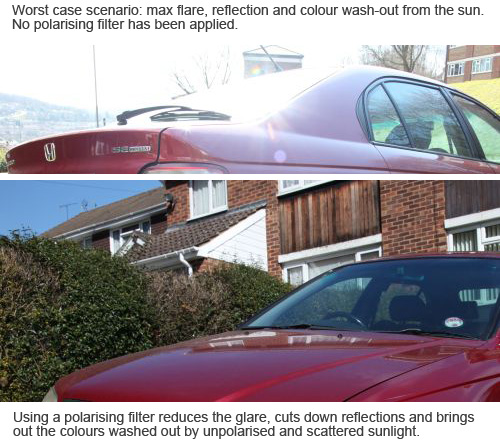
White balance: RAW or *.jpg this is one time you MUST set the white balance to a fixed setting. If you use auto-white balance you will NOT be able to match the frames later. While white balance is generally quite stable, a colour cast from one bright reflection can significantly change the colour. That would not matter too much on one image. But it will if you have to try to match ten images each with a different white balance. That will end up giving your panorama photography a patchwork effect. Choose a white balance setting and stick with it for all the shots.

Getting the shots

Panorama photography calls on more than just scene composition and settings. Also critical is “overlap”. You want to join the images so they match. That means overlapping them in a way that allows a good join.

The skill is in picking features in your landscape you can use in the matching process. I like to use patterns or textures where possible. In the software you are going to line up each image with its neighbour. Those patterns or textures allow you to make a join look seamless. So, as you go through the scene make a mental note of where you want the join to be. Rotate the camera on the tripod for each shot. Make enough overlap each side of the frame for those points to line up. This is clarified more in the video at the end.

Landscape or portrait shots can be used for panorama photography. All the pictures need to be taken in one or the other. If you use landscape format the panorama will be very long and thin. If you use portrait format the stitched image will not be so thin. But you will need to take more shots to get the whole scene. You might choose differently for each scene. It is your choice. These choices are a key skill in panorama photography. Think carefully about your composition.

Panorama photography video tutorial

Most of the above are explained in the context of the shot sequence in this video. Panorama photography is great fun, but it does require a little thinking ahead and planning your sequence. The video should help you to fix the method and settings in your head.
What Digital Camera

Stitching the image together

There are two basic methods of stitching the final image. Again this is one of the main skills in panorama photography. You can do the work manually in an image editor. This work can be a lengthy and detailed process. Each image needs to be lined up by the patterns or textures you chose on the image as the overlaps. Then you might need to clone the images together. Bit by bit and image by image you can build up your final sequence. If you enjoy detailed image editing it is very rewarding.

The second method of joining the images is to use stitching software. There are lots of different applications available. Which one you use is a matter of personal choice. Some image editors have panorama photography stitching built in. For more advanced users there is also specialist software. These applications are available with a range of functions and prices. You should do some experiments and research to pick your preferred software.

Comments, additions, amendments or ideas on this article? Contact Us
or why not leave a comment at the bottom of the page…

Like this article? Don’t miss the next — sign up for tips by email.

Using the sun to create shafts of light

Golden Morning - Light shafts pierce the mist

Golden Morning – Light shafts pierce the mist

Atmospheric shots – look for light shafts

Look out for the early morning or evening mist that creeps across the landscape. If the mist is with a clear sky, you are in for a photographic treat. This is one of the most atmospheric shots you can take.

What are light shafts?

We are talking about those lovely rays that pass through the air highlighted by the mist. They often pick up the golden colours of morning or the wonderful oranges/reds of dusk.

Misty conditions can arise in lots of ways. Early morning or evening chill after a warm day often creates mist. It’s best as a ground mist. Up above the rising or falling sun is bright, golden and low. Under these conditions you have the perfect situation for light shafts. It is the shafts of light falling through the mist that create the effect. Although often there does not need to be much more than a hint of mist. Sometimes only a moist air is enough. This is especially so if you are in a dark forest with bright light penetrating deep between the dense canopy. The strong contrasts will often pick out the light shafts.

Misty Morning • Look for light shafts

• Misty Morning •
Look for the way the shafts of light cut through the mist

How do you capture light shafts

Actually, very easily. Be careful however, because you can damage your eyes or camera. Here is what you do…

Look for the shafts of light you can see with your eyes. If you can see them then you can often bring them out in-camera by slightly over exposing the light shafts. Set your camera focus to measure light using only the centre point of the viewfinder. Check your manual to find out how. Then, make sure you point it at a dark spot – like the trunk of a tree. The camera will measure for the darker areas of scene. This will brighten the scene and light shafts will stand out strongly. You will need to use one of the manual modes to do this.

You can also look for very bright spots coming through tree cover. This is often only the case if your camera is pointing directly at the sun. This can be dangerous so only do it if tiny points of light are coming through. NEVER look directly at the sun with your eyes or through your lens. If you can, use live view. Then you will not be looking directly at a bright light. If you are able to see a place where most of the light is blocked you could capture a few rays. Powerful as they are, they will cause strong lens flare. Often this will emphasis light shafts coming through the mist.

Light shafts – examples

You can check on this search on Google Images to see a whole page of light shafts. There are so many around the web that you cannot fail to be inspired…
Google Images :: Light shafts  External link - opens new tab/page about light shafts

Getting there on time

This is one of those techniques that work best with the Golden Hours of morning or evening. So you might need to get up early. Looking out for the right conditions is crucial. So is making sure you are in the right light/dark conditions. Forests and woodland are best. Most of all, be at one with nature. These shots make exciting images to look at. They are wonderful to experience too.

Comments, additions, amendments or ideas on this article? Contact Us
or why not leave a comment at the bottom of the page…

Like this article? Don’t miss the next — sign up for tips by email.

Damon Guy - Netkonnexion

Damon Guy (Netkonnexion)

Damon is a writer-photographer and editor of this site. He has run some major websites, a computing department and a digital image library. He started out as a trained teacher and now runs training for digital photogs.
See also: Editors ‘Bio’.
By Damon Guy see his profile on Google+.

Heads together – the more intimate pose

Coffee Girls on 365 Project

• Heads together pose – an intimate feeling in your pictures •
This pose really increases the intimacy of your shot.
Image by Netkonnexion  External link - opens new tab/page

Emotion is powerful in a photo.

Every photograph has hidden messages. Everything you look at tells you about the picture. The more you are able to express emotion the better. When that emotion shows itself to the viewer you have a powerful impact.

The heads together pose

It is a pose with a long history. Putting heads together has shown trust, love and intimacy for centuries. Today the trust that goes with the pose is still felt. We all inwardly recognise it even if we could not point it out.

That is the point. Many emotional and trust elements in relations with others are not spoken. We only see them as visual clues. But, they carry a strong message.

Another message we often miss is a true smile. When someone fakes a smile they don’t smile with their eyes. We only wrinkle our eyes at the corner when we do a true smile.

The girls above worked together for a long time. They had become good friends. I asked them to put their heads together. They recognised the trust and both did true smiles. What a happy picture.

We are family – heads together show intimacy

The depth of intimacy goes beyond smiles. At weddings and funerals people often have a very formal pose. Ask them to bring their heads together and you make it less formal. It brings their character out too. In the next picture we see quite a formal father-daughter portrait. The formal feel is broken by the heads together pose. It makes the ‘family feel’ obvious. Wedding parties and groups of friends can all have that feeling with even a slight inclination of their heads.

We are family • The heads together pose even works in formal shots

• We are family •
Family closeness is shown by the heads together pose even in formal shots.

There are other hidden messages in poses

There are many poses that show our emotional and relationship status. These can be positive and negative. Have you noticed people who tend to cross their hands over their waist? This is a classic “I look over weight” pose. Another is when someone crosses their arms in front of them. This is a defense pose. They may not feel comfortable in front of the camera. People who look away from each other are often showing they are not close or intimate. I could go on.

The heads together pose is a code for having fun.

• Having fun •
The heads together pose is a code for people having shared fun!.

Looking for how people stand and pose

Sometimes the hidden clues are not easy to work out. They are always there though. How people stand, sit, look and express themselves is a code. Look out for the little things. The heads together pose, and others, show you how people really feel. Pick up the positive signs. Then you can get people to pose in positive ways. It will improve your images every time.

Comments, additions, amendments or ideas on this article? Contact Us
or why not leave a comment at the bottom of the page…

Like this article? Don’t miss the next — sign up for tips by email.

Netkonnexion

Damon Guy (Netkonnexion)

Damon is editor of Photokonnexion. He has professional experience in photography, writing, image libraries, and computing. He is an experienced web master and a trained teacher. Damon also trains digital photographers.
See also: Editors ‘Bio’
By Damon Guy :: Profile on Google+.

Rare black and white pictures – great examples

Rare historical pictures in black and white

• Rare historical pictures in black and white •
Great pictures go beyond the capturing of great events…
These are excellent examples of monochrome photography too.
[Image from the slide presentation]

Quality black and white photography is an art.

Early photography taught us there is more to an image than conveyed by colour. Black and white Photography can be emotionally powerful and visually satisfying. Sometimes colour reduces that impact.

Why is there so much impact in black and white?

The use of colour has seduced the eyes of the users of modern media and screens. The realism is amazing and the quality excellent. What people forget is that colour can reduce your awareness to the meaning in a picture. It is all too easy to lose the impact of a story when the picture is so vivid.

The underlying impact of an image is more powerful with simple presentation. Black and white or monochrome images simplify the message beautifully. They create a stark reality in an image. That reduces distractions and focusses the eye on the story.

This is a great lesson for modern photographers. Reduce the image down to a simple, powerful message. Make sure it also has great visual impact. Add a great story and you have captured the attention of the viewer.

What makes black and white visually powerful?

Here are some things to consider when thinking about making a black and white image…

  • Try to use a wide contrast range from darkest blacks to whitest whites.
  • Make sure that the darkest and brightest areas of the picture are not too large or they will distract from the greyscale in between.
  • Try to ensure there is a good spread of different greys between the darkest and brightest.
  • Using only deepest black or whitest white will tend to be too harsh for the eye except where there is a good pattern for the eye to follow.
  • Harsh shadows from hard light will distract the eye. Look to use soft light and graduated shadows.
  • Try to include as much detail as possible to bring out the subject of the image.
  • Work hard to bring out textures. This will throw up the subject without distracting the eye. It will help develop depth too.
  • Be especially sensitive to layers in the image (foreground, mid-ground and distance). Low levels of texture and poor layering will make the image look flat and lifeless.
Some great examples of successful black and white images

As you go through the great images in the slide show below consider the points above. You will find food for thought for your own black and white images.

Want to see regular historical black and white images?

As a lover of black and white pictures I signed up to Retronaut  External link - opens new tab/page. This great site is not exclusively about black and white images, but most of the historical material there is of that type. I get a daily email with some great images. It’s pretty instructive because black and white images are a personal interest. Why not give it a try? Enjoy.

Comments, additions, amendments or ideas on this article? Contact Us
or why not leave a comment at the bottom of the page…

Like this article? Don’t miss the next — sign up for tips by email.

Netkonnexion

Damon Guy (Netkonnexion)

Damon is managing editor of Photokonnexion.com with professional experience in photography, writing, image libraries, and computing. He is also an experienced, webmaster and a trained teacher. Damon runs regular training for digital photographers who are just starting out.
See also: Editors ‘Bio’
By Damon Guy :: Profile on Google+

Shutter speeds – An easy guide

Shutter Speeds Cheat Sheet

• Shutter Speeds Cheat Sheet •
Click on image to download full .pdf cheat-sheet.

Shutter speed is easier with a start point.

One of the difficulties with shutter speeds is knowing what sort of setting to use with various speeds of an event in the real world.

Here is a short guide to get you started :: A guide to shutter speeds.

There are no rules about shutter speed

The actual speeds of real world events vary a great deal. In a race one car may move at 90 miles per hour (mph) and another at only 70mph. You should vary the shutter speeds depending on the objects speed, light intensity and the aperture you are using. Remember, the download cheat sheet is a guide not a set of rules. It’ll get you started, then it’s down to good old experimentation.

There is no substitute for experience

I do a lot of panning with race vehicles. I have learned to assess the speed and light then make quick guesses to set my camera up for a few test shots.

Once I took an experienced bird watcher to a drag race event. He was used to panning fast moving birds in flight. It took him time to adjust his eye for working with cars at up to 250mph. The best way to get good at doing shutter speed settings is to practice with a wide variety of moving objects so that you can get a general feel for the shutter speeds at each speed of your object.

Experience is the best master. So practice different settings a lot to get the settings and speeds for your interest properly fixed in your mind. This gives you a head start when setting up for a new subject.

Test shots

If you are going on a shoot where shutter speed is important, practice at the likely shutter speed for a few days before going. Try out different light conditions too. This will get your eye into the subject and help you know what variations you can use to get the best shots on the day. This post might help too… How to overcome frozen movement in panning.

The difference between freeze and blur

If you freeze the action you show some amazing stuff the eye does not normally see. Facial expressions and body movements as well as other details can be stunning. It can also look a little artificial. It is strange to see, for example, water droplets fixed in mid-air or a fast car with its wheels not blurry.

You can lower the shutter speed off the peak-action speed for freezing until you get some very slight blur in critical areas. Wheels on moving vehicles or propellers on aircraft are typical examples. They look artificial as frozen features, but give life and movement to an otherwise sharp rendering of high speed action.

Work your blur in naturally and show it as you would see it. Be especially careful where you have a lot of blur. Ensure there are still sharp elements in the picture. If everything is blurred it looks like a bad case of hand-shake.

The key

The key to controlling blur or freezing and other shutter speed effects is… practice! Lots of it. So, just get out there and have a go. Gradually you’ll forget the cheat sheet, you will have it in your head from practice.

Comments, additions, amendments or ideas on this article? Contact Us
or why not leave a comment at the bottom of the page…

Like this article? Don’t miss the next — sign up for tips by email.

By Damon Guy (author and Photokonnexion editor)

Damon Guy - Netkonnexion

Damon Guy (Netkonnexion)

Damon is a writer-photog and editor of this site. He has run some major websites, a computing department and a digital image library. He started out as a trained teacher and now runs training for digital photographers.
See also: Editors ‘Bio’.