Tag Archives: Chimping

Using a neutral density filter

ND filters can be used to produce some great images

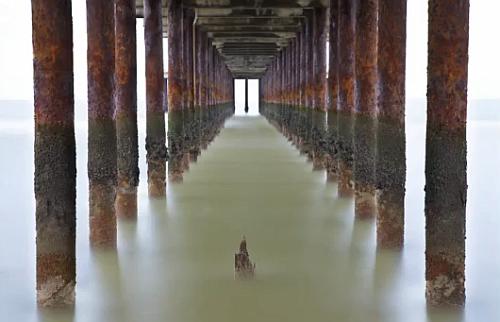
Lee Filters – Big stopper neutral density filter reduces the light by ten stops. You can produce great images like this one from the video.

Sometimes you need a long exposure…

However, to take a very long exposure in daylight will mean too much light will burn out your picture. So you need to turn down the incoming light. For that you use an ND Filter. Here is how they are used.

Remind me, why do I need this?

Remember, shutter speed controls movement blur. If you want to show a car looking blurred as it goes past you might set the shutter speed to about a fifteenth or thirtieth of a second. But what if you want to capture a much less obvious movement or a really slow movement? Say two minutes? Well, normally the amount of light coming in will burn out the shot. Of course you can use a really small aperture (eg: f22) and let less light into the camera. But on a bright day two minutes will still burn out the shot. This is where Neutral Density (ND) filters come in. They are specially darkened filters that cut the light down allowing you to extend your exposure. With one of these you can do some awesome effects.

10 stop Neutral Density Filter (video)

In the video we see the making of a picture (above) by using the Lee Big Stopper Neutral Density Filter. This ND filter is very dark, which takes down the light by 10 stops. It creates a great effect on of the water swirling under the pier. This is the darkest type of ND filter.

ND filter strengths

ND filters can reduce the light entering your camera for up to 10 stops. This allowed 2 minute exposures in the video. However, there is also ND2, then ND4 and ND8. Other strengths exist, but these are the most common. They allow you to have shorter exposures so you can adjust the exposure to the needs of your shot. You can also put them together so an ND8 + ND2 gives you an effective ND10 – the strength in the video.

ND Grad.

Another of these type of filter is the graduated Neutral Density, or ND grad. The use of an ND grad is quite specific. It is used to reduce the incoming light from the sky when you have a bright sky and dark ground. If you expose for the ground the sky burns out. If you expose for the sky the ground is too dark. The ND Grad. helps prevent the sky burning out.

The ND Grad. is dark at one end and clear at the other. The two zones meet in the middle where the clear graduates into grey. Put the filter over the lens so the line of clear/grey graduation lies on the horizon, darkening the sky. Now, you can expose for the scene and get even light distribution. The next video will show you how this type of ND is used.

Mike Browne  External link - opens new tab/page
Problems?

No, filters are simple and easy to use. There are some important things to remember…

Always use a tripod. It is impossible to hold a camera steady for more than about half a second. After that your image will start to get blurry.

You need to be quite precise about lining up ND Grads with the horizon. Take a little practice before going out to do the BIG shot.

The darker the ND Filter the more there is a tendency to impact on the white balance. Sometimes you get a blue colour cast, sometimes a red one. You can remove this in post production if you are using the RAW file format. Alternatively you can test the filter with your camera and adjust the white balance setting in-camera to correct for the aberration. Most of the stronger ND filters have this colour-shift tendency. it is exaggerated by the sensor type. CMOS sensors tend to magnify the effect.

Sometimes getting the exposure right is a matter of experimentation. Take a few test shots and make sure you do some “Chimping”.

If you are buying ND filters, especially ND Grads buy square ones. You can buy adaptors for these to fit any lens and it allows you get creative in more ways than round, screw-on filters that only fit one lens.

There are many different kinds of filters which produce a huge range of fun effects in-camera. Many of these effects cannot be processed into the shot later. The square filter system shown in these videos allows you to expand your collection and develop a new set of skills without buying an expensive filter for each lens.

ND Filter set…

3 full ND filters
3 graduated ND filters
Full fitting kit for a range of camera
and lens sizes.
10 Adapter Set + 6 Filter ND2 ND4 ND8 G.ND2 4 8 For Cokin P Canon Nikon Sony LF6

Please leave any questions or comments you have about these in the comments below.

find out more...Photokonnexion tips by email
If you enjoyed this article please sign up for our
Tips by email service.
                                                 Find out more
#11030#

By Damon Guy (author and Photokonnexion editor)

Damon Guy - Netkonnexion

Damon Guy (Netkonnexion)

Damon is a writer-photog and editor of this site. He has run some major websites, a computing department and a digital image library. He started out as a trained teacher and now runs training for digital photographers.
See also: Editors ‘Bio’.

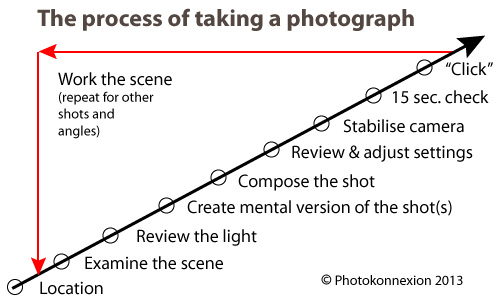
How to take photos – each important step in making a photograph

Infographic download - How to take photos

• Infographic showing the various steps in how to take photos •
A guide to what you should doing to make great images.
• Click to download printable full page version

Getting down to the detail…

Yesterdays article was How to take photos – each important step in making a photograph. Today I want to share the detail behind each step. Be warned! You might need to think again about your existing knowledge. Unlearning old ideas will help you to move forward and improve.

How to take photos – The location

Lots of people think you can just turn up and take pictures. Well you can, but often they are not good ones. Getting the best out of your location involves understanding what you’ll find there. Find out about the weather on the day. An idea of light levels and times of sunset and sunrise etc. is useful too. There have probably been lots of visits by others at popular destinations. Check “Google Images” for that site. Google will help with other details too.

When you arrive don’t just fire off loads of shots. Settle down and get into the location. Don’t make photography mistakes that mean you miss great shots. The first time you do this consider a variety of shots. Think about more than one shot, think about the whole shoot.

How to take photos – Examine the scene

Considering the scene is an important part of the work-flow on site. Unless you have been there before you need to get to know it. Use all your knowledge about camera angles, composition, lighting, camera settings and so on. Take the time to examine your location while thinking of these things. Consider your feelings about the scene too. How you feel will help your shot be an impassioned response to the location. What you feel about the scene is the best guide on how to take photos at that location.

How to take photos – Review the light

Most photographers forget this step. They are too wrapped up in the scene and the camera settings or the passion of it all. This step will make or break your shot. Look at the light. If you don’t know what I mean read these:

Ask yourself some simple questions about the light…

  • Is it hard or soft?
  • Is it coloured or more neutral?
  • Is it at the right angle to best capture the location/scene?
  • What is the best time for the right light?
  • Is it very bright and intense or dull and diffused?
  • Do I need any artificial illumination (flash, diffusers etc)?
  • Is the shadow hardly defined (sun up high) or strongly defined (sun to the side)?

Lean about the properties and vocabulary of light. It helps give you a greater understanding of photography. These questions, and others, help you make decisions about lighting for your scene. For more on “How to take photos – Light and Lighting” see the resource page in the SUBJECTS/ARTICLES menu at the top of every page.

How to take photos – Create a mental version of the the shot

If you want to make a great image – have a great picture in your head of your intended outcome. Visualisation has helped athletes, artists, thinkers, inventors and others to achieve amazing things. Train your mind to visualise in detail. If you see what you want to achieve it will guide you when setting up your camera. Take the time to create that mental picture – in detail. Consider how you are going to make the best of the light when you consider how to take photos. More about visualisation… 80 year old secret of world class photographers revealed.

How to take photos – Compose the shot

By now you have an intimate photographic knowledge of your scene. Composing the shot is about realising that potential. Long-time followers of this blog already know something about composition. For first-timers you can get lots of information from our Composition resources page in the SUBJECTS/ARTICLES menu at the top of every page. Composition is a skill that evolves as you develop as a photographer. Knowing more about composition helps your awareness and skill develop. Read about it to gain insight. Think about it every shot.

How to take photos – Review and adjust the camera settings

Now you have a picture in mind, composed, and are ready to set up your exposure. The exposure is defined by your camera settings. Camera makers will have you believe that the auto-setting on your camera is the perfect exposure. The fact is they made informed guesses to arrive at that exposure. It is different for every model of image sensor. Modern cameras do make a good representation of the scene. It is not always what you want however. You can change the exposure by under-exposing, over-exposing and by using different apertures, ISO levels and shutter times. That is your interpretation of the shot. When you think about how to take photos, plan how you want the image to come out.

Having a visualisation in your head helps you set the camera up to make that mental image. You do it using ISO, Aperture and Shutter speed. Even using one of the ‘mode’ settings is still a way of regulating your exposure. They all adjust those three basic facets of the exposure.

Here are some other links to pull together ideas about exposure:

How to take photos – Stabilise the camera

You want the photo to be sharp, crisp and clear. The faster the shutter speed the easier it is to get a sharp shot. But often, especially for a good quality shot, longer exposures are better. You need a good stance to hand-hold the camera. You will need a tripod (or other method) to steady it for longer exposures.

Stance is down to basic technique and comfort. The stance you use will be a personal thing for you. I have found many photogs have to relearn their stance after many years of a poor stance. It is best to learn a good one early. Here is my recommendation: Simple tips for a good stance

The use of tripods or other supports is a wide subject. It is also one that many learners tend to ignore- at least at first. When learning how to take photos sharpness is vital. Become acquainted with a tripod (preferably a good one) as early as you can. Your images will improve a huge amount. Here is some advice about tripods:

And, here is some basic advice about improving sharpness overall – The Zen of sharpness – 12 easy ways to improve

How to take photos – 15 second check

OK, that may seem like a long time. However, it is actually the time you need. You can get faster at it, but if you are taking a serious attitude to your shot then give it the time. You can find out all about the the 15 second check by reading these in order:

  1. An old sailors trick to improve your photography
  2. The fifteen second landscape appraisal
How to take photos – “Click”

This is where you press the shutter button. How you press that button can make a difference to your sharpness. Earlier, I mentioned this link, Simple tips for a good stance. It also gives advice on pushing the button without affecting sharpness.

An essential element of your shot is about confidence in what you have done. Today we are lucky. We just look at the back of our camera. Your first “click” may be a test shot. If your settings need adjustment then a simple technique called “Chimping” will help. Chimp and adjust. You will only need to do it a few times to get the shot right. You will not need to machine-gun the site with hundreds of “just in case” shots.

How to take photos – Work the scene

Chimping helps you set up for the shot and compose it. To get other possible shots you visualised earlier, you should work the scene. Repeat all the steps you have just done for each of the shots you foresaw. Working the scene is a skill and takes practice.

How to take photos – Time line

What is not obvious from the diagram is that the diagonal arrow is also a time-line of the shot. Of course it is a different length for every shot. You will have different problems to solve and ideas to consider for every shot. That’s fine. You have just learned a more careful, precise method for how to take photos. As you practice will quickly get faster at taking shots. But you will also make better images.

A promise

I can guarantee that if you follow the steps on this page you will…

  • Take less shots;
  • Get a better hit-rate (more usable shots per shoot);
  • Spend less time in post-processing;
  • Have better composition;
  • Improve your photography overall.

What is less obvious is that you will also save a lot of time.

By Damon Guy (author and Photokonnexion editor)

Damon Guy - Netkonnexion

Damon Guy (Netkonnexion)

Damon is a writer-photog and editor of this site. He has run some major websites, a computing department and a digital image library. He started out as a trained teacher and now runs training for digital photographers.
See also: Editors ‘Bio’.

Easy ideas for controlling your flash unit

Specular highlights

Bath toy
Specular highlights are distracting and draw the eye which spoils the shot.

Flash is a great benefit and a problem all at once!

Most people don’t realise two things about flash. First, the standard setting is nearly always too powerful. Second, the highlights resulting from flash are very distracting.

Working with flash power

Like all things in photography you need to think carefully about using flash. It is not simply click and move on. Most improving photographers are just beginning to make shots rather than snaps when they begin to see the quality and colour of light. So it is easy to miss some of the impacts that flash has on a subject. Here are a few consequences of a flash shot…

  • An over-bright subject.
  • Strong highlights with a tendency to wash out colours.
  • Specular highlights that create sharp, bright spots that distract the eye.
  • Bright foreground, dark background.
  • Flesh tones strongly whitened giving a sick look to the face.

Each of these is almost always down to using too much power in the flash. So, the way to over come these issues is to do two things. Turn down the power of the flash and diffuse the flash so it scatters the light.

Turning down the flash is simple. You must find the setting that adjusts the flash power level. This is easy if you are using an off camera flash because the unit usually has a display and a dial or buttons to change the settings. On-camera (pop-up) flash is usually adjusted by finding a menu setting that turns the power up or down. You may need to consult your camera manual to find where that setting is found.

The key to getting the right setting for your flash is to understand how to change it. Most off-camera flash units are marked up so there is two stops of light on the flash. Normally if the flash is marked 1:1 then that is full power, and more often than not this is the default setting. You can usually turn this down by one third of a stop of light at a time. Each time you stop down the setting one stop you are halving the light it emits.

Pop-up flash units may not be marked so clearly. Some are marked [low – medium – high], others, particularly point and shoot cameras, may just have “full | half”. More sophisticated pop-up units may also be marked in the same way that off-camera flash units are marked. Which ever your flash is, you should practice with it so you have an idea of how powerful it is and how much the settings can change the impact of the flash.

Flash diffusion

The best way to get used to using flash and controlling the power is experimenting. However, the issue of nasty highlights is the other problem the inexperienced user often does not spot at first. Strong highlights raise the light levels so you can see the tonal changes in the colour of the surface the light hits. This helps to define the shape of an object. So, for example, a brighter top on a ball and dark shadows under it help to define the spherical shape.

If the light intensity is too high, particularly on reflective surfaces, the reflected light level will exceed the level the camera can cope with. The highlight then becomes blown out. The light is so bright in that area that it becomes a bright spot where all the detail is lost to pure white. Unfortunately such strong, blown out areas, are severe distractions. In the picture above, the small reflective points, called specular highlights, are also strongly distracting. So what can you do to avoid these nasty effects?

If your power adjustments are not working and you still have blown out spots or highlights then you should consider diffusing the flash. This makes a difference in two ways. The diffused light will scatter the light from the flash over a wider area. This effectively lowers the light intensity even further in the area of the highlight since the light is not hitting it from a direct focused hard light from the flash.

Secondly, diffused light spreads the effect of the light. This makes it more likely to bounce off other surfaces nearby. These surfaces then become multiple mini-light sources. All these sources hitting your subject create a soft light which is much less likely to create specular highlights or very strong colour-destroying highlights.

So how do you do this diffusing? I just love this great flash diffuser. Designed to fit your off-camera flash unit it is an ingenious design and easily adaptable to any flash unit. Check out the Rogue FlashBender 2 – off camera flash. If you have an off-camera flash this is the best. It is the most adaptable diffuser I have ever used. You attach it to the flash with a wrap around grip. The big diffuser stands up above the lens of the flash. It is tough, flexible and creates a lovely daylight-white light. It is superb for portraits and still life work. Coupled with adjustments to the power settings on your flash it gives you excellent control and helps reduces highlights and the effects of hard light direct onto the subject.

For off camera flash there are a range of diffusers available. They are based on various different mounting or reflector principles too. So, you need to look around to see if you can find a diffuser that suits you.

For pop-up flash the options are not as easy. However, I recommend one of two options. I have successfully used ordinary white tissue paper sticky taped over the pop-up flash to both reduce and diffuse flash. However, while this works well, reducing the light by about a full stop, it is a temporary solution. Also, if you use the flash a lot the extra insulation may cause the flash to over heat. So, not for regular use.

My favoured options for pop-up flash diffusion are one of these three methods…

Professor Kobre’s Lightscoop, Standard Version Bounce Flash Device, Universal Model, fits over the Pop-up Flash of most SLR Cameras This diffuser produces a very effective ceiling bounce for the diffusion. However, make sure that in rooms where you use it there is no strong colours on the ceiling or it will cause colour casts.


Gary Fong Puffer – Pop-Up Flash Diffuser for Canon / Nikon / Pentax / Olympus / Panasonic- Lumix pop-up flashes A well reviewed unit, and has the advantage of an easy fit. The other advantage is that it diffuses the light moving forwards. The other two units here bounce the light which puts you slightly at a disadvantage in controlling the flash light direction.


Cateye LETS Flash Reflector/Diffuser Hybrid, for use with DSLR pop-up flashes Although I have not used this one personally, I know some people who have. I have had some very good feedback on this unit and it seems to work effectively in a wide range of situations.


Great shots with flash…

Yes, like everything else in photography, to get good with it, you have to practice use of flash. However, first you need to make sure you can spot the highlights, specular highlights and over-powered flash. Once you know what you are looking for you can adjust your flash power.

The best way to gain control of your flash is reducing the power, or at least adjusting it. Also, the more you soften the harsh, hard flash light the less distracting and natural the highlights will be.

Whatever you decide to do to make your flash manageable do plenty of experimenting to gain control of the light. Don’t forget to Examine Shots Before Shooting Again – “Chimping” to check for highlights. The practice will pay you back in great, well lit shots many times over.

find out more...Photokonnexion tips by email
If you enjoyed this article please sign up for our
daily email service.
                                                 Find out more
#11030#

By Damon Guy (author and Photokonnexion editor)

Damon Guy - Netkonnexion

Damon Guy (Netkonnexion)

Damon is a writer-photog and editor of this site. He has run some major websites, a computing department and a digital image library. He started out as a trained teacher and now runs training for digital photographers.
See also: Editors ‘Bio’.

Simple mistakes to avoid in photography

The quick way to improve:

…Is undoubtedly to listen to the mistakes that others made. Here are some easy things you can do to improve your photography in leaps and bounds. Getting lots of practice is the first step. The more you shoot the more you will get to know what works and what does not. However, going further than that takes a little diligence. So here are some things to do for quick improvements…

1. Not reading the manual

Get the manual out. Learn a technique from the manual. Then go out and use that technique.

2. Not reading the manual again in six months

Repeat (1) in six months. Using your camera will become easier and your memory will be refreshed.

3. Not making friends

The most fun you can have in photography is with friends. Join a club, find some other camera owners, join a website that shares comments… whatever you do – get people to look at your photos and help you with tips and tricks.

4. The equipment you own

Read “Seven deadly photographic sins” and realise that you should concentrate on learning everything about the equipment you own. Once you are an excellent photographer with your current equipment then consider new stuff, but not before.

5. File resolution

Shoot with the largest file size and highest resolution. If you do not know how to do that consult the manual. This is important. Using tiny files and low resolution will really frustrate your improvement.

6. Not checking the image

Beginners often click away without checking the image. Shoot-and-hope mostly fails. Check your screen, check and check again. Reduce the number of shots you take. Concentrate on composition – make the images you do take higher quality. Read up on “Chimping” the gentle art of screen checking!

7. Deleting in camera

Do not delete in camera… There are many good reasons for this…

  • Constant deleting shortens the life of your memory card – only ever format the card.
  • Unless very experienced you are probably not qualified to say if a shot is good or bad.
  • You cannot possibly tell if an image is good enough in the low resolution of a camera screen.
  • As your ‘eye’ develops you will change your idea of what is a ‘delete’. I have seen an image voted Best-shot-of-the-day but listed as a deleter by the author before the vote.
8. Not looking at the image in full size

There is only one sure test of sharpness, look at the image in full resolution. When you pull the image up on screen it is reduced and sharpened. Expand it to 100% to see it as you took it. Read your software manual to see how.

9. Ignoring the light

Find out all you can about light – all types of light and all sorts of lighting situations. You can find a whole range of resources here… Light and Lighting – Resource pages on Photokonnexion. Your knowledge of light will make you a great photographer if you focus on that alone.

10. Not using a tripod

The best sharpness tool is using a tripod. Never forget your tripod and you will always have sharp images!

For more on this subject and some detail of how to get past these mistakes read: Mistakes beginners make and how to overcome them

Here is a short video with four more great tips for you to take on board…

Mistakes to Avoid as a Beginner Photographer

startphotography channel External link - opens new tab/page

find out more...Photokonnexion tips by email
If you enjoyed this article please sign up for our
daily email service.
                                                 Find out more
#11030#

By Damon Guy (author and Photokonnexion editor)

Damon Guy - Netkonnexion

Damon Guy (Netkonnexion)

Damon is a writer-photog and editor of this site. He has run some major websites, a computing department and a digital image library. He started out as a trained teacher and now runs training for digital photographers.
See also: Editors ‘Bio’.

Can you really trust your camera battery? 12 ways to protect against battery failure.

A key component in your equipment is power.

Without power your camera stops. The battery is a most important link in the workflow of your shoot. Get it wrong, the shoot comes to an abrupt end. Here are some ways to make your battery power go further.

Cut the display time

The biggest drain on your battery is that big screen on the back of your camera. Modern LCD screens are pretty efficient compared to early models. They still use a lot of power. To cut power consumption reduce the time your shot shows on-screen. Most cameras are set to eight or ten seconds which is mostly a waste of power. Four seconds is plenty of time for a quick preview. You can easily pull the picture up to look again. The occasional ‘extra-look’ uses much less power than an extra four or six seconds of un-viewed screen time after every shot.

Live view

It makes sense to use screens less for other tasks. Where you can, use the viewfinder. Using ‘live-view’ is a really heavy drain on the battery. During live-view the screen is always-on. Also, if you have a DSLR, live view holds up the mirror. That too is a drain on the battery. Double whammy!

Here is another reason to use the viewfinder. The live-view screen shows much less contrast than your eye sees through the viewfinder. You cannot expect to frame a great shot when you can’t see the principle guide to ‘depth’ in your picture. Yup! Live view actually disables your ability to produce a great shot. Go figure!

Chimping

If you have not heard the term ‘chimping’ yet, I wrote about it in “Examine Shots Before Shooting Again – Chimping“. Resist the temptation to re-examine every shot. Learn to trust your judgement. I am a great believer in chimping, but once you have your shot pattern and settings correct you only need to re-examine shots if you change things. Again, you will be saving battery charge.

Power-saving mode

Most cameras have a power-saving mode. Check your manual. Normally power saving mode will shut your camera down after a set period. It goes to sleep until recalled. Set power-saving mode to a reasonable time, say, 30 seconds or less. That can save a lot of power. Many cameras are set for a minute as default.

Continuous auto-focus

Cameras continuously monitor movement through the lens in continuous auto-focus mode. That mode is for times when your subject might move or is moving. If shooting still shots turn this off. Otherwise, the camera continuously hunts for focus, unnecessarily using power. If you’re using a tripod, continuous hunting for focus also causes vibration. You will actually soften your shot by running this mode on a tripod.

Pop-up or on-camera flash auto-mode

Pop-up flash is a really bad light. It also uses a lot of power. Sometimes you need it, most of the time you don’t. Turn it off, or use its manual mode. Then it will not fire when least expected, or when not needed.

Another point here… use an off-camera flash. It has an independent power supply. That way you can cater separately for the flash, get better control of your light and control the main battery power.

Mirror lock-up

Lifting the mirror in a DSLR takes power. So does holding it open in some models. So, if you are using mirror lock-up mode then use it sparingly. “Mirror lock-up” is one of the pro-techniques for sharp shots. It is really worth knowing about, but, be prepared for battery strain.

Turn off your camera

I have done it myself. Left the camera on in the bag. Not generally a problem – auto-power-save sets for sleep after 30 seconds – right? Wrong. Beware ‘shutter-button gremlin’. Depress the shutter half way, it wakes the camera. My friend charged his battery overnight then took a four hour coach ride. The vehicle vibration continuously pushed the button against his bag. No battery left for the wedding! Disaster. Turn your camera off before bagging it.

Warmth

It’s a fact. Batteries use more power in cold conditions. Keep Your camera warm. Under your coat, in a warm car or engine compartment – anywhere. It helps keep things moving in the camera, preserving battery life.

Spares

Batteries get damaged or gremlins strike. Pro-photogs carry at least one spare, often a charger too. Hobbyists often don’t. One spare and some of the other techniques here will give you a decent shoot even if one battery had been used/damaged/lost. A spare is your cover.

Battery care

Prolonged storage can can cause batteries to break down. It’s prudent to remove batteries from the camera in storage.You don’t risk damage to your camera and can easily do a periodic recharge. I recommend you use and battery recharge batteries at least three times a year. Also, protect batteries from damp, chemicals, corrosives and contamination – especially salt. Protect them from hard impacts too. They can split and won’t work afterwards.

Rotation

Batteries, including rechargeable ones, have a fixed lifespan. At the first sign they are not holding a full charge dump them and buy a new one. Some batteries fail rapidly. You don’t want to be caught at that ‘special wedding’ when the battery ran down after twenty minutes? Keep your spares in use. Swap it/them regularly with the working batter. One other tip… permanently mark every battery with the purchase date. It’ll keep tabs on its replacement age.

Look after your batteries and they will give you great service and long shoots.

Is your shot ruined by bright white spots?

Lighting is about the balance between contrast and intensity.

Lighting is about the balance between contrast and intensity. The camera does not have the same range of light tollerance as the eye.

Lighting only works if the camera can cope.

To retain all the detail in a picture, light levels must be within the capability of the image sensor. Eyes see detail in a wider range of light intensities. The camera is quite limited in its range.

If you want to be able to see, for example, detail under the trees in shadow, and detail in the cloud, you need to take two exposures. One for the sky and one for the shadow. Then you can combine them in post processing. This is because a bright sky and a dark shady area is too much of a range of contrasts for the sensor to cope.

The image sensor can see the detail in the shadows perfectly well. It can see the brightness in the sky perfectly well. If you expose your shot for either you will get a great shot. Expose for both and you will get either a blown out sky or a black shadow. The dynamic range is too large.

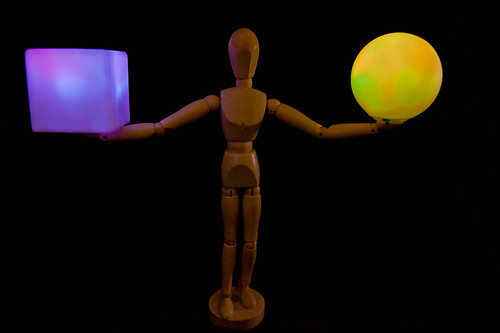
In the photograph above the artists dummy is unlit directly. The orbs it holds are self-lit. This was a difficult photo to take. The dummy was too dark and the lights too light. The light intensity between the two was too great for the sensor to cope with. Without independently lighting the dummy I had to rely on post processing to fill the light on the dummy without increasing the light in the orbs. Easy enough in PhotoShop. But how do you do it in camera?

If the contrast between the lightest part of your scene and the darkest part of your scene is too large you simply cannot take the shot and keep all the detail. You have to find a happy medium. The way to do that is use the blinkies!

Look up in your camera manual how to turn on the blinkies (often associated with the camera histogram). When you look at the back of the camera after a shot the blinkies will show. They blink-to-white if the detail is lost in very bright spots. They blink-to-black in the very dark spots. These are the areas of your shot that the detail is lost. They are also the most distracting part of the shot. If a shot has large areas of blown out white you will draw the eye away from your subject to the white spots. Your shot immediately loses impact.

The answer is ‘chimping’. Take the shot you want to take. Take a look at the shot (Chimping). If it has blinking areas you need to find another way of doing it. Try to find a way of taking the shot so there is no blinking (either black or white). What you are looking for is to reduce the contrast. Take the shot in a brighter place altogether, or take it in darker place. The aim is to reduce the contrast between bright and dark. Then the sensor can cope.

By Damon Guy (author and Photokonnexion editor)

Damon Guy - Netkonnexion

Damon Guy (Netkonnexion)

Damon is a writer-photog and editor of this site. He has run some major websites, a computing department and a digital image library. He started out as a trained teacher and now runs training for digital photographers.
See also: Editors ‘Bio’.