Tag Archives: Burnt out

Pure white featureless skys? How to tone them down…

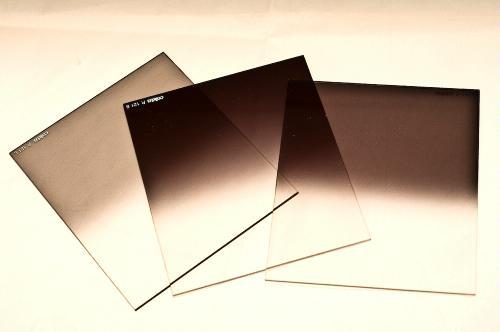
• Cokin neutral density filters (graduated) •

• Cokin neutral density filters (graduated) •
A quality set of filters that can be adapted to fit any lens size.
Buy: Cokin H250A ND Grad Kit

When your sky is too bright its a problem!

You lose all or most of the detail and your foreground is starkly highlighted by the blown out sky. The way to overcome blow out like this is to use various techniques with neutral density filters. All landscapers come across this problem at some time. The best way to overcome the issue is to tackle it head on in-camera. The best way to do that is to use “graduated neutral density (ND) filters”.

What are ND filters?

Neutral density filters are glass filters that you reduce the incoming light. They do this without affecting the colours in your shot. For blown out skies you want to reduce only the incoming sky light and allow the foreground to expose properly. The Graduated ND filter will allow you to achieve that.

In the picture above you can see the top half of each filter is dark. The bottom half is uncoloured glass. The trick is to place the filter in front of your lens. Place it in such a way that the line separating the dark and light lies on the horizon between the ground (proper exposure) and the bright sky which will be toned down by the filter.

If the sky is blown out in your picture the light is brighter than the camera can cope with. Normally that will be two stops of light or more above your exposure of the ground. The ND grads. normally come in three strengths. ND2 (two stops), ND4 (four stops) and ND8 (eight stops). Each stop of filtration is equal to half of the total light. An ND2 reduces the light by a quarter. An ND8 will cut down the incoming light to 1/16th of the light.

Video – Graduated ND filters for Landscape Photography

In this short video Tony Sweet demonstrates how he balances the dynamic range of a landscape composition using a graduated ND grad. filter working in a wooded valley. He wants to brighten the foreground with a long exposure. This would lead to the distant trees being too bright and would show burnt out spots. He uses a great technique to make the right light conditions…

Recommended purchase

I have been using Cokin filters for years. They are high quality filters that fit into a filter mount screwed onto the front of your lens. I prefer this type of fitting. It is simple to change filters and you can adapt graduated filters to the position you want quite easily. Round filters are far less adaptable and tend to be much more expensive.

If you want to buy an ND grad set of filters here is the kit I recommend…
Cokin H250A ND Grad Kit

You will also need to buy an adaptor for your lens to fit the filter mount. You can buy them singly…
Cokin filter mounts and lens adaptors

You can also buy a complete adaptor kit so you can adapt your filters to fit any one of your lenses…


If you feel like going the the whole way you can buy a kit that will cater for all your filter needs (including mount and adaptors) try this great kit…


By Damon Guy (author and Photokonnexion editor)

Damon Guy - Netkonnexion

Damon Guy (Netkonnexion)

Damon is a writer-photog and editor of this site. He has run some major websites, a computing department and a digital image library. He started out as a trained teacher and now runs training for digital photographers.
See also: Editors ‘Bio’.

Can you write? Of course you can!
Write for Photokonnexion...

We would love to have your articles or tips posted on our site.
Find out more…
Write for Photokonnexion.


How to shoot bright white backgrounds

Shooting with a high-key background

Shooting with a high-key background – a two stage process.

Simple shots focus attention on the subject.

The bright-white background technique, known as high-key, is used in a wide variety of different photographic situations. It’s fun, easy to do and produces great shots. Here is how it’s done.

The technique is always the same if you are photographing a car or person in a big studio, or a tiny table-top still life. The aim of the technique is to get the subject surrounded by a seamless white surface. This will mean your subject is thrown up in stark contrast to the background. Then the viewer’s attention is directed at the subject because the eye has nowhere else to go. Effective, powerful and bright, the technique really makes your subject pop off the page.

There are two basic methods of doing high-key backgrounds. The first is to spend a long time in photoshop with masks, cloning and painting. You can, with some skill, make your image look like it was produced in camera. Good luck with that. It really does take a lot of time and effort.

The other way to do high key shots is create the bright-white background effect using lights and a white background.

Setting up

You will need something to create the white background. You can use a painted wall, white wallpaper, white card, sheets or pretty much anything else that is white. The brighter the white the easier it is to use.

You need a bright white light. An off-camera flash unit is great. If you don’t have one then you can use very bright house lights. Be careful there is no colour cast. It is advisable to consider some test shots to get the colour right.

To set up your shot you will need to put your subject in front of the white background. In the case of the shot above I was shooting downward onto a piece of card. In this case I put a small support under the hand-carved soapstone heart. This lifted it off the background a bit.

If you want no shadows at all, like the shot below, then you must present the subject far enough off the background that you can get a bright light in behind it.

High key shot with no shadows

High key shot with no shadows. The background is strongly lit up so it blows out to a perfect brilliant white. The subjects in the foreground are lit as they would be normally.

Lighting

Next, you need to position the light so it is pointed directly at the white background. In most cases you will want to point it so that the brightest point is immediately behind the subject. In the shot above it was positioned slightly at the top of the image because I was trying to create a little shadow under it. This made it look like it was floating. However, if you want no shadows then you must have all the bright light behind the subject.

Now take a test shot. The idea is that when the camera sees the white it will be so bright that it burns out the image wherever the white is exposed. If your white looks grey… then you need to brighten the white with more light (or take a longer exposure). If your subject is so overwhelmed with white from the background, you need to reduce the intensity of lights pointing at the background.

As with most photographic lighting, its a balance. To get your background just right you need to play with the light intensity up/down until you have a nice bright seamless background.

Now for the subject

Now you can, if necessary, adjust the lighting on the subject. If you are working with a person, ideally they would be one to two meters in front of the lighted background. So they might need to be lit with a separate light like a flash. Or, if you are working with a still life, the ambient light might be fine.

You are aiming at lighting the subject so the background is much brighter. The idea is that the contrast between the two is so great that the white is blown out… it becomes pure white because of the intensity of the reflected light. The subject needs to be lit normally so it is just how you would like it to look. To achieve that you might need to turn off the back light. You can use the normal exposure mode you use on your camera. Take the picture using flash if you want. Do a few test shots to get the lighting right on your subject with the back-lighting off.

The high-key shot

By now you have hopefully got some blown-out white background shots. You should also have some normally lit subject shots – just how you want it to look. Now it is time to switch on the background lights and, using the lighting you set up on the subject, take the shot with the bright background.

In photographic terms, you are aiming for the background light to be about one or two stops of light brighter than the subject you are shooting. An increase in light of one stop is a doubling of the light intensity. You will need to test that with a few shots.

To get it right you can test the lighting of the subject and background separately with a light meter, or with your on-camera light meter. You could just experiment using test shots and changing the lighting around. Or, you could use the ‘blinkies’ and ‘chimping’ method.

Whatever you choose, a few minutes experimenting will give you some idea of the brightness. Have fun!

By Damon Guy (author and Photokonnexion editor)

Damon Guy - Netkonnexion

Damon Guy (Netkonnexion)

Damon is a writer-photog and editor of this site. He has run some major websites, a computing department and a digital image library. He started out as a trained teacher and now runs training for digital photographers.
See also: Editors ‘Bio’.