Tag Archives: Background

Five simple tips for making street portraits

• The Lady •

• The Lady •
Classic Rembrandt Lighting in a modern street portrait
Click image to view large
• The Lady • by Netkonnexion, on FlickrExternal link - opens new tab/page

There is a beauty in simplicity.

I love to make street portraits, simple characterisations of people in their real lives. The street photographer thrives on the capture of the moment in someone’s life that just says a little about who they are… a moment in the life of a person you will never know. In this post I am going to look at how best to capture a street portrait.

1. Eye to eye

Out there on the street you a part of the scene – creating a momentary rapport with your street subjects. People like to communicate. And, they like to see communication. When you take a street portrait try to get your subject looking at you. If they are, they are communicating with you. The viewer of your photograph will be a part of that correspondence too. It will pull them in. Work at the eye level of your subject. Explore their faces through their eyes. Your capture will have much more power. If you are able to capture them looking in your direction, make sure the eyes are in focus too. This is good advice for any photograph, but it is critical for portraits. If the eyes are out of focus any appearance of communication will be lost.

2. Understanding the background

Every subject exists in some sort of environment. However, street portraits don’t allow much control over the background. Sometimes that can ruin your shot. A street portrait is about your subject. If there is too much going on around your subject then it can be a distraction. It takes the viewers attention away from the person you are showing them. When you are doing street portraits you can control the background in two ways – capitalise on it or get rid of it. If it is interesting, not too distracting, and puts your shot in context, then go for a deep depth of field (say, f11). That way you show your subject in the full light of the city environment. On the other hand if the background is complicated, distracting, or just uninteresting – go for a wide aperture and shallow depth of field. If your subject is away from the background your subject will stand out leaving the background out of focus.

3. The other people round about

If your subject is a part of a group then include the group. However, if they are not in a group portrait the other people round about can add to the shot or create a distraction. Try to make your shot pick out your subject or the group they are in. If you are trying to do a street portrait then your concentration should be on the subject you are trying to show. If you are more interested in your subject with their group then the relationship is important. Fix on that and bring it out.

The point of street photography is to show something coherent. If what you show is simply the chaos of a street scene, most of the time the impact will be lost in the chaos. When there is more than one person in your scene you need to bring out relationships, coherence or some sort of point that makes the shot interesting. There is nothing wrong with capturing a group of people as long as the capture has a point. Tell a story, bring out the meaning.
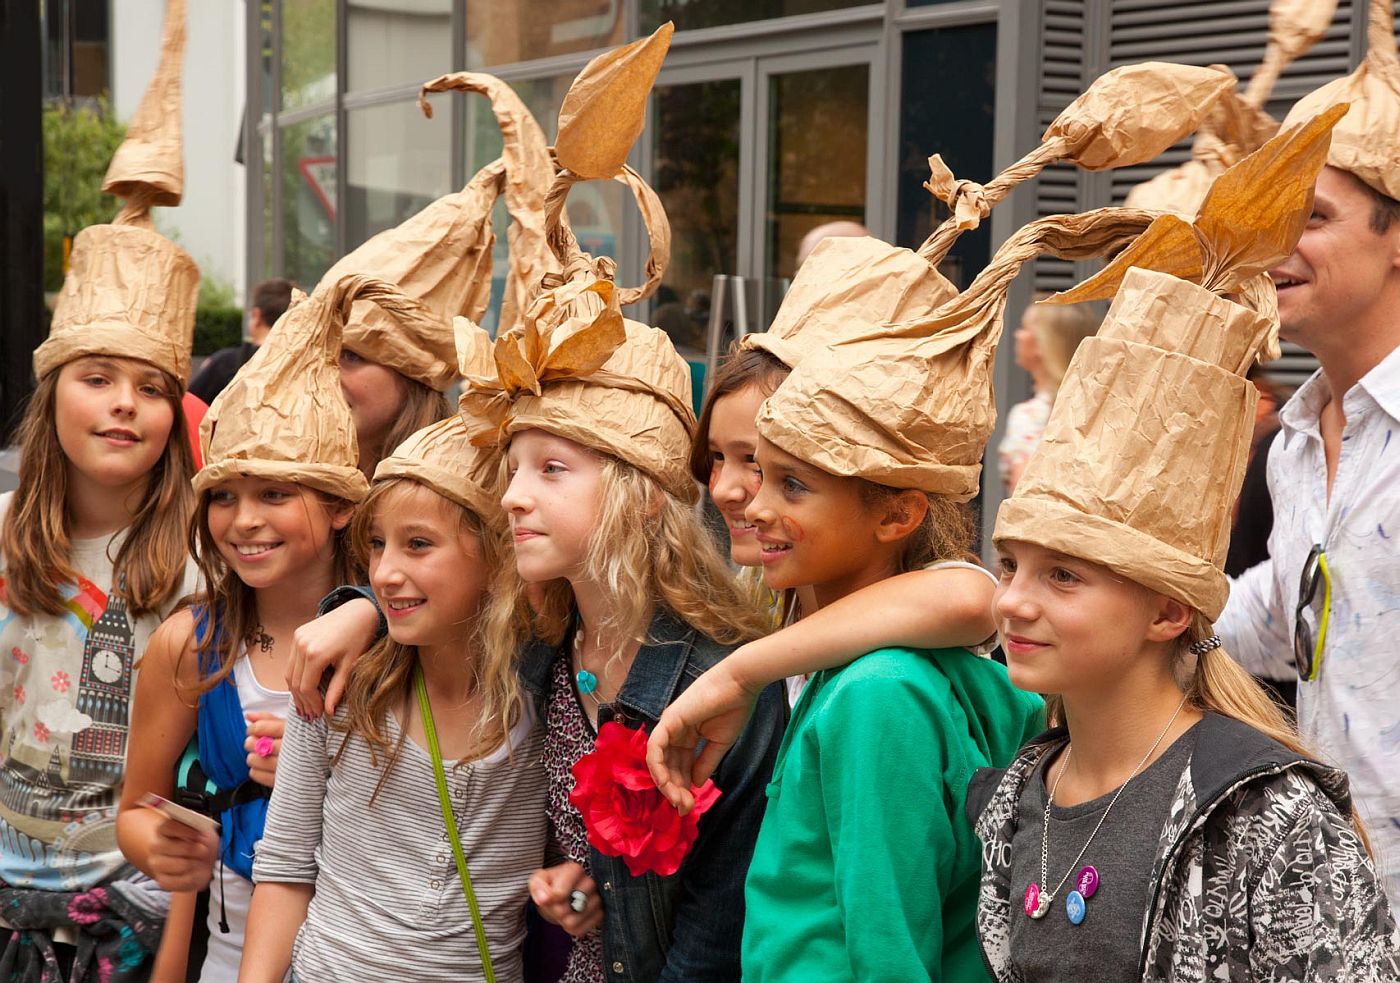
• Paper hats •

• Paper hats •
Pulling a group portrait together requires a coherence, collective story or central interest to the shot.
Click image to view large
• Paper hats • By Netkonnexion on Flickr External link - opens new tab/page

4. In the best possible light

The character of the light is one of the most important aspects of the shot. There is no single rule for lighting but it certainly helps to have an idea about the basics. In the photo above, “The Lady”, you will notice the triangular patch of light on her left cheek. This is a portrait lighting situation called “the Rembrandt” after the famous renaissance painter who pioneered this lighting. The form of the light/shadow helps show off the shape of the face and highlights the cheeks beautifully. In this case her eyelashes cast an interesting shadow and add character to the shot too.

When you are taking street portraits it helps to know about basic portrait lighting. The light and shadow on your subjects face is important. The wrong light can affect the form and shape of your subjects face, be unflattering or even create odd contrasts or miss-shape the face. It can certainly create a distraction if it is wrong. If you want to know more about how to light the face for portraits then check “Simple positions for classic portrait work”. It is the face that gives the most character to your subject. A beautifully photographed face is the foundation to a great shot.

5. Shoot many shots

No one should just be machine-gunning shots. Look for great shots and take them with care and consideration. On the other hand, you really want to make your trip worthwhile. Concentrate on bringing out some of the points above, but make sure you take lots of shots. Street photography is an uncontrolled situation. To ensure you get the best out of the subjects you see you will need to follow up on as many interesting points as you can. Things change fast – you may not get a second chance. Look, study, consider, frame, shoot – a working sequence of steps for a great shot. If you keep spotting interesting things… do your best to capture them.

find out more...Photokonnexion tips by email
If you enjoyed this article please sign up for our
daily email service.
                                                 Find out more
#11030#

By Damon Guy (author and Photokonnexion editor)

Damon Guy - Netkonnexion

Damon Guy (Netkonnexion)

Damon is a writer-photog and editor of this site. He has run some major websites, a computing department and a digital image library. He started out as a trained teacher and now runs training for digital photographers.
See also: Editors ‘Bio’.

Can you write? Of course you can!
Write for Photokonnexion...

We would love to have your articles or tips posted on our site.
Find out more…
Write for Photokonnexion.

Six things to consider for starting portraiture

A dear friend

• A dear friend •
Click image to view large
• A dear friend • By Netkonnexion on Flickr External link - opens new tab/page

Portraiture – the photographers passion.

Starting in portraiture can be daunting. We are going to look at the important things to consider when getting started with photographing portraits. There are also links to some of the portraiture resources available on Photokonnexion.

This post is aimed at introducing the portraiture resources found here…

Location

Choice of location can make or break a portrait. If you choose an outdoor location you have to consider a range of issues like the weather, how to pose your subject and exactly what you will be putting in the background. The problem with outdoor portraits is that there is potentially a huge number of composition decisions to make. Taking the shot can be quick. Deciding on what background is right can take a lot of effort and research.

If you are just starting out with portraits it might be better to focus on indoor shots. The environment and light is potentially simpler and the lighting more controllable. The essence of good indoor shots is to reduce the composition to a very simple background and lighting and to focus your attention on the subject. This gives you time to practice the posing, including expressions, and the lighting set up.

Lighting

Light and Lighting can be as simple or complicated as you make it. My advice is to make it as simple as possible. Most great portraits are done with one simple source light. Working with one light gives you the ability to try out shadow casts and hard light vs. soft light. Practice with simple ideas will help develop your skills more than working with confusing multiple light sources.

Background

This is not the same as the location (which is really more about the surroundings). When you are considering the background this could be as simple as a blanket suspended behind your subject. It could also be as complicated as a workbench that your subject works at. What you have to do is decide how to set it up, how to light it and how to place your subject in front of the background. You have to make a decision as to whether you are taking an environmental portrait (a large amount of the background is visible) or a simple portrait where the background is a minimalist setting, where you show very little of the environment and make it as simple as possible.

It is better to start simple. Placing your subject in front of a coloured, white or black background is a great way to get started. You will be able to focus on posing your subject and spend less time worrying about what to include or exclude in more complex backgrounds.

Posing

The best advice for starters is to work with your subject. He or she will be comfortable with certain poses. Get them to start the posing. Then, when you see how they like to pose, you can ask them to vary it to get your light right and get them showing their best side (the left side of the face is best).

Remember that that definition of the features of the face are defined by light and dark. Your poses should be aimed at using the shadow/light relationship to bring out your subjects facial and body features.

find out more...Photokonnexion tips by email
Enjoying this article? Please sign up for our
daily email service.
                                                Find out more…
#11030#

Props

It is difficult to provide resources about props. There are as many props as there are things people can hold, wear, sit on, stand next or or play with. Yes, props can be pretty much anything you want. However, one thing is certain. Your portrait subject will suddenly come alive when they have a prop to distract them from the daunting prospect of the camera. Try to get them to work with a prop they are familiar with – get them to tell you about it or show you how they use it while you photograph. These things will make the comfortable and help them to relax. It will also show you the character of the person they are.

Camera settings and lenses

Some people will tell you this is the most important point. Others will say the posing, still others will focus on the other things above. How you set up your camera, and how you place your subject are very closely related. But there is a lot to learn here. Start simple so you can feel in control. If you are not yet working with manual controls then be comfortable with auto mode – try to become aware of the types of settings that seem to work.

Exposure settings are an important study. There are some exposure links in the link box below. However, you should be concentrating on natural colours. The type of light you use is important to your exposure. I have one piece of adice on this. Beginners at portraiture almost always over-light. Keep your lighting soft and your exposure moderate and not over-bright to start. If you are using flash, turn it down. Bright flash always washes out flesh colours and sometimes causes nasty highlights on the face. It is worth reading up about how you can ruin your shots with flash.

I hope that this article has provided you with some options for getting started in portraiture. Please spend some time going through the links on the portraiture resources page to get more detailed information.

By Damon Guy (author and Photokonnexion editor)

Damon Guy - Netkonnexion

Damon Guy (Netkonnexion)

Damon is a writer-photog and editor of this site. He has run some major websites, a computing department and a digital image library. He started out as a trained teacher and now runs training for digital photographers.
See also: Editors ‘Bio’.

Panning With Motion… Seek A Compelling Background

The final touch to a great panning shot

There is no doubt that the killer shot is not just in the panning. Great panning action is only a part of the job. As in any situation aesthetics plays a big part in the winning image. Continuing our theme on panning and motion blur here is a great video introducing some excellent shots of moving objects filmed sharp, with great backgrounds. The panning and movement shots are wonderful, but the backgrounds make them killer shots. It all goes to show that the composition wins the day in the end… Enjoy!
Video by: www.kevinwinzeler.com External link - opens new tab/page