Tag Archives: Accessories

Easy introduction to light modifiers – don’t miss out (pt 1)

The "Honeycombe Grid" is a simple device to direct the light in a tight beam.

The “Honeycombe Grid” is a simple device to direct the light in a tight beam. It is an example of a range of grids used in front of lights to harden the light source and prevent the light from spreading out into a wider, more diffused beam.

We use light modification all the time.

Light bounces off everything. The unique light found in every location is from this bounce effect. We also deliberately modify light to create the right light for photography. Look at the options we have available…

Honeycombe

Shown above the honeycombe is a tightly arranged grid. It’s affixed to a studio strobe or an off-camera flash. The light shines through…

Softbox

There are very many different types of soft boxes. However, they have a lot in common. They create a really great soft light…

Simple tips to save you from disaster on your photoshoot!

Am I preaching to the converted?

Ever gone on a shoot and forgotten something? I have. If you’re like me you will have a bag packed ready. But, check the night before. Things may have changed. Here is some help.

Checking

The night before you go is the first time you should check your equipment. That’s the time to realise you need to charge your batteries. Yes, always have more than one – you don’t want to run out. Charge both. If you have an off-camera flash, check they are up to power too. I use rechargeable batteries in my flashes. So I charge them. But you may have standard disposable ones. Have fresh ones on hand.

Check you have a memory card in the camera and at least one spare. A corrupt card is as good as stopping your shoot if you have no spare. Oh, and make sure you downloaded the previous shoot. I turned up to a shoot once with a card nearly full of my previous shoot. I had not had time to post process them. OK, no problem. Ah! Had I downloaded them? Er… I could not remember. Then, eeek! I had no spare card. One full, no spare. It cost me an hour to find a shop for a new card – I was not impressed with the card either, but no choice. How stupid did I feel when I got back and found out I had downloaded the previous shoot. I could have used the card I had. Better safe than sorry.

Lenses

Choose your lenses if you have more than one. Also check they are clean, properly packed and have lens caps. Camera bags are generally made of very harsh material. If the glass rubs against the material it will rub off the coating and may scratch the glass. Look after your lenses and they will last for years. Got clean lens cloths? Make sure you do… you may need to clean up while out. Oh, I have an extender for my 70-200mm. It takes the lens up to 280mm – enough for most long shots. Don’t forget lens accessories. And, if you think you are going to need them, what about filters?

Camera straps?

Check your camera straps for damage. The little slits the straps go through gradually wear the strap. If a strap breaks your pride and joy will crash to the ground! Check the straps and zips on your camera bag are good too.

Got your tripod? Ah, but have you got the quick release plate? I forgot one once and had a day of really hard shots and poor results.

I normally carry three different light modifiers. They are a little honeycomb for focussed, hard light and a strap on diffuser which directs the light in one direction for soft wide focussed light. Finally, a plastic diffuser for popping on top of the flash for all-round bounce light to give wide-spread light. So, check your modifiers. If you don’t have any get some. Flash is too harsh for most shots.

Camera?

Ha ha! I am not joking actually. I once went on a shoot with a great friend. He had a new Canon 7D – proud as punch. He turned up on our shoot with a wonderful camera bag. In it was everything he needed for the shoot – except the camera body. He had left it on the table at home. Fortunately I was able to lend him one of my spares.

Sundry other items may be important too… Torch? Large plastic sack to cover everything in a sudden shower? Map? Tablets? Sandwiches, drinks, money? Well you get the idea. Everyone’s list is personal, so work out what is meaningful for you.

Going on a shoot for a day or more is a complex business. Your day can be ruined or shortened if you are not prepared. So why not make check lists. One for the night before, one for the morning before you go. Go through everything you have an then put it on the list. Then, check it all in complete confidence that you will have a great day.

A simple way to make and use a seamless white wall

The infinity wall is a way of completing a seamless white background

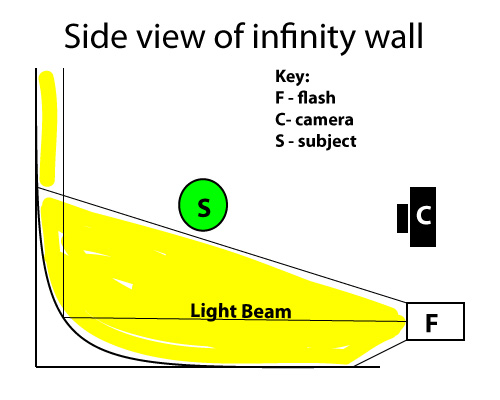
The infinity wall is a way of completing a seamless white background. Notice the flash (F) lights the background NOT the subject (S). The latter needs to be separately lit.

Seamless white backgrounds are popular and fun.

White is the perfect background for high brightness shots. Sufficient brightness will blow out the white image areas to pure white. The white highlights your subject giving it prominence. To produce this High Key effect you need to create a curved wall to project light onto. As the wall is made from a curve no lines will be apparent on the shot. It is only lines and shadows that show up. So the curve, if brightly lit, will create a seamless wall. When you look at it in the shot it will appear to go on for an infinite depth. The brightness in this technique will create a high key shot. This is a popular technique in photography and is enjoying great popularity in fashion and magazine media.

Creating the wall

As you can see from the diagram above (simplified) the principle is easy. It can be applied at any scale. I create a small table-top studio for product shots and still life. Here is how it is done…

  1. Create a flat surface up against an upright surface. I push a table against a wall.
  2. Use a large piece of white card say, European size ‘A0’ 1189 x 841 mm (46.8 x 33.1 in); or ‘A1’ 841 x 594 mm (33.1 x 23.4 in.).
  3. Fix it so the card is bent gently into a curve between the table and the wall. The side-diagram above shows the approximate shape.
  4. The diagram shows the flash below the camera. This position is for diagrammatic reasons. Normally the light will be alongside the setup or the subject (more on this below). The light beam shows the direction of light. This illuminates the card along the table and bounces off the curve lighting the wall above. This provides a well illuminated white surface.
  5. If the flash is about 2 stops brighter than the subject it will show as brilliant white in your photo. If you don’t have a light meter you can test the brightness with a few shots. If the white is brilliant white and seamless in your test shots you can start to set up the subject.
  6. The ‘subject’ in the diagram is your photo-target. Find a way to mount it, hang it or support it off the white surface. The aim is to make the light pass under, behind or around the subject. You are NOT trying to illuminate your subject. The light or flash is for the background curve only, to create a shadowless white depth. If you need to illuminate the subject do it separately – see below.
  7. Place the subject a clear distance from the infinity wall. Too close and the bright light reflecting from the wall creates a hazy white back-light on the subject. Experiment to position it away from the bright background. About 2 or 3 feet separation on a small wall is good. In a studio with people or larger objects the subject can stand about 2 to 3 Meters (6 to 12 feet) from the wall. This allows sufficient space to illuminate the wall clear of the subject.
  8. Placing your subject on something will create a shadow. Place the flash to the side of the subject. The idea is to create a light that goes around or between the wall and the subject. The reflecting back light will illuminate the space between the wall and the subject and over-ride any shadow created by the subjects own light.
  9. The illumination of the curve and white areas is created by an off-camera flash. If you don’t have one you can use any bright light(s) that you can direct at the curve/white areas behind the subject. Beware of any colour cast it may create. If you get the light bright enough the colour cast will go white anyway. You should make sure you compensate for any colour cast you detect.
  10. Positioning light(s) for the background is a matter of experiment. Try out different positions to get the optimum lighting. Sometimes you can place the light completely behind the subject. Other times you might place them either side of the subject. It could be just one side of the subject. In fact you can place the lights anywhere as long as they don’t illuminate the subject. It all depends on:
    • The size of wall/curve you are lighting
    • How close you can get the lights without illuminating the subject
    • The power of the lights

    Each shot is different. A few test shots will reveal the best position(s).

Illuminating the subject

Since the subject is not illuminated by the infinity wall light(s) you will need to consider separate flash or light sources for that. You could use a pop-up flash on your camera, the ambient light or off-camera lights.

Creating the blown-out brilliant white effect is the result of bright light on the infinity wall AND the difference in light intensity to the subject. You may need to experiment. A light meter will help you judge for about a two stop difference between the two. However, you can do it by experimenting. Your subject should look normally exposed. It should not be over-bright. Skin tones should be normal if photographing people in a larger set-up.

Using artistic licence is of course up to you. Some photographers like high-key shots to be almost all white. In this case a white sheen is found all over the shot including the subject. Others like to have the subject in a moodier lower light situation to create a strong contrast. This latter approach is difficult. A very dark subject and a very bright background creates a silhouette. So, again, try experiment. Here are some examples on Google…
High Key lighting/photography images on Google.

Taking the shots

Once you have illuminated your subject you can take the shot in the normal way. If you are using a manual mode you should be careful to meter off your subject. If you meter too close to the bright white area the meter will expose for the white background. This will create a silhouette of your foreground subject. If you are using auto-mode you must make sure your focus points in the viewfinder are pointed at the subject.

You can set your aperture as you would normally. You are working relatively close. So with bigger subjects and people working at f5.6 is great. Working with larger apertures (say f4.0 or larger) gives you a shallow depth of field. This is an advantage because the white background will not reveal bokeh but will make the blown-out white a more even colour. If you find you need to work with very small apertures (say f14 or smaller) you are probably over-lighting your subject.

To master the high key technique takes practice like all other photography work. However its fun and interesting to get this technique right. Please leave comments or questions below. I would be happy to provide feedback too. Please send links so I can look at your shots.

How to work with reflectors… essential!

Every photographer likes natural light – reflectors give you more.

Using a reflector you can use ambient natural light and modify it to suit your needs. The 5-in-one reflector is probably one of the best buys you can make to extend your lighting.

The five-in-one reflector is a system of reflectors in one package. The system includes a white ring (42inch) with white translucent material filling the ring. The translucent ring is accompanied by reversible covers. The set provide the following properties…

  • Translucent white: creates a strong light diffuser It creates a soft light so it has a vibrant wrap-around quality. Ideal for softening hard light sources, direct sunlight and effectively creating soft shadow edges particularly on the face for portraits.
  • Silver cover: reflects silver-light for increasing specular highlights and high-contrast light reflectance.
  • Gold cover: reflects a warm golden colour for gold colour fill light which is ideal for sunsets, portraits indoors and out, and for special work like fashion highlights, jewellery and back reflection on other surfaces.
  • White cover: produces an even and neutral reflection which will be an effective fill-light for still-life, portraits, product shots and many other situations where light is needed at an angle to the main source of light.
  • Black cover: used to absorb light increasing the shadow on the side used and to dampen the softer lights in the area. Effectively applies definition to glass on the edges of illuminated glass pieces. It will also stop-down sun light and bright hard lights.

In the video the guys from ImprovePhotography go through the different reflectors and how they can be used… more information after the video.
Published on May 23, 2012 by ImprovePhotography External link - opens new tab/page

The use of reflectors is the best way to create a second light-source to produce fill-light for your shots. Reflection or diffusion softens light and reduces its intensity. This is great news because it means that the reflected light looks natural and in proportion to the main light source. It even exhibits similar tonal quality to the main source unless the reflector colours it as gold or silver for example. One side of the shot will be illuminated with ambient light from a natural source or from a flash or other light. The other side is filled by the reflected light. Reflectors are a great way to extend your lighting equipment cheaply and to create great light that is controllably in proportion to the other light in the area. Excellent!

You can buy a five-in-one reflector set on Amazon now…

By Damon Guy (author and Photokonnexion editor)

Damon Guy - Netkonnexion

Damon Guy (Netkonnexion)

Damon is a writer-photog and editor of this site. He has run some major websites, a computing department and a digital image library. He started out as a trained teacher and now runs training for digital photographers.
See also: Editors ‘Bio’.

Can you write? Of course you can!
Write for Photokonnexion...

We would love to have your articles or tips posted on our site.
Find out more…
Write for Photokonnexion.

10 Tips for Saving Your Camera

It is so easy to kill your camera... do your best to protect it

It is so easy to kill your camera… do your best to protect it

Camera damage is devastating!

If you are like me you go everywhere with a camera. I would be lost without it. The one time I did damage a camera it cost me a lot of money and I was without it for nearly three months. Now I take precautions. Here is my spin on protecting and maintaining your camera.

1. Keep it clean

Surprising, but many people do not do this. I regularly wipe my camera all over on the outside with a dry but very clean cloth. Invisible dust and dirt lurk on your camera. If you have been out for a day on a shoot it will collect lots of dirt. Before you put it in the camera bag wipe it down. It keeps the dirt out of your bag and ensures that all the equipment stays free of camera-killing dust.

2. Changing lenses, opening doors

Keep your camera clean inside too. If you open any part of your camera do it in a dust, moisture and liquid-free place. If dust gets inside it will stick to everything, especially the sensor, mirror and any glass. You will gradually get spots and marks on your shots. As this builds up it becomes a big problem. When changing lenses hold the open camera lens-hole pointing downward. Dead skin, hair and dirt will fall into it from you as you change the lens if it is pointing upward.

3. Cleaning lens glass

Use a blower to blow the lens clean first. Do not use your breath. You will exhale a mist of biological vapour with grease and all sorts of other bio-chemicals onto the lens. This will not clean it and WILL make it attract more dust. Do not put lens cleaner fluid directly onto a lens. Instead, put a tiny drop onto the cloth and wipe that around the lens. Get into the habit of wiping your lens regularly and renew your lens cloth/cleaner regularly too. They soon accumulate dirt and then become more damaging than cleaning. Always keep your lens cloth in a bag to keep dust off it. Keep a lens cap on when you are not using the lens to keep it clean and safe from knocks.

4. Temperature

Extremes of hot or cold can damage your camera. So where possible protect it from heat sources or extreme cold. Most cameras have a working temperature range and you should try to work within that (usually stated in the manual). However, if your camera does get hot or cold never open it until it has returned to room temperature. The atmosphere inside a camera is quite well sealed even if it is not waterproof. If you open it the sudden change of air temperature and moisture can cause condensation or in-draughts of air. This will get moisture and dust deep into the body. Simply leave your camera in its bag for about 12 hours at room temperature for everything to equalize if you are unsure.

5. Moisture, water, chemicals and salt

Unless your camera is waterproof avoid getting it wet. Many cameras are “weatherproof”. Actually this means that a bit of damp in the air is OK. Any more than that and you risk serious damage to your camera. So, if you must go out in a boat, the rain, or near open water keep it under cover or in its bag. I have a roll of black trash bags in my car boot. In the event of rain I push a fist-sized hole through one corner of the bag and stick out the lens hood. Then I work inside the bag. Simple, quick and dry.

Always keep your camera away from exotic chemicals. Vapours, dry chemical dust and gases may damage your camera permanently. Keep clear of spills and ensure anything that is accidentally deposited on your camera is removed/neutralized quickly.

If working near salt water wipe your camera clean with a very slightly damp cloth to remove salt after use. Salt is corrosive and will cause all sorts of problems. If it penetrates your camera it attracts moisture and corrodes electrical parts. Salt also dries and leaves thin deposits on your lenses. Do NOT wipe with a dry lens cloth. Dry salt can damage the lens coating or even the lens itself. One of my waterproof cameras was completely destroyed by salt corrosion once. I did not clean it before storing it. Very costly! If your camera is waterproof wash it in clean fresh water and dry it in a warm place for several days before storage.

6. Wind-blown dust and sand

EEEEEK! Deadly stuff for cameras! If you work on beaches a lot, as I do, just don’t bother if it is windy. Or, if you must go on the beach, make sure your camera is enclosed in a sealed bag. Dust gets everywhere when it is windblown. If your lenses get dust or sand under the focus rings you can say good-bye to your lens soon after that. Wipe the camera down after coming off the beach. Never open it in dusty, sandy environments. That includes not opening the battery chamber or any other orifice or cover.

7. Straps

Straps are surprisingly vulnerable. They often have plastic buckles that get stepped on, knocked or caught in things. Believe me, although they are robust, fittings do break. Inspect all fittings on your straps regularly for wear and damage. Especially check the straps where they are attached to the camera. The little slots for the straps are quite sharp and they gradually saw through the strap. Do not use any chemical cleaners on your straps as they can break down. Wipe them clean regularly with a damp cloth to keep dust from impregnating the material. Use straps all the time when carrying your camera. Remove them if you can when using a tripod. They move or blow around and cause vibration and may catch on clothing etc and pull over your camera.

8. Drops, shocks and knocks

Most modern cameras are built to take the knocks of day to day use. Some people have taken extreme measures to test this. However, if your pride and joy is worth anything to you take care not to drop, knock or shock it. This means constant vigilance. Keep it in a good, padded bag. Don’t let kids or pets near it. Make sure it is strapped, tied, or otherwise fixed to something so it is secure if knocked or dropped. Over the years I have dropped a very expensive pro-lens, two cameras, a cheap lens and a range of other equipment. Of those, the cheap lens broke. The others were all secured or in great bags. Believe me you will drop or knock your equipment. If you have taken adequate precautions you will be OK. Otherwise you will be out of pocket.

9. Handle with care

If you have to push it, pull it, turn it or lever it with any force – something is wrong. Everything on your camera should be easy to open, close, turn, twiddle or use. If something does not work easily it may be jammed or broken. Don’t make matters worse. Check the instructions in your manual first to see if you have done it right. If it is not right, or you cannot see a reason for the problem take it to a camera shop. They may help you immediately if it is a simple problem. If it is more complex then get an expert to fix it. Better to be safe than sorry as they say!

10. Power, cables and sockets

I have never broken a cable socket in a camera. I know people who have. Sockets are expensive to fix. Keep cables clean, undamaged and untwisted. If someone trips over your cable they may be hurt – your camera will be destroyed! Damaged sockets and suddenly-tugged cables cause all sorts of problems. When you have cables plugged into your camera make sure you have them secured or away from places where they can get caught. Before connection/disconnection of any cable turn off your camera. Sudden electrical surges may damage internal components. The same applies to memory cards and connections to computers or radio-triggers etc. To avoid undue wear and tear on cable sockets in your camera make sure cables do not carry weight. If they tug constantly on the socket eventually it will not fit the cable any more. So find a way to keep the weight off the socket.

Oh! And, remember these…
  1. Clean everything and remove batteries before storage.
  2. Replace memory cards and batteries every two to four years before they wear out.
  3. As my old Dad used to say, “…and if all else fails read the manual!”

There, three extra tips for free!

By Damon Guy (author and Photokonnexion editor)

Damon Guy - Netkonnexion

Damon Guy (Netkonnexion)

Damon is a writer-photog and editor of this site. He has run some major websites, a computing department and a digital image library. He started out as a trained teacher and now runs training for digital photographers.
See also: Editors ‘Bio’.

Filters – Some Reasons To Love Them

Filter making is a craft

Over the years it is possible to collect a lot of filters. They are sometimes a necessary item in the kit bag an sometimes something to be bought out for a particular shot. However, every time I buy one I wonder why they are so expensive. After all they are only a bit of coloured plastic in a frame – aren’t they? Not so! This video shows you how they are made and what goes into making them.

Despite all the modern technology in up to date photography, filters are still hand crafted. Each one may take several days to make, including the ‘cooking’ phase. It is a surprisingly hands-on process involving a number of quite technical steps. When you consider how much goes into making these things it is not surprising there is a heavy price attached. Yet a good quality filter is worth its weight in gold when getting the right shot. Since seeing this video I will not feel so bad about handing over my money next time… and I learned a lot about filters. More on filters after the video. Enjoy!

But… Are they really necessary?

Here are some reasons to love filters…

  • They create great light in-camera saving post processing
  • Some can do things that cannot be done in processing
  • They protect your expensive lens
  • They can create effects that are unique to the scene

The fact that filters can do things in-camera that cannot be done in processing is excellent. For example, a polarising filter gives a blue hue to the sky that is difficult to produce in post-processing. It is also closer to the sky colour we actually see rather than the washed out colour most photos create. Some filters are also great for reducing glare and reflections, making shots through liquid and glass easier. There are a wide range of other effects that they can create too. More on that in another article.

Filters can be expensive but I know they are not a rip-off – they are the result of a time consuming craft process. There are some very good reasons to know more about them. If you would like to know more about filters here are four great books on the subject…

By Damon Guy (author and Photokonnexion editor)

Damon Guy - Netkonnexion

Damon Guy (Netkonnexion)

Damon is a writer-photog and editor of this site. He has run some major websites, a computing department and a digital image library. He started out as a trained teacher and now runs training for digital photographers.
See also: Editors ‘Bio’.

What is a softbox?

New Information on Softboxes

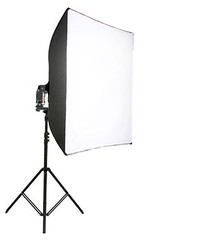
Softbox fitted with off-camera flash

Softbox fitted with off-camera flash

Here on we have looked closely at different light situations. To help you further we have drawn up a definition of the softbox. It’s simple. They are very useful as a quick and easy way to produce soft light. You can see the new entry in the photographic glossary for reference… Soft box; softbox; soft-box


Contribute A Definition?

Send us a definition of a photographic word or phrase...

Send us a definition for our list of photographic words and phrases. Simply write a clear definition and send it in. Include an original picture if you wish. Give us your name and a link to your website and we will credit your work.