

• Drama •
Click image to view large
• Drama • By Netkonnexion on Flickr ![]()
How to get the maximum detail.
In Summer photos are at risk of “blow out“. Clear, open sky and sun makes bright colours and reflective surfaces show up as bright, un-detailed white areas. How do you avoid these distractions? Very bright white areas on your image will draw the viewers eye and spoil the impact of your subject.
Shoot into the shadows
The simple answer is to try and find an area of your scene where you can exclude the bright spots. While that may be fine in a forest or under cover, it is a challenge in the open. The best approach is to find an angle of your scene where you can shoot into an area of shadow. If you expose your shot for that area then the shadowed area will be bright enough to show the details.
Cameras have a limited dynamic range. That means they cannot see very bright and very dark at the same time. If your scene has both, the darkest areas will be black and un-detailed. The brightest areas will be featureless white. Both will draw the eye off your subject.
If you expose for one end or other of the brightness-to-darkness scale you will retain the detail in the end you choose – bright or dark. The trick is to shoot into shadowed areas so you retain the detail in the lower light without the risk of bright areas being burnt out. The bright white will still tend to burn out. But, if you close in on the shadow area you can minimise the impact of the white-out areas round about.
Choosing the best position for the shot is a challenge even when shooting into shadow. Turn it around to your advantage.
Be aware of the light angle. View the shot above in ‘large’ and you’ll see I positioned myself to minimise the impact of the high sun. I’ve tried to make the sun have the same effect as a rim light. The sun is at the backs of the subjects in the shot. However, because they are in shadow they make an ideal spot for me to take my exposure. I knelt down in a selected position so that the brightness from the sun formed a rim around the objects in the shot. This is shown in more detail below.
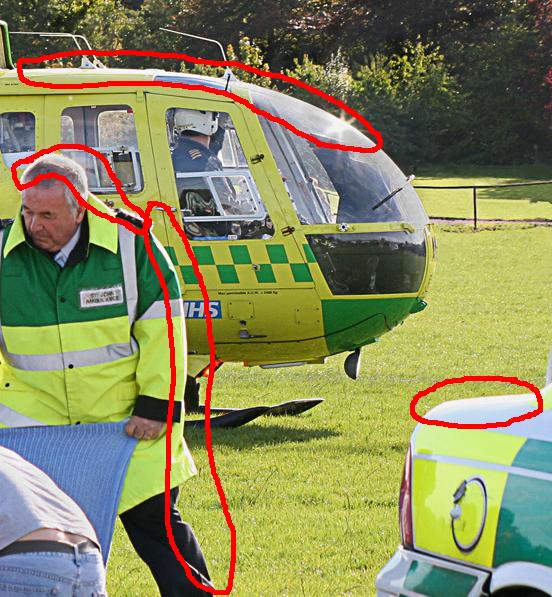
Position yourself so the brightest light comes only around the rim of the subject. This creates a sharper edge and gives a three dimensional feel to the object.
Strategic positioning relative to the sun gives the subjects one bright edge. This enhances three dimensionality of the subjects. It also preserves the brightness in the scene without dazzling the viewer. Instead of drawing the eye it has made the shot more dynamic and increased its depth.
I managed to avoid burning out the very bright yellows, pale reflective greens and oranges. These would be very difficult to control in this light if I was shooting into directly-lit colours. The creation of bright rims is a positive feature – not a negative distraction to the eye.
Photographing people
I have seen many beach shots where this technique could have been used. Photographers often settle for old advice, “Shoot with the sun over your shoulder”. Eeek! The result of that angle on bright skin will be burn-out, over exposure, flat features, dark and scrunched-up eyes. Horrible.
When on the beach taking pictures of your loved ones in bright sunlight here is how to do it…
- Make your subject(s) stand with the sun behind them and off to one side.
- Make sure you have your lens hood on – this is a classic position to cause lens flare.
- Come in close so they fill the shot.
- Position yourself so the brightness of the sun forms a fine rim around them. It often helps to be a little lower down to minimise the rim if the sun is really high.
- Expose for the shadier side of them (point your camera focus-point at the shadow on them not a bright spot).
- “Chimp” the shot.
If the subjects are too dark you can use a low power fill-in flash.
If the sky is blue it will tend to be washed out a bit from this position. This is because you are taking the shot more toward the sun than away. This is the best possible time to use a polarising filter. It will make the blue sky bluer, the colours in front of you less washed out by the sun, and reduce speckled brightness from any nearby water.
Rim lighting is a big subject
This technique used in lots of situations where a bright source of light can be placed behind and to the side of subjects. Once you are aware of the potential for using rim light (or backlighting) you can really help your shots get depth and definition. With careful positioning you can make a difficult scene look great. Check out this link for examples and more on this type of lighting… A simple introduction to backlight
Start Photokonnexion email subscription now!
Photokonnexion Photographic Glossary – Definitions and articles.
Light and Lighting – Resource pages on Photokonnexion
Definition: Burn out; burnt out; blown out; blow out; burnt highlight; blown highlight
Definition: Backlight; kicker or rim lighting
Examine your Shot Before Shooting Again – Chimping
A simple introduction to backlight
 Photokonnexion tips by email
If you enjoyed this article please sign up for our
Tips by email service.
Find out more…
By Damon Guy (author and Photokonnexion editor)

Damon Guy (Netkonnexion)
See also: Editors ‘Bio’.