Category Archives: Things to try

Things that photographers can try out and enjoy.

Break the pattern – draw in the eye

Break The Pattern - interest the eye

• Break the pattern – interest the eye•
When you break the pattern your texture, pattern or background takes on a new perspective. The eye is drawn in to explore the changed symmetry.
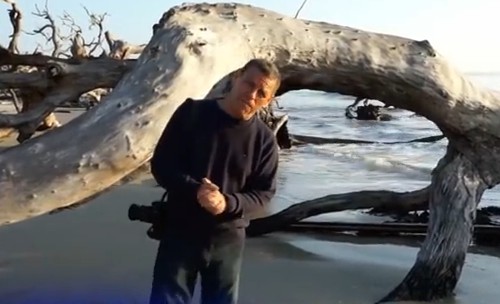
(Image of Brian Peterson taken from the video).

The eye loves pattern and texture…

Detail in the world around us can be attractive to the eye. But often we miss this detail if the eye is not drawn to it. Break the pattern and our eye is drawn in.

Break the pattern – break the monotony

Pattern attracts the eye because it is uniform and predictable. However, pattern is also spoilt for the same reason. When we see a pattern we are not threatened by it. We quickly know it. We feel comfortable with it. In fact the eye quickly becomes bored.

There is a good reason for this quick loss of interest. As we move around in our environment pattern allows us spot safety or danger; predator or prey. When we see something break the pattern we need to explore it. Is there danger here? Is there prey here? We find the things we seek when we see a break in the expected pattern.

Seek the difference

Our eye-brain system is really good at recognising pattern. But it is the ‘slightly different’ we really want to know about. We quickly lose our focus on the pattern – unless we see it is no longer uniform at some point. An edge that is different; or colour, or form, alerts the eye. Then, our eye-brain system spends time comparing and contrasting. We explore.

If you think about what really fascinates the human spirit it is all about things that break the pattern. When something is not as we expect it all sorts of questions are raised. We could almost say that understanding “pattern and inconsistency” is behind the scientific revolution. We look to understand the world by finding pattern. When something breaks the pattern it is a source of endless curiosity.

So it is in photography…

Images provide this same interest. By creating a pattern we make it easy to know the picture. When we break the pattern we introduce the same endless quest to explore. You have won the viewers eye when you make them explore your image. Ultimately, you interest them when they want to know more, or to know why.

Pattern Texture: You Keep Shooting with Bryan Peterson

In this short video Brian looks at a simple, predictable texture. He very simply shows how to break the pattern to attract the eye. Another tip after the video…
Adorama External link - opens new tab/page

More than one dimension

If you break the pattern you interest the eye. However, composition has more than one dimension. If we want to interest the eye a break the pattern – yes. But, we can do it in a boring way and lose the eye quickly. If the flower in Brian’s shot was placed dead centre the effect would be lost. When central the picture suddenly becomes about the flower. Actually we want the picture to be about how we broke the pattern. So, if you re-run the video you will see that not one of the photos had the break at dead centre. Each one was on, or near, a “third”. Yes folks… the good old Rule of Thirds.

If you off-set the break to a “third” you break the pattern again. You raise another question in the viewers mind. Why there? Why not the centre? Why not where it was expected? At the same time you give the pattern in the picture a strength that would not be there if the flower were central.

Vision

Seeing, in the photographic sense, is all about understanding vision. Knowing pattern and why we look at it is a large part of understanding what attracts the eye. At the same time, understanding why we seek patterns, is also why we are fascinated by any break in the same pattern.

Comments, additions, amendments or ideas on this article? Contact Us
or why not leave a comment at the bottom of the page…

Like this article? Don’t miss the next — sign up for tips by email.

Netkonnexion

Damon Guy (Netkonnexion)

Damon is editor of Photokonnexion. He has professional experience in photography, writing, image libraries, and computing. He is an experienced web master and a trained teacher. Damon also trains digital photographers.
See also: Editors ‘Bio’
By Damon Guy :: Profile on Google+.

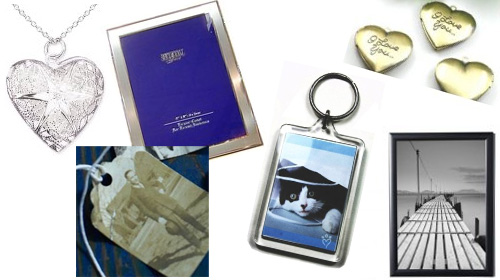
Using your photos – ten ideas for crafts and gifts

Using your photos for gifts and crafts

• Using your photos •
Putting your photos to good use as gifts and crafts.

Why do you take photos? Most of them are never used.

We all like to see our shots when they are finished. But the vast majority go unused. They’re left in a folder for storage. What about actually using your photos? Artists have many different ways of using their shots. But most of us do not.

Using your photos – get motivated…

There is more to art than its existence. It must be seen too. We put a lot into our photography. Shame! All that work and energy – then nothing. Maybe it’s time to think about what we can achieve with our photos. This is a chance to get motivated for something more.

Some ideas for using your photos

Using your photos for positive things can be really satisfying. It’s a really great outcome for your interest. With some simple ideas you can produce some lovely things. Here are some ideas…

A host of projects for using your photos

You’ve seen some ways you can use your photos for craft projects and for great gifts.You will get great satisfaction for using your photos to make others feel good.

There are many other ways you could also use this craft idea. You can help some people who are not as privileged as you. These ideas make great revenue raisers for charity and care organisations. If you work for an organisation that needs to raise funds think of ways you can use these inexpensive methods of making things to sell. Benefits and fund raisers are great places to raise extra cash. Charities are ever grateful for such support.

There are probably many more crafts, and ways you can help others by using your photos. Have fun. Help people feel good. Check out some of the links above and come up with some ideas of your own.

Comments, additions, amendments or ideas on this article? Contact Us
or why not leave a comment at the bottom of the page…

Like this article? Don’t miss the next — sign up for tips by email.

Netkonnexion

Damon Guy (Netkonnexion)

Damon is editor of Photokonnexion. He has professional experience in photography, writing, image libraries, and computing. He is an experienced, webmaster and a trained teacher. Damon runs regular training for digital photographers.
See also: Editors ‘Bio’
By Damon Guy :: Profile on Google+.

On-camera flash… advice for taming the beast

Taming on-camera flash

• Taming on-camera flash •
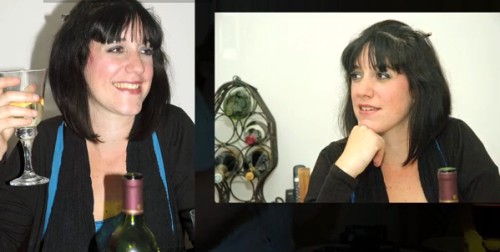
Left: harsh light and highlights are so unflattering!
Right: properly controlled you get proper skin tones and no highlights.
•••••||•••••
On camera flash can be a pretty tough nut to crack – learn how.
(Images taken from the video)

On-camera flash is pretty harsh…

In fact it’s often the source of ruined pictures from otherwise great dinner parties and family events. Dealing with with these little beasts takes a little work. You can make them do you bidding, you just need to know how.

A small powerful light source

The power of the little flash on your camera is misleading. For such a small light it puts out a lot of power. The learner is often caught off-guard. A great scene can be ruined by very unpleasant light, colour leached from faces, shiny reflections on faces and really hard-edged shadows. The whole thing is pretty ugly.

Here is some news. There are ways to control these little beasts and make them do your bidding.

Two of the most useful techniques for dealing with the problems are explained more fully in: Find out more about diffusing your on-camera flash. The other way is to help your flash work better in the room. Use the room itself as a way to bounce light around. Point your flash at a wall or ceiling so the light is reflected everywhere. It will make harsh flash into soft light – make it a more wrap-around light. This is always more flattering and shows the gentle curves of the face much better. It also means the light works its way around the back of the subject reducing harsh shadows cast onto the wall.

Practical use of the on-camera flash

For those quiet evenings where you are chatting with your friends and family here are some easy techniques. You can use your on-camera flash to good effect without the harsh shadows. You can escape the electric shock faces and startled expressions too. Have a look at the video and follow the sage advice of Mike Browne at a dinner party…

Using on-camera Flash Indoors – With Mike Browne


Mike Browne  External link - opens new tab/page

Using the proper tools is best

Let’s face it. On-camera flash is always going to be a bit difficult. As good as it looks in the video controlled results are always going to be difficult from such a little light source. Here is what Mike himself has to say about on-camera flash…

I’d suggest a speedlight is better because you can fit a diffuser and better still, turn the flash head in any direction and bounce the flash off a wall or ceiling.
Mike Browne  External link - opens new tab/page.

Have a look at some off-camera ideas. These are probably the most flexible options for moving your photography forward, especially for small intimate surroundings. Check out these options…

Off camera flash units

Canon Speedlite 430EX II Flash Unit – a great branded flash for general use  External link - opens new tab/page

Nikon SB-600 Speedlight – a great quality mid-range Nikon flash unit  External link - opens new tab/page

Special pick…

This high quality own-brand flash unit performs like branded units but is much more affordable. The unit provides a range of functions as well as being compact, light and robust. Great value for your money. YN560 III 2.4Ghz Wireless Flash Speedlite Support RF-602/603 YN560-III For Canon Nikon Pentax Olympus  External link - opens new tab/page

 
All these units will fire as normal when mounted on the camera. They will require an off-camera flash cord or wireless radio triggers for off-camera flash units  External link - opens new tab/page to connect to the camera when shooting off-camera.

Comments, additions, amendments or ideas on this article? Contact Us
or why not leave a comment at the bottom of the page…

Like this article? Don’t miss the next — sign up for tips by email.

Netkonnexion

Damon Guy (Netkonnexion)

Damon is managing editor of Photokonnexion.com with professional experience in photography, writing, image libraries, and computing. He is also an experienced, webmaster and a trained teacher. Damon runs regular training for digital photographers who are just starting out.
See also: Editors ‘Bio’
By Damon Guy :: Profile on Google+
Autumn photography – 50 things to think about

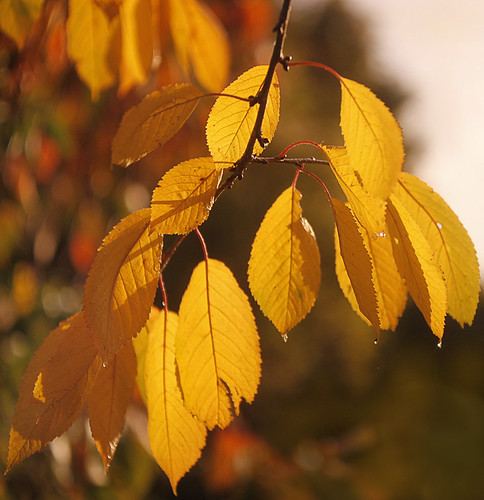
Autumn Cherry Leaves

• Autumn Cherry Leaves •
As Fall is upon us. Think of new ways to pull in the eye of the viewer.
Autumn Cherry Leaves by Netkonnexion on Flickr

Autumn is a great time of year.

There is so much to see and photograph. Being out in the open air and lovely locations is part of the attraction. Here are some other important and photographic things to consider.

Locations
  • Don’t always go to the same spot. Find somewhere new every Autumn.
  • Fall colours depend on the species, which may not be shown on maps.
  • Check with park information centres to see if the colours are right.
  • Information centres are great at giving directions to the best locations.
  • Watch weather forecasts to see when the best light is likely to show up.
  • Check websites for the area near the location for useful information.
Colours

What makes Autumn particularly exciting is the lovely russet and golden colours. Making those come out is not always easy. Think about these points…

  • Even slight greyness in the sky can dampen the colours.
  • Bright colour can be lost against a bright sky, exaggerate colour contrast.
  • Shoot yellows against a darker background so they don’t get lost.
  • Golden colours are best with a red dusk. Aim for times in the Golden Hour.
  • Don’t use a pop-up flash. It will flatten the colour and depth.
  • Use off-camera flash from the side to make leaves translucent and bright.
  • Use side light as much as possible to emphasis shadows and define shapes.
  • Use any greens you can as a back-drop for golden colours.
  • Low sunlight peeping under clouds often brings out yellows.
  • Take pictures after rain – the wetness often revitalises colours.
  • Consider a filter on your camera to exaggerate natural colours.
  • Try shots with as many mixed colours as possible.
  • Try shots with lots of similar colours across the picture.
Equipment

Every shoot demands its own approach. But here are some ideas to help the Autumn shots work for you…

  • A tripod is essential. A fuzzy shot of a great scene is horrible!
  • Most people forget the wide angle shots.
  • Remember that zoom lenses flatten perspective – consider prime lenses.
  • Consider using white boards and gold reflectors to help bring up colours.
  • You can’t make great images if you are cold/wet. Wear proper clothing.
  • Beware of changing lenses in damp air!
The shots

Found a great place to rejoice in colour and texture? Now you need to think about composition and ideas for your shots…

  • Check out our resources on composition.
  • Before going spend two hours looking at images by others (Google)  External link - opens new tab/page.
  • Work out a list of, say, 25 shots you would like to try out.
  • Concentrate your efforts on a few ideas.
  • Use your trip to try at least one type of shot new to you.
  • Practice your chosen shots before you go.
  • Remember to work the scene at the location.
  • Remember The fifteen second landscape appraisal.
  • Have a go at this old sailors trick to improve landscapes.
  • People often look up when in trees. Look down, there is plenty there.
  • Get really low.
  • Get really close.
  • Experiment with Depth of Field:.
  • Light leaves from behind. Translucent leaves are wonderful.
  • Consider backlighting to bring out shapes.
  • Hold up something interesting and photograph it with your hand.
  • Dogs look great in leaves! Capture your pet having fun!
  • Take a macro lens or macro tubes. Get really close.
  • Look for golden, yellows and reds in reflections… they look great!
Try going to manual (M) settings…

There is nothing more exciting. Get great images knowing they came out the way you intended. Avoid ‘auto’ shots programmed by a boffin at the camera factory.

Autumn and you…

Don’t be so intense that its not fun! Love your trip, enjoy the moment and if possible share it with a friend. Make some great images along the way.

Have a great Autumn.

Comments, additions, amendments or ideas on this article? Contact Us
or why not leave a comment at the bottom of the page…

Like this article? Don’t miss the next — sign up for tips by email.

Netkonnexion

Damon Guy (Netkonnexion)

Damon is managing editor of Photokonnexion.com with professional experience in photography, writing, image libraries, and computing. He is also an experienced, webmaster and a trained teacher. Damon runs regular training for digital photographers who are just starting out.
See also: Editors ‘Bio’
By Damon Guy :: Profile on Google+

Using the command dial to pick the right Mode

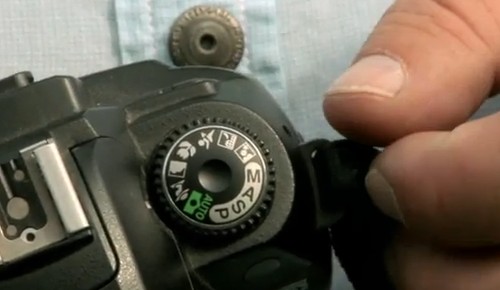
The Command or Modes dial

• The Command or Modes dial •
(Image taken from the video)

Setting up your shot.

The settings you use when taking a photograph affects the shot outcome. Before choosing camera control settings, first choose the camera mode. Here is an explanation on the ‘Command’ or ‘Modes dial’ where you make that choice.

Getting into manual mode

In “The Exposure Triangle” I looked at how you should balance…

These settings, when balanced, create an optimal exposure. You need to understand these settings to go manual with your camera.

What the dial offers

The Command or Mode dial sets the camera to use particular controls. You see a typical example of the command dial above.

‘Auto-mode’ or ‘Auto’ – the camera does everything for you. This setting is sometimes called the “green square” or Green mode. It’s normally green on the command dial. Using Auto you hand over full control to the camera. It provides a set of fairly average exposures. It’s used to snap basic shots in everyday situations.

To make your photography really effective you want full creative control. Learn to use the semi-manual modes and ‘Manual’ Mode. These give control to the three exposure factors. The picture shows these settings as ‘M’, ‘A’, ‘S’ and ‘P’ in a silver band.

  • M – the full Manual setting. You have full creative control over exposure.
  • A – Aperture – you set the aperture (f number) and the camera finds the right shutter speed for you.
  • S (or Tv) – the shutter speed setting or Time value. It sets the shutter opening time. The camera finds an aperture setting to match.
  • P – ‘Program’ allows some menu settings that ‘Auto’ will not allow. This auto setting gives only limited artistic control.
  • Also… B (not shown) means ‘Bulb’. It’s a setting for long exposures of more than 30 seconds. Bulb may not be available on all cameras.
Other modes

There are often other modes available. But these are really pre-sets. They do the same thing as manual and semi-manual modes. However, they give you less than full control over your shot. So I am not going into them here.

Camera Controls (intro) – command dial

Mike Browne goes through these settings (except ‘Bulb’). He explains the ideas and points out each mode. Remember, the command dial only sets the exposure controls for Auto-modes. The manual and semi-manual modes allow you to change the exposure factors from other controls.
Mike Browne  External link - opens new tab/page

Comments, additions, amendments or ideas on this article? Contact Us
or why not leave a comment at the bottom of the page…

Like this article? Don’t miss the next — sign up for tips by email.

Netkonnexion

Damon Guy (Netkonnexion)

Damon is managing editor of Photokonnexion.com with professional experience in photography, writing, image libraries, and computing. He is also an experienced, webmaster and a trained teacher. Damon runs regular training for digital photographers who are just starting out.
See also: Editors ‘Bio’
By Damon Guy :: Profile on Google+

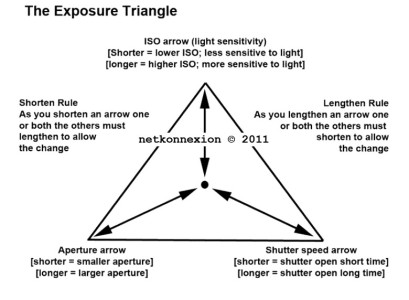
The Exposure Triangle – An aid to thinking about exposure

The Exposure Triangle

• The Exposure Triangle •
Click the image to download an A4 *.pdf version to print.

Going manual with your DSLR.

For many people exploring manual settings is a challenge. There is a lot to learn. Without guidance it is difficult to work it out for yourself. Here is my approach to the subject.

Why the exposure triangle

The “Exposure Triangle” is a memory aid to help us balance light for a good exposure.

One thing you should remember. The exposure triangle is NOT a calculator. The aim is to help you get used to using the settings. The ‘Triangle’ loses its importance once you understand the settings. Instead you will see your visualisation of the shot as more important.

Beyond auto-settings

“Auto settings” in modern cameras are average types of shot. They are pre-set in the camera programming. Sports mode freezes the action; landscape mode gives deep focus in the shot; portrait mode promotes close focus and so on. The pre-sets make credible pictures but take creative decisions away from you. Controlling exposure gives you artistic control over our photos.

It’s all about control

Photographs capture light reflected from objects in the scene. Too much light – the object is over-bright, or worse, blown out (completely white). Too little light and the light does not excite the sensor enough. Thnthe object is dark, sombre, or worse – black. At the extremes we have blown out or black. In between are a whole range of capture intensities.

The trick is to balance the incoming light so the sensor can make the picture as we wish it to come out. the idea is to control the light in-camera to create optimal light conditions for the sensor.

Three essential elements

There are three critical elements that control the incoming light…

  • ISO: controls the sensitivity of the sensor and how we capture the light brightness. A sensitive sensor allows a shot in lower light conditions (example: ISO100). High sensitivity to light is referred to as High ISO (example: very high ISO = 3000). The penalty is the picture becomes noisy (Definition: Digital Noise) as the ISO gets higher. Noise affects the quality of the picture. The lower you keep the ISO, the better quality the final image will be.
  • Aperture: controls the amount of light allowed through the lens. It also controls the depth of field. As the aperture increase the amount of light entering the lens also increases. However, as the aperture gets bigger the lens loses the ability to focus at infinity. As the focus shortens part of the picture is not so clearly defined. Taking a photo at F4 means you might be able to focus on a face beautifully and with sufficient light. But you may not be able to discern any detail behind the head. The depth of field has been shortened by the wide aperture.
  • Shutter value or Time value: How long the sensor is exposed to light affects the amount of light you collect. Leave the shutter open too long and the shot is too bright, blowing out parts of the picture. Close the shutter too quickly – the result is underexposed. Long exposures tend to exaggerate movement introducing blur. Fast shutter speeds tend to freeze an object in place.
What is exposure?

There is no right or wrong for achieving the outcome we desire. But there is only ONE point at which the exposure (all three elements combined) is right for your picture. That is the one to make your photo come out the way you want. You must find the correct exposure balance for your visualisation of the picture using all three elements.

Exposure is the right balance of ISO, Aperture and Shutter speed which provides for your intended depth of field, movement blur, brightness and representation of the scene. It is a unique response to the sensor settings you think will make your shot come out right.

The Exposure Triangle is a concept to help you adjust the balance to get the exposure right. The key to using the exposure triangle is that the three elements of exposure: ISO, aperture and shutter speed, must always balance.

It teaches us to understand how the three exposure elements play off one-another. Shorten one arrow the others will need to accommodate by adjusting their length. You can increase one or both of the other elements to accommodate the change.

If you increase one element you will need to decrease one or both of the other elements to accommodate the change.

Full Manual Control

Our exposure settings aim to balance the three elements in the camera. This needs to be done on the ‘Manual’ setting or ‘M’ setting to get the desired result. To gain full creative control we must do two things…

  • First we must have a clear idea of what we are going to achieve for each shot. Do we want the water blurred in our stream or not? Do we want the final picture to look bright and breezy or dark and sombre? Do we want movement blur or sharp, frozen action… and so on. So look at the scene and determine what you want.
  • Secondly, on the basis of what we want we must adjust the camera settings to achieve the desired result.

How do we adjust the settings to get the optimal exposure? Simple. The camera light-meter indicates when exposure is optimal.

The DSLR light sensor is the key

Inside every DSLR is a digital sensor. It detects light intensity. If the light is correctly optimised it will be indicated on the exposure meter.

With the camera set to “M” look through the eye-viewer. At the bottom of the screen you will see a scale. There should be a needle above the scale. This is the indicator of the current exposure. The centre of the scale is the correct exposure level for most shots.

If the needle is off to the right the sensor is getting too much light. If it is off to the left there is insufficient light. The trick is to balance ISO, aperture and shutter speed so the needle is centred.

Your camera manual will show you how to change each of the three settings. There are normally three controls somewhere on the DSLR body to change each of them. Again, your camera manual should have a diagram of the readings in your viewer screen when you look through it. Check out that diagram. You will see the location of the settings on the screen that will change when you alter the controls.

A trick to get you started…

Put the camera on full automatic (the ‘green square’ setting). Take a shot like the one you want. Now look at the settings for that picture on your camera screen. Your camera manual will show you which setting you can look at on the screen. This gives you a guide to what your manual settings should be for this shot.

Now switch to ‘M’ or manual to vary the results. If you want movement blur then slow down the shutter speed (longer exposure, more light let in) and/or decrease the aperture (reduce incoming light) to keep the needle in place. One click of longer shutter speed needs one ‘f-stop’ less of aperture to keep the exposure optimal. But now you get the movement blur!

The aim here is to balance a change in one element by changing one or both of the other elements. In the process you try to keep the needle over the centre of the scale in your viewer. The centred needle tells you you have an optimal exposure that your sensor can use.

Experience…

If you practice regularly with your camera on ‘M’ you will get control of your shots. Try to relate the settings to the type of results you get. Relate shutter speed to the resulting blur/sharpness. Similarly, relate depth of field to aperture size. Relate ISO to balancing light sensitivity to achieve the correct sensitivity for your intended exposure. Gaining experience with these attributes will help you remember settings to use in particular situations.

Comments, additions, amendments or ideas on this article? Contact Us
or why not leave a comment at the bottom of the page…

Like this article? Don’t miss the next — sign up for tips by email.

Netkonnexion

Damon Guy (Netkonnexion)

Damon is managing editor of Photokonnexion.com with professional experience in photography, writing, image libraries, and computing. He is also an experienced, webmaster and a trained teacher. Damon runs regular training for digital photographers who are just starting out.
See also: Editors ‘Bio’
By Damon Guy :: Profile on Google+

Ten motivational Tweets from @photokonnexion

Twitter is a medium of communication

Twitter is a medium of communication. It perfectly complements the power of photography.
 

Thinking about photography…

This blog shares a lot of information about the fundamentals of photography. The same can be said of the information we share on Twitter. Every day on Twitter @Photokonnexion provides motivational phrases, answers to questions, links to this site, quotes and great photography tips. Most of all we try to motivate the thousands of photographers who follow us. You can follow us too…


You can learn so much from so few words

Twitter is a succinct medium. You only have 140 characters to make your point. It is a challenge to put over great ideas in that small amount of text. Below are a few of the many @photokonnexion tweets…
• 
Every champion was once a contender that refused to give up. Every photographer had to start somewhere.
• 
The difference between an image and a photograph? Images conjure up meaning – photographs represent a scene. Aim for images.
• 
Failure is a dress rehearsal for success. The good photograph is the dress rehearsal for the great image.
• 
“The art of photography is all about directing the attention of the viewer.” ~ Steven Pinker.
• 
Photography has bought great value to my life. You can see so much through such a little window.
• 
Learning to be a photographer is about learning to see beauty and detail in everything and showing it to others.
• 
A closed mind will never understand photography. Insights come from opening your mind to new experience and knowledge.
• 
Everyone says “get closer”. They mean you to fill the frame. I mean to look closer! Seeing is the first step in photography.
• 
Rejoice, tell a story. Your images can communicate so much. Let your pictures speak to the world.
• 
Photography is a varied and engaging ray of light in your day. Make some images. You deserve a little sunshine.
• 

Comments, additions, amendments or ideas on this article? Contact Us
or why not leave a comment at the bottom of the page…

Like this article? Don’t miss the next — sign up for tips by email.

Damon Guy - Netkonnexion

Damon Guy (Netkonnexion)

Damon is a writer-photographer and editor of this site. He has run some major websites, a computing department and a digital image library. He started out as a trained teacher and now runs training for digital photogs.
See also: Editors ‘Bio’.
By Damon Guy see his profile on Google+.