Category Archives: Technology

electronics, science
Synonyms: applied science, automation, computers, electronic components, hi tech, high tech, industrial science, machinery, mechanics, mechanization, robotics, scientific know-how, scientific knowledge, technical knowledge, telecommunications
Any item that relates to the technological background or techno-speak, techno-standing, techno-meaning of something. Can be interpreted widely.

How to buy a new camera…

Buying a new digital camera

Buying a new digital camera

Buying is a big decision.

Photographers should be wary of the simple answer. Buying a camera is a deeply personal matter and a big investment. You live with the consequences for a long time. Look carefully at considerations that really matter to you and your performance as a photographer. Impulsive buys may spoil your photography. If you’re comfortable with your buy you will be more likely to get to know it, use it and have fun with it.

1. Work out what you need

Impulsive buying means something will not match your need, then you won’t get the use you want. The points below will help refine your thoughts. Write down your ideas to ease your research later.

Budget: Fix a budget – it may define the type of camera you can buy. So write down what you want to spend before starting. Change your mind later, but start with an idea to guide initial research.

Usage: What type of photography will you do? There are broadly two types of photographer…
The ‘point-and-shooter’:

  • Interested in recording fun, family, events and memories.
  • Love things they do when they have a camera around.
  • Take pictures as reminders. (Holidays, family, fun, action, friendship).
  • The camera is an accessory to the activity.
  • The camera is easy to use, probably in auto mode.
  • Simple controls – lighter, lifestyle-type design.
  • Less interested in the art of photography, more the style of life.

The ‘photographer’:

  • Take pride in every shot.
  • Indulges other passions through photography.
  • Wants more equipment.
  • Interested in “functions” and “controls” – technical cameras/DSLRs.
  • Camera is an essential part of the activity. (Landscapes, macro, action, nature, still-life, fine art…).
  • Loves photography for its art, technology, skills and techniques.
  • Documents passions and communicates interests through photography.
  • Take pride in camera control.
  • Enjoys the technical aspects of the capture as much as the images.

Each has an associated type of camera. A heavy DSLR is not well suited to the carefree life of the point-and-shooter. A compact, colourful, wrist-strap camera is not suited to landscape shots and large prints. Preferences and lifestyle should be shorted out early on. Are you are a point-and-shooter or a committed photographer (DSLR style)?

Conditions: Indoors/outdoors, weather, underwater, holiday, abroad, air travel? The situations in which you use the camera affects what you buy. Consider protection, travel, camera size and special equipment needs.

Experience: Skill level affects purchase – your aspirations for your future photography will too. If you’re just starting out, buying a camera with a bewildering range of functions is daunting. Take simple steps. Entry level DSLRs provide for years of growth into your hobby and produce great images. This allows you to develop skills without confusion.

Features/flexibility: Spending more on a camera means more features and flexibility. However, while this gives more control it increases cost for relatively little increase in picture quality for starters. Don’t waste your money. Focus on what you need, not “feature bloat”.

Physique/fitness: When buying you don’t get a feel for using a camera. Little, disabled, or not very fit people may find big cameras unusable. Fit, but not shooting daily? You might struggle to hold up a big camera for long periods. Buy a camera you can hold steady and use all day (if necessary). I know people who bought great cameras and had to sell them again to buy another great, but lighter, camera. Also ensure you can grip it properly and comfortably. Can you reach all the buttons easily?

Size of prints: More megapixels is NOT a better camera today. Good quality cameras have sensors to produce great images. High megapixels are only necessary for high resolution pictures – mostly for large prints. You pay a lot of money for top-megapixel cameras. Only buy them if you frequently do big prints in high definition. Don’t worry about megapixels in the market mid-range.

Lenses: To a committed photographer lenses are key. Buying the right lenses is more important than a camera body. Lens investment pays you back for a lifetime, or many camera bodies. Spend less on the body than you intended and save money for better quality lenses (not more lenses). Consider retaining at least half your budget for lenses.

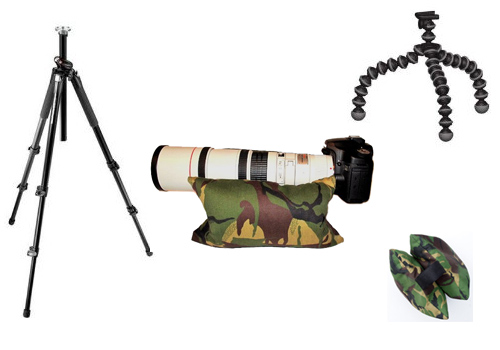
Other equipment and accessories: New cameras require other items affecting your budget. Consider…

  • Lenses (Wide angle, Zoom, macro etc)
  • Camera/equipment bag
  • Tripod
  • Spare batteries (two)
  • Light modifiers (diffusers), filters, reflectors
  • Specialist equipment for specific interests
  • Memory cards (at least two – eg. 2×16 Gb not 1×32 Gb – cheaper and more secure)
  • Off-camera flash (pop-up flash is rarely useful)
  • Remote trigger to fire the flash/camera

There may be other things too.

Compatibility: Is your existing equipment compatible? Buying a camera could mean buying those extras again, straining your budget. Consider the camera brand you want to buy. That may affect the other equipment you buy later. Lenses are a particular consideration. Top brands make good lenses, but other brands may not. That could be important for your buying strategy.

Picture quality: Quality digital cameras produce great picture quality. However, large, high resolution images (especially for printing) may need larger digital-sensor size (cropped or full frame?) and type of lens and lens quality. Buy up-market lenses as far as you can. For a point-and-shoot camera consider the quality of zoom. ‘Optical zoom’ is best, the lens does the enlarging. The quality will be better with a good optical zoom. With a large digital zoom component expect lower quality prints. Digital zooms crop the picture in-camera to make the picture appear bigger. You will see more detail, but the picture may be a lower definition/resolution.

More after this…

find out more...Photokonnexion tips by email
Enjoying this article? Please sign up for our
daily email service.
                                                Find out more
#11030#

2. Research

Now look at what is available. examine a range of reviews on different websites. Check out what’s popular around the web and get a “best fit” camera to your specification from above. Talk to experienced photographers. Join a club. Leave questions on Internet forums. Ask in shops.

Be prepared for this stage to take quite a long time. You may be committing to a brand for a quite a few years, or your career. Take it slowly so you can understand all implications. Keep notes and be prepared to check definitions and learn about features.

3. Try it out

Once you have identified your dream machine, see if you can try one out. Beg, borrow or hire. You will be unlikely to try everything but spend a weekend or week with it to really get a feel for it. That will help you to feel confident about your ideas or start new research. Ensure you are on the right track.

4. The purchase

From a shop: Local camera shops often have deals and committed staff. They will have knowledge and experience too. Remember they are on commission and a different focus to you. So go to a shop with a really good knowledge from the above before you buy.

Online: There are some great deals but also a lot of scam artists. Consider…

  • Who you are buying from.
  • Does the site cover losses?
  • Is delivery and packaging good?
  • Delivery times?
  • Are there proper cancellation and returns procedures?
  • Transit/purchase insurance (the company or your credit card)
  • Is the online store reputable and well known?
  • Do not click from email ads to the site – insecure.
  • Check with friends to see which online stores they used.

If it sounds too good to be true, it probably is. A reputable company will have protections built into the purchase and made clear on the site.

When you are ready consider negotiations. Lots of websites will do deals. Shops will too. Make sure you get the right deal, but don’t compromise security or safety.

5. After purchasing

Check your purchase properly – has everything arrived? Retain all paperwork and orders for future reference, returns and insurance. Test to see that it works properly. Get signed receipts and correct paper work for returns, delivery shortages or damage.

Satisfied you have the correct equipment and it works? Put it through its paces in a logical way. In Getting started with a new lens I show how to work through testing and getting to know new lenses. Many of the principles apply to the purchase of a camera and help you get to know your camera properly.

Other ideas?

Please share your other ideas, tips or experiences on buying a camera with us below in the comments…

By Damon Guy (author and Photokonnexion editor)

Damon Guy - Netkonnexion

Damon Guy (Netkonnexion)

Damon is a writer-photog and editor of this site. He has run some major websites, a computing department and a digital image library. He started out as a trained teacher and now runs training for digital photographers.
See also: Editors ‘Bio’.

Simple videos showing how camera settings work

Understanding the relationship between ISO, Aperture and Shutter speed…

These are the three critical factors in the exposure relationship. Getting a feel for how they work together is the essence of controlling your camera. Several people asked me to find a simple explanation for the way this relationship works after seeing this post yesterday: How to work with your camera settings – a simple, fun lesson.

The key point

The three settings, ISO, Aperture or Shutter Speed are set up on your camera in stops, or fractions of stops. The stop is a photographers way of measuring light in the camera.

The most important thing to remember is that a stop of aperture is the same as a stop of ISO, and in turn a stop of shutter speed. As they equal each other, you can keep them in balance. If you put one setting up a stop (or fraction of a stop) you can put one of the others down a stop (or fraction) and you will get the same exposure. This allows you to change your settings to get a different result (more bokeh, less movement blur etc) but retain the same exposure levels.

The two videos below will help you to understand the way the settings work. I have given you two versions of the same information. They both present differently, and they both have snippets of information that are different from the other. However, they both cover the same material. I hope that one or both of them will help you to see how the settings work. Enjoy!

Aperture Shutter Speed and ISO, Photography 101

The second video covers almost identical material but shows some of the points through the camera viewer. This helps you to see the context of the settings easier.

Exposure (Aperture, Shutter Speed, ISO)

Now try out your new knowledge…

Now you can try out CameraSim in yesterdays post. Try varying the settings for yourself like they did in the videos and see how they work together to get an exposure balance.

By Damon Guy (author and Photokonnexion editor)

Damon Guy - Netkonnexion

Damon Guy (Netkonnexion)

Damon is a writer-photog and editor of this site. He has run some major websites, a computing department and a digital image library. He started out as a trained teacher and now runs training for digital photographers.
See also: Editors ‘Bio’.

Can you write? Of course you can!
Write for Photokonnexion...

We would love to have your articles or tips posted on our site.
Find out more…
Write for Photokonnexion.

How safe are your photography files from file loss?

Electronic files are threatened by many dangers.

File loss comes down to one of two problems. They can be electronically lost or mechanically lost. There are simple things you can do about it. A proper backup strategy is something we should all have in place. Have you reviewed yours recently?

File loss can seriously affect your happiness – that’s important

As a keen photographer, if you lose your electronically stored photographs you lose the fruits of all your labour. If you are a keen family photographer you could lose all the memories those photos represent of good times and family togetherness. You might be losing both, or more if you have other uses for your images. Losing files, and particularly ones that impact on your family life and memories, can be quite traumatic. If your home is destroyed by fire the trauma is terrible. Imagine if you were to lose all your family photographs in that fire too! File loss can be completely devastating.

When a disaster strikes – earthquake, fire or tsunami – the disaster organisations pick up the pieces. Often they say the loss of photographs causes serious emotional problems for people recovering from trauma. Think carefully about taking action to protect your files. Don’t let file loss devastate your memories.

Protecting against file loss is easy

Being keen on taking photographs can help you to enjoy yourself. Protecting against file loss helps you to preserve your files. But it also gives you peace of mind. So it is worth investing a little time to protect your files.

Things change

You may have a great computer. It may even be new. Things change fast with technology. Before long your existing hard drive will be getting old, subject to mechanical failure. Hard drives are more reliable than they used to be. However, they are are still liable to fail. If you have all your data on one hard drive that fails you will lose everything. I used to run an Information Technology department. I know how often hard drives just suddenly give up. Believe me do not trust to luck. One day you will lose everything. A mechanical failure will occur and file loss will happen.

Of course you may suffer from some sort of software error first. I have seen hard drives that completely corrupted themselves. They were working fine. But everything on the drives was simply trashed beyond use. There are several ways this can happen. Virus or malware activity on the computer can be one cause. Damage to the file storage database is another possibility. There are other issues too.

Knowing about the reasons for file loss or damage is interesting. However, all you really need to know is that your files can be deleted, completely corrupted or otherwise damaged. This can happen at any time.

I know you are going to tell me of firewalls, anti-virus and other protection. But, even those can be overcome by hackers, virus infection or malware. Computer security is an ongoing battle. It never ends. You can protect yourself as much as you can afford. The worst can still happen – although it is less likely. And, that is the point. If you ensure you have all the right protection AND you back up your files you have the best possible cover against file loss.

Don’t panic about potential file loss

The answer is simple. Back up; back up; back up!

Notice I said that three times? Well, for safety sake that is what you should do. The principle is simple. Here is how it works:

  • Level one: Updated every time you create a new file or change a file. Most hobbyist photographers will have this storage on the hard drive of their computer. It is the working storage space. But this storage alone is vulnerable. It is a single point of failure for file loss.
  • Level two (back up): Use an external/portable hard drive. Normally these plug into your computer using a USB connector. Each time you create new files or change old files, you copy them to the back-up external drive.
  • Level three (off-site backup): This is also an external/portable hard drive. You need to keep this copy at a different site to your computer. Then, if there is a fire at your house the level two back up drive is safe at another site. Then, about once a week, you copy all new files from your level two back up to the off-site level three drive.

So, in addition to your computer hard drive, you need two external hard drives. One stays next to your computer. The other you can keep in your office, or in a shed – anywhere out of your home. Then, you need to back them up to each other regularly. That three level approach is a simple and safe system to prevent file loss.

It’s supposed to be fun

Photography is fun. We all love it. However, file loss would be a a total disaster. You will be able to relax and enjoy your hobby all the more if there is a fall-back position. You can rest easy and feel comfortable with your hobby if you know that those files are safe.

Look carefully at your potential file loss situation. Think about getting yourself a couple of hard drives and backing up all your files on them. Then you are covered.

Check out these external hard drives on Amazon:
External hard drives on Amazon  Protect against file loss. Backup to a hard drive | External link - opens new tab/page

Also check out the links below for more information on files and file protection…

By Damon Guy (author and Photokonnexion editor)

Damon Guy - Netkonnexion

Damon Guy (Netkonnexion)

Damon is a writer-photog and editor of this site. He has run some major websites, a computing department and a digital image library. He started out as a trained teacher and now runs training for digital photographers.
See also: Editors ‘Bio’.

Can you write? Of course you can!
Write for Photokonnexion...

We would love to have your articles or tips posted on our site.
Find out more…
Write for Photokonnexion.

When is a tripod not a tripod?

Tripods & Bean Bags

Tripods & Bean Bags are great alternatives to a full sized three legged contraption. And there is one other option too!

A tripod is not a tripod when it’s another stabiliser!

I suggest everyone use a tripod for the sharpest image. Of course they are not always practical. However, there are alternatives. Here are ideas for stabilised working without tripod.

Working alternatives

Working with a tripod is perhaps evidence for careful attention to detail. After all the use of a tripod does require some persistence. They can be heavy, they certainly take up space and take a little time to put up when you want to take a shot. On the other hand, they definitely increase the sharpness of the shot and allow longer exposures. They also provide a firm platform to work with when working a scene, giving the photographer flexibility to walk around. They also provide a vantage point for the camera during the shot – a solid holding point for the camera in difficult situations.

Using different versions of tripods extend their usefulness. The Joby Gorillapod  External link - opens new tab/page series of tripods are excellent. They provide a solid platform for taking photos which can be adapted to almost anything as a holding point. So instead of a long set of three legs, the existing bendy legs can be used to grip fences, poles, furniture, walls… well pretty much anything you can think of using. They are light and practical and can be used in most situations as long as you can find a place to anchor them. They do not work at their best with a very heavy camera and lens setup. So they do have their limitations. However, for most entry level DSLRs, medium sized DSLRs and most normal lenses they are great.

The other possible tripod-alternative product to consider is the bean bag. There have been a number of different types of bean bags made over the years. The idea is that you can use a bean bag to bed down your camera on a variety of surfaces. Wall tops, rocks, the ground, cars, even furniture are all perfectly acceptable for using the bean bag. The one that I recommend is the Maxsima – Professional Camera Bean Bag – ‘twin bags’ 262×162. Lens support Bean Bags for Wildlife photography etc.. also Designed for use on a Vehicle / Car door  External link - opens new tab/page. It provides a solid and adaptable way to put your camera on a hard surface to prevent damage to the camera (from abrasion, chips and dirt). This is, in effect, a cheap and efficient way to make a solid stand-point from which to make a shot. It is not as accurate as a tripod – you may have to massage the bean bag into the right shape to get the camera pointing exactly where you want it. In general however, it is a great way to work when you have limited options, especially at ground level or when working with other surfaces.

Another, simple option!

The final option you have is somewhat surprising. Its simplicity is also its flexibility. And because it is so simple, a lot of photographers forget to use it as an option. Try rolling up your jumper, jacket or even your coat! If you make a ball or cushion on which to put your camera you have a way to protect it from the ground or abrasive surfaces. But it provides a simple and solid surface for your camera. Lots of photographers forget the simple answer. They often think of the high-tech solution. But sometimes it pays to work smart when you are in a situation and you are caught out.

By Damon Guy (author and Photokonnexion editor)

Damon Guy - Netkonnexion

Damon Guy (Netkonnexion)

Damon is a writer-photog and editor of this site. He has run some major websites, a computing department and a digital image library. He started out as a trained teacher and now runs training for digital photographers.
See also: Editors ‘Bio’.

Can you write? Of course you can!
Write for Photokonnexion...

We would love to have your articles or tips posted on our site.
Find out more…
Write for Photokonnexion.

The advantages and disadvantages of live view

• DSLR Camera •

• DSLR camera diagram (side veiw) showing mirror down position •
Click image to view large
• DSLR Camera • By Netkonnexion on Flickr External link - opens new tab/page

Live view is here to stay.

What are the good and bad aspects of this technology? Should we be using it? What does it offer the DSLR user over the time honoured viewfinder system? In this post we look at the pros and cons.

The DSLR mirror system

If you are not familiar with the inner workings of the DSLR you can read more about it in this post: DSLR; Digital Single Lens Reflex Camera.

The essence of the mirror system is simple. The photographer peers through the viewfinder (see the diagram above) and the eye receives light directly from the main lens. Light reaching the eye has been redirected by the mirror up through the camera to the viewfinder eyepiece. When the photograph is taken the mirror flips up. Then the shutter opens allowing the digital image sensor to be exposed to light entering through the lens. While the mirror is up the photographer is unable to see through.

Live view…

When using live view the mirror is flipped up. You cannot see through the viewfinder. The view detected by the image sensor is instead created electronically on the camera screen on the back of the camera. In the most up to date mirrorless cameras the view is projected electronically into the viewfinder so you can use that instead of the screen-view on the camera.

The screens on the back of the DSLR, bridge cameras and point-and-shoot cameras provide a good, clear image on the screen. The displays offer a pretty good representation of the image seen through the lens. Reviews of the new mirrorless cameras suggest that electronic viewfinders are apparently not as good as those using mirrors. However, the technology is young and significant advances have been made recently. I think eventually electronic viewfinders will provide as good a view as the back screen.

Why do we need a viewfinder?

One of the problems of a back-screen is holding the camera steady. When you have a big lens on a camera the sheer unbalanced weight-in-hand makes it difficult to steady the camera with two hands held out in front of you. For a professional, or the keen amateur, the extra softness this induces is intolerable.

This is less important with light point-and-shoot cameras which can be held steady with one hand. Mirrorless cameras are smaller and lighter than DSLR counterparts. Bigger lenses still make them relatively heavy. Pressing a camera-lens combo to your eye while also held in both hands gives a third point of stabilisation to your camera – a steady position. So, a practical consideration for more substantial combinations of large camera and lens.

Retaining a viewfinder also ensures the “eye-view” is actually available to the photographer. By this I mean that the camera can be placed where the eye actually is on the body. Then the photographer sees through the camera in the same plane and level as the eye. I find this leads to better composition. We are more used to using eye-level views in our everyday vision. I acknowledge that the free-roaming screen composition may provide a more unusual point of view. However, artistic considerations aside, when composing an image I find close scrutiny of the scene leads to cleaner images and a rigorous composition. OK, this is not for everyone. It is a point to bear in mind for the more discerning photographer.

In my experience doing a back-screen composition is difficult because the eye is distracted from the screen. This leads to limited, incomplete composition, or missed details. I have been guilty of this sort of sloppy composition and have seen it in the images of others. Personally, I think the viewfinder helps me to compose accurately and cleanly allowing proper examination of detail.

What live view can offer…

Despite the shortcomings of back-screen composition and lack of steadiness there are good reasons to use live view.

On a tripod… While using a tripod to compose for landscapes, macros, wide angle and fish-eye shots do a quick check in live view before the shot. I suggest you do your initial composition using a viewfinder on the tripod. Once composed quickly check the live view simultaneously scanning your scene by eye. This enables comparison of the lens-distorted view against the scene as the eye sees it. This cross-checks your composition against your vision for the final outcome of the shot.

Mirror lock-up… When using a tripod use mirror lock-up to help sharpness. This mode sets the camera to flip-up the mirror ahead of the shot. The vibration from the ‘mirror-flip-up’ then passes before the exposure takes place. This reduces vibration enabling a sharper shot. Most DSLRs offer the mode which is found in the menu screens. Live view also performs a mirror lock-up action on many cameras. If you have a “live-view” button, do your composition, perform a live view check and take a mirror lock-up shot in the same sequence.

Access to the viewfinder is restricted… Yes, sometimes I simply cannot get to the viewfinder. When doing macro work, complex close-ups suspended under a tripod and when holding the camera high all create situations when the eye cannot easily get to the viewfinder. In this case the live view mode is a definite advantage and enable otherwise impossible shots.

Depth of field… The viewfinder has its own optical characteristics additional to the main photographic lens. Normally viewfinder lenses are pretty faithful and do not affect the view through the main lens. When using a fast lens, say f1.2 wide open aperture, the depth of field may be distorted by the viewfinder. It’s said live view helps you better see the areas of bokeh. I am sceptical. I have not seen this effect accurately on my Canon 5D MkII to make any difference. I am prepared to accept it works on other cameras. Try it and see.

Horizons, converging verticals and straight lines… Live view offers a set of lines dividing the screen up into thirds (nine segments). This “rule of thirds” grid is helpful in composition. I find it most useful when checking converging verticals when lining the camera up. However, a good electronic display of focus points laid out in your viewfinder is excellent for most compositions. The focus points usually allow for rule of thirds composition and more. So, live view offers an option, but no better than the viewfinder. Other cameras may differ on this, make your own choice.

Live view histogram… Some cameras allow the display of a live view histogram. This enables you to check your colour and light intensity prior to the shot. This saves later examination of lots of frames online. However, I prefer “Chimping”. The post-shot histogram review is the best way to tell if you have a good shot or not. If you do use the live view histogram beware of poor composition. The histogram takes up screen space I prefer to use for composition. So, not to my taste, but the opportunity is there on some cameras.

Live view can be useful

More cameras are providing good live view mode and offering more facilities with it. I think there are some good reasons to use this mode especially with a tripod. It certainly provides some useful functions. There are some severe shortcomings with live view composition and personal stance when using it. The good old viewfinder still wins the day for me. However, a lot depends on your camera. I hope these points have opened your eyes. I leave you to draw your own conclusions.

find out more...Photokonnexion tips by email
If you enjoyed this article please sign up for our
daily email service.
                                                 Find out more
#11030#

By Damon Guy (author and Photokonnexion editor)

Damon Guy - Netkonnexion

Damon Guy (Netkonnexion)

Damon is a writer-photog and editor of this site. He has run some major websites, a computing department and a digital image library. He started out as a trained teacher and now runs training for digital photographers.
See also: Editors ‘Bio’.

Shooting tethered… easy control, excellent shots

Battery On Lens

Battery On Lens
Taken using Canon tethering software to accurately capture the battery terminal and leave the rest of the shot out of focus
Battery On Lens By Netkonnexion on Flickr External link - opens new tab/page

Photography phactoids number 003.

When you are trying to get it right a high resolution screen is a great support. A significant development in photography is the screen on the camera. How would you feel about seeing your picture even larger? Tethered shooting allows you to use a screen off-camera to display your shot immediately. Tethered shooting is the way you can get greater camera control and see your shot in a large display immediately.

Tethered shooting involves plugging your camera into your computer (laptop, tablet – PC or Mac. etc). Then you can control the camera from the software and as soon as you take the shot it is displayed on your large screen. It is the ideal way to increase your screen resolution so you can see how effective your shot was a soon as it is taken. The camera control is also excellent. From your keyboard you can focus, change the settings and see the live view version of your intended shot too.

Canon supply tethered shooting software free with their cameras. Nikon charge extra for their software. There are also a range of third party software packages to do the same as the manufacturers own software. Install the software on your computer then simply connect up your camera. If you have the appropriate equipment you can even use wireless connections.

The control of your camera from the keyboard of your computer gives great accuracy for taking the shots. The precise control off settings and focus allows you to do close-ups and macros with certainty that you have the shot you want. Because the picture is direct to the screen the shot is easily verified directly.

Tethered shooting can be used for all sorts of shots. Its great for those shots where you will use a tripod. Portraits, macros, close-ups, landscapes and technical or product shots are all great examples. The technique is less useful for shots where you are on the move or where you would need to hand-hold. The latter are still achievable however, if you use a wireless connection.

Tethered shooting is really useful for accuracy, verification of shots and precise control of the camera settings. Every photographer should all have a go at this. The experience is worth the small amount of effort it takes to set up.

By Damon Guy (author and Photokonnexion editor)

Damon Guy - Netkonnexion

Damon Guy (Netkonnexion)

Damon is a writer-photog and editor of this site. He has run some major websites, a computing department and a digital image library. He started out as a trained teacher and now runs training for digital photographers.
See also: Editors ‘Bio’.

A very quick tip about filters

• Filter size mark •
Buy the right screw-on filter.

If you get it wrong it will not fit your lens. Not all of them are the same. You need to know with certainty you have the right one.

The importance of size

Lenses have different diameters. The end of the lens, where the filter screws onto the lens thread, is also of a different diameter. So here is how you know what size lens you want. If you look at the picture above you can see the lens is marked on the frame at the side. That mark is the filter thread size mark. It is accompanied by the filter size in millimetres. That is the size you need to quote to the dealer when you are asking for the filter size.

Get Photokonnexion tips by email!
We send you tips daily – find out more…

Start email subscription now!
#11030#

Sometimes the size is found on the side of the lens, but it is normally accompanied by the size mark… ” Φ “ . Some lenses don’t have the mark and size of the filter. In this case the lens manual/leaflet will provide the size for your lens. In the case where you no longer have a lens manual/leaflet you should be able to look the lens specification up on the lens manufacturers website.

Filter adapters

Filters can be very expensive to buy. If you have several different lens sizes it is cheaper to buy a lens adapter for your lenses to fit the filter. So look at the filter manufacturers website to get the details on the filter adapter sizes.