Category Archives: Starters School

Articles essential for starters

Tripod myths – why are amateurs tripod shy?

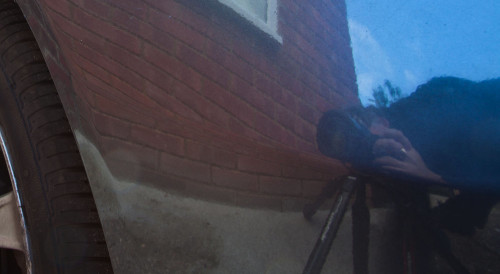
Me and my tripod - reflected in paintwork - tripod myths

• Me and my tripod – reflected in paintwork – tripod myths •
I use a tripod most days in some pretty tight situations. They are
quick, effective and give great results!
[Image by Damon Guy • Click to view large]

Tripods improve your results – fact!

Tripod myths can be heard regularly. Actually they make life a lot easier and faster. So, why are amateurs tripod shy? Why buy cheap? Why is simplicity apparently so difficult for tripod starters? Read on…

What are the tripod myths?

Over the years I have heard all the excuses. Here are some things I have heard…

  • I’ll miss the moment!
  • Tripods are too much bother.
  • I can shoot great shots hand-held.
  • It slows me up.
  • I like to walk the scene…
  • They are cumbersome, get in the way and heavy.
  • It’s not possible or easy to use it all the time.

I am sure there are other issues. But let’s look at these in detail.

Tripod myths: Missing the moment?

Every photographer gets lucky sometimes. They happen to point the camera pointing right and, snap, they got it.

Let’s be honest. How many times does that lucky capture happen? “Journalists?”, I hear you say? Actually, they rarely get lucky either. Photo-journalists train in preparation, planning and investigation. Being there and aware when the event happens is not an accident. They get the story time and time again.

If you plan for your tripod you will get the shot too. You won’t miss the shot getting your DSLR out either.

Forethought and planning are good photographic habits. Cultivate and develop these skills. You get the shot, and it’ll be sharper. If you are going to shoot, do it properly. Have both camera and tripod ready. Don’t be a victim of tripod myths, be in control of your photography.

Too much bother? One of the tripod myths that is just silly

What can be too much bother about getting a sharp, properly framed image? Loading a tripod is no more trouble than putting your camera in the car. It takes only 15 seconds to set up. The tripod will also give you time and scope to take a great shot. It holds your camera for lens changes and while scouting the next shot. Bother? Not really.

Bothered people think tripods are hard work. Do they realise how much the picture is improved? Attention to detail over your shots is what makes excellent images. Taking a quick snap may be no bother. Its unlikely to yield a great image either. This is one of the tripod myths that does not stand up!

Tripod myths: Great hand held shots

There are lots of situations where great light and a steady hand can get a sharp result. Congratulations. The time and effort you put into your photography is paying off. However, of all the situations I take pictures in, only about a third can be hand held. High ISO might help. More likely digital Noise would spoil the image. Better to take a longer exposure and use, say, ISO100. Quality is important.

Tripod myths will limit you to one third of your potential as a photog. It makes you a limited photographer. Tripods extend your shooting time, flexibility and quality of image.

Tripod myths: It slows me up

Yes, finally, a fact! Tripods make you think about your photograph. Perhaps not one of the tripod myths, more of a tripod mistake.

Since digital cameras became common I see a lot of machine-gun photography. A keen photog arrives, sprays off a hundred shots… Then, off they go. Wow.

Spend the first few minutes considering options. Proceed with a plan and with care. Cover all the shots you need. Sometimes you will get new ideas. Great, get more shots.

Once, at an aircraft museum with a keen photographer I was alone in minutes. My friend shot out of sight. We met up later. He had over 1000 pictures. He was elated. I had less than seventy shots. “Ah!”, he said. “You should’ve left the tripod at home!”

Later that week things turned around. He had eleven fair shots and one really good one. He had spent hours and hours in post-processing and missed lots of sleep. My more careful approach paid off. I had more than 40 quality images. As he looked at them he kept saying, “I took a picture of that too, but it didn’t come out”. And, “How did you get that one to look so good?”. My care, quality and composition paid off. The tripod helped me think about my photography and take care. I only spent about two hours in post-processing too. Most on simple tweaks. I had plenty of time for other shoots that week.

One question… Who was really slowed up here?

Tripod myths: Working the scene

One of my regular jobs involves 15 – 20 finished pictures of a scene. Picture order and camera height is important. We often work in low light. Space is restricted at many sites. We are not allowed to do any post-processing.

This is fast work. In 15 minutes I make up to 35 shots at a high enough standard to meet the needs of a court case.

Does a tripod hold me up or prevent me working the scene? Does it prevent my shots? On the contrary. I could not do the job without it. I would have to take many more shots. My shots would be less flexible. I would not achieve court-ready sharpness and detail. Without a tripod I could not work the scene properly.

Tripod myths: Cumbersome, heavy, intrusive?

Sometimes. A tripod can be badly adapted for what you are doing. So, if you are going to do something a lot, buy the right tripod. Travel a lot? Get a light one. Work on beaches a lot? Choose sealed feet to keep the sand out. Working special scenes? Get a special tripod. General photography? Buy general.

If you have the wrong equipment you can rightly claim it’s no good! So, buy the right equipment for the job. Make sure you get a quality piece of equipment. You spend thousands on your camera and lenses, so there is little point in spending only ten on your tripod. Quality workmanship and materials are important to producing quality images. You would not accept less with your camera so why with your tripod? This is one of the tripod myths that does stand up – if you have the wrong equipment. Get it right and you have a friend for life.

Sometimes ya gotta go with the flow…

I am not saying tripods are everything. In fact there are many situations where they are not suitable or you can’t use them. Also, we all enjoy the freedom and creativity of hand-held shots sometimes. If we fall prey to tripod myths we will never get past auto settings and bright daylight shots.

All I am saying is, don’t limit yourself. Get past the tripod myths. Buy a tripod and make sure you know how to use it. Your photography will improve if you use it a lot. Use it only a little and you’ll pay a penalty.

Why not look at some of the options now…

General tripods for DSLRs  External link - opens new tab/page
Manfrotto – Quality tripods for committed photographers  External link - opens new tab/page.

Also check out this post and recommendation…
Buy a good tripod – nothing beats it
Manfrotto 055XPROB Tripod Legs Only – Black External link - opens new tab/page

Comments, additions, amendments or ideas on this article? Contact Us
or why not leave a comment at the bottom of the page…

Like this article? Don’t miss the next — sign up for tips by email.

Netkonnexion

Damon Guy (Netkonnexion)

Damon is managing editor of Photokonnexion.com with professional experience in photography, writing, image libraries, and computing. He is also an experienced, webmaster and a trained teacher. Damon runs regular training for digital photographers who are just starting out.
See also: Editors ‘Bio’
By Damon Guy :: Profile on Google+

The Exposure Triangle – An aid to thinking about exposure

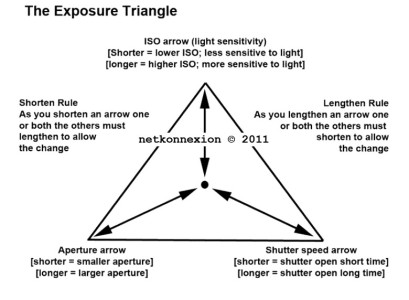
The Exposure Triangle

• The Exposure Triangle •
Click the image to download an A4 *.pdf version to print.

Going manual with your DSLR.

For many people exploring manual settings is a challenge. There is a lot to learn. Without guidance it is difficult to work it out for yourself. Here is my approach to the subject.

Why the exposure triangle

The “Exposure Triangle” is a memory aid to help us balance light for a good exposure.

One thing you should remember. The exposure triangle is NOT a calculator. The aim is to help you get used to using the settings. The ‘Triangle’ loses its importance once you understand the settings. Instead you will see your visualisation of the shot as more important.

Beyond auto-settings

“Auto settings” in modern cameras are average types of shot. They are pre-set in the camera programming. Sports mode freezes the action; landscape mode gives deep focus in the shot; portrait mode promotes close focus and so on. The pre-sets make credible pictures but take creative decisions away from you. Controlling exposure gives you artistic control over our photos.

It’s all about control

Photographs capture light reflected from objects in the scene. Too much light – the object is over-bright, or worse, blown out (completely white). Too little light and the light does not excite the sensor enough. Thnthe object is dark, sombre, or worse – black. At the extremes we have blown out or black. In between are a whole range of capture intensities.

The trick is to balance the incoming light so the sensor can make the picture as we wish it to come out. the idea is to control the light in-camera to create optimal light conditions for the sensor.

Three essential elements

There are three critical elements that control the incoming light…

  • ISO: controls the sensitivity of the sensor and how we capture the light brightness. A sensitive sensor allows a shot in lower light conditions (example: ISO100). High sensitivity to light is referred to as High ISO (example: very high ISO = 3000). The penalty is the picture becomes noisy (Definition: Digital Noise) as the ISO gets higher. Noise affects the quality of the picture. The lower you keep the ISO, the better quality the final image will be.
  • Aperture: controls the amount of light allowed through the lens. It also controls the depth of field. As the aperture increase the amount of light entering the lens also increases. However, as the aperture gets bigger the lens loses the ability to focus at infinity. As the focus shortens part of the picture is not so clearly defined. Taking a photo at F4 means you might be able to focus on a face beautifully and with sufficient light. But you may not be able to discern any detail behind the head. The depth of field has been shortened by the wide aperture.
  • Shutter value or Time value: How long the sensor is exposed to light affects the amount of light you collect. Leave the shutter open too long and the shot is too bright, blowing out parts of the picture. Close the shutter too quickly – the result is underexposed. Long exposures tend to exaggerate movement introducing blur. Fast shutter speeds tend to freeze an object in place.
What is exposure?

There is no right or wrong for achieving the outcome we desire. But there is only ONE point at which the exposure (all three elements combined) is right for your picture. That is the one to make your photo come out the way you want. You must find the correct exposure balance for your visualisation of the picture using all three elements.

Exposure is the right balance of ISO, Aperture and Shutter speed which provides for your intended depth of field, movement blur, brightness and representation of the scene. It is a unique response to the sensor settings you think will make your shot come out right.

The Exposure Triangle is a concept to help you adjust the balance to get the exposure right. The key to using the exposure triangle is that the three elements of exposure: ISO, aperture and shutter speed, must always balance.

It teaches us to understand how the three exposure elements play off one-another. Shorten one arrow the others will need to accommodate by adjusting their length. You can increase one or both of the other elements to accommodate the change.

If you increase one element you will need to decrease one or both of the other elements to accommodate the change.

Full Manual Control

Our exposure settings aim to balance the three elements in the camera. This needs to be done on the ‘Manual’ setting or ‘M’ setting to get the desired result. To gain full creative control we must do two things…

  • First we must have a clear idea of what we are going to achieve for each shot. Do we want the water blurred in our stream or not? Do we want the final picture to look bright and breezy or dark and sombre? Do we want movement blur or sharp, frozen action… and so on. So look at the scene and determine what you want.
  • Secondly, on the basis of what we want we must adjust the camera settings to achieve the desired result.

How do we adjust the settings to get the optimal exposure? Simple. The camera light-meter indicates when exposure is optimal.

The DSLR light sensor is the key

Inside every DSLR is a digital sensor. It detects light intensity. If the light is correctly optimised it will be indicated on the exposure meter.

With the camera set to “M” look through the eye-viewer. At the bottom of the screen you will see a scale. There should be a needle above the scale. This is the indicator of the current exposure. The centre of the scale is the correct exposure level for most shots.

If the needle is off to the right the sensor is getting too much light. If it is off to the left there is insufficient light. The trick is to balance ISO, aperture and shutter speed so the needle is centred.

Your camera manual will show you how to change each of the three settings. There are normally three controls somewhere on the DSLR body to change each of them. Again, your camera manual should have a diagram of the readings in your viewer screen when you look through it. Check out that diagram. You will see the location of the settings on the screen that will change when you alter the controls.

A trick to get you started…

Put the camera on full automatic (the ‘green square’ setting). Take a shot like the one you want. Now look at the settings for that picture on your camera screen. Your camera manual will show you which setting you can look at on the screen. This gives you a guide to what your manual settings should be for this shot.

Now switch to ‘M’ or manual to vary the results. If you want movement blur then slow down the shutter speed (longer exposure, more light let in) and/or decrease the aperture (reduce incoming light) to keep the needle in place. One click of longer shutter speed needs one ‘f-stop’ less of aperture to keep the exposure optimal. But now you get the movement blur!

The aim here is to balance a change in one element by changing one or both of the other elements. In the process you try to keep the needle over the centre of the scale in your viewer. The centred needle tells you you have an optimal exposure that your sensor can use.

Experience…

If you practice regularly with your camera on ‘M’ you will get control of your shots. Try to relate the settings to the type of results you get. Relate shutter speed to the resulting blur/sharpness. Similarly, relate depth of field to aperture size. Relate ISO to balancing light sensitivity to achieve the correct sensitivity for your intended exposure. Gaining experience with these attributes will help you remember settings to use in particular situations.

Comments, additions, amendments or ideas on this article? Contact Us
or why not leave a comment at the bottom of the page…

Like this article? Don’t miss the next — sign up for tips by email.

Netkonnexion

Damon Guy (Netkonnexion)

Damon is managing editor of Photokonnexion.com with professional experience in photography, writing, image libraries, and computing. He is also an experienced, webmaster and a trained teacher. Damon runs regular training for digital photographers who are just starting out.
See also: Editors ‘Bio’
By Damon Guy :: Profile on Google+
Visual toolbox for photographers

Sharpen up your creative photography…

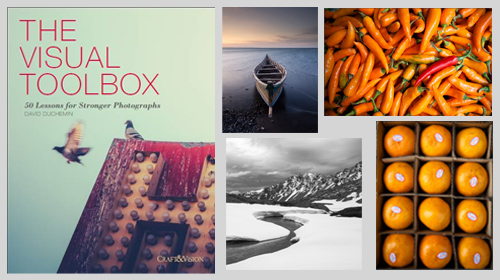
It’s easy when starting photography to over emphasis the importance of gear. In fact it’s ‘photographers eye’ that really makes the difference. Your vision and insight into a scene are critical to producing a wonderful image.

Sage advice from a world master

The Visual Tool Box by David duChemin is all about the skills of composition. He goes into depth around the background ideas which help you look at a scene. The ultimate success in photography is to make your image a pleasure to view. Aesthetics rule – it’s as simple as that. This book is dedicated to teaching you the tools you need to develop the ‘eye’.

David duChemin says,

These are the lessons I wish I’d learned when I was starting out.
The Visual Tool Box by David duChemin

This is my kind of book. He writes superbly, in simple, readable form. His examples are excellent and the pictures are just amazing. But most of all the book is organised for learners to extend their knowledge in easy, well structured steps. This book is all about putting new tools in your photographic tool box and it achieves that with an ease that any beginner will find a joy.

Composition

The book is packed with examples of the sort of compositional ideas that really work – for anyone. Just look at some of the topics covered…

  • Manual
  • Optimize Your Exposures
  • Master the Triangle
  • Slower Shutter Speed
  • Learn to Pan
  • Use Intentional Camera Movement
  • Use Wide Lenses to Create a Sense of Inclusion
  • Learn to Isolate
  • Use Tighter Apertures to Deepen Focus
  • Use Bokeh to Abstract
  • Consider Your Colour Palette
  • Lines: Use Diagonals to Create Energy
  • Lines: Patterns, Lead my Eye, Horizons
  • See the Direction of Light
  • Light: Front Light, Side Light, and Back Light
  • Quality of Light: Further Consideration
  • White Balance for Mood
  • Light: Reflections, Shadow, Silhouettes, Lens Flare
  • People
  • Experiment with Balance and Tension
  • Use Your Negative Space
  • Juxtapositions: Find Conceptual Contrasts
  • Orientation of Frame
  • Choose Your Aspect Ratio
  • Use Scale
  • Simplify
  • Shoot from the Heart
  • Listen to Other Voices (Very Carefully)

And there is plenty more content to complement and extends these ideas. What’s not shown in a list is the excellent and sage advice throughout the book. I will let David duChemin have the last word…

Pace your-self. Anyone can master a camera; that just comes with time. It’s the other stuff — learning to think like a photographer — that takes so much work and allows this craft to become the means by which you create art.
The Visual Tool Box by David duChemin

And it is thinking like a photographer that you will quickly learn from reading this book.

How to buy this great book

This book was originally published as an ebook. However, it is no longer available in that form. The book has moved into the real world. It will be available on Amazon as a Paperback From 31 Mar 2015.
The Visual Toolbox: 60 Lessons for Stronger Photographs (Voices That Matter)You can per-order the book from Amazon.

Comments, additions, amendments or ideas on this article? Contact Us
or why not leave a comment at the bottom of the page…

Like this article? Don’t miss the next — sign up for tips by email.

Damon Guy - Netkonnexion

Damon Guy (Netkonnexion)

Damon is a writer-photographer and editor of this site. He has run some major websites, a computing department and a digital image library. He started out as a trained teacher and now runs training for digital photogs.
See also: Editors ‘Bio’.
By Damon Guy see his profile on Google+.

When to ignore the rules

 Symmetry • by aebphoto, on Flickr

The arrangement of your pictures can be so much more than a simple rule followed.
Click image to view large
Symmetry • by aebphoto, on FlickrExternal link - opens new tab/page

What works tends to get overworked…

The “rule of thirds” works in more than 95% of photographs. OK, maybe there is not a certain statistic like that. But it sure is effective to the eye. For that reason it helps us to compose most of our photos.

The principle behind the rule of thirds is not a universal “Law”. No one went to prison for violating it. It is more what we might refer to as a guideline. The rule helps us to compose a picture to meet the expectations we have wired in our brains about what is pleasing. Aesthetics is a funny thing – we all have our own preferences about what we like. However, we all seem to have some generally appreciated ideas. The rule of thirds seems to be one of them.

What if you feel like breaking the rules?

No problem. Do it!

A cavalier attitude to breaking the “rules” when you are learning photography, or any art, is a good thing. The difficulty is knowing what will work when you stray from the guidelines. That is a fair point. But there is no need to be fearful. You need to have a go to see what will work. And, like any experimentation, you will more likely be unsuccessful than successful.

Ah! But if I am going to be unsuccessful then why try? The simple answer to that is so that you can know yourself and your audience better.

No artist is born as a seasoned and finished creative. They all devote long hours to learning, experimenting and listening to the thoughts of others on their work. In other words, they practice, practice, practice. They get feedback. Then they practice some more. There is a lot of work and experimentation in becoming an artist.

Breaking the rules is about trying out something lots of times. If you have one particular passion for your photography then go for as much variation and feedback on your work as you can. You will perfect your shots only when you know that the work is capturing attention and holding it.

A more general approach to your photography, photographing many different things, is another approach. However, it is reasonable to take a similar attitude. Instead of trying out lots of shots about one subject you can try lots of different angles around each subject. I am not talking about a machine gun blast of pictures from one button push. I am talking about genuinely working the scene. Try all the angles, all the possible ways to frame your subject. Do some of the shots in a traditional way (Rule of thirds etc). But do some shots that are decidedly not traditional. It is all about experimentation.

As long as your approach is considered…

Louis Pasteur External link - opens new tab/page, the father of modern microbiology said, “Chance favours the prepared mind”. He did not mean you should go shooting off random shots at everything in sight. What he meant was you should consider your options. Know your subject. Experiment with a good knowledge and background in your subject. Move forward in a logical and consistent way. It is this approach that will help you to learn to successfully break the rules. Know what the different shots are about, how the different methods of composition can affect the shot. Understand how the different shots would affect your subject, or experiment until you know.

Practice, practice, practice… and careful thought about what you have done and what you are going to do is a route to success. Enjoy the journey as well as the outcome!

By Damon Guy (author and Photokonnexion editor)

Damon Guy - Netkonnexion

Damon Guy (Netkonnexion)

Damon is a writer-photog and editor of this site. He has run some major websites, a computing department and a digital image library. He started out as a trained teacher and now runs training for digital photographers.
See also: Editors ‘Bio’.

Can you write? Of course you can!
Write for Photokonnexion...

We would love to have your articles or tips posted on our site.
Find out more…
Write for Photokonnexion.

Buying a tripod – the essentials

Buying Tripods

• Buying Tripods •
Buying a tripod? There are a lot to choose from. So what should you look for?
Image from the video.

Why would you buy a tripod?

Because a tripod is of the central pillar of your sharpness strategy. Without a tripod you are denying yourself the opportunity to use a large proportion of the settings on you camera. Let’s look more closely at what this means…

Settings

Your camera has three primary controls…

  1. ISO – Controls how sensitive your camera image sensor is to light.
  2. Shutter speed – Controls how long your sensor is exposed to light.
  3. Aperture – controls how much light is allowed to reach the sensor.

These are inter-related. As we want a high quality result (with low digital noise) we set the ISO to around 100. Therefore, for our purposes here we are particularly interested in two of those settings.

  1. Shutter speed – movement blur created with long exposure; movement frozen at short shutter speeds.
  2. Aperture – Wide aperture, shallow depth of field; small aperture gives a deep depth of field.

Looking at these you need to consider how you do photography where only low levels of light enter your camera. Here are some examples:

  • Landscape – Use aperture f11 or higher. Small aperture gives Depth of Field, but lowers the light influx. Therefore you need to have a longer shutter speed especially during the Golden Hour. Hand-holding is not an option.
  • Portraiture – In bright sunlight a shallow depth of field (wide open aperture – blurred background) would overexpose the shot the shot.Use a Neutral Density Filter. This reduces light influx but means a ling exposure. A tripod stops handshake.
  • Still life: You are doing a still life requiring low light for the mood shadows. To get the exposure you need a longish exposure. You do some test shots. Your best exposure is with a shutter speed of one second. Tripod needed!
  • Fireworks: You need to hold the camera steady for about 1/20th of a second to get the full spread of the explosion. Tripod – essential.
  • A disco dance floor – If you want to capture movement you will need to work at around 1/60ths of a second. But you also need sharpness right through. You will need an aperture of f8 or f10. A Tripod is essential if you want the movement blurred and the rest of the room sharp.
  • Photographing a baby. Flash changes the mood and invites crying. It’s also harsh light. Baby skin loves natural light. Use a fast shutter and tripod. Make the composition right then watch the baby. Pick your moments and take several shots. A tripod helps you can concentrate on the right moment while baby is still and happy. You don’t have to recompose for every button push.
  • Family photo – Set the timer, join the group! A tripod is essential.

I could go on… there are dozens of everyday scenarios requiring a tripod. These are just the obvious ones. For sharp, quality shots I need to use a tripod around 75% of the time. My tripod is essential to my business.

If you are an amateur you probably cover more varied situations than me. You need a tripod for a high quality result. It is not uncommon for me to hear students say, “I never use a tripod, I don’t need one”. Then in almost the same breath, “Why are my pictures always blurred or dull?” The answer to the question is – to get a proper exposure you need a tripod.

Lots of people say, “A tripod just slows me up!” My response is simple. Most amateurs take ten shots to get one – and are not necessarily successful. A tripod actually saves you time. You can rely on one shot being sharp. In post production you review one shot for each composition, not dozens.

What to look for…

In general the main considerations are:

  • Well designed: smooth operation, strong leg clips so you can set the tripod at various leg heights.
  • Centre column: Solid, little movement, clamps solid.
  • Legs – variable wideness: You can spread the legs out wider and at different angles to each other.
  • Tripod provides a platform for different heads: Do not buy a tripod with one type of head pre-fitted. It may not be suitable for your camera and there are different heads for different types of photography.
  • Weight or lightness: Solid and heavy tripods mean a good platform. Lighter carbon fibre tripods are more expensive, but the carbon fibre has the ability to reduce vibration (especially when stressed by a weight bag hanging on it to steady it).

For general work I use this tripod…

Of course you need a good head on a good tripod. This head is my mainstay for most work…

A good tripod will last you years. It will be stable and steady even in wind. It will not wear out easily. A worthwhile investment. Don’t be tempted to go cheap. Look for quality brands with after sales parts and good design. Spend more and you will have a flexible friend that helps you in all aspects of your photography.

Have a look at these ranges of tripods. I use a Manfrotto for most situations, but there are other quality ranges. My Benro tripod is very rugged and nothing beats it on a beach or mountainside. Check out these links for a range of ideas…

Manfrotto tripods  External link - opens new tab/page

Gitzo Tripods  External link - opens new tab/page

Giottos Tripods  External link - opens new tab/page

Benro Tripods  External link - opens new tab/page

Which Tripod Should I Buy?

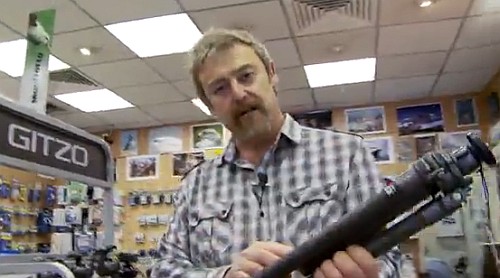
Mike Browne introduces this video with the basics of how to think about what you want in a tripod. What he says is good thinking. At the end two other photographers add their advice. I was impressed with the comments of both. There is a lot of great advice in this video.

Mike Browne  External link - opens new tab/page

Comments, additions, amendments or ideas on this article? Contact Us
or why not leave a comment at the bottom of the page…

Like this article? Don’t miss the next — sign up for tips by email.

By Damon Guy (author and Photokonnexion editor)

Damon Guy - Netkonnexion

Damon Guy (Netkonnexion)

Damon is a writer-photog and editor of this site. He has run some major websites, a computing department and a digital image library. He started out as a trained teacher and now runs training for digital photographers.
See also: Editors ‘Bio’.

Fifty tips to set photography starters on their feet

There are some great things to learn.

When you are starting out and need to learn some things fast, it helps to have some guidance. Here are a few things photographers need to know to get started. And some things I wish I had known when starting photography…

Roller coasters ‘R’ us – Photo-learning list…
  1. If you want to learn fast take lots of pictures.
  2. If your pictures aren’t good enough, you’re not close enough.
  3. Spend more time reviewing your pictures than it took to make them.
  4. There are billions of types of light. Learn to see 10 types to start.
  5. Get obsessed with the quality of light and its properties.
  6. Work on image composition at least as hard as your technical skills.
  7. Use natural light as much as possible. Learn its variations.
  8. Don’t use on-board flash. It will ruin your shots.
  9. Make people a central study of your photography.
  10. Count 1000, 2000 slowly then take your camera from your face.
  11. Think carefully about how to do it well. Then follow a process.
  12. Clean your kit before you go out and when you’re back. Cameras hate dust.
  13. “Learners don’t need a tripod”. My biggest learning mistake.
  14. Sharpness is a habit – work hard to get it right from the start.
  15. Think “Why am I taking this picture?” for every shot you take.
  16. Add another lens to your “kit lens” as soon as you can.
  17. Great lenses are more use than an expensive camera. Spend more on them.
  18. Don’t cheap out on a tripod. Cheap ones will not do the job.
  19. Use your tripod.
  20. Own more than one memory card AND more than one battery.
  21. Learn the meaning of RAW and then shoot with it.
  22. “Your first 10,000 photographs are your worst.” ― H. Cartier-Bresson
  23. A keen digital photog can clear 10,000 shots in 14 days – shoot more.
  24. Make some photography gear. You’ll understand your needs.
  25. Gear lust replaces your photographic vision with a hole in your pocket.

More after this…

find out more...Photokonnexion tips by email
Enjoying this article? Please sign up for our
Tips by email service.
                                                Find out more


  1. Carry your camera with you everywhere.
  2. Look at 50 pictures by other people every day.
  3. Take a clichéd shot – satisfy your curiosity. Store it in a secret place!
  4. The “Rule of thirds” works nearly all the time. Learn it early.
  5. Simplicity is the ultimate sophistication.” Leonardo da Vinci
  6. Read your camera manual. Try something. Read that bit again. Repeat.
  7. Have a go at every setting on your camera lots of times.
  8. A proper stance will provide a steady hand-held camera position.
  9. Amateurs often do better pictures than professionals.
  10. And, Professionals do more good pictures, more often.
  11. If your photos look tired and drab – go manual – learn control.
  12. For every shot you do, look at 50 similar ones. How does yours look?
  13. Don’t panic. Usually there is no problem.
  14. No photo, however good, replicates reality. Cameras distort – get over it.
  15. If you see it one way, most people will see it a different way.
  16. Check all gear before you go. Have a list of what you need.
  17. Know why you are going to a location and plan shots in advance.
  18. Back up your files. If your hard drive crashes you will lose the lot.
  19. Wear the right clothes. You cannot do good photography if you are cold.
  20. Help someone else to learn. You will learn too, and make a friend.
  21. Learn the meaning of “exposure” – practice using manual settings.
  22. Learn “Depth of Field” and practice it with each of your lenses.
  23. Post processing is an art and part of photography. Learn it.
  24. Join a club or class – you learn fast with other photogs.
  25. Use Google Images to research every shot you take.
And one for luck!

Photography is fun. Make sure you go with that!

Comments, additions, amendments or ideas on this article? Contact Us
or why not leave a comment at the bottom of the page…

Like this article? Don’t miss the next — sign up for tips by email.

By Damon Guy (author and Photokonnexion editor)

Damon Guy - Netkonnexion

Damon Guy (Netkonnexion)

Damon is a writer-photog and editor of this site. He has run some major websites, a computing department and a digital image library. He started out as a trained teacher and now runs training for digital photographers.
See also: Editors ‘Bio’.

Cliché in photography – are you guilty and what to do about it

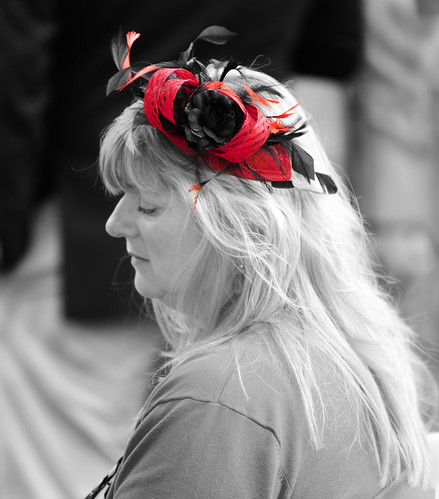
• Hat Selective •

• Hat Selective •
Click image to view large
Hat Selective By Netkonnexion on Flickr External link - opens new tab/page
It is one of the things we have a go at… selective colour. But, is it really effective?

Clichés are fun but can blow your credibility.

Everyone wants to try some well tried ideas in photography. They help you learn the basics with great examples. Beware, some things have been done so often they are clichéd. It is not wrong to do them. It might be right to keep them to yourself in some situations. Here is some advice about cliché in photography.

Advice

Caring, sharing websites around the web help you get honest, fun and supportive comments made. They are great places where learners can safely post clichés and enjoy doing it. In fact it is a good thing to do. You learn by doing the photos that other people have done, and by example. You get the obvious shots out of your system then move on to more creative photography.

Developing photographers cultivate observational skill helping them get past the cliché. I think the lifetime challenge for a photographer is to see what everyone else failed to see and were amazed they missed. Work to get past the cliché and publish the inspirational.

Photographs create the beautiful and – over generations of picture-taking – use it up. Certain glories of nature… have been all but abandoned to the indefatigable attentions of amateur camera buffs. The image-surfeited are likely to find sunsets corny; they now look, alas, too much like photographs.
Susan Sontag, “On Photography”, London, 1979

In a competition once I heard a judge say… “Ah, N – A – B – S – S!”. He didn’t say what he meant until he encountered the third sunset that evening. Several audience hands shot up to ask. He recounted the story of a judges seminar. They had seen so many sunsets the acronym stuck for “Not Another Bl..dy Sun Set! Taking a sunsets for the sake of it is not an achievement. It is a disappointment – unless something inspirational is included. Sunsets should set the scene, not be the scene.

If you publish a cliché on some websites, or in a personal gallery, you had better watch out for your credibility ratings. What else should we cut out from our online portfolio?

What are these clichés?

Bathroom mirror selfies: Doing “selfies” is fun. They’re examples of things we need to purge from our system. Lets face it most bathroom selfies are boring – of interest mostly to the person making them. Consider doing a mirror selfie in a truly palatial rest room (try the Palace of Versailles, Paris  External link - opens new tab/page).
Selective colour: I happen to enjoy some of these. But really, most of them are out of context. It is fine with a clear artistic point. Quite often there is not.
Black and white (B&W): Making a picture B&W does not make it artsy. A naff picture remains naff when converted to B&W. There are some well documented, excellent reasons to use B&W. It can ruin a shot, or doesn’t add anything. Use the technique. I love a contrasty B&W capture. However, make sure it works before publishing. The long history of B&W photos in street photography make a modern B&W look clichéd if done only for effect. It is NOT a “street photography” shot just because it lacks colour. There should be something else there that justifies that approach.
Flower: Your prize bloom is of extreme interest to you and your family. Most other people have seen stunning photos of blooms in magnificent gardens or with exquisite photography. These are the ones that capture the eye. If you have a truly inspired view of your blooms and a top technique, then publish.
“Perspective shots” in tourist spots: We have all seen them – pinch the Eiffel Tower between two fingers, Kiss the Sphinx, catch the sun between your hands; hold up the Leaning Tower of Pisa  External link - opens new tab/page. These are fun. We should all have one in the home album. Online they are definitely a cliché.
Fake lens flare: Flare is great when used to good artistic effect. Faux flare is just a disaster and easily spotted. Do it right with a proper shot or not at all.
Vintage iPhone apps: They’re not great because everyone else does them. Several years ago they were fun and different. Now, I think “Phone apps” look tired and frankly embarrassing. Over done or what!
Naff borders: Powerful borders filled with character, exotic flushes or effects make strong statements. If your picture needs that then it’s probably lacking in some way. Don’t publish it.
Over-saturated HDR: HDR has been vastly overdone. We are beginning to see HDR photographs that are not super-saturated, heavily rimmed and tonally wrecked. That’s good. HDR is a post-processing technique that is beginning to mature. If you use HDR, try it as it should be used, to enhance contrast depth. If you really notice HDR – it has been over cooked!
Your car on holiday: After 1000 pictures of the Grand Canyon the vista is not improved by the presence of your car in the last shot. Great shot for the hard drive. Not one to publish.
Fake gang signs, peace signs, bunny ears and naughty middle fingers: These have been over done. If you find them funny keep them to yourself. Remember, employers often use social network sites to check on prospective employees. Do you want a potential boss checking out your gangster signs and middle fingers shots!
Duck face: The average snapper gets quite a few of these. The silly poser with the pouting smackeroonie kiss lips! Just not good photography.
Making heart-shaped hands at sunset, weddings, engagements: These are usually just embarrassing. If you feel an occasion is romantic there are a multitude of soft focus, colour casts and posing angles that do the job so much better. There are a few other wedding clichés too…

  • Brides garter around the grooms head.
  • Posing to cut your partners throat with the cake knife.
  • Selective colour on confetti, wedding cakes, brides shoes etc.
  • “Bloke shots” – doing silly things in lines, with beer and mock genitals etc.

A few years ago there were thousands of shots of rings standing upright in open books. The ring casts a shadow heart-shape. They are good in the right place – the wedding ring ceremony. Certainly learn about the light/shadow relationship and have a go at a classic. Otherwise it’s an idea with a limited time and place. For examples: Google Image Search = Heart Ring Book  External link - opens new tab/page.

It is not just the amateur

Professional photographers are guilty of creating cliché in their work too. Take two minutes to enjoy this video poking fun at “Stock” photographers.

The Clichéd Stock Photo Song


GerritAndKit

Inspirational is good.

Are there any more of these cliché shots? Yes, hundreds… some websites are filled with nothing but these types of shots. So how do you avoid the mistake?

The cliché is something we can all spot – we’ve seen it so often it’s tiresome. Quietly have a go at the techniques – learn – move on. Don’t infest your online gallery with it. Cliché tends to come and go. In 20 or 30 years the retro effect will re-birth today’s cliches! That’s the time to release ones safely stored on the hard drive.

Your time as a photographer is best spent looking for inspirational images and developing a unique communication with your viewers. You will learn more by ignoring the cliché and working on your unique vision of the world.

Comments, additions, amendments or ideas on this article? Contact Us
or why not leave a comment at the bottom of the page…

Like this article? Don’t miss the next — sign up for tips by email.

Can you write? Of course you can!
Write for Photokonnexion...

We would love to have your articles or tips posted on our site.
Find out more…
Write for Photokonnexion.

By Damon Guy (author and Photokonnexion editor)

Damon Guy - Netkonnexion

Damon Guy (Netkonnexion)

Damon is a writer-photog and editor of this site. He has run some major websites, a computing department and a digital image library. He started out as a trained teacher and now runs training for digital photographers.
See also: Editors ‘Bio’.