Category Archives: Background Info.

General, articles of interest, information not under other categories, information to help inform and educate people about photography, interesting reading

What good is a lens hood?

Five Types Of Lens Hood

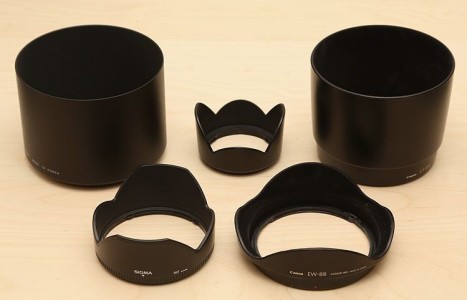
• Five Types Of Lens Hood •
Attribution: Photo of five lens hoods for a mix of lenses; March 2013; Author: Geni; Permission: GFDL CC-BY-SA

Using a lens hood is important.

It is not always clear why we need a lens hood. Why do we need them and what are they for? Actually they are pretty important and can help prevent some nasty visual artefacts.

What is going on in the lens

Normally photographic lenses perform really well. They receive light reflected from your subject as parallel beams. These are focused by the lens into an image formed on the digital image sensor.

When light hits the lens from the side the situation is slightly different. Some of the light is refracted through the lens correctly. Some of the light however, is reflected off the surface and lost. But there is a percentage of light that goes astray in the lens. It can be bounced around in the lens – reflecting around from the surfaces of different lens elements internally. If it does so, on each reflection some of the light will get through to the sensor. Each time that happens there will be a slightly side-shifted ghost image. All sorts of light aberrations can be created by this internal reflection in the lens. It is these that cause the artefacts you see in the image.

Light is also scattered by inconsistencies in the lens glass. Chemical, and structural variations in the glass can impact on the way the light travels through the lens. This scatter contributes to the problem. These artefacts, and often an associated haze, are called lens flare and can be worse the further to the side that the light enters the lens. Flare and haze will not only form a distraction but also act to wash out the colours in your shot and reduce contrasts. These will make your picture look flat and lifeless. Unintended flare can simply kill the effectiveness of the shot.

A sharp angle of side-light can therefore cause all sorts of visual image ghosts which are not there in the scene. You can see a range of different types of flare in this Google image search…
Google images: Example lens flare images  External link - opens new tab/page

In general, poor quality glass and multiple elements in the photographic lens will tend to create more flare. Of course better lenses (read: “more expensive”) can help to reduce the problem. Higher quality lenses will incorporate a range of ways to reduce the problem. These include optimised lens-element design, surface coatings and non-reflective surfaces/parts internally as well as high quality glass. Despite that no lens is immune to flare.

What does a lens hood do?

The most common reason we use a lens hood is to reduce the incidence of a bright light source hitting the lens from the side. This will act to reduce the chance that the lens will suffer from the flare problem. In other words, the hood will help to keep the light coming in from the front of the lens in parallel rays.

It is simple really. Put up a wall at the side and the side light is cut out. However, it is not so simple to design a lens hood that will do that without obstructing the lens. The field of view of the lens cannot be allowed to catch the hood sides. If it does it will leave its mark on the image. So all sorts of hood shapes and sizes are required to match the visual characteristics of the lens. Lens hoods are quirky shapes because they have been designed to optimally reduce the side incidence of light and not interfere with the field of view.

Common design elements include “petal” shaped edges. These allow the corners of the sensor a wide field of view without interference in the corners from the hood. The long petal shape must be along the long side of the sensor (landscape view). If you put it on the other way the side of the picture will show the edge of the hood and light will also get in from the top (or bottom) because the cover is insufficient there.

There are conical shapes and cylindrical shapes too. When these don’t have petals they are designed to accommodate the full field of view of the lens from any angle. You may find that these types of hoods are common on lenses where the front of the lens extends when changing focal length. As the extension of the lens will change the field of view the hood shape must be wide enough for the widest angle of view. But it cannot have petals because they would rotate with the lens and at some focal lengths would interfere in the picture.

Lens hoods do more…

As you can see you should buy a hood for your lens that has specially been designed for it. If you don’t, you risk the hood intruding in your shot, or not providing sufficient protection against flare.

Hoods can help in other ways too. When you have a lens hood on the lens it acts as a primary protection for your vulnerable front element. Once, when I was panning to follow a bird with a heavy/expensive pro-zoom lens I whacked the lens hood off the glass of my car window. I am convinced I would have broken the window and damaged the front lens element if I had not had a lens hood on. It harmlessly bounced. Phew! I use hoods whenever I can these days.

Lens hoods also help to reduce over exposure generally from incident reflected light on bright days. There may be no direct bright light source shining into your lens. But it helps to reduce the high levels of brightness from the side regardless. That helps to reduce the overall high light levels and especially the contrast.

Lens hoods are worth the effort

Lots of learner photographers forget the lens hood. Yet it can have quite a significant impact. Even if it is not significant, when you are trying to get a sharp image and reduce the colour wash-out in bright light every little detail counts. Great images come from the attention to detail.

Comments, additions, amendments or ideas on this article? Contact Us
or why not leave a comment at the bottom of the page…

Like this article? Don’t miss the next — sign up for tips by email.

By Damon Guy (author and Photokonnexion editor)

Damon Guy - Netkonnexion

Damon Guy (Netkonnexion)

Damon is a writer-photog and editor of this site. He has run some major websites, a computing department and a digital image library. He started out as a trained teacher and now runs training for digital photographers.
See also: Editors ‘Bio’.

10 quick hacks that photographers need to know…

Photogs life hacks

• Photogs life hacks •
There are some things which seem so simple once you have been shown how to do them… here are some free hacks for photographers.
Image taken from the video.

Simple and cheap ways to do things in photography…

In every situation there are lots of ways you can cut corners without affecting the outcome. Here are ten “life hacks” that give you something extra in your photography.

10 Photography Life Hacks You Need To Know

Uploaded by DigitalRevTV  External link - opens new tab/page

Of course there are lots of other life hacks that photogs need to know… Do you have a favourite hack? Let us know what it is in the comments so we can all gain something from your idea.

Comments, additions, amendments or ideas on this article? Contact Us
or why not leave a comment at the bottom of the page…

Like this article? Don’t miss the next — sign up for tips by email.

find out more...Photokonnexion tips by email
If you enjoyed this article please sign up for our
Tips by email service.
                                                 Find out more

By Damon Guy (author and Photokonnexion editor)

Damon Guy - Netkonnexion

Damon Guy (Netkonnexion)

Damon is a writer-photog and editor of this site. He has run some major websites, a computing department and a digital image library. He started out as a trained teacher and now runs training for digital photographers.
See also: Editors ‘Bio’.

Six tips for reigniting your photographic passion

Reignite passion in your photography - try charity Work

• Charity Work •
Doing a bit of charity work can really uplift your photographic spirits while helping others. It is a great way to make contact with new people, get interested in new things and Reignite passion in your photography.

Discover your passion again…

Sometimes it can all go wrong! You just cannot get it right and you’re not bursting to take the next shot. When things look down don’t give up. This is the time to take new steps to invigorate your approach. Photography with a passion is one of the most exciting and interesting pursuits. When the passion fades it is not because photography is not engaging. There’s enough in photography to keep you captivated for a lifetime. More likely your vision has become distracted, stale or you’ve lost the creative spark. These are not long term problems. Lets get you fired up again! Here are six tips to reignite passion in your photography.

Reignite passion :: Take a photogs break

We are not talking holidays here. Although that would be nice, actually it would not solve the problem. Holidays make you want to take the camera out. When you are down in the dumps about your photography, more photography can be off-putting.

Take a real break from photography. Have a month off. Tell yourself to put all your equipment away and don’t be tempted to touch it. A rested mind is a freshened mind. Just forget your photography, your composition, your equipment. Rest.

Reignite passion :: Do something different

One of the most creativity stimulating activities is to learn something new. It helps you to cross fertilise your ideas and introduce new perspectives to your thinking. Adding a new dimension to your outlook can only be a good thing for your photography. So read something you would not normally read. See something you would normally not be interested in. Do something your partner wants to do without taking along a camera. If you had an interest in the past that you have neglected, spend a little time getting up to date on it. The wealth of our experience is the greatest gift we can give our creativity. Try this little trick. Pick out ten techniques from another interest. Think about ways to incorporate those skills into your photography. This new synergy will be sure to reignite passion in your photographic work later on.

Enjoy a few weeks of photographic respite, and immersion in an alternative area of insight. Bath in its luxury. Now you are ready to reignite your passion…

Personal contact will help you reignite passion

I have always found that meeting new people and having new discussions helps me get really fired up about photography. Every year I do two or three charity events. It is a really fun and cleansing experience. I come away from each of these events feeling refreshed and tingly – as if I had stood under a hillside waterfall. The sharpness of the water making my skin sting and turn ruddy.

One of my charity activities is to take the photographs at a local event held for senior citizens. Sobering too. As they sit eating their lunch I chat at each table for about ten minutes then take photos of each of the guests. During the course of about two hours I talk briefly with over 100 people and take a quick and candid portrait of them all. Wow. What stories I have heard – of war and love, action and sadness. It has not only helped my photography to be more passionate and expressive, but it has helped me grow as a person too. I have some great pictures as well.

Find something to get you involved in something new. Charity is great, but schools, drama groups, local clubs and even sports organisations all love photographers. Get involved. You might learn something new and you will certainly find a new way to express your photography and reignite passion in your hobby. The most important thing is getting involved with the people. That will spark off new contacts, opportunities and enthusiasms.

Reignite passion through commitment to a project.

Give yourself something to develop. It could be learning how to photograph your new interest in the club or group you have got involved with. Or, equally, it could be some aspect of photography that is new to you. I spent a lot of time two years ago developing my table-top work. It re-invested my interest in photographic art, as well as complementing the product photography I started to do for my work. Funny how things come together in your life when you start exploring new angles.

If you are working up a project for yourself enjoy it, but have some goals. A project with no plan or goals soon gets forgotten. Then the point will be lost and so will your passionate commitment. Sit down at the start of the project and have a good think about what you want to achieve. Then, set a deadline for completion. The key to a good project is to make it time-bound and challenging; cover new material and have specific targets. You will reignite your passion by just having those positive goals and thoughts in mind.

Reignite passion :: Learn a new technique

We would all like to learn more about photography. The simple away is in bite sized chunks. Pushing the boundaries to learn it all at once will simply lead to failure. That will make things worse for an already down time. So, find out about a particular technique. Practice in lots of different situations and with a variety of equipment. Put it to use in your project, your charity work or in your every day shots. Before long you will be a proficient and enthusiastic user of that technique. Sometimes you can help this process along by buying a new piece of equipment. It does not need to be expensive. Make it something you have never tried before – try to extend your experience and your approach with it.

Change your work flow

I have often noticed with developing photographers that when they learn to be more effective editors their success as photographers improves. Obviously a more effective editorial process relies on good knowledge of post production, and composition too. The more important point is that being more ruthless about what is an acceptable photograph also helps you when you are looking through the viewfinder too. Your eye develops, your acceptance of what should be in the frame is more discerning and your satisfaction with your shots goes up.

If you are in the photographic doldrums studying editing will sort out your problem. But, it can be a great way to sharpen your awareness of your good points and what needs improvement. Once you have a framework to improve your whole attitude will lift and be more positive. So think about this as a way to positively sharpen your photographic wit and reignite passion and feeling in your work.

The path to success

If you want to become a good or great photographer, or if you just want to make a better job of photographing your grand children… its possible to get stuck along the way. There are a variety of ways you can get out of the down times. Being positive, resting and then trying new things will set you off in ways you never suspected you would enjoy. Give it a try. Extend yourself, push the boundaries, try something new – have fun!

Comments, additions, amendments or ideas on this article? Contact Us
or why not leave a comment at the bottom of the page…

Like this article? Don’t miss the next — sign up for tips by email.

By Damon Guy (author and Photokonnexion editor)

Damon Guy - Netkonnexion

Damon Guy (Netkonnexion)

Damon is a writer-photog and editor of this site. He has run some major websites, a computing department and a digital image library. He started out as a trained teacher and now runs training for digital photographers.
See also: Editors ‘Bio’.

Getting the right shutter speed

New Canon Powershot G1X Digital Point-and-Shoot With SLR control

The Canon Powershot G1X Digital Point-and-Shoot With SLR control. Billed by Canon as the “Highest Image Quality Powershot Digital Camera”

Getting sharpness right…

It’s not just about the right camera. It is also about technique and knowing the best way to set up your shot. Getting the right shutter speed takes a little knowledge when you are starting from scratch. Here are some pointers to help you make choices about shutter speed.

Why set your own shutter speed?

Getting full control of your camera is an important aspect of gaining creative control over the outcome of your photographs. Despite what the manufacturers say, you can only achieve so much by messing around with their ‘modes’. Capturing pictures using camera modes other than the basic photographic modes (ISO, aperture, shutter speed) is going to give you a programmed result. In other words ‘modes’ are what some boffin back at the lab has formulated as ‘about right’ for the average photos people take. But, you are not average are you? You want to produce the shot your way. So gaining control over your shutter speed is important.

The long and short of it

Shutter speed gives us creative control in a number of ways. A very shallow depth of field will give great bokeh in the background. But it is difficult to create on a bright day unless you have a fast shutter speed (to reduce the incoming light). Bokeh is created by a wide aperture. A wide aperture lets a lot of light in. If the shutter is open too long the photograph will be overexposed. So a shorter shutter speed is required.

Shutter speed also controls movement blur. If you are taking a photo of a moving object a relatively long shutter speed will create greater blur (example 1/15th sec). A very short shutter speed will tend to freeze the action preventing blur (example 1/500th second).

Sharpness counts

Starting to control your shutter speed is often about finding the best shutter speed that you can handle for a sharp result. So what is the lowest hand held shutter speed you can apply?

Actually, in practical terms, the slowest hand-held shutter speed is reliant on a number of factors…

  • Physical fitness: If you are not strong enough for using your camera weight it is more difficult to hold it steady. Regular practice with your camera will help you build muscles to steady your hand and therefore shoot at lower shutter speeds.
  • Focal length: Longer focal lengths tend to need higher shutter speeds. As you shoot further into the distance the angle of movement seen at the point of focus is more exaggerated.
  • Optical stabilisation: If your lens is optically stabilised this means it will compensate for the tiny movements of your hands. This compensation will help you to reduce hand shake and therefore give you potentially longer shutter speeds.
  • The picture you want to create: Obviously, the picture you want to produce is dependent on how much blur you want in it. So if you want no blur (for the sharpest result) you want a fast shutter speed.
  • The amount of light: Brighter light allows you to have a shorter shutter speed. Knowing when to use a tripod instead of hand-held is the crucial issue here. Most people simply give up if a low shutter speed demands a tripod… For the accomplished photographer many of the best shots are found in low light situations. So shutter speed control is of crucial importance – as important as using a tripod at the right time.
Rule of thumb

Those factors aside here is a rule of thumb. In practice most people do not shoot with a steady enough hand to produce sharp hand-held shots below 1/60th second. Of course, optical stabilisation on the lens will help you get longer shutter speeds. But even then a practical limit of 1/30th of a second is about as low as you can go and be sharp. That is not a shutter speed I would suggest you work with regularly when hand-held.

Best guide to shutter speed

The shutter speed you need to work to is often related to the focal length you are working with. There is a reasonable rule that can help you get a good guide to picking the best shutter speed for your focal length. It is said that the longest shutter speed you can use hand-held for a lens or zoom setting is:

1 divided by the Focal length times 1.5

So, if your lens is a normal lens at 50mm it will have an effective lowest hand-held shutter speed of 1/(50 x 1.5) or 1/75. The nearest (rounded up) setting on your camera is likely to be 1/80th second.

If you are working at 200mm then, 1/(200 x 1.5) or 1/300th of a second will be your lowest working shutter speed. The nearest setting on most cameras will be 1/320th second.

These apply if you are not using optical stabilisation. You can of course work one or maybe two stops faster if you are using stabilisation. You will need to check that figure against your lens specification. Most optical stabilisation systems will give you between one and two stops extra control.

Shutter speed standard

shutter speed is standardized on a 2:1 scale. When you open the aperture on single aperture stop and at the same time reduce shutter speed by a single step the result will be an identical exposure. This table shows the shutter stop standard steps…

  • 1/2000 sec
  • 1/1000 sec
  • 1/500 sec
  • 1/250 sec
  • 1/125 sec
  • 1/60 sec
  • 1/30 sec
  • 1/15 sec
  • 1/8 sec
  • 1/4 sec
  • 1/2 sec
  • 1 sec

The scale extends up above these figures to very high shutter speeds. Up to date DSLRs may allow have shutter speeds of less than 1/5000ths of a second. Very fast indeed. While at the other end cameras will allow long shutter speeds of up to 30 seconds in manual modes (M mode; or Manual) and longer in “bulb mode”.

Each of the steps in the table above will be equal to a change of one stop of light up or down. A change of one stop of light will double the amount of light entering the camera.

As one stop of light is quite a large amount, cameras have become more sophisticated. Most are now marked off with thirds of a stop for ISO, aperture and shutter speed. So your calculations can be quite precise and lie between these values in the table above.

You can read more about stops of light here: Definition: f number; f stop; Stop

Doing it right

Gaining control over your camera is of importance if you want to become a creative master of its full potential. Learning about shutter speed and other aspects of exposure are critical to learning that control. You can have great fun creating bokeh and controlling movement blur. At the same time you can remove that other type of blur – ugly hand-held shake-blur.

Please leave questions and issues for us to discuss if you want to take this further…

By Damon Guy (author and Photokonnexion editor)

Damon Guy - Netkonnexion

Damon Guy (Netkonnexion)

Damon is a writer-photog and editor of this site. He has run some major websites, a computing department and a digital image library. He started out as a trained teacher and now runs training for digital photographers.
See also: Editors ‘Bio’.

Ansel Adams – Master Photographer

Ansel Adams Video

• Ansel Adams BBC Master Photographers (1983 •
Ansel Adams speaks about his photography and his development.
Picture taken from the video.

Exquisite insights to a legend.

The videos I show are usually for you to quickly watch and learn. This one’s different. It’s longer (34 mins.). And, there is so much in it that you will want to watch it over and over again. The wonderful insights run deep and some show us how much photography has changed.

Ansel Adams’ ideas, photographic insights and depth of feeling is magnetic. He was probably one of the first philosophers of photography. He was one of the undoubted masters too. I hope you enjoy this video as much as I did.

Ansel Adams – “BBC Master Photographers” (1983)

Uploaded by: Rob Hooley External link - opens new tab/page

Can you write? Of course you can!
Write for Photokonnexion...

We would love to have your articles or tips posted on our site.
Find out more…
Write for Photokonnexion.

By Damon Guy (author and Photokonnexion editor)

Damon Guy - Netkonnexion

Damon Guy (Netkonnexion)

Damon is a writer-photog and editor of this site. He has run some major websites, a computing department and a digital image library. He started out as a trained teacher and now runs training for digital photographers.
See also: Editors ‘Bio’.

When to ignore the rules

 Symmetry • by aebphoto, on Flickr

The arrangement of your pictures can be so much more than a simple rule followed.
Click image to view large
Symmetry • by aebphoto, on FlickrExternal link - opens new tab/page

What works tends to get overworked…

The “rule of thirds” works in more than 95% of photographs. OK, maybe there is not a certain statistic like that. But it sure is effective to the eye. For that reason it helps us to compose most of our photos.

The principle behind the rule of thirds is not a universal “Law”. No one went to prison for violating it. It is more what we might refer to as a guideline. The rule helps us to compose a picture to meet the expectations we have wired in our brains about what is pleasing. Aesthetics is a funny thing – we all have our own preferences about what we like. However, we all seem to have some generally appreciated ideas. The rule of thirds seems to be one of them.

What if you feel like breaking the rules?

No problem. Do it!

A cavalier attitude to breaking the “rules” when you are learning photography, or any art, is a good thing. The difficulty is knowing what will work when you stray from the guidelines. That is a fair point. But there is no need to be fearful. You need to have a go to see what will work. And, like any experimentation, you will more likely be unsuccessful than successful.

Ah! But if I am going to be unsuccessful then why try? The simple answer to that is so that you can know yourself and your audience better.

No artist is born as a seasoned and finished creative. They all devote long hours to learning, experimenting and listening to the thoughts of others on their work. In other words, they practice, practice, practice. They get feedback. Then they practice some more. There is a lot of work and experimentation in becoming an artist.

Breaking the rules is about trying out something lots of times. If you have one particular passion for your photography then go for as much variation and feedback on your work as you can. You will perfect your shots only when you know that the work is capturing attention and holding it.

A more general approach to your photography, photographing many different things, is another approach. However, it is reasonable to take a similar attitude. Instead of trying out lots of shots about one subject you can try lots of different angles around each subject. I am not talking about a machine gun blast of pictures from one button push. I am talking about genuinely working the scene. Try all the angles, all the possible ways to frame your subject. Do some of the shots in a traditional way (Rule of thirds etc). But do some shots that are decidedly not traditional. It is all about experimentation.

As long as your approach is considered…

Louis Pasteur External link - opens new tab/page, the father of modern microbiology said, “Chance favours the prepared mind”. He did not mean you should go shooting off random shots at everything in sight. What he meant was you should consider your options. Know your subject. Experiment with a good knowledge and background in your subject. Move forward in a logical and consistent way. It is this approach that will help you to learn to successfully break the rules. Know what the different shots are about, how the different methods of composition can affect the shot. Understand how the different shots would affect your subject, or experiment until you know.

Practice, practice, practice… and careful thought about what you have done and what you are going to do is a route to success. Enjoy the journey as well as the outcome!

By Damon Guy (author and Photokonnexion editor)

Damon Guy - Netkonnexion

Damon Guy (Netkonnexion)

Damon is a writer-photog and editor of this site. He has run some major websites, a computing department and a digital image library. He started out as a trained teacher and now runs training for digital photographers.
See also: Editors ‘Bio’.

Can you write? Of course you can!
Write for Photokonnexion...

We would love to have your articles or tips posted on our site.
Find out more…
Write for Photokonnexion.

Action portraits… easy to do

Action Portraits

• Action Portraits •
Getting the shot in action situations is not difficult although the lighting can prove a key aspect of success. (Shot taken from the video)

Getting it right…

Most photographers have a go at action shots. Vehicles are common targets – they are easy to find and fun to do. Action portraits can be great fun too and you can do them at home.

Lets talk flash…

 Set up pictures at home to show some action.

Easy action shots at home for anyone.
“Some more bed-jump!!” by Mr Din, on Flickr  External link - opens new tab/page

In its most basic form, it’s a portrait of someone in motion (action?). The wonderfully muscled fighter in the shot above is one way to go. On the other hand pictures of your grand children jumping into the air can be just as effective – and probably more relevant for many of us!

Use off-camera flash for best results

The basic technique is to capture the action with a flash. You can use the on-board flash on your camera. However, it will tend to leave tight shadows on the wall behind the action because the flash is directly in line with the optical axis of the camera. Such shadows look artificial and are difficult to remove in post processing. They look as if there is a slight double image. In the picture of the jumping children the flash is from the left hand side. If you look carefully the shadows are projected away from the kids giving a more realistic feel.

Off-camera flash can be placed to the side of the shot and used to illuminate the scene, give it a little depth and off-set those harsh shadows. For this you can use an off-camera flash. I use this one…

YONGNUO YN460 Flash Speedlite for Canon Nikon Pentax Olympus…  External link - opens new tab/page
This is an excellent buy… it is inexpensive and can be used for any off-camera flash situations. It is reliable, robust, flexible and effective.

I have several of these flash units. At about one fifth of the price of a branded product they are excellent value. If you want to get something a little more sophisticated you can get the YONGNUO YN-560 II Flash unit  External link - opens new tab/page – also a great product. With inexpensive remote flash triggers  External link - opens new tab/page you can set them off when not connected to the camera.

What are you going to capture?

Plan out your scene in advance. You will need someone to be the action taker. You could use more than one person. Then, work out what they are going to do. Jumping on the spot is a favourite. You also try jumping or stepping off something like a chair or low table. You can do skipping, walking, Kung Fu, Juggling, tumbling, hula-hoop, playing ball… well all sorts of things.

How do you do it?

I am assuming that you will be working in a domestic room with a white wall behind the actions.

It is best to use a robust tripod to mount your camera. This is essential. Action shots often cause floor movement and you want a good tripod (Manfrotto 055XPROB)  External link - opens new tab/page and tripod head (Manfrotto 322RC2 Grip Ball Head)  External link - opens new tab/page to give you a chance.

You will need to pre-focus your shot and have it ready to take because you cannot easily compose for action in progress. So set up the camera in advance. Here are some typical settings to get you started…

  • Turn off image stabilisation on your lens.
  • Focus your lens on your subject then turn off the auto-focus.
  • Set white balance to the appropriate ambient light setting.
  • Set ISO to 200 (or 400 experiment).
  • Aperture priority (select F5.6 as a start) [Shutter speed will be set by the camera].
  • Flash synchronisation – 200ths or 250ths of a second (if you need to set it check your manual).
  • Flash setting, try the lowest setting or 1/16th or 1/8th power – again, experiment.

This will give you appropriate starting points. Check you shot and then make any changes to the settings. If you click up or down a setting – say aperture or ISO – then the camera will compensate with a different shutter setting for you. Experimentation is good!

OK, now you are ready for action… this part takes a little practice. The idea is to sit next to your camera ready to push the shutter button as soon as the action is where you want it. As you have already lined up your focus the person can now perform and you can press the button as you see fit to capture your shots. Fire away, enjoy yourself.

Two tricks you have learned here

1. The pre-set-up of your shot is important. There are lots of situations where you can do that. So think about it – that is one of the benefits of having a tripod.
2. Flash! The way to capture a good shot like this is to have a very fast shutter speed. That freezes the action. However, I have suggested you hand the shutter speed to the camera by using the “aperture priority” mode. Well, you can in fact control shutter speed another way. By varying the flash duration. “What?”… I hear your cry. “You did not tell us about that control! But I did. Flash intensity is always the same for any given micro-second. It becomes more intense for the sensor if you leave it on longer. When you set the power of the flash to low power you are actually shortening the length of the flash. Hence you are more able to freeze the action. However, to do this you will need to have your ambient light lower. So using natural light rather than bright room lights works better for this technique.

See how its done in a video

In the video you can see all this action in a full process. The photographer, Joel Grimes, starts off by some discussion about how he came to discover this secret and how he used it in a studio context. Then from about six minutes into the video he shows you how to take the shots.

Remember that the settings are important. He mentions about low power and says that it works to freeze the action IF the flash is more intense than the ambient light. Watch out for that.

One other thing worth looking at is the shot progression. He is constantly assuring his model that he has done a good job. Then he is at the same time developing his shot. He is constantly evolving the positions and situations until he gets the shot he wants. This is critical. Make sure you look out for odd lighting effects, hands over face, bits of body out of the frame etc… He works the shot to reach his ideal as he visualised it – then stops. Even great photographers have to practice and perfect a shot. This is quite a helpful lesson about that. Enjoy!
“Special FX, High Speed Action”

Framed show  External link - opens new tab/page

Comments, additions, amendments or ideas on this article? Contact Us
or why not leave a comment at the bottom of the page…

Like this article? Don’t miss the next — sign up for tips by email.

By Damon Guy (author and Photokonnexion editor)

Damon Guy - Netkonnexion

Damon Guy (Netkonnexion)

Damon is a writer-photog and editor of this site. He has run some major websites, a computing department and a digital image library. He started out as a trained teacher and now runs training for digital photographers.
See also: Editors ‘Bio’.