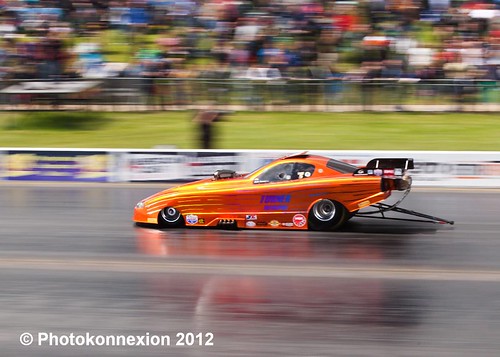
Fast action demands a prepared shot. Work the shot before it happens; keep your finger on the shutter button for multiple shots; pan and follow through to the end.
EXIF data for this shot… Model – Canon EOS 5D Mark II
ExposureTime – 1/125 seconds; FNumber – 14; ISOSpeed – 200
ExposureProgram – Shutter priority
Sequence mode – Continous; Focus mode – AI Servo
Motion blur is created by panning (Action shots Pt 4)
In Getting Started With Action Shots I showed how to ‘fix’ the action using fast shutter-speeds. Fixing the action creates a picture that is not quite as the eye sees it. In life, when watching fast motion we keep our heads and eyes following the action. The background is of little interest – it blurs with motion and we see the subject sharp in the foreground while we track its movement. Here is how we create a still photograph reproducing that background movement blur.
Setting the shutter speed
The principle exposure control we need to work with is shutter speed. This means you can either work with manual control, or set your camera to use the Tv (time value setting). If you are not happy using manual then set your camera to shutter priority (Tv).
More after the jump…
We previously set a fast shutter speed to ‘fix’ the action. To capture background motion-blur the shutter speed should be slow. Start your panning experiences with a shutter speed of 1/125th second. At this speed you get some motion blur and it is easy to capture a sharp image. Later, after some practice you can decrease your shutter speed to 1/60th second and even lower to an ideal 1/30th of a second.
- 150-200 mls/hr – s/speed 1/200th sec. – Racing car, small aircraft landing
- 130 mls/hr – s/speed 1/125th sec. – Fast motorcycle
- 70 mls/hr – s/speed 1/60th sec. – UK motorway driving limit
- 30 mls/hr – s/speed 1/30th sec. – typical Urban free-flowing traffic
- 15 mls/hr – s/speed 1/15th sec. – Sprinter, running dog
- 3 – 8 mls/hr – s/speed 1/15th sec. – jogger
Other camera settings
If you are working in shutter priority your camera will adjust the aperture. You should leave the ISO on automatic. The camera will take care of itself while you shoot the movement.
If you are working with full manual set your aperture to give you a good depth of field – say f11 on a bright but cloudy day. In this case set the ISO to an appropriate setting. Probably around 200 ISO (bright day) or 400 ISO (bright/cloudy) will be best. On a very bright sunny day you could try 100 ISO. Do some chimping to get the right exposure.
If you are using either manual or shutter priority you should also set the ‘burst mode’ – otherwise known as continuous shooting. The burst mode will let you fire shots continuously. You will need to fire more than one shot at a time when panning your camera. At least some of the shots will come out sharp. Your camera will shoot off about four to six shots in a burst (RAW) – more with some cameras. You will need to judge the best place to start continuous shooting.
And so to the panning…
By now you have your camera set up. The fun bit is actually capturing your shot. The aim of panning is to follow your subject with your camera shooting as you go. Here are some pointers to get you started…
- Stand with feet shoulder width apart for stability. Ideally you want the action to pass right in front of you. Place yourself so your subject comes from one side and passes you when you are facing forward. It will then recede again on your other side.
- Turn your body toward where your subject is going to come from. Don’t move your feet. Point your camera at the oncoming object.
- Start tracking the subject with your camera as it comes toward you. As the object comes nearer you must smoothly swivel your body from your waist. Note that your camera/head face the object, it is your body that rotates. As the object passes your body will be facing full forward. Then, you continue to swivel keeping it in your sights as it recedes the other side. Smoothness in the rotation of the body is essential.
- When your subject is large in your viewfinder you can press the shutter button and hold it down continuously shooting as you pan along with the subject.
- Do not stop tracking the subject when your ‘burst’ is finished. It is important to follow through With the panning so there is no sudden jerky move at the end.
What you are aiming for
Ideal panning shots provide the following outcomes…
- At least one element (the subject) will be sharp, preferably ‘pin sharp’.
- The background will be too blurred to see any details.
- Moving parts on the subject (legs, wheels, oars, propellers etc) may also be blurred.
Getting Started With Action Shots – (Action shots Part 1)
Space To Move Into… Action Needs Space – (Action shots Part 2)
The Danger in Action Shots – (Action shots Part 3)
Action Panning Shots with Motion Blur – (Action shots Part 4)
Practicing and Improving your Panning (Action shots Part 5)
Panning With Motion… seek Compelling Backgrounds (Action shots Pt. 6)
Composition – resources pages
EXIF data

