
:: CameraSim ::
A comprehensive camera simulator for learning to use your DSLR settings.
Try out the CameraSim web app. ![]()
CameraSim – website to try out exposure settings.
Camera settings can be confusing without guidance. This website provides camera simulations allowing you to vary settings and learn the relationships between them. It’s interactive – try it – it’s fun!
You can go to the CameraSim ![]() website and try it there.
website and try it there.
Trying it out
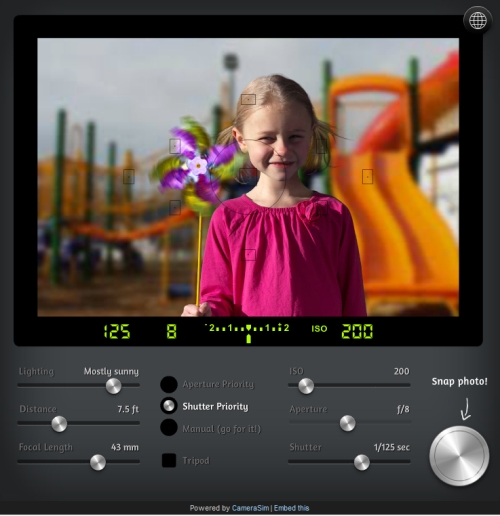
As you can see above the controls allow two types of set up. Lets walk through an introduction.
On the left are the controls that allow you to set the lighting and the the focus controls for your distance-from-subject and focal length for your lens. The light level allows you to simulate the ambient light levels. Set the light and your distance/focal length points first.
The girl on the screen moves continuously and so does the windmill. This allows you to try out settings for capturing movement. The two different rates of movement give you a chance to try freezing one or both or allowing some movement blur. It gives you a controllable situation so you can experiment.
By selecting ‘manual control’ you give CameraSim no control over the settings – just like a real camera. Click ‘Manual’ control now. I will explain a few points.
In the centre of the viewfinder screen is a green scale and figures. If you cannot see it press the silver button to return to the viewfinder view. The ‘needle’ is centred below the scale. If you now move any of the ISO, Aperture or Shutter Speed settings you will see the needle shift to indicate the exposure setting. If it moves to the right it will be over exposing (by up to two stops of light). If you change a setting and the needle moves left you will be similarly under exposing. Also, moving a slider will change the corresponding value on the green settings shown.
Try selecting Aperture Priority (A) – slide the aperture slider. You will see the needle in the screen does not move. In ‘A’ mode exposure is controlled by the camera. If you slide either the ISO or ‘A’ setting the shutter slider is set by the camera. As they slide, the needle in the viewer window stays centred. When this happens the camera is keeping the exposure constant at an ‘ideal’ position. It keeps this position by moving the Shutter Priority (Tv) or Time Value setting to compensate. So, if you move the aperture slider to the right this makes the aperture smaller and reduces the incoming light. CameraSim moves the shutter slider to the left. This means the shutter is open longer to let in more light to compensate.
If you select the Shutter Priority slider the same situation occurs. The Aperture Slider is disabled. Now the camera controls aperture if you change the Shutter speed (Tv).
Pressing the shutter button on any setting and you can take a picture. When you do, the exposure created by the shown settings is captured. The screen then turns into a simulation of DSLR back-screen showing you the exposure. Press the silver button to return to the settings/viewfinder.
A lot of thought is needed to master settings. Practice and understanding takes time. CameraSim is a great idea – it allows you to play with settings and get a feel for them.
The picture of the girl and playground is a bit limited. However, it allows you to explore the settings with a constant view. This simple situation lets you test different scenarios without confusing variation of scenes.
No such thing as a perfect exposure
CameraSim has a few shortcomings. Cameras with Auto-mode, ‘A’ and Tv settings make it look like there is a perfect exposure – when the needle is centred. In reality the perfect exposure does not exist. There are lots of times when you want to over or under expose a scene for dramatic effect, mood or other scene-setting. Normally, to achieve these using AP or Tv, you would use “exposure compensation” which is not available in CameraSim. Of course it is possible to set under/over exposure by using the “Manual” control – that’s worth exploring.
Focus on the subject is limited only to the girl. So it is difficult to practice landscape shot-simulation. However, if you ignore the girl and move the ‘distance’ slider you can, sort of, practice the focus and control over the background. It would be quite a nice idea to have a few other types of views to try out. However, to go further with the CameraSim concept you need to go pro and buy the full package.
Overall…
The CameraSim site has come of age. It has great potential for teaching exposure and there is lots of fun to be had with personal experiments. There are some explanatory notes under the simulator on the site itself. So it is worth reading those or following the links below to the exposure information on Photokonnexion.
I like CameraSim. It is a great idea. However, I think it will be most useful for people working with an instructor or experienced friend. Some guidance and explanation is useful while you are experimenting to help you understand the exposure relationship. The author recognises this and suggests it is a great way to use the simulator. So maybe you will see it in a photography class soon. Do have a go, it helps you think about exposure in a very worthwhile way.
Start Photokonnexion email subscription now!
Photokonnexion Photographic Glossary – Definitions and articles.
Definition: Exposure
Definition: Aperture
Definition: f number
Definition: ISO
Definition: Shutter Speed
CameraSim
ambient light
DSLR
There is no such thing as a perfect exposure
By Damon Guy (author and Photokonnexion editor)

Damon Guy (Netkonnexion)
See also: Editors ‘Bio’.

Find out more…
Write for Photokonnexion.
5 responses to “How to work with your camera settings – a simple, fun lesson”