
Choose your settings from a range of modes.
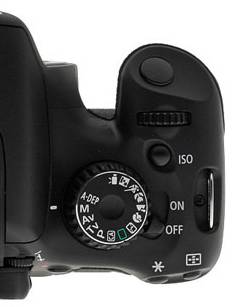
Camera Mode Dial
Choose the most suitable setting for your shot.
The DSLR contains a sophisticated computer providing a wide range of exposure options. They may seem bewildering. In this post we will provide simple explanations for the most common exposure modes to help you choose the best method for your next shot.
Exposure…
The modern Digital Single Lens Reflex (DSLR) can accommodate so many options that it is often difficult to know how to get started. So it is helpful if you have some idea of what exposure is about.
As photographers we are concerned with the use and manipulation of light. Everything else is secondary. We need to understand the concepts relation to how the camera detects light and the impact that has. Basically there are three controls which affect way the camera uses light. These controls are:
- ISO – controls how sensitive the camera is to light. However, at high ISO levels there is an increase in digital noise.
- Shutter speed – controls how long the camera sensor is exposed to light. The shutter speed also affects the amount of movement blur in the shot. The slower the shutter speed the more blur.
- Aperture – controls how much light is allowed into the camera. Aperture also controls the depth of field. The wider the aperture the shallower the sharp zone in the picture.
(The links above take you to a full explanation of each control).
Between them these three provide control over your exposure. Co-ordinating them requires a little practice. Nothing too difficult. It is about balance. For the camera to create an exposure it has to collect a fixed amount of light. Too much light and the picture will be over-exposed. Too little light and the pictures will be underexposed. Getting it right requires a little knowledge of your camera light meter and how to change the controls to create the balance that makes the exposure.
In addition to the direct controls listed above there are the others called “modes” found on most cameras. These have been developed by the camera manufacturers to try and assist beginners who don’t understand the exposure process. The modes are intended to provide easy pre-selections for certain situations.
The different modes range from fully controlled by the camera (fully automatic mode) through to fully controlled by you (full manual mode). That is a range of controls from where the camera does everything for you through to where you make all the decisions. These modes differ from camera to camera but in general terms they are described below. The names may be different with each manufacturer too…
Full Auto: Basically this puts your camera into “point-and-shoot” mode. The camera uses its sensors to make an exposure. It responds to its programming and creates a picture which is of good quality but which you have no creative control over at all. It will even activate the flash if the camera detects insufficient light to create a balanced exposure.
Auto with No Flash: This is the same as the full auto setting, but the flash will not work under any circumstances. This leaves the camera to make the exposure without the additional light from the flash.
Program: The camera responds to its programming and makes an exposure by controlling the settings on your behalf. However, you have the option to make changes to that pre-programmed exposure – small adjustments that allow you to have a small amount of creative control.
Scene settings:
The scene settings on your camera includes a number of scene variations. These are likely to vary widely between the manufacturers and various models they make. Here are some of the more popular options:
• Portrait (for taking portraits)
• Landscape (landscapes shots and long distance shots)
• Night-time (night and dark shots)
• Sports and/or Action
• Macro
The above are standard modes. In most recent cameras these may be extended to include other additional modes to cover children, pets, specialised filters for colours and vintage settings for example. All sorts of other modes may be included depending on the target market for the camera.
These automatic modes above are pretty much camera controlled. Aside from tweaks, the camera has all the control. The problems with all of these is that the manufacturer is calling the shots. You can compose the shot, but have little control over what it looks like in the exposure. The discerning photographer wants to take creative control and use the main three controls mentioned above. Then they will be able to use the depth of field, movement blur and sensitivity to light to create the exposure that expresses their interpretation of the scene they are shooting. As a result there are three modes to deal with this. The first two are “semi-automatic” and the third gives you full manual control of the camera.
Aperture Priority:
The aperture semi-automatic mode relates to the manual control of aperture and the automatic control of the shutter speed and ISO. When you are in ‘A’ or ‘Av’ (aperture value) mode you are able to change the size of the aperture. The different sizes of the aperture are measured in “f-stops”. You can find out more about f-stops in this Definition: f number; f stop; Stop. The term aperture relates to the size of the hole which allows light into the camera. As the aperture varies the depth of field changes. Controlling the depth of field gives you discretion over the sharp area of the picture. The sharp parts of the picture attract the eye. Controlling where the sharpness is in the picture therefore affects where the viewer looks. This makes aperture control a valuable aspect of your composition.
Aperture also determines how much light is allowed through to the digital imaging sensor. A wide aperture allows more light in (say, F2.8) and has a shallow depth of field. A narrow aperture allows less light through (say, F22) but has a deep depth of field – at F22 sharpness will be more or less right through the picture.
Aperture priority allows you true control over the creative aspects of the light levels in the exposure. However, the camera balances your exposure control to make a good quality exposure because it sets appropriate ISO and shutter speed. You have creative control, it provides the quality exposure you need to make a great image.
Shutter Priority: This too is a semi-automatic mode. However, using this mode you have access to the shutter speed. Nominated as S, T, or Tv (time value) mode allows you creative control over the length of the exposure. Using this mode you can set yourself up for longer or shorter shutter opening. If the shutter is open for longer anything moving in the field of view will tend to blur. If the shutter is open longer the movement will be more blurred.
Shutter speed allows for control over the creative aspects of the total amount of light allowed to influence the exposure. While using the shutter speed the aperture setting and the ISO are under the control of the camera so it can balance the overall exposure while you control the creative part.
Manual or Full manual setting: The manual setting or “M” setting on the modes dial of your camera is used to give you full control. If you do it right your exposure will allow for depth of field control as well as creative use of movement blur. This mode gives you full control of all three aspects of the exposure.
So which mode do you choose?
In essence the automatic modes and scene modes are manufacturers programming – they do all the work for you. They represent an attempt to create classic ways of doing certain shots without you needing to take part in the exposure control. However, as a result these modes respond to make a picture that is not of your vision. Instead it is the suggested settings that manufacturers have researched about what the average shot of that type. These modes are in effect telling you how to take the shot.
On the other hand, the semi-automatic modes allow you to take control of major aspects of the control of the camera. As you have control of only one of the controls it allows you to concentrate on working on the creative part of the shot. That leaves the camera the make a balanced exposure to support your creativity. As this mode gives you an important aspect of the control without upsetting the outcome of the exposure it is an excellent mode to learn control of the camera.
Likewise, when using the shutter speed as a way of controlling the camera. You have the creative control over the length of exposure and any movement blur. This too is a great mode to learn control of the camera.
Both Av and Tv modes are affected by the other controls when in use. So, it stands to reason that you do not have the total control needed to get an exact overall exposure. However, for you to make full use of such a full manual control you should also have quite a sophisticated vision of what you want to achieve in your final exposure. While that is quite a normal requirement for a picture it does require some practice. The semi-automatic modes allow you to learn about the use of these controls and to develop the vision you need to start using the full manual mode. Learn to use these semi-automatic modes and you are not only on the way to full manual control, but also learning about how to envision your final exposure.
 Photokonnexion tips by email
If you enjoyed this article please sign up for our
daily email service.
Find out more…
Photokonnexion Photographic Glossary – Definitions and articles.
Definition: Exposure
Definition: Aperture
Definition: f number
Definition: ISO
Definition: Shutter Speed